SEARCH FINESCALE.COM

Enter keywords or a search phrase below:

60th Anniversary Korean War Group Build- extended for the duration

764949 views
3335 replies
1 rating 2 rating 3 rating 4 rating 5 rating
  • Member since
    September 2003
  • From: Australia
Posted by Helo H-34 on Wednesday, December 28, 2011 7:21 PM

Andy , thank's for the info on the TF-102 and F-106B Vacuform conversions , particulary scratch building those control yokes . I might look around to see what reference books are available on both two seaters .

Greg , I didn't realize that the venerable Couger was still flying during the Vietnam War , now you have me interested in another  Airmodel or Falcon vacuform set .

Nice work Stik on repairing the paint finish on your F-86 Yes , I hope the rest of the painting process goes well . In fact you have inspired me to get on and finish my 1/72 Banshee and Panther ...

I'll mask the wing leading edges this afternoon and airbrush the gloss sea blue ; It would be nice to post a couple of finished pic's on New Years day !!! 

                             John

  • Member since
    December 2010
  • From: Yangju, Gyeonggi-Do, Korea
Posted by the_draken on Wednesday, December 28, 2011 9:08 PM

Helo,

Off Topic The only TF-102 Conversion that I know of is the RVHP resin set.  But keep in mind, there's at least two versions, early and late!  The Case X and Case XX wings are the big difference.  Each comes with decals appropriate to the version.  The F-102 and TF-102 were both deployed to Vietnam as air defense interceptors for Tan Son Nhut AFB.  The only air to air action recorded for the F-102 resulted in a loss for the delta winged bird against a NVAF MiG.  Another unusual series of events in Deuce history was that they were used in air-to-ground missions as well!  Armed with 24 Mighty Mouse rockets in the weapons bay doors and an excellent IRST ahead of the windscreen, on more than one occasion they were sent out at night and found VC camps using the IRST and attacked with rockets.  The Deuces were deployed over the Pacific using probe and drogue aerial refueling with temporary probes rigged externally to the aircraft.  They were seen in both ADC grey with TAC thunderbolt fin flashes and in SEA camo.  One of the more interesting set of pictures of them is in a late sixties issue of National Geographic about the USAF!

Having said that, I've got the RVHP TF-102 (late) conversion that I plan to use with the requisite Hasegawa kit for a NDANG bird.  It is WONDERFUL and well worth the $40 [USD] spent on it.  It also allows you to use the interior weapons bay and you can add in the Airwaves PE set for even MORE detail!  My single seat bird got the added Airwaves set, an Aeroclub seat, and metal landing gear.  It was fun to do the decals, I used the fin flash from the Matchbox F-101B kit and other decals from both the Hasegawa kit and Superscale.  Which reminds me, make sure that you get the appropriate kit from Hasegawa!  The older kits are originally AMT molds and have the CASE X wing and no IRST.  The NEWER kits have the IRST and the CASE XX wing.  If you want to build  one of the really early birds, the RVHP conversions also provide the option of buying a version with the smaller tail.

Anyway...

Back onto the group topic!  I've gotten involved in the Hobbycraft/Academy Sabres and there's a few minor details that are different.  The only thing so far is that the Academy kit has a separate back deck for the cockpit canopy.  Everything else is identical, so far.

Happy modeling, folks!


________________________________________________________________________________

Andy Hill (the_draken) landrew.hill(at)live.com <*> ASE Master Auto Tech, Imaca certified.  >^.^<

PADI OWSI Certified, BA Poli Sci (NDSU), BS Secondary ED-Social Studies MSUM (Sigma *** Laude)

  • Member since
    October 2009
  • From: Texas
Posted by Gregbbear on Sunday, January 1, 2012 4:30 PM

Happy New Year!

I finally painted a flat coat on my LVT about 45 minutes ago.  Weathering and final assembly to follow soon.  I have been building a nightfighter meteor for another GB that has been dragging on.  So, I opened up the RoG F-4U5 (1/72), and saw it had the N parts, and started it.  I held it up to some scale drawings to see where I need to extend the fuselage.  I made some cuts, and I am making a plug.  Other than that, the kit seems nice.  The engine needs a little work, but for this scale, not too bad.  I should have some pictures up soon.  It felt good to actually do something for a change.  This week it will be back to the books.

Cheers,

Greg

- yat yas!


  • Member since
    September 2003
  • From: Australia
Posted by Helo H-34 on Sunday, January 1, 2012 5:12 PM

Hi Greg ;

Happy New Year to everyone as well .

Greg here's a link to page 40 of the Korean War GB , where i started a 1/72 F4U-5N ;

/forums/p/129001/1336118.aspx#1336118

I was kit bashing the Revell kit with the High Planes resin kit . Apart fro the fuselage extension I also added a plug to the wing top center edge .

When I built my two previous Italeri F4U-4's , there was an issue with the wings when I glued them to the fuselage ; That is , one wing angled up higher than the other , so I had to use some masking tape attached to the underside of the wing and stuck back to the fusalege and pull one wing up higher . Also it may be a good idea to leave off the horizontol sabilizers (tail planes) and paint them seperatly as mine look a little out of level when I view my F4U-4B's from the rear . Might have something to do with pulling one wing higher and slightly affecting the landing gear stance ?

Anyway , I look forward to finishing a lot of my on-going builds during the first few months of 2012 , I'm trying to resist the temptation to open any new KW kits until I finish the incomplete ones ....

That's my New Years resolution Whistling

                        John .

Except for the Academy 1/72 M1126 Stryker , which I opened a couple of days ago and cut open the plastic bags to look at the sprues !!!

  • Member since
    October 2009
  • From: Texas
Posted by Gregbbear on Sunday, January 1, 2012 7:34 PM

John, thanks for the link.  I remembered how you spliced the two together, but I forgot about your -4 issues.  Thanks for the tip, to be forewarned is to be prepared, or something like that.  Holding the fuse up to the drawing in the Detail and Scale book shows it short 1 cm between the cowl flaps and the front of the fuselage.  It looks like I will have to move the exhaust cut outs forward and the exhaust glare shields.  I thinnned out the inside of the cowl flaps with my motor tool to position them open.  I thought about dropping the flaps, but I really want a short and sweet project.  I am using True Details wheel/tires since the kit ones do not have to correct tread, and  I am going to rob my Hobby Boss Panthers of their 100 lbs bombs, since this kit comes with no ordnance.

My M32B3 will have to wait.

Cheers,

Greg

- yat yas!


  • Member since
    September 2003
  • From: Australia
Posted by Helo H-34 on Monday, January 2, 2012 1:46 PM

I didn't realize that the tyres have a different tread , so I will look for a set of those True Details resin wheels as well . Thanks for the tip .

I've been looking at the 1/72 Academy M1126 Stryker these past couple of days ;

My first APC build , I guess I may as well make a start on the kit , it will be OOB .

                                         John .

  • Member since
    December 2010
  • From: Yangju, Gyeonggi-Do, Korea
Posted by the_draken on Monday, January 2, 2012 5:47 PM

Yo Helo;

If you're into modern armour, the Academy Stryker is incredible!!!  Toast  I've got one completed back in the states, plus two in the box.  A real nicety if you can happen across it, is that Academy sup0plied resin stowage for a select limited series of them!!!  I've got one of those at home also!  The resin is perfect and a much appreciated addition to what is all in all a superbly moulded and built up kit.  BTW, they're dirt cheap here in Korea!  I've seen the kit list for as much as $30[USD] online and I get them for between $6-$10 here, I can't remember the price off of the top of my head.

BACK ON TOPIC!  I was able to get off of my lazy sphincter last night and for the first time in a long time shoot some spray paint at my Academy and HobbyCraft Sabres.  The only extremal difference between the two kits (apart from the canopy deck) is that the HobbyCraft has a bottom fuselage nav light.  Why Academyu chose to delete this minor detail is beyond me.  I also hit the wing tanks with Tamiya Gloss Aluminuym while I was at it.  From this point out it's more a matter of painting and basic assembly.  Everything's pretty much ready to go.

________________________________________________________________________________

Andy Hill (the_draken) landrew.hill(at)live.com <*> ASE Master Auto Tech, Imaca certified.  >^.^<

PADI OWSI Certified, BA Poli Sci (NDSU), BS Secondary ED-Social Studies MSUM (Sigma *** Laude)

  • Member since
    September 2003
  • From: Australia
Posted by Helo H-34 on Tuesday, January 3, 2012 1:23 PM

The 1/72 Stryker is for the Korean War GB , as it comes with markings for the U.S. Army in South Korea .

It should fit in with the modern theme of the KW . Those resin stowage items would be great , is there anything available seperatly that might suit . I have the 1/72 "Black Dog" M-3 Halftrack resin stowage , so something like that for the Stryker would be great . I'll have to search around Hannants and see if I can find some resin stowage .

                 John .

  • Member since
    December 2010
  • From: Yangju, Gyeonggi-Do, Korea
Posted by the_draken on Tuesday, January 3, 2012 9:38 PM

Let's talk "Haze Grey" kits for a few seconds...  Big Smile


There's far too few 'wet' kits in this build.  I've got an LCVP built, an LCM 3 in the stash and the old Lindberg LSU (inaccurately labeled as 1/72 scale).  Here's something that I wasn't sure I remembered correctly or not, but it DOES work!  Another Lindberg kit, the 'Bob-Tailed Cruiser' was a landing craft converted to fire rockets in a shore bombardment role.  They played an important role in both the Incheon and Wonsan landings, as well as intermittent shore bombardment in the later 'siege of Wonsan'.

http://www.users.globalnet.co.uk/~pinniger/shipkits/reviews/lindberg_carronade.html

I also seem to recall that Lindberg had a not too horrible LST kit.  Does anyone have one of those to build?


________________________________________________________________________________

Andy Hill (the_draken) landrew.hill(at)live.com <*> ASE Master Auto Tech, Imaca certified.  >^.^<

PADI OWSI Certified, BA Poli Sci (NDSU), BS Secondary ED-Social Studies MSUM (Sigma *** Laude)

  • Member since
    July 2004
  • From: Sonora Desert
Posted by stikpusher on Wednesday, January 4, 2012 2:03 AM

I would love to see someone do any ship subjects for here... carriers, battleships, cruisers, destroyers, 'phibs, mine warfare, subs... anything will do!


F is for FIRE, That burns down the whole town!

U is for URANIUM... BOMBS!

N is for NO SURVIVORS...

       - Plankton

LSM


  • Member since
    September 2003
  • From: Australia
Posted by Helo H-34 on Wednesday, January 4, 2012 4:45 AM

I have the Mach 2 1/72 LCT-6 kit sitting under the bench waiting her turn but there is about 15 incomplete KW builds sitting above it and it's probably going to be at least a couple of months to clear the back-log .

For the time being we'll have to settle for some sprue pic's

Instructions cover both sides of the single page ;

It sure looks like a fun build , sadly though most of those little U shape parts that fit on the different ship structures , ladder runs I think they are , well mine are broken in the middle ...Sad

Anyway Mach 2's web site has some nice pic's of a LCT-6 all built ...

http://www.mach2.fr/lctg.htm

My New Years resolution was to finish all the incomplete KW builds first before starting anything new ;

Just trying to break a bad habbit of starting too many builds at once . Anyway it's not really my fault , you guy's do these post and put all sorts of idea's in my head ........Whistling

                      John

  • Member since
    October 2009
  • From: Texas
Posted by Gregbbear on Wednesday, January 4, 2012 12:48 PM

Hello, I made some progress on my Corsair last night.  I need to take some pictures though.  I finished the cockpit and buttoned up the fuselage, and wired the engine.  I need to attach the oil sump line piece I made, and then the engine is done.  I used a True Details seat, and cut off the gun sight to replace with a Quickboost one.  It was nice to actually have some stuff in the spares for once.

John, there are a few nice sets of Stryker stowage on ebay.  I too have a bunch of stalled projects.  The worse one is Ju-290 taking up most of my work bench for years....  One of these days (or years).

Stik, some ships would be nice.  If Dragon would only put more planes on their aircraft carriers, or at least make some seperate sets!  Does anybody make a 1/700 Royal Navy carrier that would be appropriate for Korea?  I have a cool a/c set with Sea Furies in it I would like to use.

Oh yea, I almost forgot to mention, I got a 2012 update email from Airfix, and they are releasing a new tool 1/72 P-51D, and in F-51D guise with rockets etc.  Of interest elsewhere, a new tool A-4B Skyhawk (1/72), and a recon update for the Valiant.

Cheers,

Greg

- yat yas!


  • Member since
    September 2003
  • From: Australia
Posted by Helo H-34 on Wednesday, January 4, 2012 2:55 PM

Thank's for the tip on the Stryker stowaage set Greg Yes

I checked ebay and saw one for about $14 but they wanted another $14 for shipping , so I went and looked around google and saw that Tracks n Troops had a lot of Black Dog resin items . Well my eye's almost popped when I saw some nice IDF resin , so I ordered an IDF M113 Fitter and Command set , 3 sets of IDF stowage accessory's and the M1126 Stryker stowage .

The Stryker stowage is designed for the Trumpeter kit , I suppose it should fit the Academy kit okay ?

John .

  • Member since
    October 2009
  • From: Texas
Posted by Gregbbear on Thursday, January 5, 2012 7:10 PM

John, sorry, I missed that part on the shipping.  Ouch!

I had totally forgot that Revell is going to re-issue the USS Pine Island sea plane tender.  It even comes with a little PBM.  The Pine Island served in Korea. 

Cheers,

Greg

- yat yas!


  • Member since
    December 2010
  • From: Yangju, Gyeonggi-Do, Korea
Posted by the_draken on Friday, January 6, 2012 12:14 AM

So...

I've just gotten news from my niece, she's not coming to Korea with her husband. Sad  What does this mean to me?  It means that I won't extend my contract past September of 2012.  So, I've got a ton of built models, and will be building more, and have no idea what to do with them.  It's too costly to ship them home, I've been considering what I could possibly do with them as donations.  Maybe to one of the local VFW's, or the Post arts n crafts center for a display.  I'd be more interested in donating them to a school, but who knows...

Anyway, getting busy a little bit at a time on the Sabres.  Getting the gear, air brakes, and more on tonight.  I'll post some pics when I get them done.


________________________________________________________________________________

Andy Hill (the_draken) landrew.hill(at)live.com <*> ASE Master Auto Tech, Imaca certified.  >^.^<

PADI OWSI Certified, BA Poli Sci (NDSU), BS Secondary ED-Social Studies MSUM (Sigma *** Laude)

  • Member since
    September 2003
  • From: Australia
Posted by Helo H-34 on Friday, January 6, 2012 3:40 AM

Greg , the Revell ship kit sounds good ;

The link to the Black Dog resin stowage turned out to be a great surprise anyway . Up untill recently I didn't have very many 1/72 IDF Armor kits , like the M4 Shermans and now the M113's . So I'm really happy you mentioned the Blag Dog resin accessory's . Also a lot of the time on ebay I see stuff for around $10-$15 but the postage can go between $30-$48 shipping to Australia , so I miss out on stuff from time to time .

Like I said I'm more than happy with my recent order from Tracks n Troops Big Smile

Andy , sorry to hear about your family cancelling their visit ; I don't suppose you could pack some of your completed builds in sturdy cardboard box's with lots of styrofoam beads packed around each aircraft . Some minor parts like bombs and rockets may come loose but their easy to re-attach again ?

Your armor kits should be able to handle the trip back to the states .

                     John .

  • Member since
    December 2010
  • From: Yangju, Gyeonggi-Do, Korea
Posted by the_draken on Saturday, January 7, 2012 12:04 AM

Off Topic  How many of you guys have glasses?  I'm new to the eyewear game, I just bought my first pair of glasses for reading and doing models.  WOW, what a freaking difference.  I've been noticing over the years that I have issues reading at night with the pages getting fuzzy and such.  I've also noticed that my detail painting and parts placement has gone down in quality.  With these glasses, I still see 20/15 regular distance without them, but now I can see close up and details so much better.  The frames actually fit my face, but they kept falling off whenever I looked down until I got some free silicon plastic tabs from the glasses place for the ear pieces.

What are your tales about glasses and modeling?  Right now, my only concern about them is my paranoia of losing them in the loo when I go to drain my bladder.

ON TOPIC!

I'm essentially done building and painting my F-86E's by Academy and Hobby Craft.  Another detail that's different between them is the detail to the landing gear (the wheels are identical!) and the detail in the front nose gear bay.  Other than that and details previously mentioned, they're the same kit.  I've started in on  my Fujimi F-86F's  Unfortunately, one is missing a freaking seat bucket!  I have no idea what happened to it.  I'm thinking of stealing a seat bucket from something else, or simply going without and putting that one in the back of the display.  The kit of the RF-86F also has fences on the leading edge of the top of the wing.  I'm not sure what to make of that.  I've also purchased some decals that have the wing and fuselage stripes for these kits, as I've only got two sets here for four aircraft.  While a few sqaudrons and wings didn't have the yellow body and wing bands early on, by late 1952 all Sabres in theater had the yellow and black fuselage and wing tip bands.  Only the 51's FIW had them on the tail also.

My two E's are going to be from the 51'st FIW (Academy's El Diablo kit and markings) and from the SAAF No. 1 Sq (because I have so many SA friend here who are teachers).  It'll be a nice set of Sabres when I'm done, especially since it will show off the differences in the kit manufactures.  I'll have an OOB atchbox -A, a kitbashed Matchbox RF-86A, the Frog F-86F, the Hobby Craft and Academy -E's, and two Fujimi -F kits.  Since I'll be heading home to the states in September, I'd like to ship home as few boxes of kits as p[ossible, so I'm going to be shifting into overdrive her, I hope, and getting a lot more done.

Happy modeling!  Big Smile


Oh, and Helo, my niece was supposed to come over with her husband to stay for a two year tour with the USAF at Osan AFB.  Turns out that it's going to be a year un-accompanied instead of two years accompanied.  I'm under the impression that he didn't turn in the paperwork on time, or else it got lost and was re-submitted too late.  I'm getting homesick, the contract for teachers has changed a lot for the worse, and I had decided that if she DID come over with him that I'd stay another year.  I just don't feel that it's worth it to stay another year at this time.  So don't feel too bad about it.  All for the best. 


________________________________________________________________________________

Andy Hill (the_draken) landrew.hill(at)live.com <*> ASE Master Auto Tech, Imaca certified.  >^.^<

PADI OWSI Certified, BA Poli Sci (NDSU), BS Secondary ED-Social Studies MSUM (Sigma *** Laude)

  • Member since
    July 2004
  • From: Sonora Desert
Posted by stikpusher on Saturday, January 7, 2012 2:56 PM

I wear glasses/contacts... but for distance vision not for up close Geeked My near vision is still excellent. Although sometimes these days it is not what is used to be in low light conditions.... aging is not a fun process...Whistling

I have started masking on my 1/48 F-86 so I can try out the Floquil Old Silver. But yesterday's hobby time was curtailed sharply due to family stuff, so maybe today I can fiish up my work there.

Draken, is your niece military? Back in the day I recall that Korea was considered a "hardship" tour for the US Army, and thus was only 1 year long tour there (as opposed to 2 years in Europe during the Cold War)and no dependants. I know we have backed US troops away from the DMZ and that some dependants are now allowed though. Kinda shortsighted to me, as I dont think the Communist threat from the North has abated at all. But if the balloon does ever go up again there, getting dependants evacuated safely will be most difficult I imagine.


F is for FIRE, That burns down the whole town!

U is for URANIUM... BOMBS!

N is for NO SURVIVORS...

       - Plankton

LSM


  • Member since
    July 2004
  • From: Sonora Desert
Posted by stikpusher on Saturday, January 7, 2012 8:33 PM

Hey guys, I found another nice thread of koreanWar aircraft pics... they are gorgeous for the most part, and in color. After page two the pics taper off and its mainly comments, but page one is just gorgeous!Stick out tongue

http://www.militaryphotos.net/forums/showthread.php?195594-Allied-Aircraft-in-Korea


F is for FIRE, That burns down the whole town!

U is for URANIUM... BOMBS!

N is for NO SURVIVORS...

       - Plankton

LSM


  • Member since
    September 2003
  • From: Australia
Posted by Helo H-34 on Sunday, January 8, 2012 5:10 AM

Stik , awesome link to all those color photo's of Korean War aircraft .

They are inspirational and motovational for the Korean War GB

Great stuff buddy Toast

John.

  • Member since
    December 2010
  • From: Yangju, Gyeonggi-Do, Korea
Posted by the_draken on Monday, January 9, 2012 5:45 AM

stikpusher

For those of you who were too busy drooling at the awesome primary subjects of the pictures, go back and take a closer look at the backgrounds!  There's a lot of interesting stuff that didn't make 'the cut' for the photographer.  One picture I noticed had a USAF OA-10 Catalina in silver/yellow Rescue scheme in the distance.  All of the pics that I've found to date are of a white and two tone blue with insignia red and insignia yellow bands on the wing tips and tail.  This is an awesome treasure trove of new info for some of us!

Thanks a bazillion, Stik!  Toast

________________________________________________________________________________

Andy Hill (the_draken) landrew.hill(at)live.com <*> ASE Master Auto Tech, Imaca certified.  >^.^<

PADI OWSI Certified, BA Poli Sci (NDSU), BS Secondary ED-Social Studies MSUM (Sigma *** Laude)

  • Member since
    July 2004
  • From: Sonora Desert
Posted by stikpusher on Monday, January 9, 2012 12:50 PM

You're very welcome guys. I thought you would like it as much as I did. Stick out tongue


F is for FIRE, That burns down the whole town!

U is for URANIUM... BOMBS!

N is for NO SURVIVORS...

       - Plankton

LSM


  • Member since
    November 2009
  • From: SW Virginia
Posted by Gamera on Tuesday, January 10, 2012 8:40 PM

SP: Finally got a chance to look though all the photos in your link.

Wow! Great stuff - that Duggy has found the mother lode of colour Korean War photos. 

Now I have a strange compulsion to build a F-86.....

And maybe another B-29, some fantastic nose art there. Some company did a decal of the Jane Russel 'The Outlaw' B-29 years ago and I've never been able to find a copy.

"I dream in fire but work in clay." -Arthur Machen


  • Member since
    December 2010
  • From: Yangju, Gyeonggi-Do, Korea
Posted by the_draken on Thursday, January 12, 2012 11:39 PM

WOOHOO!  Pretty much completed all of my Sabres!Big Smile  Now to get the last few decals in the mail and put the wing and fuselage stripes on the last three, and I'm DONE!  The coolest looking one is the Academy kit of 'El Diablo'.  The worst to build was the Frog kit.  The worst decals were the "El Diablo" kit from Academy.  Too thick and would NOT conform, and would NOT adhere.  I ended up using white glue on some of them!  The Fujimi kits weren't bad, but could've been much better.

The kits look amazing in a gaggle together.  I'll take a few shots and put them up, but I don't want anything going to the front page until they're all done.  In other news, I almost bought a New Jersey kit by Academy in 1/400 scale for less than $24!!!  Then I realised that it was the modern refit, so it wouldn't apply.

I'll be heading to the hobby shop tomorrow to pic up some spray paints, and then heading home to work on a 'modern' 1/35 armour kit with a friend's son.  He's building the M-551 Sheridan that his dad drove during Operation Desert Storm.  I'm going to help him do it, show basic techniques and stuff.  I'm sure that he'll have a blast with it!  A sad story, his dad divorced mom to go be with a Filipina hooker here in Korea.  He's got no father figure, I'm just doing kind of a 'big brother' program sort of thing with him.  Take him places, doing things with him.  Giving him someone to look up to and providing a good role model for him.  He's less into plastic models, but loves to do the card stock wood and paper ones.  I'll probably pick one up for him at the lhs while we're there.

________________________________________________________________________________

Andy Hill (the_draken) landrew.hill(at)live.com <*> ASE Master Auto Tech, Imaca certified.  >^.^<

PADI OWSI Certified, BA Poli Sci (NDSU), BS Secondary ED-Social Studies MSUM (Sigma *** Laude)

  • Member since
    September 2003
  • From: Australia
Posted by Helo H-34 on Friday, January 13, 2012 4:35 AM

Great News about those Sabre's nearing completion Andy .

It's also good of you to give up your spare time and spend it with your friends son and wether it's plastic , wood or paper , working with your hands and creating stuff is always rewarding .

You mentioned spectacles earlier , I've been wearing glasses for about 30 years now and my most recent pair are multi-focal . The lenses  are ground quite thin despite my vision not being the best , especially reading . I was holding kit instruction sheets at arms length there for a while any closer and it was to blurry .

Just looking at my lenses you can't tell that the small section on the bottom is for close reading , then again they cost me $600 at OPSM , I still find myself wearing the head magnifying gear as well , perhaps eventually I may need to have Lasik (laser) eye surgery  . It costs about $3,000 per eye these days , not cheap .

Anyway It's Friday evening here and I'm planning the weekend modeling schedule and I'm aiming to get some blue paint on these three stalled builds ...

I would really like to putting decals on all three come Monday morning and I would also be nice to start cutting sprue on the M1126 Stryker .............................' That's the Plan ' 

John .

  • Member since
    December 2010
  • From: Yangju, Gyeonggi-Do, Korea
Posted by the_draken on Friday, January 13, 2012 7:31 AM

Here's the 'Slew of Sabres' and I apologize for the poor lighting.  When I get the decals on the last three wings and fuselages I'll take better pics at my office.  Until then, here's a teaser!

Here's the Fujimi E with Testors/Fujimi decals:

Academy E with Academy decals (I should've learned my lesson by now, gods they were HORRIBLE decals!):

The Matchbox/Fujimi kitbash with Superscale decals:

Fujimi F with Superscale decals:

Frog/Heller/Hasegawa with Superscale decals:

Matchbox A oob:

Hobbycraft E with Superscale decals:

This is my favorite build:  The Academy E with their own decals (as crappy as they were...) because of how easy it went together, the quality of the details, the little extras like the good nose gear and the FOD protectors.  I also loved the colorfulness of the bird.  It REALLY stands out in the collection!  One more thing that I noticed different between it and the Hobby Craft kit (same manufacturer, different boxing, slight retool in between) is that the clear parts had slightly different panel lines.  The Hobby Craft had much fatter frames for the clear parts and no integral antennae in the canopy.  One GOOD effect of the Academy decals is that they were already 'cut' for having open speed brakes!  That made my life much easier!  Otherwise, any place that the decals had to bend (Eg:  around the wing slats and rear fuselage) I had to make them adhere with a coating of Elmer's glue!  I have no idea what Academy thinks that they're doing with their decals, but I'd be much happier if they'd just job them all out to Cartograph or someone else who knows what the heck they're doing!!!

Much thanks to the Museum of the USAF, Stik for his link of pictures, and to Osprey Books Airplanes of the Aces 4:  Airplanes of the Korean War Aces.  Lots of SERIOUSLY uber cool info in that book!

________________________________________________________________________________

Andy Hill (the_draken) landrew.hill(at)live.com <*> ASE Master Auto Tech, Imaca certified.  >^.^<

PADI OWSI Certified, BA Poli Sci (NDSU), BS Secondary ED-Social Studies MSUM (Sigma *** Laude)

  • Member since
    November 2009
  • From: SW Virginia
Posted by Gamera on Friday, January 13, 2012 8:45 AM

Nice stable of sabers Draken Andy!

I have to agree the Academy kit does look the best detailed. Too bad about the decals, I'd love to see them, Hasegawa, and Tamiya just go with Cartiograph decals on ALL their kits. I find it strange they make the best kits around with the worst decals- it's like buying a forty-thousand dollar car with a fifteen dollar radio.

I've worn glasses for thirty years now, you get used to 'em after awhile. BIggest issue I have with them is keeping them clean. After just a day or so they're covered in dust and krap and I have to wash them constantly. And don't fling airbrush paint around too much, I've gotten it on my glasses before- it's a bear to get off Dead

"I dream in fire but work in clay." -Arthur Machen


  • Member since
    September 2003
  • From: Australia
Posted by Helo H-34 on Monday, January 16, 2012 8:52 PM

I've made a start on the 1/72 Academy M1126 Stryker for the U.S. Army in South Korea ;

Most of the parts , particulary the suspension pieces are quite small , so I needed to use the head magnifiers to help me to see what I was doing ;

The top hull section has the hatches added along with the forward lights ;

 Once the glue is dry on the lower suspension , I'll glue the top and lower hulls together and add a few more bits and get ready for painting .

Everything has fitted together nicely so far , nice little kit .

John .

  • Member since
    September 2003
  • From: Australia
Posted by Helo H-34 on Tuesday, January 17, 2012 11:38 PM

I airbrushed some H-340 Field Green on the Stryker and once dry I gave her several coats of clear gloss ;

I'll add some black enamel wash to the recesses next and mask the wheel hubs to paint the tyres flat black .

John.

  • Member since
    December 2010
  • From: Yangju, Gyeonggi-Do, Korea
Posted by the_draken on Friday, January 20, 2012 11:16 AM

To begin with; I don't know about you guys, but the FSM pop up ad is really bugging the living poopy outta me!!!  I can't figure out the ad-block-plus script to turn it off.  It's enough to keep me from using this forum!  I HATE pop-ups!

That aside, I've been working on my Milicast resin M-4 HST and 90mm DP AAA/Howitzer piece this week.  The M-4 was the prime mover for a large number of weapons in the KW, including the M-1 and M-2 105mm howitzers, the 90mm DP AA gun (also used by the 187 RCT Airborne group), the 155mm guns, and the 208mm guns.  Milicast has produced both pieces with an eye towards them being displayed together.

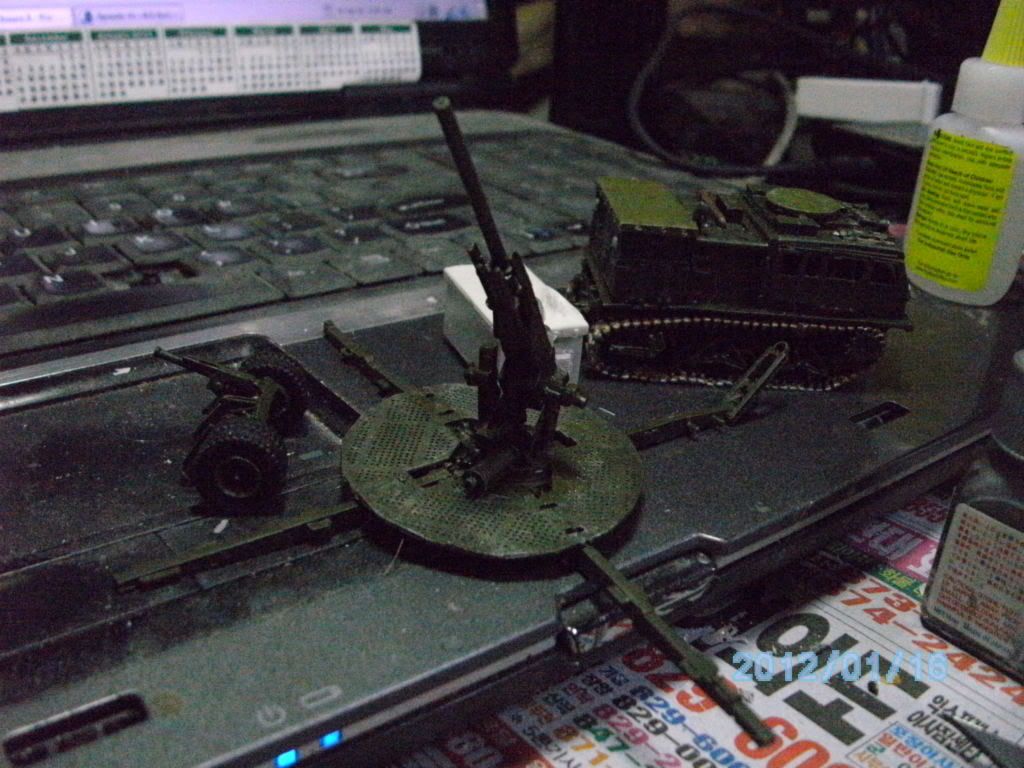
Here's the M-4 prior to construction.  The hull is a single piece; the hull, the super structure, and the tracks being assembled prior to shipping.  There are numerous parts that must be assembled, construction critique to follow in this post.

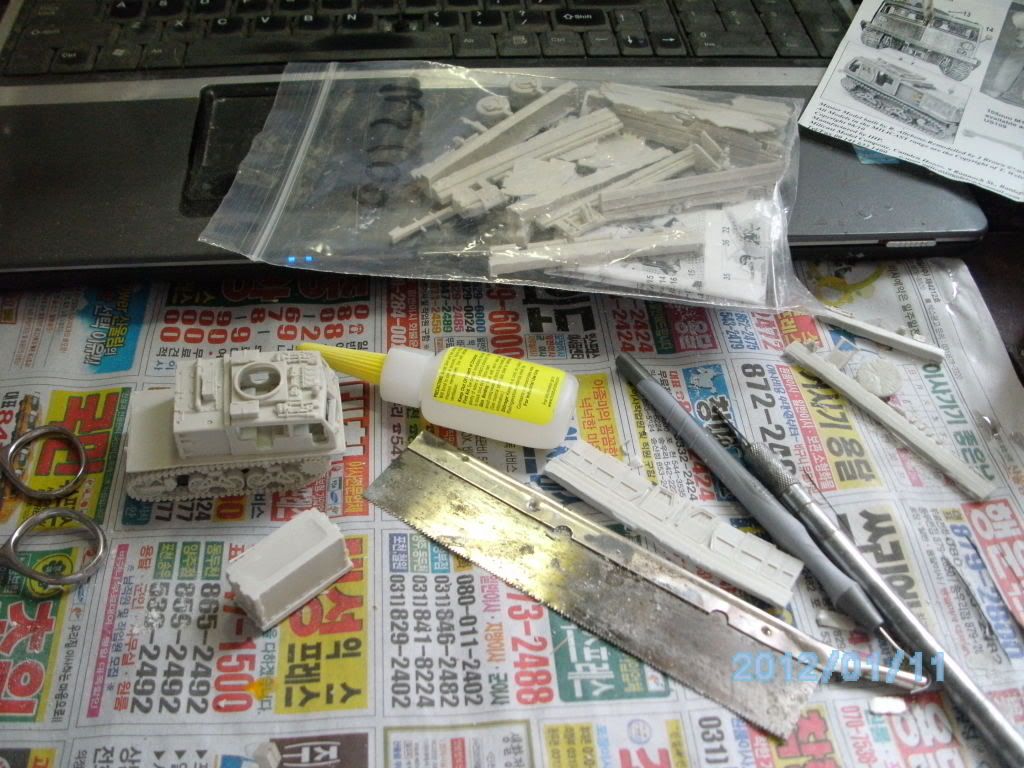
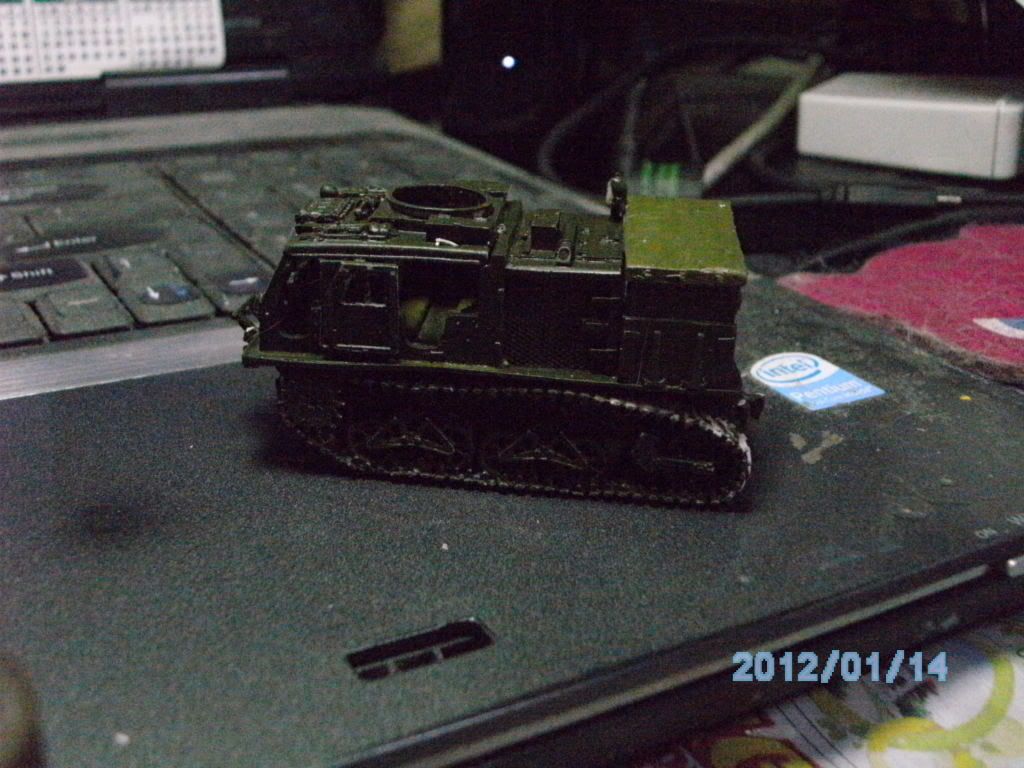
The doors are separate parts, and must be cut from the pour stubs and cleaned separately.  The hull section is relatively free of flash, all things considered.  Here's the mmajor sub assy after painting.

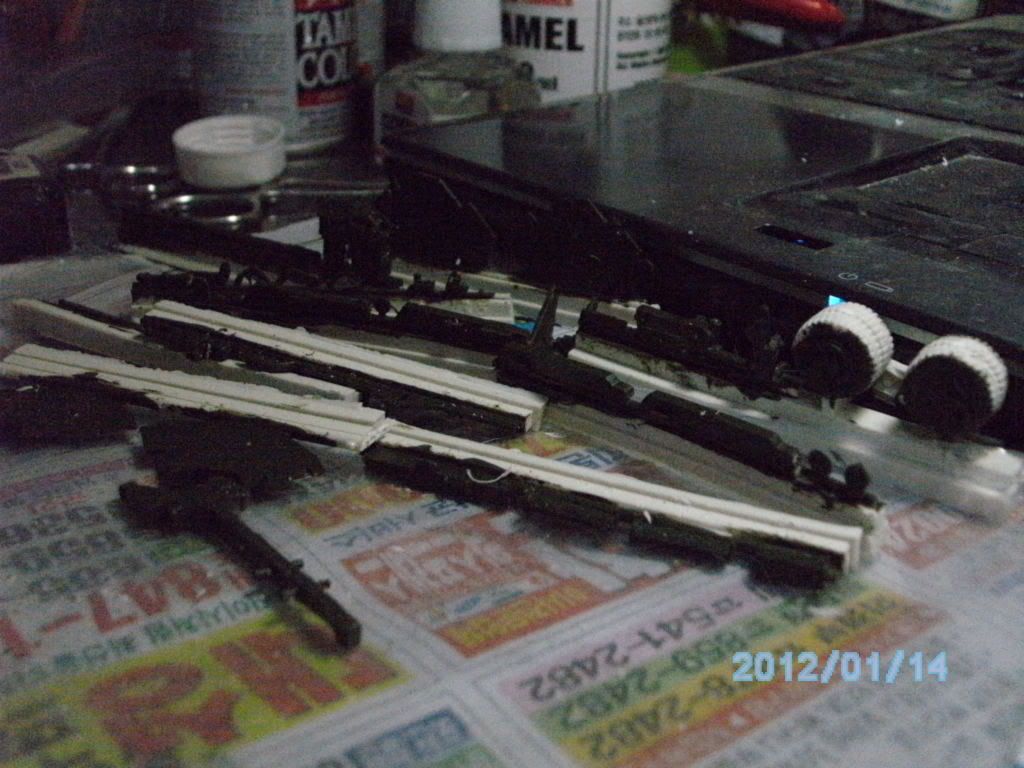
The 90mm DP AAA/field gun is a total joy (pleas note the sarcasm dripping fro that statement).  While the M-4 tractor was straightforward and had easy to follow instructions, the M-1 90mm gun was a PITA with some of the worst instructions imaginable.  Most irritating was the fact that key areas were simply not visible in the instructions.  Also hard to discern were finer details and directions of the actual weapon in the instructions.  I was quite literally flipping parts around to see if I even had the right ones before I even tried to figure out where the parts were supposed to go.  It was that bad.  The pictures in the instructions were horrible, and gave no clue as to what you were supposed to do.  I eventually used my pictures taken at the Korean War Memorial Museum to figure out what the heck to do!  That bad...

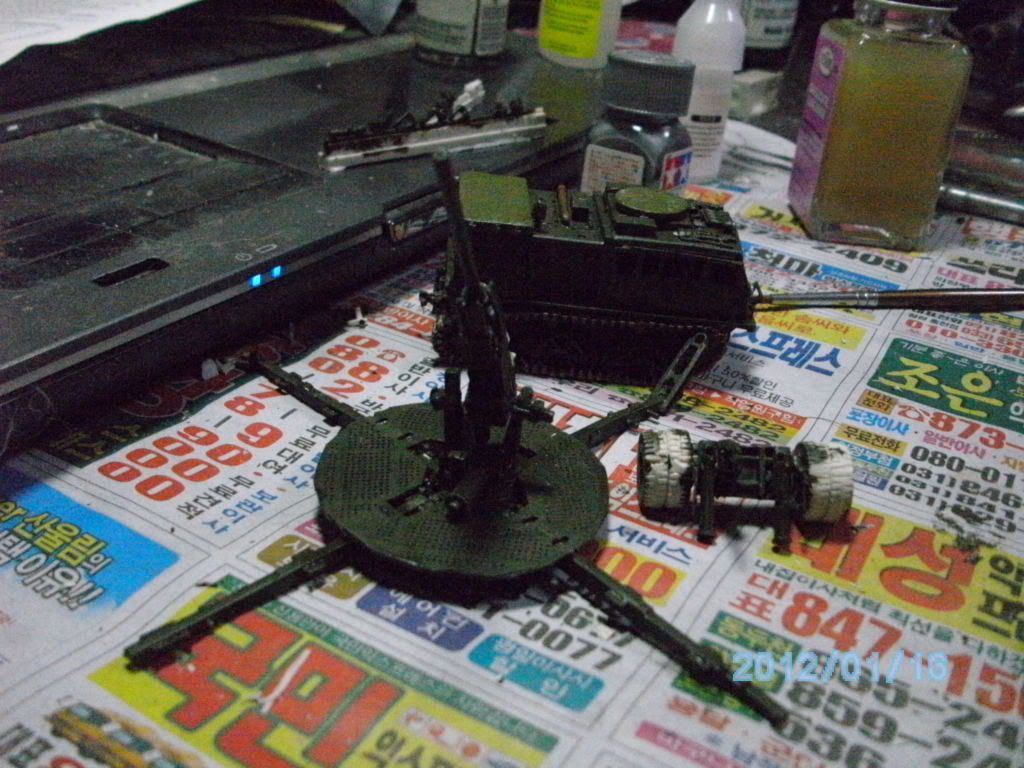
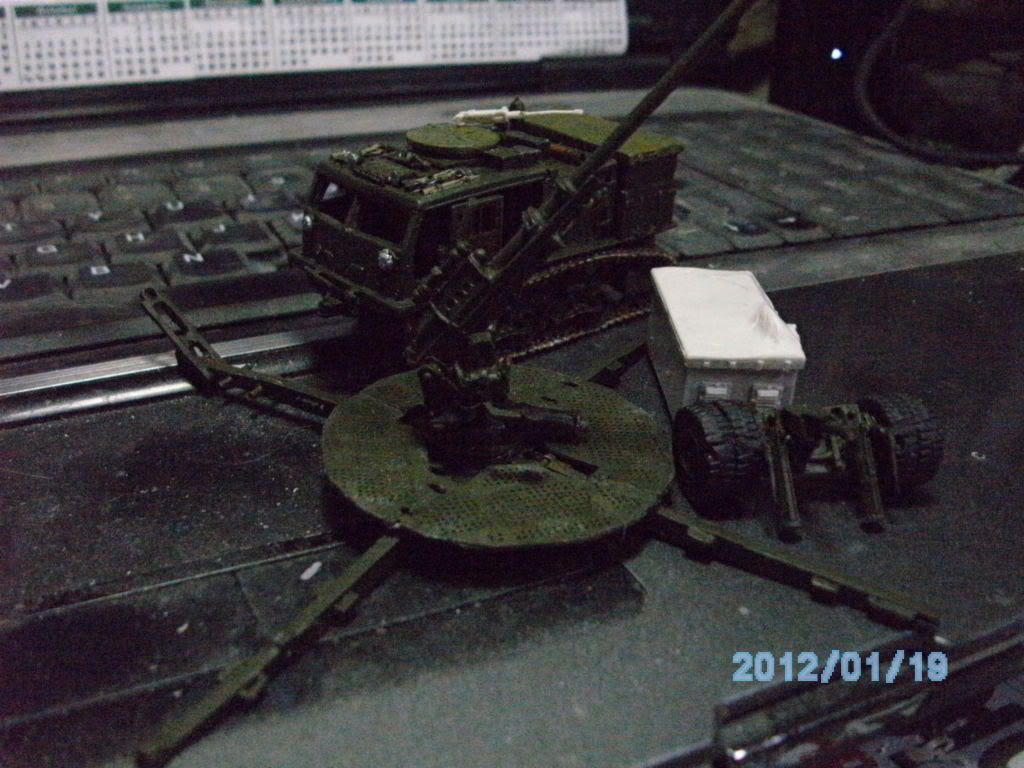
And finally, the whole kit and kaboodle completed, minus the decals!  I'm actually happy with how it turned out.  I did have to clip some of the 'walk around' are from the standing plates for the M-1 gun.  They not only didn't fit the base of the gun, they didn't match the drawings on the instructions, either.  It took me quite a while, given the quality of the instructions, for me to figure out which way the platform parts were supposed to be situated.  The M-4 is okay for lower end and un skilled builders, but the M-1 90mm DP gun is for highly skilled builders only!  I'd never suggest it to someone with poor ability to juggle figures spatialy in their head.

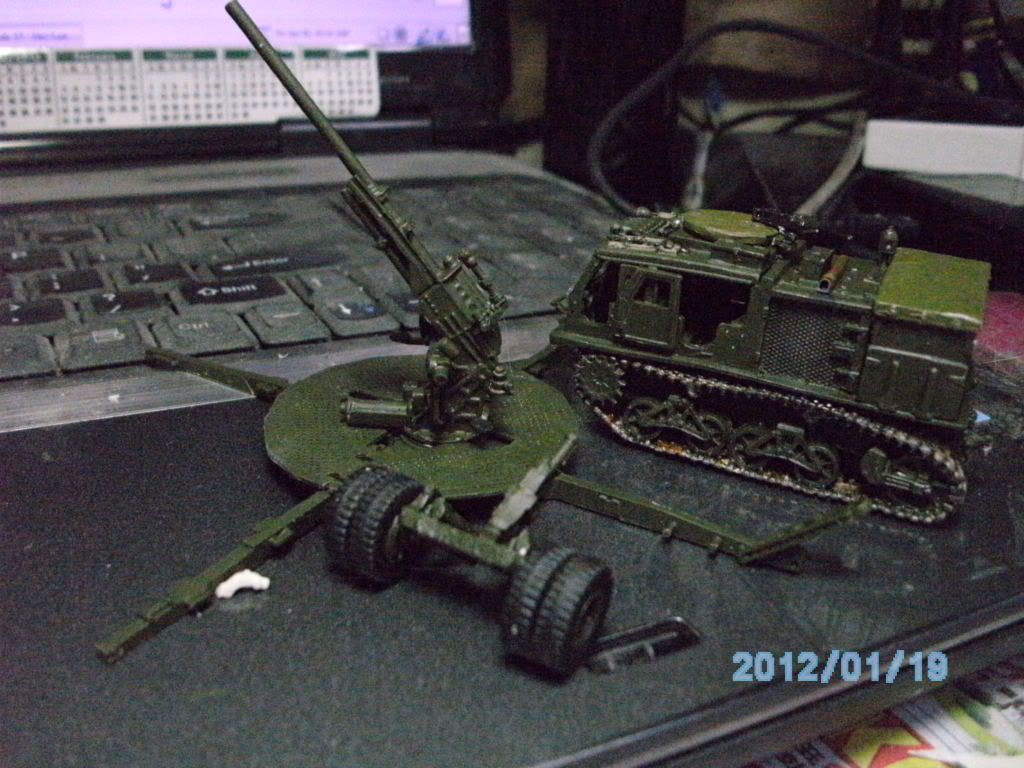
BTW, I've _FINALLY gotten around to updating the time stamp on my camera.  At this time, it's actually showing the correct date.  The 19th!  Enjoy! 

PS, hey Stick!  I'll get some pics with a good background once they're decaled and in my office at work.

________________________________________________________________________________

Andy Hill (the_draken) landrew.hill(at)live.com <*> ASE Master Auto Tech, Imaca certified.  >^.^<

PADI OWSI Certified, BA Poli Sci (NDSU), BS Secondary ED-Social Studies MSUM (Sigma *** Laude)

JOIN OUR COMMUNITY!

Our community is FREE to join. To participate you must either login or register for an account.

SEARCH FORUMS
FREE NEWSLETTER
By signing up you may also receive reader surveys and occasional special offers. We do not sell, rent or trade our email lists. View our Privacy Policy.