SEARCH FINESCALE.COM

Enter keywords or a search phrase below:

60th Anniversary Korean War Group Build- extended for the duration

764949 views
3335 replies
1 rating 2 rating 3 rating 4 rating 5 rating
  • Member since
    December 2010
  • From: Yangju, Gyeonggi-Do, Korea
Posted by the_draken on Friday, February 3, 2012 6:04 AM

Hey Helo,

Not that's it's a big deal, but i was looking at your M-4 tractor and I noticed that it has the ammo box for the 'small size' ammo.  That means that it would be paired with either the 90mm gun or the 105mm guns. 

As for me, I've picked up some play-do (Korean equivalent) on the way home and will maybe be spray painting the fuselage of the Connie tonight.  If that happens, then I'll be looking at decals on the Sabres tomorrow AM and final assy of the C-121 tomorrow afternoon.  I'll do painting of the flaps and ailerons tonight, the de-icers tomorrow afternoon, and then maybe decals in the late evening.  It will be incredibly awesome if I could take a taxi to work two days in a row next week!  Once with the Connie and Sabres, and once with my Superfort and Commando!  I bet you guys would FLIP over the photos getting posted then!

Big Smile

________________________________________________________________________________

Andy Hill (the_draken) landrew.hill(at)live.com <*> ASE Master Auto Tech, Imaca certified.  >^.^<

PADI OWSI Certified, BA Poli Sci (NDSU), BS Secondary ED-Social Studies MSUM (Sigma *** Laude)

  • Member since
    November 2009
  • From: SW Virginia
Posted by Gamera on Friday, February 3, 2012 8:48 AM

Theuns & Greg: Really nice pair of corsairs there guys. Yes

Draken Andy: You sir are really pumping them out, nice builds! Maybe I should switch over to 1/72-76. You and Helo John have built more AFVs in this GB than I think I've built in my whole modeling life.


Stikpusher: Just finished off my Char B1 for Tigerman's Blitzkrieg Build and was hoping to get back to my Dragon Korean War M46. But it seems I've been bit by some French bug and pulled out a Hotchkiss H38 and started on it last night. Will try to get back on the Patton before too much longer... Embarrassed 

"I dream in fire but work in clay." -Arthur Machen


  • Member since
    April 2010
Posted by Theuns on Friday, February 3, 2012 9:22 AM

I shot some paint on the F-4 late yesterday, went for the "out the tin" Humbrol #15 Midnight blu and it looks (in scale anyway) pretty close to the blue on the big ones. Now it is just a long wait for the gloss to FULLY cure before I can start decalling.

Even though it is gloss I still lightly sand the decal area with 2000 wet paper to remove any dust in the paint, it seems to give OK results.

Theuns

  • Member since
    December 2010
  • From: Yangju, Gyeonggi-Do, Korea
Posted by the_draken on Friday, February 3, 2012 11:31 AM

MORE PREVIEWS!

Here's the three big kits sitting on the top of my new (old) TV!  Finally got the big screen that I've been lusting after, only $100 [USD] used.  I'm leaving Korea in 8 Mos. and leaving it to the poor sap that replaces me.  i still have no idea what to do with the models!

Here's the Academy B-29, Heller C-121, and Williams Bros. C-46 Commando in order from left to right.  The Connie is still awaiting a few parts and some detail painting.  Then it's on to the decals.  I did the prop tips prior to installation of the engines as it seemed to be a much easier install that way.

Yeah, I know that the port main gear is weird, I still haven't glued the wing structure on yet.  I'm debating on whether or not to do that at the office or at home.  If I do it at the office I can carry it in a 'long box' and with less issues in the taxi/bus.  If I glue it at home, then it becomes much more of an issue about fitting inside of a vehicle.

Anyway, I figured that you guys would appreciate the update!

________________________________________________________________________________

Andy Hill (the_draken) landrew.hill(at)live.com <*> ASE Master Auto Tech, Imaca certified.  >^.^<

PADI OWSI Certified, BA Poli Sci (NDSU), BS Secondary ED-Social Studies MSUM (Sigma *** Laude)

  • Member since
    July 2004
  • From: Sonora Desert
Posted by stikpusher on Friday, February 3, 2012 2:02 PM

the_draken

BTW, does anyone know what the Navy/USMC used for Napalm canisters? 

according to the USN site where I lifted this photo, this is a Napalm cannister.

http://www.history.navy.mil/photos/events/kowar/50-unof/un-2.htm

It looks like the Navy did the same as the Air Force and used standard drop tanks filled with Napalm and most likely fitted with a fuze in place of the filler cap.


F is for FIRE, That burns down the whole town!

U is for URANIUM... BOMBS!

N is for NO SURVIVORS...

       - Plankton

LSM


  • Member since
    July 2004
  • From: Sonora Desert
Posted by stikpusher on Friday, February 3, 2012 2:09 PM

Theuns

I shot some paint on the F-4 late yesterday, went for the "out the tin" Humbrol #15 Midnight blu and it looks (in scale anyway) pretty close to the blue on the big ones. Now it is just a long wait for the gloss to FULLY cure before I can start decalling.

Even though it is gloss I still lightly sand the decal area with 2000 wet paper to remove any dust in the paint, it seems to give OK results.

Theuns

I look forward to your F4U Theuns. Just rememeber that they operated in an environment that quickly dulled their gloss finish as these photos show.

Evfen in bright direct sunshine, there is only some sheen to the paint.


F is for FIRE, That burns down the whole town!

U is for URANIUM... BOMBS!

N is for NO SURVIVORS...

       - Plankton

LSM


  • Member since
    July 2004
  • From: Sonora Desert
Posted by stikpusher on Friday, February 3, 2012 3:00 PM

Draken, the better shot of your M32 and the new M1 90mm have been added to the front page. You must like those Milicast kits. You're turning them out left and right lately.


F is for FIRE, That burns down the whole town!

U is for URANIUM... BOMBS!

N is for NO SURVIVORS...

       - Plankton

LSM


  • Member since
    November 2009
  • From: SW Virginia
Posted by Gamera on Friday, February 3, 2012 3:32 PM

Draken Andy:

Those are really cool! Is there any chance you could donate the ones you can't bring back to the school?

"I dream in fire but work in clay." -Arthur Machen


  • Member since
    October 2009
  • From: Texas
Posted by Gregbbear on Friday, February 3, 2012 11:55 PM

Awesome trio of heavies, Draken!

Theuns, I am really looking forward to seeing more of your Corsair.

I have to say, there has really been a lot of cool stuff here lately.  I am glad this GB got extended.

The Mauler only comes with two Tiny Tims.  I bought a little resin mold kit from Hobby Lobby not too long ago (coupon), and I might try to make some copies.

I actually stayed focused long enough to finish something.  Here is my Dragon LVT(a)4 modified to an LVT(a)5 in 1/72 scale.  At some point, when I have a place to put it, I want to build a diorama base and put some figures on/around it.  But I will call it complete for now.

Cheers,

Greg

- yat yas!


  • Member since
    April 2010
Posted by Theuns on Saturday, February 4, 2012 12:37 AM

Desaster struck my build last night. I sanded the plane down with 2000 wet paper readu for decals.I put the "MARINES" side decal in water and as I tried to remove it , it just fell appart (almost as if there was no carrier film)

Tried the '"NAVY"  "S" and the same thing happened, so clearly the decals have gone bad.

I will try to find some decal liquid, but I am affraid here in South Africa "exotic stuff" is hard to find. I don't know of a coat of clear closs enamel would work......

Bottom line is that I am now commited to do the only remaining "MARINES" sceeme that I have decals for and that is the one with the white cowl band with red dots on it, it looks like a bread bag!

Update to follow. Any advice to fix this will be VERY welcome.


Thanx


Theuns

  • Member since
    December 2010
  • From: Yangju, Gyeonggi-Do, Korea
Posted by the_draken on Saturday, February 4, 2012 7:15 AM

Dude! 

Oh mang!  The EXACT same thing happened with both of my Corsair decals from Testors.  Sorry to hear that.  What I did was (and I have continued to do it) use a few (four on the Italeri sets) coats of Tamiya Clear gloss.  In the past I've just used Testors' spray clear gloss, but Tamiya is all I can get in Korea.

Back in the states I used Krylon clear gloss but it coated heavy in a single shot.  So, to wrap up, I've used both lacquer and enamel gloss sprays with great effect.  It'llwork out fine for ya.

SadSadSad

Hope that this helps!

BTW, glad to hear that there's someone in a country other than somewhere in N. America.  For a while it's just been me, Doc Win, and Helo that were 'outsiders'!


________________________________________________________________________________

Andy Hill (the_draken) landrew.hill(at)live.com <*> ASE Master Auto Tech, Imaca certified.  >^.^<

PADI OWSI Certified, BA Poli Sci (NDSU), BS Secondary ED-Social Studies MSUM (Sigma *** Laude)

  • Member since
    April 2010
Posted by Theuns on Saturday, February 4, 2012 12:26 PM

Kamsahamnida ! (about all I can say in Korean including " Anyong Haseo" , forgive the spelling I was in S/ Korea only for a week in 2002 :-)   )

I have cut one of the declas off the "ofending" sheet and sprayed on a good wet coat of humbroll gloss. As soon as it's cured I will see what it does, hopefolly it's bound the carrierfilm. I was warned to go easy on the enamel as it might turn yellow in time.

Will the Tamiya acrylic not "go soft" (once fully cured) if put into the water???


Theuns

  • Member since
    October 2009
  • From: Texas
Posted by Gregbbear on Saturday, February 4, 2012 12:39 PM

Theuns, sorry to hear about your decal trouble.  I have an extra set for the kit you are building.  If you want, pm your address and I will mail them to you.  I will even go over them with some Microscale decal film first.  I have no idea how long mail takes to get to South Africa, but they are yours if you want them.

I will be extra careful with any Italeri Corsair decals I use in the future. 

Cheers,

Greg

- yat yas!


  • Member since
    April 2010
Posted by Theuns on Saturday, February 4, 2012 1:07 PM

That's very kind of you, thanx mate!

I will give the clearcoat thing a go and if it's a total failure I will defenately take you up on your offer, just remember to put in a bottle of Future while you are at it LOL!!! It is easier to get BinLadin here that any future or Alclad or any of the "good stuff" I read you lads playing withPropeller

In all my modling years I have never had this tipe of thing where a decal just flakes appart totally, maybe one will tear a bit but not like this!

I can't see that the box got wet or damaged in any way,but  I did get it from a hoby store that bought it from a recently devorced guy who's EX might haveput them in the microwave or something !


Stay tuned for results of my clearcoat effort.


Theuns

  • Member since
    April 2010
Posted by Theuns on Saturday, February 4, 2012 1:26 PM

Success!......well sort of. :-D

I couldn't stand the susspence so I tried the small "S" decal for the NAVY plane I cleared earlier and it took about 5 min to come off the backing paper, still extremely fragile but I managed to persuade it into place and from what I can see the Tamiya Mark fit solution didn't eat it, and there seems to be no silvering.............pheeww!!!

I will ony be able to tell once the top clear goes on, atleast there is some hope for this model yet.


Theuns

  • Member since
    July 2004
  • From: Sonora Desert
Posted by stikpusher on Saturday, February 4, 2012 5:10 PM

I had success here too. Last night I masked off the base color areas on my F-86. Earlier today I sprayed on Floquil Old Silver on selected areas. I removed the masking a short while ago and am happy with the contrast it provides to the base aluminum color. But now I need to buff/polish out the surface to make them match as the aluminum is not as smooth. I will have pics up soon. I also painted the drop tanks Floquil ANA 319 OD as that is what "Paper Tiger" supposedly carried. OD drop tanks were made in Japan and had different release characterisitcs compared to the US made ones which were left in NMF for the pilot to tell the type carried.


F is for FIRE, That burns down the whole town!

U is for URANIUM... BOMBS!

N is for NO SURVIVORS...

       - Plankton

LSM


  • Member since
    October 2005
  • From: New Port Richey
Posted by deattilio on Saturday, February 4, 2012 5:25 PM

stikpusher

http://www.history.navy.mil/photos/images/g420000/g422341.jpg

Freakin' BRRRRRR!!!!!!!!!


WIP:
Trying to get my hobby stuff sorted - just moved and still unpacking.


"Gator, Green Catskill....Charlie On Time"


  • Member since
    October 2005
  • From: New Port Richey
Posted by deattilio on Saturday, February 4, 2012 5:31 PM

Gregbbear

http://i293.photobucket.com/albums/mm80/gregbbear/Korean%20War%20GB%202010/groupbuilds092.jpg

http://i293.photobucket.com/albums/mm80/gregbbear/Korean%20War%20GB%202010/groupbuilds091.jpg

Sweet looking LVT, job well done.  I am chugging along on mine in the Semper Fi GB.


WIP:
Trying to get my hobby stuff sorted - just moved and still unpacking.


"Gator, Green Catskill....Charlie On Time"


  • Member since
    July 2004
  • From: Sonora Desert
Posted by stikpusher on Sunday, February 5, 2012 12:34 AM

Deattilio, I agree about the "brrrrrrrrrrrr" for those poor guys on that flight deck.

Gregbear, do you want the pic of your LVT to go up front now or wait until you have  base done?

Well here are a few shots of the F-86 so far

The panel variations stand out fairly weeldepending upon the lighting.

And here is with the drop tanks placed on the pylons

Once I smooth out the aluminum paint she will be ready for decals.Wink


F is for FIRE, That burns down the whole town!

U is for URANIUM... BOMBS!

N is for NO SURVIVORS...

       - Plankton

LSM


  • Member since
    September 2003
  • From: Australia
Posted by Helo H-34 on Sunday, February 5, 2012 3:35 PM

Andy , the Connie is looking awesome , the prop tips and wing walk decals look great , I can't wait to see her finished .

Theuns , I hope the rest of the decals work out okay on your Corsair . It's interesting how you mentioned about how difficult it is getting certian products there in South Africa ; These past few months here in Sydney a lot of the supermarkets are no longer stocking "Pledge One Go" (Future) . I'm in need of a fresh bottle or two .

Greg , fantastic finish pic's of your LVT-5 , excellent work converting the Dragon LVT-4 kit and the added stowage gear looks terrific .

Great reference pic's of the F4U-4B Corsair you posted Stickpusher , especially the last one showing the position of the underwing staggered rockets ....great reference pic's for my files .

Also nice work on the Sabre with the different metal finish colors ; The panel variation stands out quite well .

I added to the work bench along side the SHQ M4 Tractor , Hasegawa's M5 and Long Tom . I also scrounged the 105mm Howitzer from the Revell CH-54 Skycrane kit and I hope this might be suitable to hook up to the M4 Tractor ;

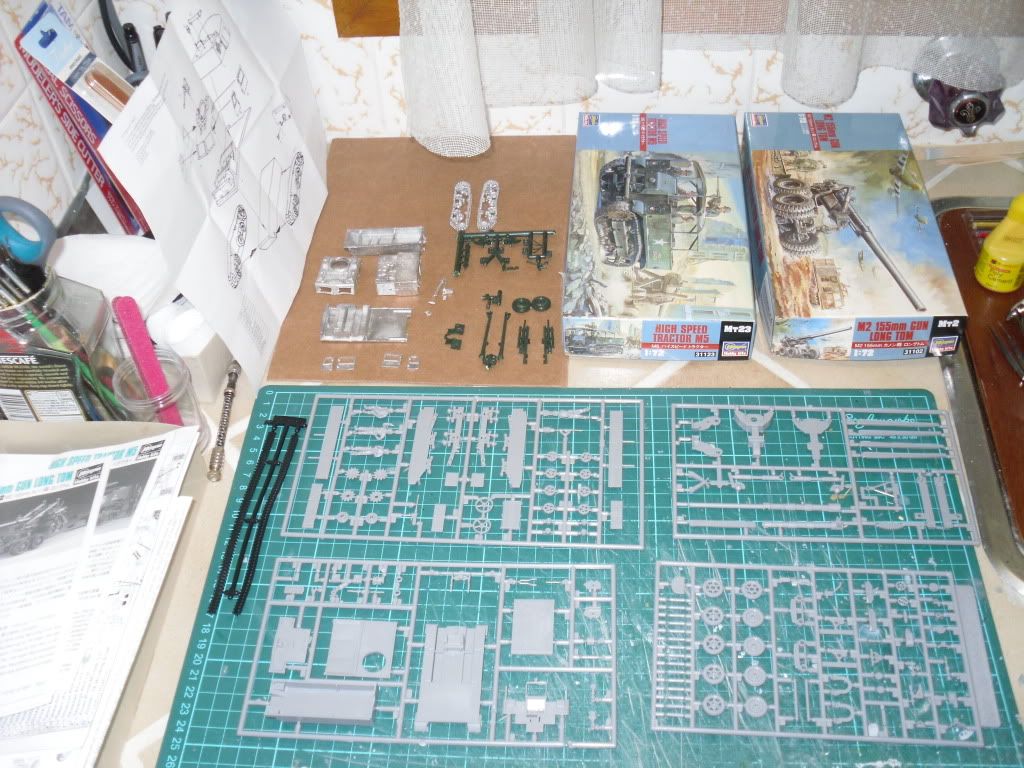
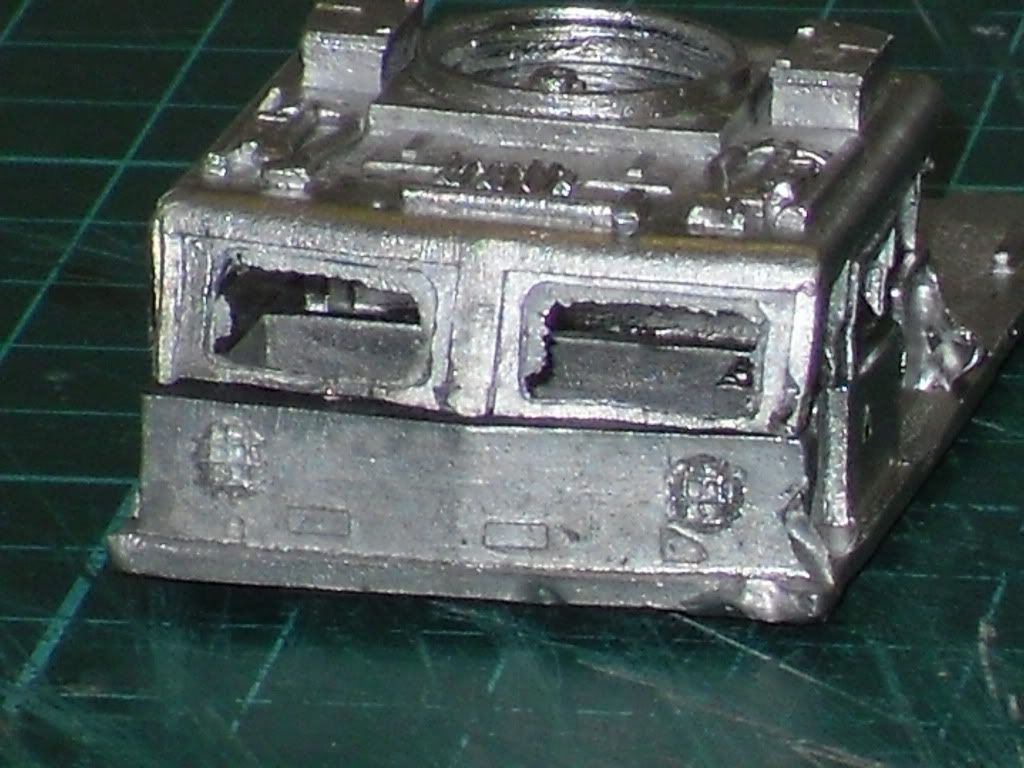
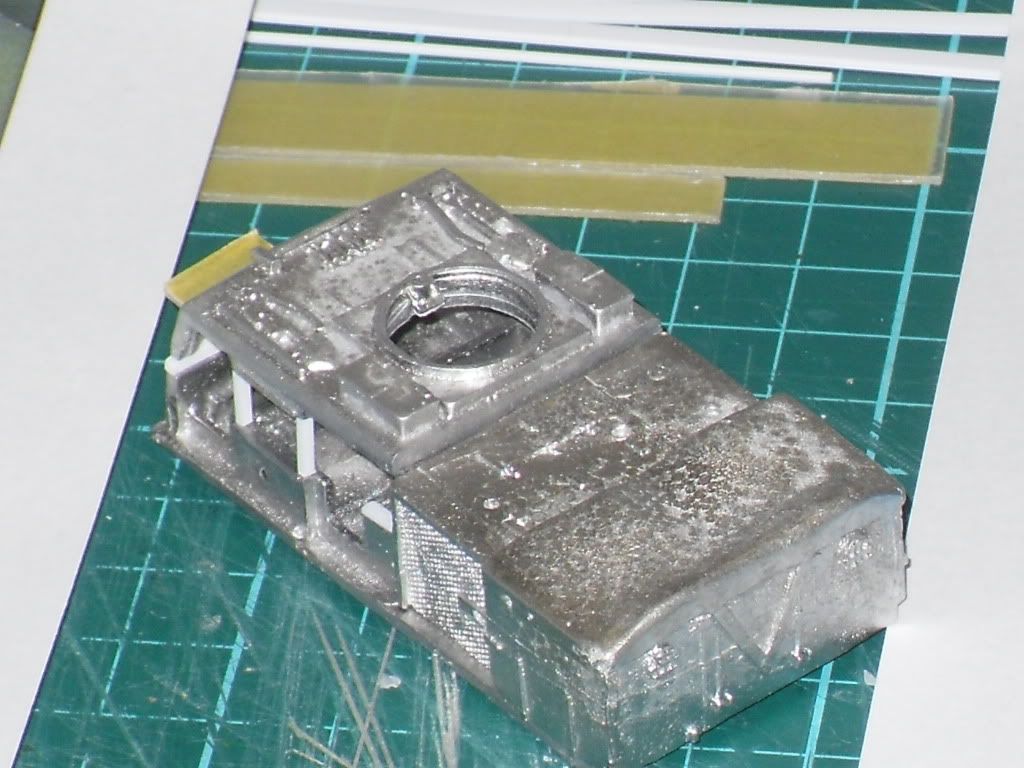
Starting with the M4 build first , SHQ molded some nice detail to the cabin roof ;

Unfortunatly the front windscreen section looks a little rough and the side door pillars don't qiute reach the lower hull piece ;

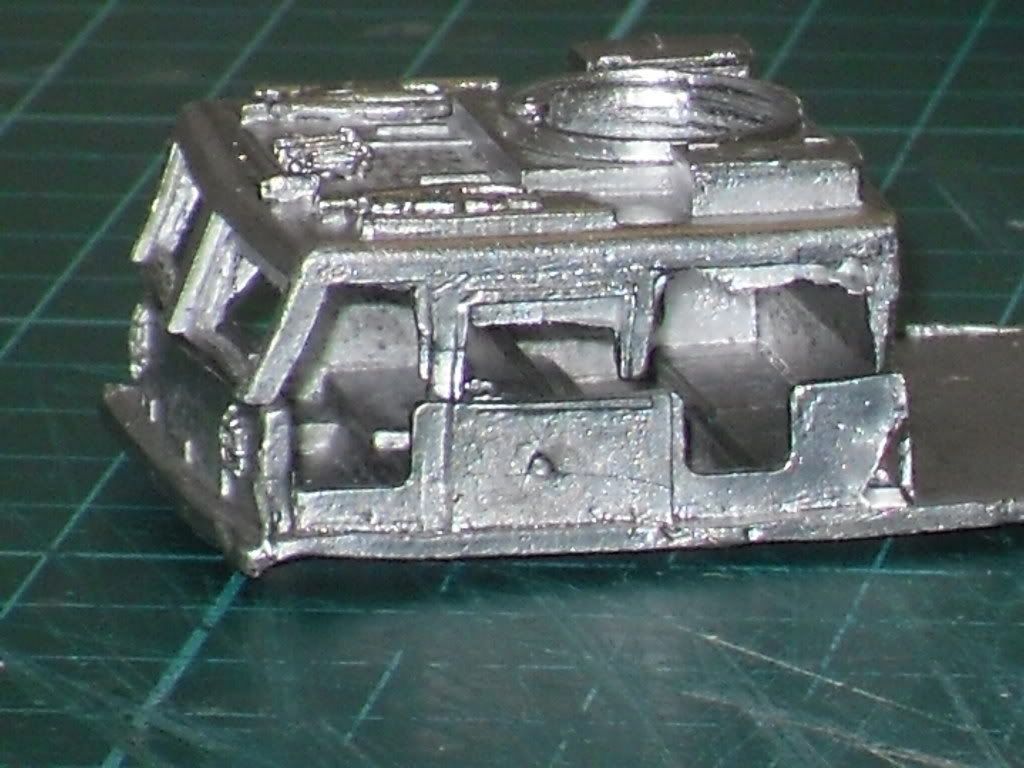
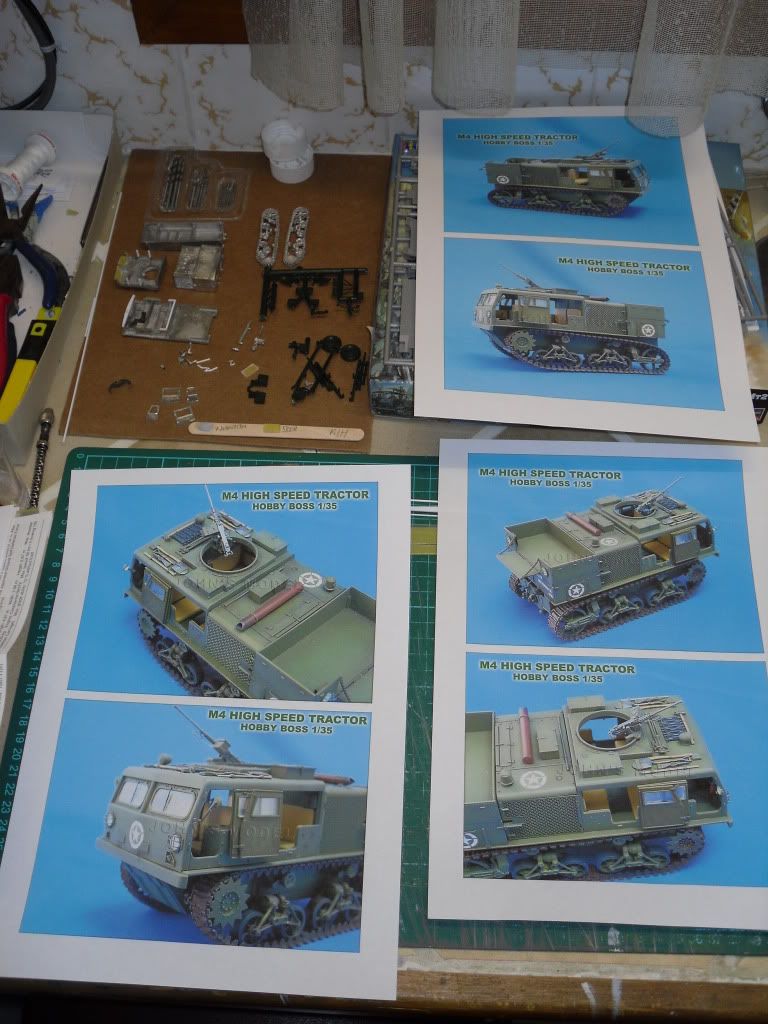
I also noticed while looking around the net for images of my version of the M4 Tractor that the cabin roof is slightly higher than the engine compartment . My kit has both pieces sitting almost flush at the top , so I printed out some reference pic's of the Hobby Boss M4 90mm Tractor ;

I decided to raise the height of the roof piece by a some plastic strip to top edge of the lower hull section and I carefully cut away the dodgy looking side door pillars and replaced them with plastic stip and I have started cutting some clear sheet plastic for the front winscreen and side door windows ;

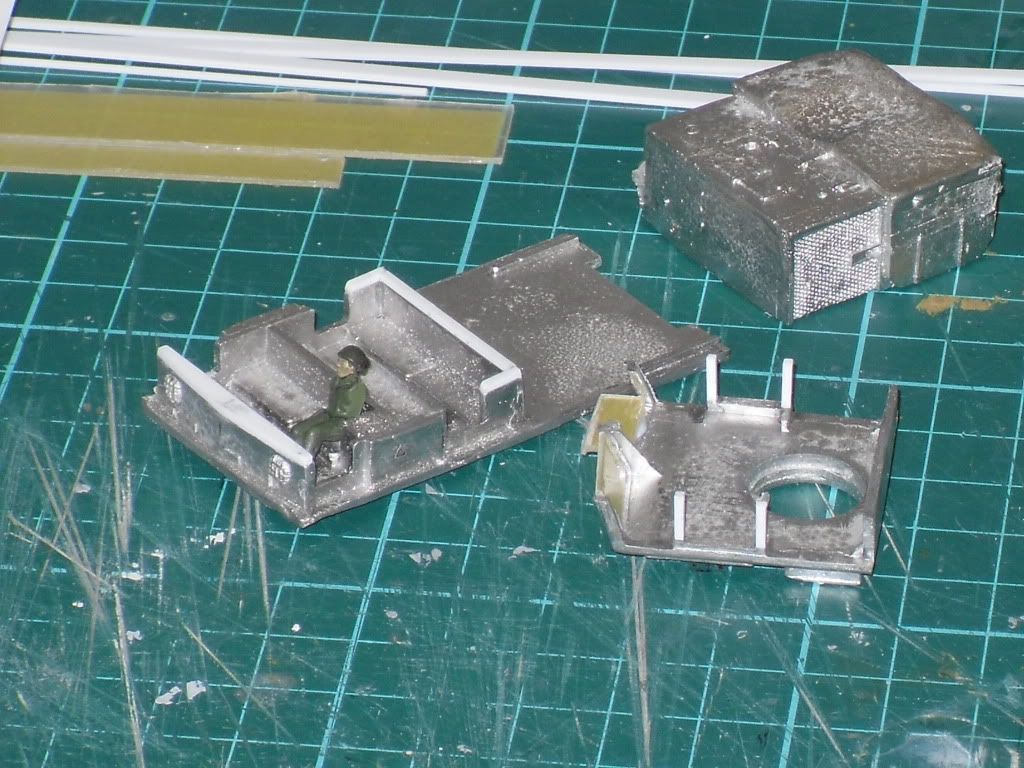
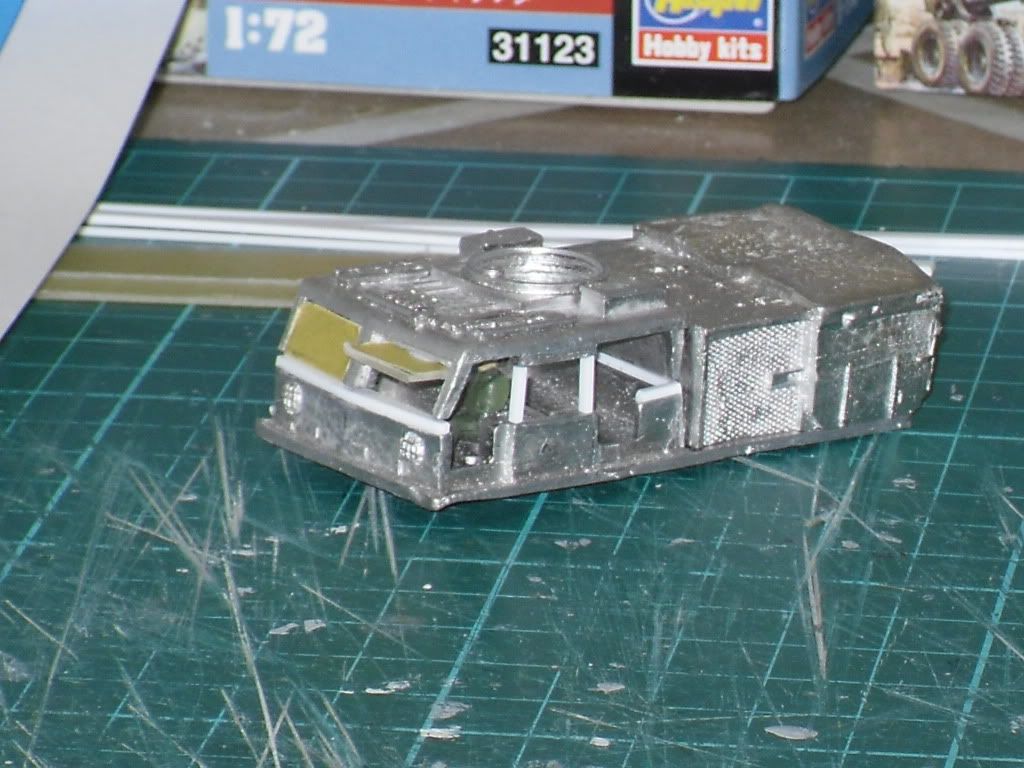
The added bonus of raising the roof slightly is I can also fit a driver in the front cab without his helmet hitting the underside of the roof ;

I think my front cab roof section sitting slightly higher looks a lot better now .

I'll continue on with the side and door windows , while cutting and filing the white metal I was carefull to wear disposable gloves and a face mask , so I have been very safty conscious through out .

John .

  • Member since
    December 2010
  • From: Yangju, Gyeonggi-Do, Korea
Posted by the_draken on Sunday, February 5, 2012 4:46 PM

Helo H-34

I added to the work bench along side the SHQ M4 Tractor , Hasegawa's M5 and Long Tom . I also scrounged the 105mm Howitzer from the Revell CH-54 Skycrane kit and I hope this might be suitable to hook up to the M4 Tractor

That Revell Germ./Revell/Aurora 105mm is apparently the 'light' 105mm that was in use by the RoK at the beginning of the war.  It's kind of a dog to build well, lacking detail and it's not meant to move in azimuth, only vertical angle.  The barrell is not going to line up, I'd suggest cutting off the locator pins.  Keep in mind, that thing was designed back in the late fifties/early sixties as a toy.  It's very long in the tooth and the molds have never been re-tooled from the original Aurora use.  I also had issues with the splinter shield not wanting to fit correctly.  Having said that, I built mine in the 'towed' mode and it looks a peach.  If you go to my web page (I presume you've got it book marked) I have a little review of the build.  I still haven't taken any good pictures of my Allied and Communist artillery, I'm waiting to get the last three or four kits done before I do that.  Then Stik can put them all up on the front page at one time!

I'm going to be displaying mine as being towed behind either a 2.5t truck or a half track as part of a convoy crossing an Airfix bridge.  Hope that this helps!

________________________________________________________________________________

Andy Hill (the_draken) landrew.hill(at)live.com <*> ASE Master Auto Tech, Imaca certified.  >^.^<

PADI OWSI Certified, BA Poli Sci (NDSU), BS Secondary ED-Social Studies MSUM (Sigma *** Laude)

  • Member since
    August 2010
  • From: Beaverton, OR
Posted by Ghostrider114 on Sunday, February 5, 2012 9:11 PM

Ok, I'll make it official and throw my hat in the ring, I'm starting the Academy F-86F "Migkiller" kit, using Alcad II aluminum for the finish

  • Member since
    December 2010
  • From: Yangju, Gyeonggi-Do, Korea
Posted by the_draken on Sunday, February 5, 2012 9:24 PM

THE SABRES AND SUNSHINE HAVE ARRIVED! Cool

Here they are, by the numbers...  (whatever that means.)


The Hobby Craft F-86E with Academy Decals:


The Academy F-86E with Superscale Decals:


The Matchbox F-86A OOB:


The Matchbox F-86A with Fujimi parts and Superscale decals to make and RF-86A:


Fujimi F-86E with Testors/Fujimi decals:


Fujimi F-86F with Superscale Decals:


Frog/AMT/Hasegawa kit with Superscale decals:

Take your pick of the pics, Stick!


________________________________________________________________________________

Andy Hill (the_draken) landrew.hill(at)live.com <*> ASE Master Auto Tech, Imaca certified.  >^.^<

PADI OWSI Certified, BA Poli Sci (NDSU), BS Secondary ED-Social Studies MSUM (Sigma *** Laude)

  • Member since
    December 2010
  • From: Yangju, Gyeonggi-Do, Korea
Posted by the_draken on Sunday, February 5, 2012 9:37 PM

Hey Helo!  Here's some pics of my three different 105mm guns:


On the left is the Revell kit that you're going to be starting.  Be careful with the splinter shield, it just doesn't want to work the way that the instructions show.  In the center is the far more detailed Ace kit.  They work out to both be the same scale!  Note that the barrel of the Ace kit does not have the taper to the muzzle.  This is a problem with almost all of our 105mm guns (including the M-7's) for the build.  The barrels had all been replaced by the end of the war with the un-tapered version.  On the right is an airborne 105mm gun from SHQ.  These were used by the 187th RCT in their combat drops.  It's a very different gun, and much smaller (as well as being 1/76 scale).  The figures with the Ace kit are from SHQ and are meant for the airborne gun, but the Ace gun comes with five ready rounds, and I thought that they looked cooler standing with the extra rounds near them.

If you want to have the Revell gun towed (like me) there's still some work to do; the spades need added, it needs the handles for the trailing arms, and it also needs the towing ring.  You might also want to add some rails at the bore end for the gun to slide back on.  Other than that, you've got it made.  It's kind of a bugger of a kit, but it CAN turn out nice if you try hard and are patient.  Mine took me just a couple of hours to build. 

Hope that this helps!


________________________________________________________________________________

Andy Hill (the_draken) landrew.hill(at)live.com <*> ASE Master Auto Tech, Imaca certified.  >^.^<

PADI OWSI Certified, BA Poli Sci (NDSU), BS Secondary ED-Social Studies MSUM (Sigma *** Laude)

  • Member since
    October 2009
  • From: Texas
Posted by Gregbbear on Sunday, February 5, 2012 10:06 PM

Wow!  The Sabres have arrived!  I was admiring Stik's, and then I scroll down, and there is a whole squadron!  Stik, Draken, very nice indeed.

I agree with John.  Great Corsair shots!  I can't ever get enough of those.

John, I like the M4.  Despite the kits shortcomings, I know you will work your magic and it will be great.  I am interested in building an M4 too, so I will be using yours as guidance and inspiration.

Draken, I like your little battery of 105's.  That Ace does look nice.

Stik, as for the LVT, it could be years before I make a base for it.  Until I get a display cabinet, I have no real place for it.  So, if you don't mind, just pick whatever shot you like for the front page.  

Cheers,

Greg

- yat yas!


  • Member since
    September 2003
  • From: Australia
Posted by Helo H-34 on Monday, February 6, 2012 12:22 AM

Andy , Awesome finished pic's of the F-86 Sabre's ; They sure did arrive with a BANG

Well done Sir ...Toast

I saw some Ace 105mm guns on ebay ; One seller had both the M101 and M102 105mm kits so I bought both . I much prefer the Ace kit you built over the Revell 105mm , thank's for posting the pic's and I went and looked at your web page on the revell gun and decided against building it . I look forward to the Ace kits arriving in the mail .

I was also over at Milicast looking at the M19 Twin 40mm Bofors AA Tank and the M39 Utility Vehicle . The only drawback for me is cleaning up the bottom of the tracks , otherwise I really like both vehicles , especially your finished builds Andy . Can you see any way on substuting the resin wheels and tracks .

John .

  • Member since
    September 2003
  • From: Australia
Posted by Helo H-34 on Monday, February 6, 2012 3:15 AM

Well I've tortured myself long enough and bought a Retrokit resin M39 Utility Vehicle . An ebay seller ...smallmilitarymodelsandmore has lot's of 72 /76 scale stuff . After drooling over the finished pic's of Andy's Armor on page one of the KW GB , I settled on the M39 . It's just an observation and I'm sure there are a huge number of difference's but I'm just wondering if the wheels and tracks from a hasegawa M24 Chaffee would suit the M39 ?

John .

  • Member since
    December 2010
  • From: Yangju, Gyeonggi-Do, Korea
Posted by the_draken on Monday, February 6, 2012 4:20 AM

I don't think that the Chaffee wheels will fit.  The M-39 is based off of the M-18 Hellcat.  The only manufacturer at this time of an M-18 Hellcat kit is...

Wait for it...


Milicast.


Yeah, the Milicast M-39 uses the same track/wheels set as their M-18.  And the M-18 is FAR worse than their M-39 to work.  I don't know what to tell you John.  Heck, I didn't even know retrokit MADE the M-39.  I've built their Water tank trailer and was not impressed.  I hope that the M-39 turns out okay.  Send me pics of it when it arrives!  I'd like to see how different it is from the Milicast. 

BTW, I still have a Milicast M-39 on the to-do shelf, ever since the little rat-finks STOLE mine, i've had it waiting to be re-built.  That and my Airfix M-3 half track.  I'm so ANGRY with those little @#$%ers!

ALSO BTW, I hope that you're happy with the service from that seller, he's pretty decent!  I've gotten a lot of SHQ stuff from him over the last two years or so.  He has okay prices, ships quick and doesn't afraid of anything.

________________________________________________________________________________

Andy Hill (the_draken) landrew.hill(at)live.com <*> ASE Master Auto Tech, Imaca certified.  >^.^<

PADI OWSI Certified, BA Poli Sci (NDSU), BS Secondary ED-Social Studies MSUM (Sigma *** Laude)

  • Member since
    October 2009
  • From: Texas
Posted by Gregbbear on Monday, February 6, 2012 11:53 AM

John, going for the M39?  Sounds good.  After you posted the picture of the M35 prime mover, I saw a resin one (very expensive) on ebay.  As for the M18 Hellcat (not used in Korea, I know), for the 1/35th scale guys, I saw a trans-kit for the AFV club M18 to make it an M39.  Pretty cool.

Cheers,

Greg

- yat yas!


  • Member since
    September 2003
  • From: Australia
Posted by Helo H-34 on Monday, February 6, 2012 1:27 PM

Other than that picture I posted of the M35 Prime Mover , I haven't as yet found any other info as to their use in Korea . Andy sent me alink to that resin kit on ebay , I suspect you were probably looking at the same kit going by the price tag . Andy mentioned it would be an easy and inexpensive conversion of the Armorfast M36 Jackson kit (2 in the box) and a trailer from the Revell M19 Tank Transporter kit . We would just need to scratch build that square crew compartment for the top of the M36 ....I'll keep searching around for more info

John.

JOIN OUR COMMUNITY!

Our community is FREE to join. To participate you must either login or register for an account.

SEARCH FORUMS
FREE NEWSLETTER
By signing up you may also receive reader surveys and occasional special offers. We do not sell, rent or trade our email lists. View our Privacy Policy.