SEARCH FINESCALE.COM

Enter keywords or a search phrase below:

60th Anniversary Korean War Group Build- extended for the duration

764949 views
3335 replies
1 rating 2 rating 3 rating 4 rating 5 rating
  • Member since
    September 2003
  • From: Australia
Posted by Helo H-34 on Wednesday, January 25, 2012 12:17 AM

I'm now in two minds as to how to progress with my M32 .

I cut the bogie and tracks from the resin M32 ;

This was easy enough to do , but  I really do like the look of Italeri's M4A1 and I'm wondering why I don't just try and remove the bins and smaller bits from the resin M32 and add them to the Italeri kit . The resin turret seems to fit okay ...........Mmmmmm.

John .

  • Member since
    April 2010
Posted by Theuns on Wednesday, January 25, 2012 7:30 AM

Here is my Italeri 1/72 F-4u 4 . It is out the box, shake and bake.

The fit of the parts are sofar very nice with good detail for 1/72.

The cockpit colour is actually a little greener, the flash makes it apear lighter. The fuselarge has been joined and the wings will be following soon.

Pitty that the one blade is broken off the prop hub, I will have to faind a way to glue it back, but it is a very small area.

1/72 F-4u4

1/72 F-4uf

1/72 Italeri F-4u4

Has anyone built this kit? Is it posable to pose the canopy open???

Comments welcome


Theuns

  • Member since
    October 2009
  • From: Texas
Posted by Gregbbear on Wednesday, January 25, 2012 8:37 AM

Theuns, good start on the Corsair.  Funny, but mine came with a broken blade too.  I built one a while ago.  I learned a few things after the fact.  One, the 5 rockets on each wing is incorrect.  That setup is only used on the AU-1 and F4U-7.  The -4B had the off set little launchers.  I don't remember about the canopy.  I am currently building the -5N variation of this kit.  It is nice.  The problem with the -5 is that the fuselage is 1 cm short, and it doesn't come with any ordnance.

Cheers,

Greg

- yat yas!


  • Member since
    April 2010
Posted by Theuns on Wednesday, January 25, 2012 9:33 AM

Cool, thanx for the heads up. How many rockets were used on the "4"

?


Theuns

  • Member since
    September 2003
  • From: Australia
Posted by Helo H-34 on Wednesday, January 25, 2012 4:20 PM

Hi Theuns ;

Here's a pic from the Osprey book , F4U Corsair units of the Korean War ;

The aircraft is a F4U-4B from VMF-214 loaded with the 5 inch HVAR rockets and as Greg mentioned their not lined up evenly but staggered .

Also when I built my Italeri F4U-4B , the little holes italeri have marked out on the underside of the wings for the HVAR rocket pylons are two close together , as the tail fins on the rockets hit each other . So you will have to space the pylons a little further apart .

John .

  • Member since
    October 2009
  • From: Texas
Posted by Gregbbear on Wednesday, January 25, 2012 7:25 PM

Helo H-34

Hi Theuns ;

Here's a pic from the Osprey book , F4U Corsair units of the Korean War ;

http://i1082.photobucket.com/albums/j362/Helicopternut/F4U-4BCorsairHVARrockets.jpg

The aircraft is a F4U-4B from VMF-214 loaded with the 5 inch HVAR rockets and as Greg mentioned their not lined up evenly but staggered .

Also when I built my Italeri F4U-4B , the little holes italeri have marked out on the underside of the wings for the HVAR rocket pylons are two close together , as the tail fins on the rockets hit each other . So you will have to space the pylons a little further apart .

John .

Corsairs are so darn cool looking!  Especially with rockets! 

You'll have to excuse me, my love of the hose nose gets the better of me sometimes.  My kids are very lucky they're not named some variation of Chance-Vought Corsair!  Kidding, of course.  I did come real close to naming my Doberman puppy that though......

Cheers,

Greg

- yat yas!


  • Member since
    September 2003
  • From: Australia
Posted by Helo H-34 on Wednesday, January 25, 2012 7:51 PM

OH , okay then ;

Perhaps we can go with Gregbentwingbear from now on ....................Devil

John .

  • Member since
    October 2005
  • From: New Port Richey
Posted by deattilio on Wednesday, January 25, 2012 8:44 PM

the draken,  thanks for the heads-up on the C-46, apparently it won’t be a purchase for a quick build.  I am surprised Trumpeteer or Hobby Boss have not picked up this challenge yet.


The Corsair is one of my favorites as well, I have Italeri’s 1/72 F4U-7 I plan on building as an AU-1.


WIP:
Trying to get my hobby stuff sorted - just moved and still unpacking.


"Gator, Green Catskill....Charlie On Time"


  • Member since
    April 2010
Posted by Theuns on Thursday, January 26, 2012 1:20 AM

That is an exelent pix of the F4, thanx guys!

Interesting to see those rockets stagered like that, defenately a thing the kit got wrong there. Also nice to see the paint chipping and the exhaust stains, this the boxart did get right LOL!

I have smoothed out the seamlines on the fuselarge, all of about 5 minutes work! It is a joy to build like this :-D

The wings have been joined to the bottom section, but with dryfitting to the fuse it seems a little bit of work will be needed to get a nice clean wingroot joint.

Pix to follow

It is a pitty the South African Air Force never flew F-4's, I would have liked to see it in our markings, we flew the F-51's and 86's in Korea. (Hmm......maybe a" what if" corsair build)


Theuns

  • Member since
    September 2003
  • From: Australia
Posted by Helo H-34 on Saturday, January 28, 2012 4:48 AM

I picked up the inexpensive 1/76 Airfix M1 Sherman kit  and compared it to the Millcast M32 Resin Recovery Tank and Andy was spot on about the Airfix kit being closer in scale to the resin M32 than the Italeri kit ;

The easy way of course is to just use the bogies and tracks from the Airfix M1 kit , however after sitting at the bench and looking at the pro's and con's about which kit to bash together with the Millcast M32 , I have decided to go the more difficult route and use the Italeri kit , mainly because of the really nice engine in Italeri's M4A1 Sherman .

I started by carefully cutting with a brand new double edge Wilkinson Sword thin razor blade the small round cylinders and other small parts from the rear side deck  as well as some pieces molded to the front of the resin M32 and then I used the razor saw to remove the stowage bins .

Before ;

After ;

Close up ;

This seemed to work out okay , so I will clean up the flash on the rest of the resin parts , seeing I have come this far , I may as well keep going with the build and finish it over this weekend .

Next  I drilled through the turret to extend the crew opening holes ;

I also noticed that I had to file Italeri's coller piece that secure's the turret to the hull to suit the resin turret ;

It fits nicely around the bottom of the resin turret ;

I then airbrushed the engine pieces silver and the hull interior and parts  flat white ;

I cut open the lower rear hull doors and will pose them open so I can see part of the engine and I was thinking of doing the same with the cover piece that fits on top of the hull between the stowage boxs and the rear of the turret ;

I'll glue the engine and lower hull pieces in place first thing in the morning and while the glue is drying on that , I'll glue the bogie pieces together , then fit the top hull in place and add all those little resin parts back onto the hull and continue on cleaning up the boom , "A" Frame parts  and other resin bits .

More pic's to follow tomorrow .

John . 


  • Member since
    December 2010
  • From: Yangju, Gyeonggi-Do, Korea
Posted by the_draken on Saturday, January 28, 2012 6:51 AM

WOW!  Impressive work on the Sherman there, Helo!  I now wish that I'd done mine the same way.  I had no clue about the Italeri Sherman having such a nice engine.

I've started another kit today.  Not the trio of Thunderjets that I'd originally intended.  I had a think session last night laying in bed awake amidst bouts of coughing and realized that if I go home in September, given my current state of progress on my collection, I would be shipping home some danged big boxes.  Why not do the 'biguns' first?  So I yanked out the Heller Constellation (Has both the Heller "Berlin Airlift" decals and SuperScale decals) and took a gander at it.  Holy Hannah!  This thing is easy!  I could easily see finishing it in a single weekend.  The parts fit isn't fantastic, but it's almost all comprised of easy subsets of large parts.  My only question is going to be how to best mask the round windows.  At this moment, the nacelles are together, the wheels together, wing and tail portions together, cockpit finished and installed, and all landing gear and interior portions of the gear doors painted.  And that's just a couple hours of work.  I'm going to get the nacelles complete with engines and props and get them to fit perfectly and then assemble the rest of the kit leaving installation of the engines for last.

BTW, the armour made it to the office on Friday, but we had snow and clouds all day.  Pictures on Monday? Hmm

________________________________________________________________________________

Andy Hill (the_draken) landrew.hill(at)live.com <*> ASE Master Auto Tech, Imaca certified.  >^.^<

PADI OWSI Certified, BA Poli Sci (NDSU), BS Secondary ED-Social Studies MSUM (Sigma *** Laude)

  • Member since
    December 2010
  • From: Yangju, Gyeonggi-Do, Korea
Posted by the_draken on Saturday, January 28, 2012 12:31 PM

So, here's today's progress on the Connie...

I' really happy with how the nacelles have turned out with just the paint.  Added with the props in different shades, and the inevitable tip colours, they're going to be awesome.  This thing is simply ZOOMING along!  I may even have it finished by the end of tomorrow (Sunday, my time), or at latest on Monday.  Decals would, of course, have to follow.  One item of note, the decals for the Heller kit seem to have some seriously wicked glue that dries almost immediately!  I barely got the two instrument decals off of the paper.  It was, quite frankly, a bastadge to get them off.  And they DO respond extremely well to Solva-Set...

Hope you have a good time with yours Helo!

________________________________________________________________________________

Andy Hill (the_draken) landrew.hill(at)live.com <*> ASE Master Auto Tech, Imaca certified.  >^.^<

PADI OWSI Certified, BA Poli Sci (NDSU), BS Secondary ED-Social Studies MSUM (Sigma *** Laude)

  • Member since
    July 2004
  • From: Sonora Desert
Posted by stikpusher on Saturday, January 28, 2012 3:27 PM

Helo, I am pretty certain that the M4A1 varaint of Shermans was not used by the US in Korea. The M4A3 was the standarized version chosen for post WWII US usage for logistical reasons. And as an aside note, the late M4A1 hull with the angled hatches was never used on M32s. Only the early M4A1 hull or M4/M4A3 welded hulls, which by the time of Korea would be all M4A3s.


F is for FIRE, That burns down the whole town!

U is for URANIUM... BOMBS!

N is for NO SURVIVORS...

       - Plankton

LSM


  • Member since
    September 2003
  • From: Australia
Posted by Helo H-34 on Saturday, January 28, 2012 10:55 PM

Hi Stik ;

I am most gratefull for your advice on the M32 Hull that was used in the Korean War .

I can't help but feel a little embarrassed  Embarrassed  that I did not research this project better before diving straight in .

In saying that , here's a couple of scans from Squadrons Armor in Korea book of the M32 ;

When I look at both pictures I can see exactly what you mean about the M32 KW not having angled hatches .

I could be wrong but the hatches look to be slightly elevated like on the M4A2 Shermans ?

Going through my stash of 1/72 Sherman kits , I picked out the Dragon , Trumpeter and UM M4A3 kits and the hatches are flush with the top of the hull ;

UM's M4A2 Sherman kit has what appears to be a closer match to the hatches as in the pictures from Squadrons book ;

UM M4A2 instruction sheet

So I don't know how to proceed with the kit bash and which 1/72 Sherman kit to use .

Would it help if I posted pic's of all the different kit M4A3 Hulls sitting on the bench ?

John .

  • Member since
    September 2003
  • From: Australia
Posted by Helo H-34 on Saturday, January 28, 2012 11:09 PM

Andy ;

Sorry I forgot to mention the awesome start on your C-121 Constellation ..... Great stuff indeed .

With masking those little round windows , I alway's use Blu-Tack rolled into little balls and pushed into place , silly putty would work just as well .

Anyway good luck with the rest of the build and the engine nacelles look great as well .

John .

  • Member since
    July 2004
  • From: Sonora Desert
Posted by stikpusher on Saturday, January 28, 2012 11:24 PM

Well I'll be... thats an early M4A1 hull on that M32. The straight fore/aft orientation on the hatches and rounded contours of the hull casting ID the type. So if you have a 75mm turret M4A1 in your stash go with that, or an M4A3. The US Army did not use the M4A2 so unless you feel like converting the engine deck to a different variant...


F is for FIRE, That burns down the whole town!

U is for URANIUM... BOMBS!

N is for NO SURVIVORS...

       - Plankton

LSM


  • Member since
    September 2003
  • From: Australia
Posted by Helo H-34 on Sunday, January 29, 2012 12:57 AM

I have two Dragon M4A1 76mm Shermans in the stash , obvisously it has the larger angled hatches ;

However a seller on ebay has these nice resin M4A1 hull tops with smaller Fore/aft hatches and rounded contours which is designed for the Dragon kit ;

Do you think this might be suitable to use ?

John .

  • Member since
    July 2004
  • From: Sonora Desert
Posted by stikpusher on Sunday, January 29, 2012 1:27 AM

That's what you need to make the one in the photo. The hatches off any early/mid production small hatch hull M4/M4A1/M4A2/M4A3/M4A4 should fit.


F is for FIRE, That burns down the whole town!

U is for URANIUM... BOMBS!

N is for NO SURVIVORS...

       - Plankton

LSM


  • Member since
    December 2010
  • From: Yangju, Gyeonggi-Do, Korea
Posted by the_draken on Sunday, January 29, 2012 11:21 PM

Oh my gawd!  I almost fell out of my chair laughing at this.  Way off-topic, but kinda ON-topic as well.  Enjoy!  Big Smile

________________________________________________________________________________

Andy Hill (the_draken) landrew.hill(at)live.com <*> ASE Master Auto Tech, Imaca certified.  >^.^<

PADI OWSI Certified, BA Poli Sci (NDSU), BS Secondary ED-Social Studies MSUM (Sigma *** Laude)

  • Member since
    December 2010
  • From: Yangju, Gyeonggi-Do, Korea
Posted by the_draken on Monday, January 30, 2012 9:54 AM

Weird, but true...

My cat here in Korea (acquired in Korea, spent time in the US, Persian full blood, long nose) loves to lick my sandpaper.  Wth?  Yes, he will destroy anything and everything on my desk just to get at y Korean or even American sandpaper, doesn't matter if it's wet-dry or not, doesn't matter what the backing is.  He wants to lick my sand paper.

I'm convinced he's insane.

On a totally different subject...  My Connie is coming along, I forced myself to work on it tonight after a rather bad and disturbing day at work.  The fuselage and wing are sanded, the wing is spray painted, the tails are are assembled, and now fully painted.  I'm going to do the details on the wing before mating it to the fuselage and then fill, sand, mask, spray that area only.  I noticed that the upper wing has markings for walk ways.  HELLO GRAPHIC TAPE!  It's going to be getting walkways!  Other than that, I have no clue how to get the dust off of the interior of the cockpit clear parts.  One of my biggest issues with ALL of my big kits.


________________________________________________________________________________

Andy Hill (the_draken) landrew.hill(at)live.com <*> ASE Master Auto Tech, Imaca certified.  >^.^<

PADI OWSI Certified, BA Poli Sci (NDSU), BS Secondary ED-Social Studies MSUM (Sigma *** Laude)

  • Member since
    November 2009
  • From: SW Virginia
Posted by Gamera on Monday, January 30, 2012 10:01 AM

Draken Andy: Lol, yeah I know gals like that- gals that talk a guy's ear without the poor guy getting a word in edgewise that is Wink

Very nice job on the C-47 and the Connie sounds really cool.

BTW: Sandpaper isn't that expensive, cheaper than catnip or pet toys!

"I dream in fire but work in clay." -Arthur Machen


  • Member since
    December 2010
  • From: Yangju, Gyeonggi-Do, Korea
Posted by the_draken on Thursday, February 2, 2012 12:47 AM

Heya Stik!

Here's the finished product pictures for you (and a couple extra for Helo34).

The first two are the Milicast M-19 2x40mm AAA.  I prefer the second picture as it shows off the ammo in the guns.


These two are the Milicast M-15 (40mm Special).  Once again, I prefer the second picture for the same reason.  I'm REALLY happy with how the antennae turned out!


Here's the Milicast M-5 High Speed Tractor.  I really like the first picture as it shows off the rust on the tracks to good effect.  I included the second and third picture for Helo as references for his M-5 HST from SHQ.  I'm not sure what Ammo Box is on yours Helo.  This is the one for the smaller sized ammo (up to 105mm),


And for Helo, these are pics of my previously completed (prior to joining the group build) Hasegawa M-4 HST and M-2 "Long Tom".  I used the base from the Matchbox/Revell-Germany M-19 transporter kit.  If you can get in really close, the sign actually says Yangju 양주 5 miles.  Not bad kits, but they have toy-like qualities that can't be missed.  They were obviously made for war gamers back in the late 60's.  Easy to build, sufficient detail, and some moving parts.  One item of note; if you want to display the M-2 in the deployed position you have to cut the spades off of the trailing arms and glue them onto the ends of said arms.  One of the minor complaints that I have with this kit.  Also, I'll be building the 208mm gun which uses the same carriage, trailing arms, and breech as the 155, but with a bigger bore for the breech and a bigger diameter gun barrel.  Easy-peasey with some Plastruct rod!


So there you have them folks!  I'd actually have more pictures but my batteries died!  I'll bring fresh ones tomorrow and hope for sunshine!

________________________________________________________________________________

Andy Hill (the_draken) landrew.hill(at)live.com <*> ASE Master Auto Tech, Imaca certified.  >^.^<

PADI OWSI Certified, BA Poli Sci (NDSU), BS Secondary ED-Social Studies MSUM (Sigma *** Laude)

  • Member since
    September 2003
  • From: Australia
Posted by Helo H-34 on Thursday, February 2, 2012 3:45 AM

WOW , Awesome Armour builds Andy Toast

When it comes to the small scale armour you are definitly ahead of the pack my friend .

And YEP , I sure do like the M4 tractor as well as the M15 and the antennas look awesome .

The M19 looks great as well ; I have plenty of M4 Sherman hatches in the spares box , what type would fit the M19 ?

I found a couple of pic's on the net of some Armour , the first pic is from wikipedia which seems to depict a M5 Tractor in Korea ?

This next pic is of M35 (based on the M36 Jackson) Prime Mover ;

There was no info with the picture , so I don't want to come off looking like a complete idiot but I have been wondering about the white star on U.S armoured vehicles and is it the white star with the circle from WWII and the white Star with no circle post WWII ......like the Korean War ???

Andy had mentioned to me recently about how the ROK were using the M36 and he and I are wondering if the South Koreans may have used the M35 Prime Movers as well ?

Anyway those latest armoured builds are really great additions Andy to the Korean War GB , Stik and the others will be most pleased with your latest efforts .

John .

  • Member since
    December 2010
  • From: Yangju, Gyeonggi-Do, Korea
Posted by the_draken on Thursday, February 2, 2012 3:59 AM

Helo H-34

I found a couple of pic's on the net of some Armour , the first pic is from wikipedia which seems to depict a M5 Tractor in Korea ?

http://i1082.photobucket.com/albums/j362/Helicopternut/Artillery-prime-movers-korea.jpg

I dunno Helo, but if the date and location for the picture is correct, that's looking a LOT like an M-5 in use in Korea.  It doesn't have the front 'bumper' of the M-4, nor does it have the wind screen or doors.  Add in the fact that the back end is much lower than the top of the vehicle, I'd say that it's not an M-4.


Helo H-34

There was no info with the picture, [snipped] so I don't want to come off looking like a complete idiot but I have been wondering about the white star on U.S armoured vehicles and is it the white star with the circle from WWII and the white Star with no circle post WWII ......like the Korean War ???

I'd asked that same question a while back (uh, a year ago or so?), too far back for me to remember.  Basically attempting to save myself issues with not having sufficient white stars for kits.  Anyway, post WWII the US dropped the circle.  I'm fairly sure that it was Stik whom answered.

________________________________________________________________________________

Andy Hill (the_draken) landrew.hill(at)live.com <*> ASE Master Auto Tech, Imaca certified.  >^.^<

PADI OWSI Certified, BA Poli Sci (NDSU), BS Secondary ED-Social Studies MSUM (Sigma *** Laude)

  • Member since
    April 2010
Posted by Theuns on Thursday, February 2, 2012 6:48 AM

My F-4 is basically ready for painting. The wing trailing edges needed allot of thinning to look better.

I will be spraying with Hu Midnight blue as I am not going to be mixing up a batch of paint for just one model.

1/72 F4U-4

There is a bit of confusion with me re the placing of the Rockets under the wings. The instr call for them to be inline with each other, but I have pix of them staggered to not foul the rear fins. It look as if the rails though are all inline, just the rockets are installed staggered.

These rockets seem to be attached with clamps to the rails, could they have been staggered in any pattern, or was there a spesific way to do it?

Thanx


Theuns

  • Member since
    July 2004
  • From: Sonora Desert
Posted by stikpusher on Thursday, February 2, 2012 1:47 PM

Draken those are some beautiful builds! YesThey really look sharp. I will add the ones you suggested/prefer to the front page here shortly.

Theuns, your F4U is coming along nicely. Stick out tongueLooking forward to seeing the markings applied. That is the point in my eyes when you can see an aircraft as it is intended to look.

and to answer couple questions...

Helo H-34

There was no info with the picture , so I don't want to come off looking like a complete idiot but I have been wondering about the white star on U.S armoured vehicles and is it the white star with the circle from WWII and the white Star with no circle post WWII ......like the Korean War ???

The star was the original US Army ID marking just prior to WWII and all thru WWII on US Army vehicles. Originally applied in yellow, this was changed to white after complaints of low contrast visibility by various folks such as pilots flying close air support type missions. The white circle was first added in the MTO and later the ETO after complaints by aircrew that the five pointed white star could be mistaken for a German cross under the stress of combat conditions. So the circled start became the standard painted air recognition marking in the war against Germany. It was never used against the Japanese as it was not needed. Once WWII ended in Europe, there was no longer the need for the circle around the star and it was dropped from Army marking regulations. The Marines in the PTO never really used the star on their vehicles.

Helo H-34

 I have plenty of M4 Sherman hatches in the spares box , what type would fit the M19 ?.

The M19 is based off the M24 hull and chassis. I had a look at my 1/35 M24 and M4 kits. The hatches on the M24 are roughly the same size and general shape as those on the late Shermans with the angled hatches. But they install and operate differently. The Sherman hatches open via an end pivot from horizontal to vertical while the M24 hatches open by a swivel on the horizontal plane.The M24 hatches are also a bit thicker and have rounded edges to sit on top of the hull deck over their positions rather than flush into the deck as on the M4s. The last difference is that the rotating periscope mounts are centered on the M24 hatches and more offset on the M4 hatches. Most of the differences can be fixed easily with some sheet and strip plastic or sanding, and in 1/72 the  periscope location difference would hardly be noticeable except to the rivet counter.


F is for FIRE, That burns down the whole town!

U is for URANIUM... BOMBS!

N is for NO SURVIVORS...

       - Plankton

LSM


  • Member since
    December 2010
  • From: Yangju, Gyeonggi-Do, Korea
Posted by the_draken on Thursday, February 2, 2012 7:34 PM

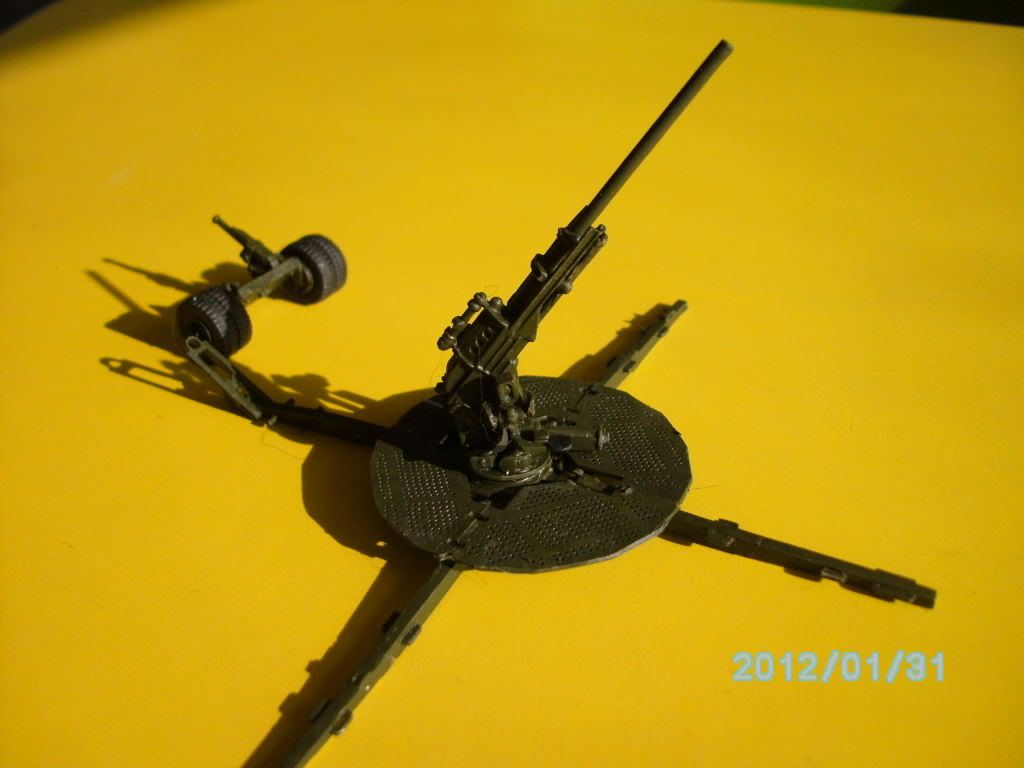
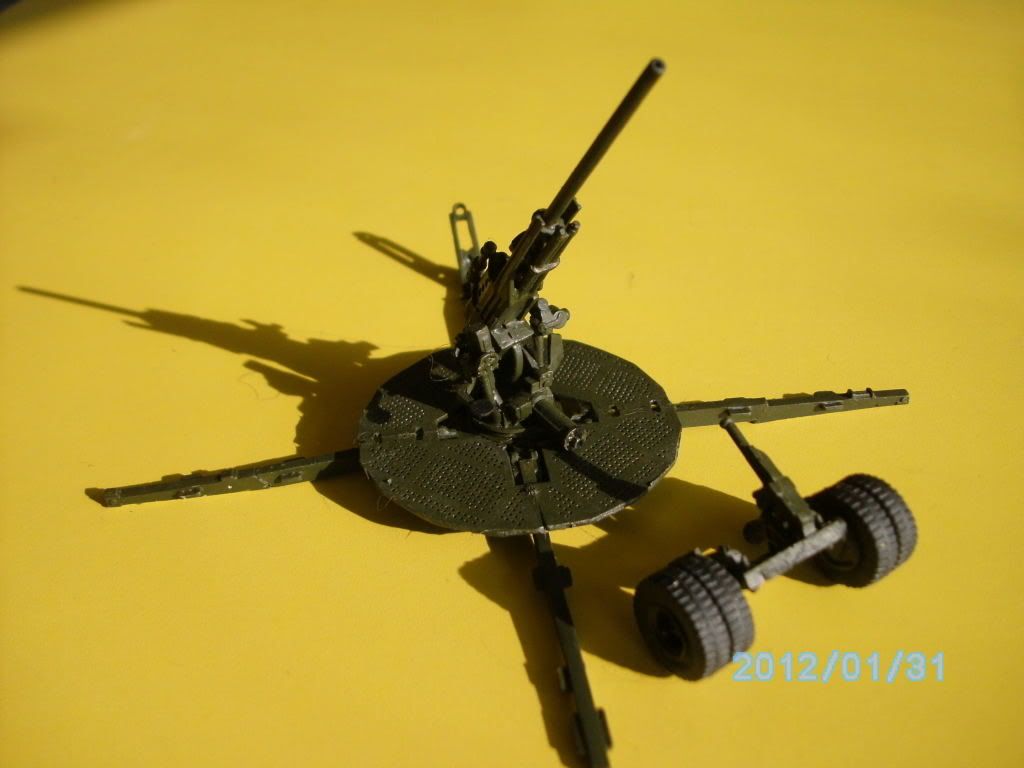
Back at the office with fresh rechargeable batteries in the digital camera.  Here's the 90mm gun and a few extras:

Here's the Milicast 90mm DP AA/Field Gun.  These were used both by the 187th RCT and by the anti aircraft units around the airbases.  The kit wasn't too bad, but the instructions left a great deal to be desired.  Since it can be shown in either deployed or towed configurations, you really need to study the pictures to figure out what goes where.  I ended up using the pictures I took at the Korean War Memorial Museum of their 90mm guns to figure out what the heck went where.


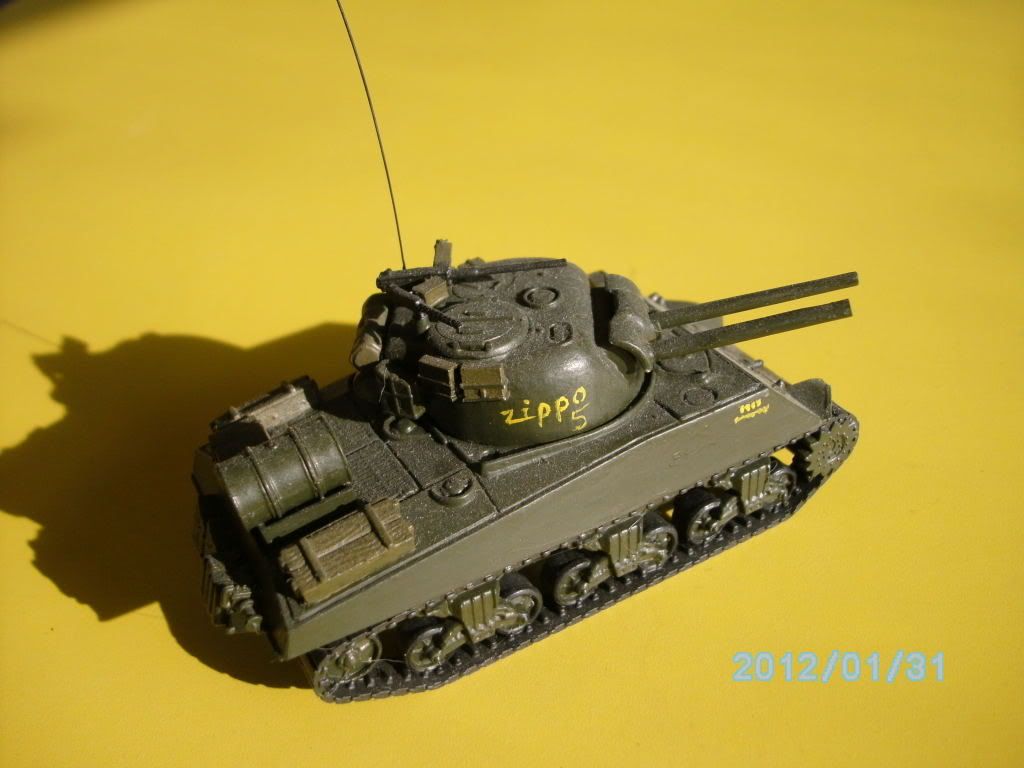
Two kits that I built before I became part of the GB:  The first is a USMC flame thrower tank.  I decided that since I was going to be modifying a tank, that I didn't want to spend TOO much money, so I went with the Armourfast kits.  These kits are actually a dream!  A decent amount of detail, in fact better than some Italer/Esci/Revell kits, and few parts with excellent fit and zero flash.  I was incredibly pleased with them!  For all intents and purposes, the flame tank was simply an M-4A3 with what appeared to be another gun barrel slightly above and offset to the right of the main gun barrel.  I used some stretched sprue for mine.  I also added extra fuel for the flame thrower in a drum on the back, this was typical of USMC flame tanks.  They also tended to have a great deal of extra stowage on their vehicles.


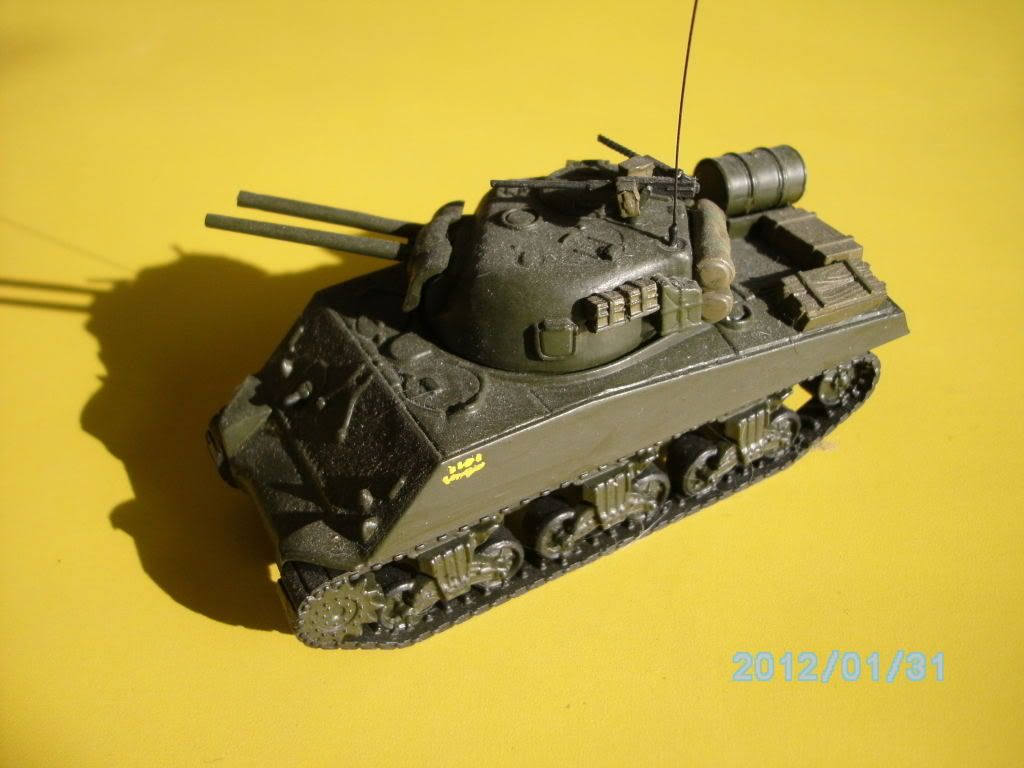
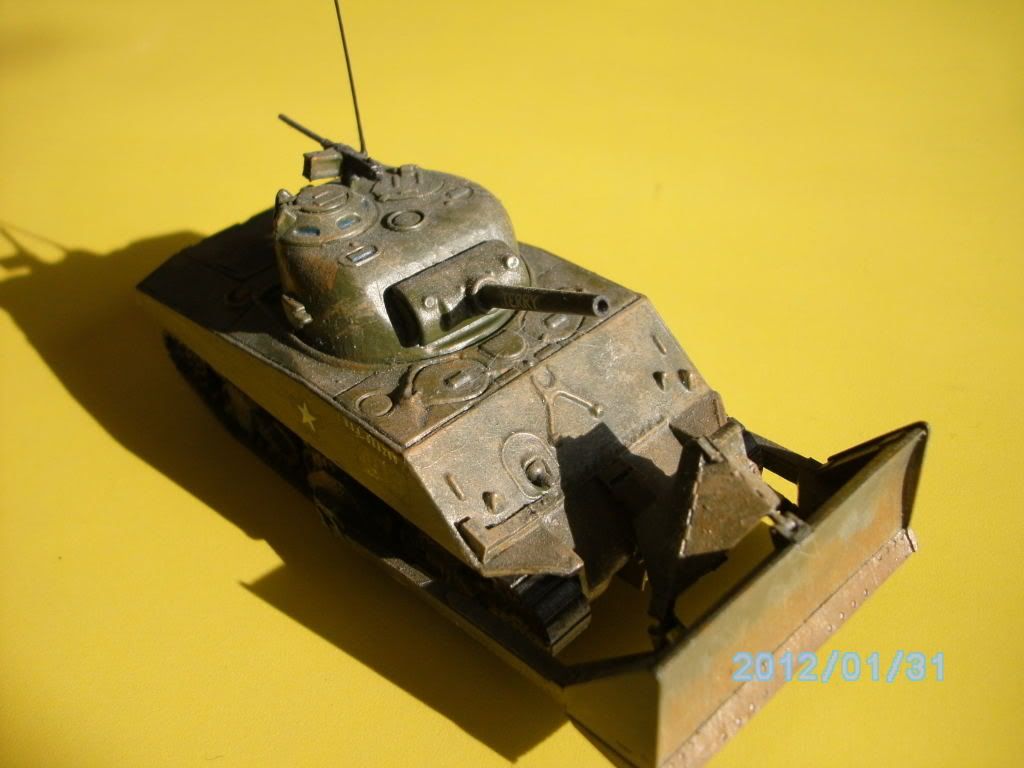
This next one is another Armourfast kit, the M-4A3 (105mm), but modified with the Calibre72 Dozer gear.  At the time that I bought it, this was the only option for a Sherman with a dozer blade in this scale.  Since then UM have come out with an incredible line of Shermans!  Dozer, and several mine roller systems, and other specialty versions.  Much better than what's been on the market previously, and by a single manufacturer.  It wasn't too bad!  The kit went together in no time flat, and the dozer gear was molded nice and crisp, and for my third attempt at doing resin I was VERY pleased!  Everything fit perfectly, and the instructions were straightforward and to the point.  Loved that conversion!  Unlike the USMC (Which kept their dozers in combat) the Army tended to keep theirs behind the lines in Engineering Battalions.  This one is very dirty and doesn't have any stowage because it would have been intended for road building and what not rather than combat ops.


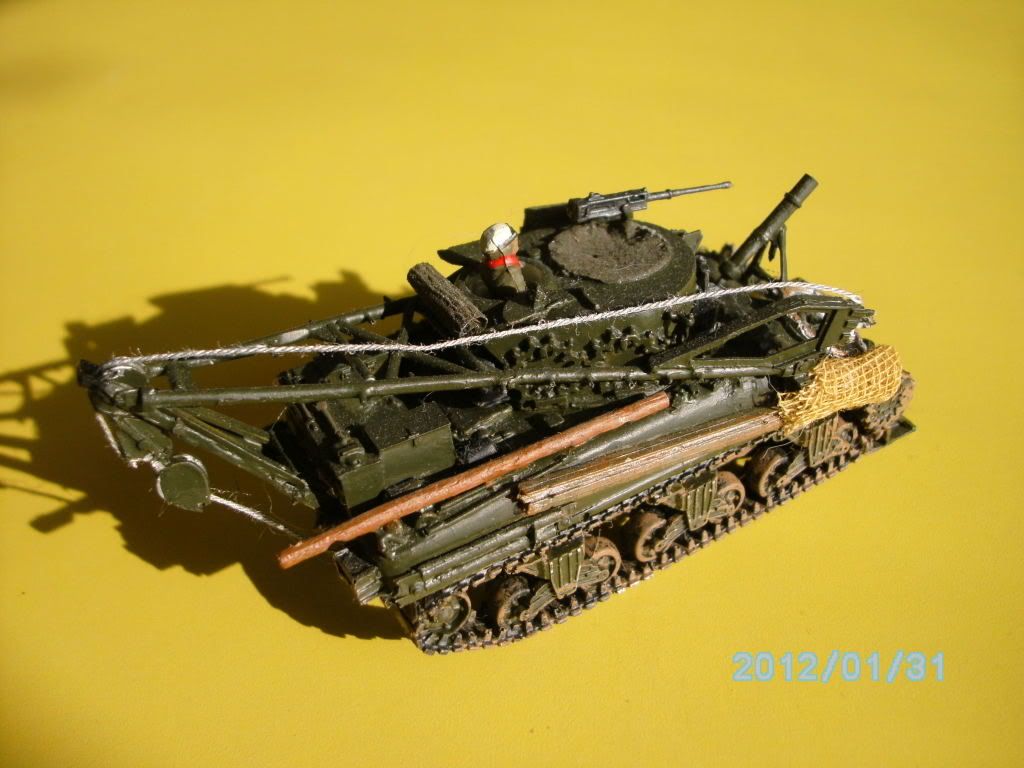
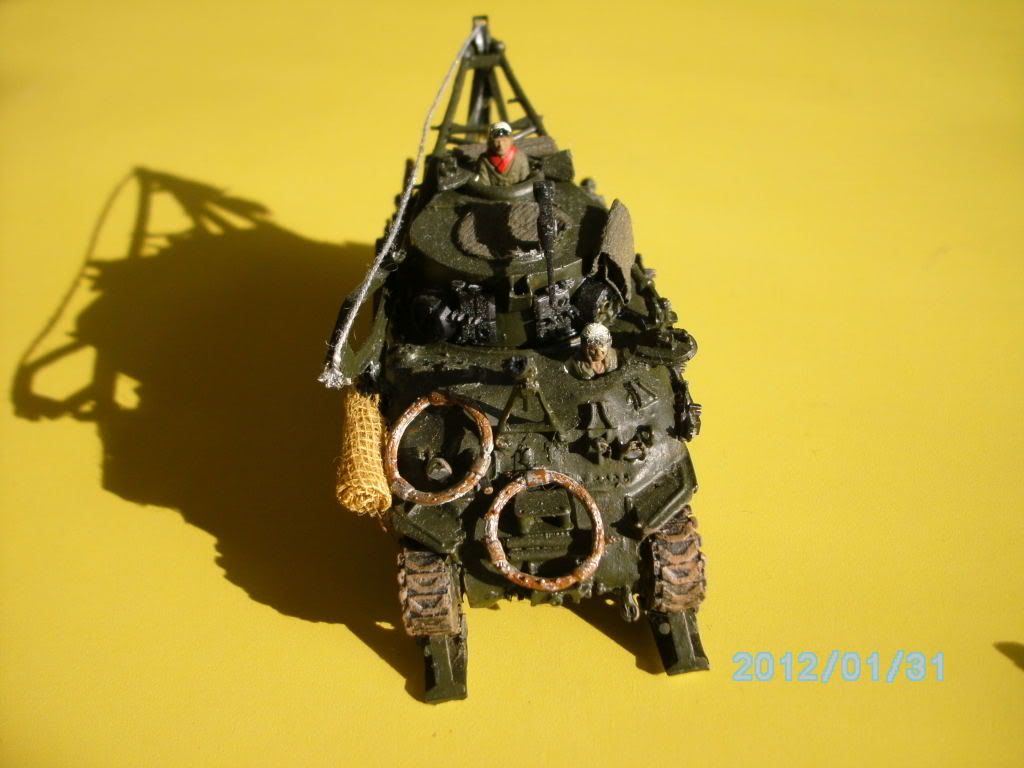
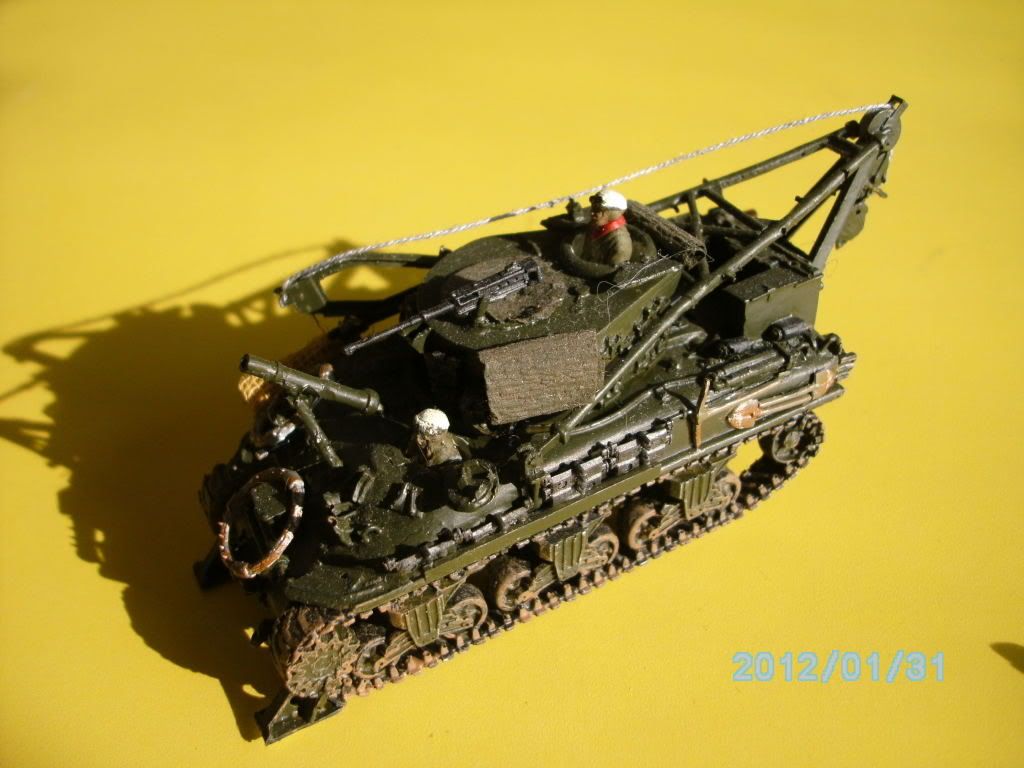
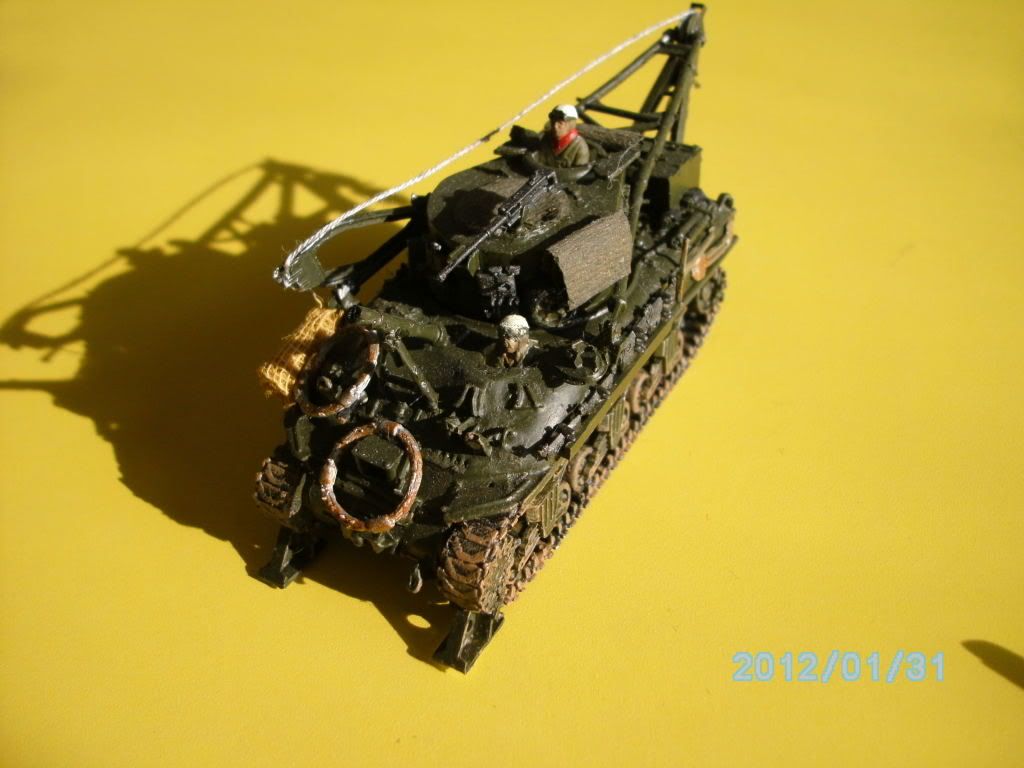
Hey Stik!  If you'd like to replace the image of the M-32 on the front page, take one of these.  The one on the front page is kinda badly focused andI don't recall if I'd finished the kit or not.  So here's some new ones to choose from.


I'm still at work oin the Connie at home.  I just haven't m\been bitten by the modelling bug this week.  The fuselage is together, the wing is painted with walkway stripes, The tails are painted and I've got to remember to buy some playdough on my way home to mask the round windows.  Then I can spray the fuselage!  I also finally got the decals from the states, that means that I can finish the decals on the sabres and get them to work next week and take some pics of them!  WOOHOO!  That'll be a wonderful set to post!  I'm also considering the next 'big' build, maybe something that's not silver?  I've got the Savage and more from the states, but I really need to get the 'big ones' moving.  Maybe one or both of my Invaders...

We'll see.


________________________________________________________________________________

Andy Hill (the_draken) landrew.hill(at)live.com <*> ASE Master Auto Tech, Imaca certified.  >^.^<

PADI OWSI Certified, BA Poli Sci (NDSU), BS Secondary ED-Social Studies MSUM (Sigma *** Laude)

  • Member since
    October 2009
  • From: Texas
Posted by Gregbbear on Thursday, February 2, 2012 9:38 PM

Hi guys, wow, Draken,  those are some great builds!  Very cool stuff indeed.

As for the M5 HST, there is a picture in the Concord book that shows a picture of two of them.  One is towing a counter-battery artillery radar, and the other its generator.

Here is where I stand with my -5N hose-nose as of yesterday.  I have got the 1 cm filled out, and the plane matches dimensions in scale drawings now.  Lesson learned, I intended to just make a plug for the gap, but I jumped the gun and thinned out, and opened the cowl flaps.  After doing that, it made the plug idea a lot more difficult.  So, here is my solution:  I build an inner frame.

After that, I just skinned it with sheet styrene, and I am blending it in, and just need to re-scribe and finish out the exhaust cut outs.

Unsure if you can see the detail, but I added a bit to the bare Italeri engine.  Also, I corrected a couple of not visible things too.  The circular access panels on the horizontal stablilizers were filled in.  They were not on the -5.  Also, the ip is T-shaped in the kit, but was not in the -5, so I cut that off and used it to replace some missing detail on the console.  The nightfighter used a different gun-sight than the day version, so I am using an extra quickboost one I have.  I also solved my ordnance problems!  My Ace Martin Mauler came with a nice assortment, including some Tiny Tims.  I have 3 Able Dogs on deck that needed it.

I have got some done on my LVT, so I will try and do an update soon.  Squadron has some Hobbyboss AAV's on sale for $19.99 for those who might be interested.

Cheers,

Greg

- yat yas!


  • Member since
    December 2010
  • From: Yangju, Gyeonggi-Do, Korea
Posted by the_draken on Thursday, February 2, 2012 9:47 PM

DANG!  I'mma be picking up a few of those Maulers!  How many Tiny Tims did it come with?  Like you, I've got some Skyraiders that I want to beef up, and I can't find those rockets anywhere.  What else came with the kit, looks like it has a couple of torpedos and some other lovelies? 

BTW, does anyone know what the Navy/USMC used for Napalm canisters?  I robbed some out of my Academy F-51 kit for my Academy F-84 Kit.  I'm thinking about building the F-51 in USAF scheme, I've got RoK and RNZAF at the moment.  But I'd also like to throw some napalm on one of my AD's to compliment the bombs that it's getting.

________________________________________________________________________________

Andy Hill (the_draken) landrew.hill(at)live.com <*> ASE Master Auto Tech, Imaca certified.  >^.^<

PADI OWSI Certified, BA Poli Sci (NDSU), BS Secondary ED-Social Studies MSUM (Sigma *** Laude)

  • Member since
    September 2003
  • From: Australia
Posted by Helo H-34 on Friday, February 3, 2012 4:12 AM

Greg , excellent on going work on the 5N and I like the idea of building the inner frame so you skin over with thin plastic sheet . I thought of doing something similar on my stalled Corsair Night Fighter but instead I dipped into the grocery money and bought High Planes '5N just for the front end to graft onto the italeri kit . Your way should work out just as well .

Nice detail on the engine too Yes

As for me it's Friday evening and I'm sitting at the bench  trying to decide which kit to work on this weekend ; I'm thinking of a quick build , so I was looking at the Trumpeter M26 or the Matchbox M40 ? ; Suddenly I remebered I hadn't checked the letterbox today and I went outside and found the SHQ M4 Tractor has arrived ;

I'm not sure what size the ammo box is Andy ? ;

Most of the metal parts are clean of any excess flash , I may just need to file the bottom edge of the upper roof section where it fits to the lower body (hull) for a neat fit ;

The tracks look good , it shouldn't take too long to get this build painted and together , posting your recent completed builds Andy was excellent timing for me .

I might do the M40 side by side with the M4 , they both have about the same number of parts and build sequence .

After last weekends debacle with the M32 kit bash , I'm busting to build and finish something .......Hopfully it's this weekend !

BTW , I'm pretty sure that those staggered rockets are set to a standard patten , I couldn't find a reference pic of the underside of the wing in any of my books but I'm sure it's the same layout on each plane . I'll keep looking anyway .

John .

JOIN OUR COMMUNITY!

Our community is FREE to join. To participate you must either login or register for an account.

SEARCH FORUMS
FREE NEWSLETTER
By signing up you may also receive reader surveys and occasional special offers. We do not sell, rent or trade our email lists. View our Privacy Policy.