SEARCH FINESCALE.COM

Enter keywords or a search phrase below:

Official Alley Cat GB Sept2010-Sept2011

82690 views
488 replies
1 rating 2 rating 3 rating 4 rating 5 rating
  • Member since
    October 2009
  • From: Texas
Posted by Gregbbear on Sunday, September 5, 2010 11:42 AM

Mike, glad you are okay.  When I heard about the quake in the news, I said a little prayer for you and yours.

Those Hobbyboss 'cats look great!  I'm seriously thinking about picking one up now.

Last shift at work, I made some progress, but forgot my camera.  I brought it today, so here is a little update.  After doing some seam work, I sanded off a bit of detail, so I rescribed it.  I also cut the flaps out too.  That was a pain, as I should have done that to begin with.  It was an afterthought, but I thought that they would look good sagging down a little.  Hopefully, I will get the NMF parts done in the next few days, in preparation for the Dark Sea Blue.  Nice kit so far.

Cheers,

Greg

- yat yas!


  • Member since
    June 2010
  • From: Austin, TX
Posted by DoogsATX on Monday, September 6, 2010 2:08 AM

More progress on the Wildcat twins tonight. The wife and kids get back from visiting grandparents in Houston tomorrow, so my progress will probably go back to it's slightly slower pace...

Managed to get through a good chunk of the major construction tonight. Both fuselage halves, and all four wings. Dear god, I'll probably end up dreaming about those wings tonight!

So far, I'm loving these Hobbyboss kits, except for two things. First, the fit of the gear bay trestles, which I'll see about tackling tomorrow. Second, the way their sprue attaches to the join seams. Typically sprue cutters and a quick swipe of a file or scrape of a knife are all I need, but these leave these little tabs that have to be filed perfectly flat in order for things to line up. Not a dealbreaker by any stretch, but annoying.

Also...I had to laugh at how pointless the cockpit work seems once it's shoved up into the fuselage!

Glad I didn't spend much time super-detailing things in there!

On the Bench: 1/32 Trumpeter P-47 | 1/32 Hasegawa Bf 109G | 1/144 Eduard MiG-21MF x2

On Deck:  1/350 HMS Dreadnought

Blog/Completed Builds: doogsmodels.com


  • Member since
    June 2010
  • From: Austin, TX
Posted by DoogsATX on Tuesday, September 7, 2010 10:51 AM

I'm amazed how fast these Wildcats are going together. 

Installed the gear bay guts and the lower fuselages last night. These were a pickle, since the lower fuse doesn't seat up very well without the cockpit/gear bay bits. Once they're in place, things get more complicated.

Since I installed the cockpit into the upper fuselage - per Kermit's suggestion - the cockpit's "legs" didn't seat properly on the lower fuselage's locating tabs. So I cut them off!

After that I still had to deal with the gear bay trestle/bulkhead assembly. I found that placing it in the lower fuselage, and clamping the forward end down with a clothespin did the trick and let me fit everything together more or less well. From there, I busted out the touch-n-flow and went to work. The fit was still rough, and I'm going to have a fair amount of seams to deal with, but I test fit the cowls on both 'cats and they fit great.

Also got the rudders, stabilizers, and the scoopy things (technical term) under the wings attached. Just need to get the landing struts, radio mast, and a few other details in place before I can move on to sanding/filling/priming.

On the Bench: 1/32 Trumpeter P-47 | 1/32 Hasegawa Bf 109G | 1/144 Eduard MiG-21MF x2

On Deck:  1/350 HMS Dreadnought

Blog/Completed Builds: doogsmodels.com


  • Member since
    June 2009
  • From: Netherlands
Posted by kermit on Tuesday, September 7, 2010 11:12 AM

... the cockpit's "legs" didn't seat properly on the lower fuselage's locating tabs. So I cut them off...

Sorry Doogs, forgot to tell you that bit....Embarrassed And from the pics you show i can tell you now that you probably will have to be cruel to those legs and maybe part of the cockpit floor too in order to have the wings fit into the fuselage...

This bit of the build i have to admit is the major drawback of the kit but once you get the fuselage bits smooth and level with some filling and sanding work you will probably have smooth sailing from there. I agree that the three piece fuselage could have easily been avoided with some careful designing of the molds but if that is all that you have to solve with such a sweet and bang-for-buck kit i would personally be happy to accept that. I will most probably build another wildcat in the future as i am still eager to do an atlantic grey scheme provided in i believe the FM-1 offering of hobbyboss.

You are really doing great Doogs! Love all of it sofar.Yes

Richard

"Success is the ability to go from one failure to another with no loss of enthusiasm." - Sir Winston Churchill

  • Member since
    June 2010
  • From: Austin, TX
Posted by DoogsATX on Tuesday, September 7, 2010 11:32 AM

kermit

Sorry Doogs, forgot to tell you that bit....Embarrassed And from the pics you show i can tell you now that you probably will have to be cruel to those legs and maybe part of the cockpit floor too in order to have the wings fit into the fuselage...

Amazingly, I've been test-fitting the wings obsessively, and they seem to fit and line up just fine. It's actually not the fit I'm worried about, but the strength of the join. The wing "tabs" are really, really shallow.

I'm still trying to figure out how I can manage to hold wing, fuselage AND Touch-n-Flow all at the same time without three hands. 

Right now I'm thinking I might bust out my Loctite adhesive. It's thick and slow-setting, but sticky enough that I could use it to help hold the tab in place while I Tenax the wing roots. That and I'm going to need to attach the real landing gear so I can keep the fuse more or less steady.

On the Bench: 1/32 Trumpeter P-47 | 1/32 Hasegawa Bf 109G | 1/144 Eduard MiG-21MF x2

On Deck:  1/350 HMS Dreadnought

Blog/Completed Builds: doogsmodels.com


  • Member since
    June 2009
  • From: Netherlands
Posted by kermit on Tuesday, September 7, 2010 11:48 AM

It kinda helped me to let gravity do the holding job, running tamyia tape from the wingtips to the upper fuselage after my styrene glue (i use revell contacta exclusively) becomes tacky.  I really can't remember having alot of gap trouble there...maybe a bit on the undersides...

Richard

"Success is the ability to go from one failure to another with no loss of enthusiasm." - Sir Winston Churchill

  • Member since
    March 2007
  • From: Michigan
Posted by tonka on Tuesday, September 7, 2010 10:04 PM

I finally started..here are the kits. Only Thing I have done is clean up the parts and paint the interiors.

My Plan is to build both as Blue Angel birds.

]

  • Member since
    October 2008
Posted by eatthis on Wednesday, September 8, 2010 1:52 PM

some progress pics of the tomcat


snow + 4wd + escessive hp = :)  http://www.youtube.com/watch?v=x7egUIS70YM

  • Member since
    March 2010
  • From: New Zealand
Posted by Scorpiomikey on Wednesday, September 8, 2010 5:35 PM

Nice work so far everyone. In a way im kinda dreading my F-14. its got alot of PE which ive never used before. and ALOT of tiny tiny parts. Im still not sure if i should have the little winglets in or out. and im not sure if i should do it wings swept or extended.

"I am a leaf on the wind, watch how i soar"

Recite the litanies, fire up the Gellar field, a poo storm is coming Hmm 

My signature

Check out my blog here.

  • Member since
    October 2008
Posted by eatthis on Thursday, September 9, 2010 1:56 AM

Scorpiomikey

Nice work so far everyone. In a way im kinda dreading my F-14. its got alot of PE which ive never used before. and ALOT of tiny tiny parts. Im still not sure if i should have the little winglets in or out. and im not sure if i should do it wings swept or extended.

Scorpiomikey

Nice work so far everyone. In a way im kinda dreading my F-14. its got alot of PE which ive never used before. and ALOT of tiny tiny parts. Im still not sure if i should have the little winglets in or out. and im not sure if i should do it wings swept or extended.


afaik they deleted the winglets after a while anyway so i wouldnt bother with them. are you gluing the wings in position??


snow + 4wd + escessive hp = :)  http://www.youtube.com/watch?v=x7egUIS70YM

  • Member since
    June 2009
  • From: Netherlands
Posted by kermit on Thursday, September 9, 2010 3:43 AM

Great tomcat painting there Eatthis!Yes I demand more!!Stick out tongue Seriously, good work.

As for my progress sofar...

The Hellcat is painted after preshading and i attempted an oil wash over the panellines for the first time ever. Normally i use water colors exclusively. Also i have decided on fitting the wings with HVAR's after posting a question about it over at the aircraft section of this forum. Should be ok...

Still have to do some more weathering/ fading on the aircraft before i will commence the decalling. I feel it is too dark as it sits on my bench...Also can't fit the wings yet because of that but a dryfit or two looked just fineSmile.  And also the canopy is not on yet because i intend to leave it opened so i will attach that in the very end.

Thanks for watching,

Richard

"Success is the ability to go from one failure to another with no loss of enthusiasm." - Sir Winston Churchill

  • Member since
    June 2010
  • From: Austin, TX
Posted by DoogsATX on Thursday, September 9, 2010 10:03 AM

Great looking 'cats, Eatthis and Richard! Loving the paint jobs!

Richard - the Hellcat doesn't look too dark to me. Remember the late war gloss sea blue scheme WAS really, really dark.

Also, something you may want to consider - decaling before you take on the weathering. It's a bit more hair-raising, I'll certainly admit, but the end result is that you get decals that are exactly as faded/weathered as the rest of the plane.

On the Bench: 1/32 Trumpeter P-47 | 1/32 Hasegawa Bf 109G | 1/144 Eduard MiG-21MF x2

On Deck:  1/350 HMS Dreadnought

Blog/Completed Builds: doogsmodels.com


  • Member since
    June 2010
  • From: Austin, TX
Posted by DoogsATX on Thursday, September 9, 2010 10:23 AM

Combination of progress and intense frustration with the Wildcats last night.

It was still raining pretty good last night, so no dice on priming the engine or cowl interior. One day...

In the meantime, I got the wings installed, finished up my initial Mr. Surfacer/sanding pass of the main fuselage seams, and went back in with the putty.

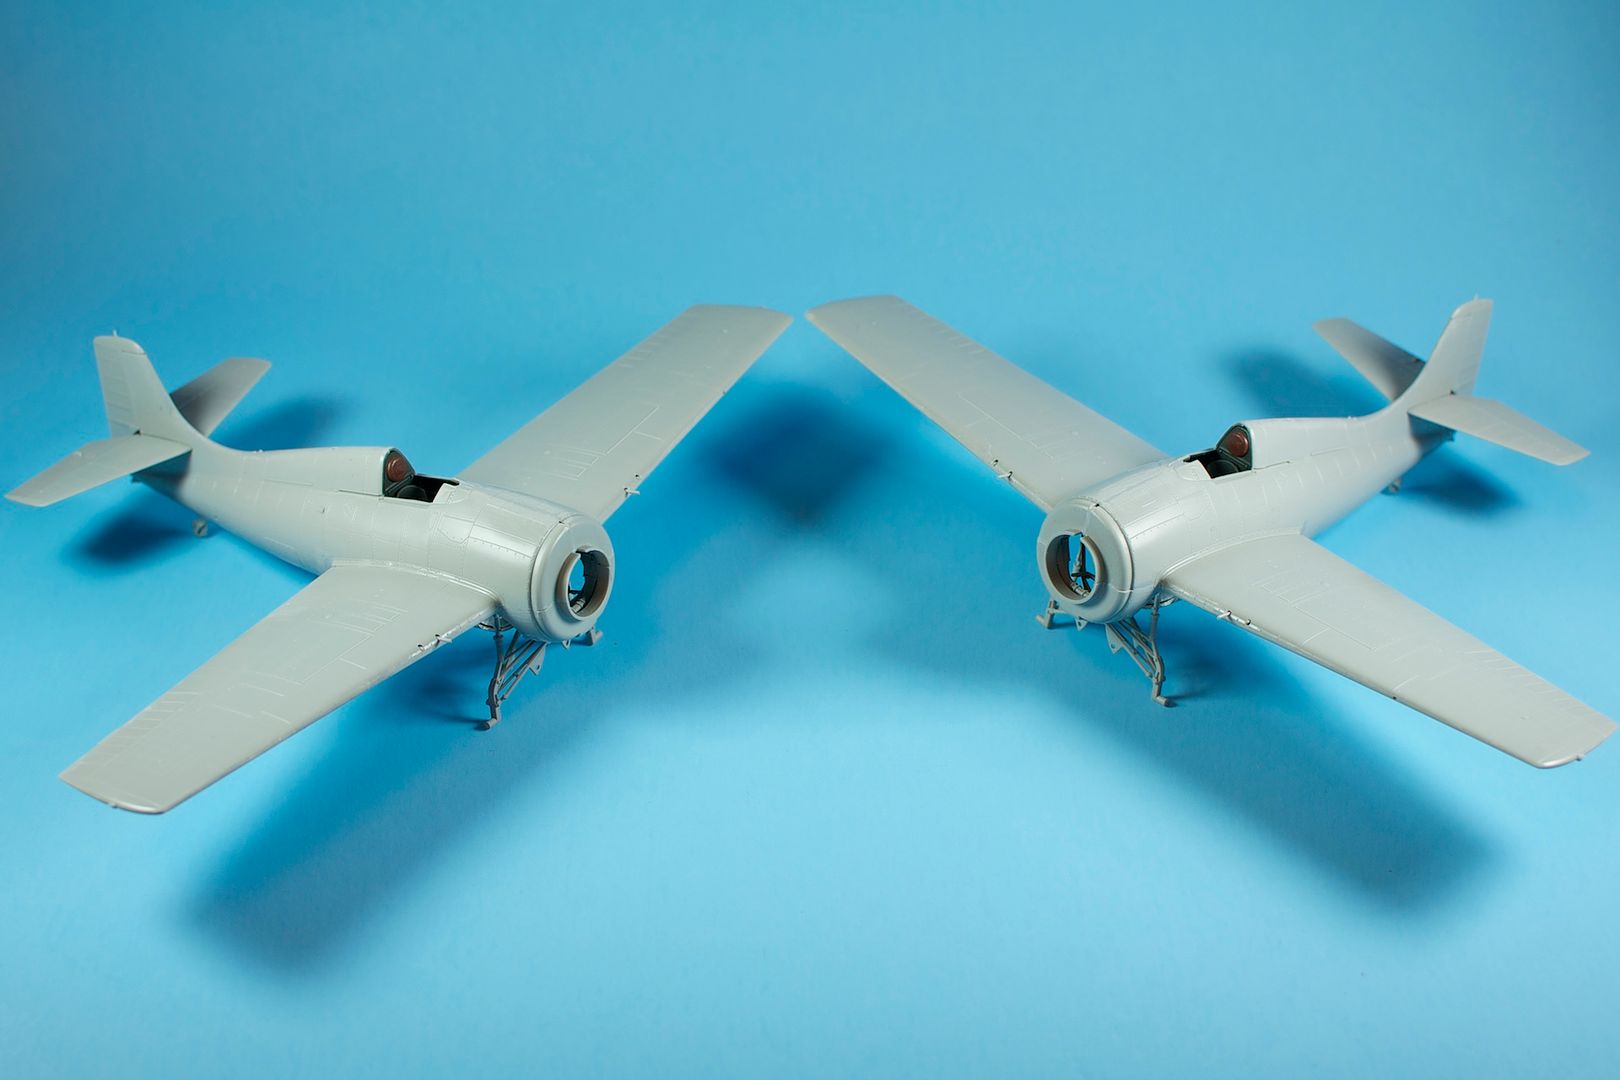
The wings were tricky. The mounting tabs are extremely shallow, and there's basically no way to "seat" the wings so that they stay up on their own. This made for an interesting process that involved bracing one side of the 'cat with a bottle of Windex, applying CA around the mounting tab, shoving the wing into place, then grabbing the Touch-n-Flow and doing the solvent thing while holding the wing in position with my left hand. Everything went together mostly well enough up top. There's a small step between one of the wings and the fuselage, but I figure the yellow wing/NMF fuselage will more than hide it, especially after sanding and filling.

The bottom is a bit nastier. Focusing on getting the topside alignment correct created a pretty massive misalignment between the bottom wing and fuselage that will have to be filled with probably two layers of putty.

Lastly, I got around to test fitting the canopies last night. I was going to go ahead and Future them, but after the Dauntless' stacking-averse canopies, I figured I'd be a bit extra diligent on this front. Good thing, too, since the windscreens on both kits sit noticeably higher than the canopies (and the canopies are too thick to be mounted open). I thought about trying to shim the bottom of the canopies to bring them level, but that would create an arguably more noticeable misalignment between the canopy and the fuselage immediately aft. And shimming at an angle would throw off the windscreen/canopy vertical alignment. So I spent an hour carefully sanding and filing the bottom of the windscreens. It helped somewhat, but the height difference is still noticeable, and I'm afraid any more filing will start to compromise lower framing and overall fit.

Here's after filing:

I keep telling myself "these are for the kids...they don't have to be perfect"...but the perfectionist in me hates that! So I did some digging on the interwebs, found a few others with the same issue, and one person who fixed it by replacing the windscreen with glass from another manufacturer's Wildcat kit. So at present, I'm planning to call Tamiya and order two replacement canopies. I figure at best, the windscreens work as a direct replacement (minus the telescopic sight, which, since I'm going for "accuratish" rather than accurate, who cares?). At worst, I'll have the bits to pose them open canopy.

Any thoughts on the plan? Ridiculous? Retarded?


On the Bench: 1/32 Trumpeter P-47 | 1/32 Hasegawa Bf 109G | 1/144 Eduard MiG-21MF x2

On Deck:  1/350 HMS Dreadnought

Blog/Completed Builds: doogsmodels.com


  • Member since
    November 2008
  • From: Crawfordsville, Indiana
Posted by Wabashwheels on Thursday, September 9, 2010 12:08 PM

Squadron makes a nice canopy. You could make them open or closed.   Two canopies are included when you buy.  Actually they are cheap enough, you could just order two sets just in case.   Rick.


  • Member since
    June 2010
  • From: Austin, TX
Posted by DoogsATX on Thursday, September 9, 2010 12:46 PM

Thanks Rick! I did a half-hearted search for Squadron canopies late last night and didn't see anything. Do you happen to know the part #? The only one's I've turned up are parts of large canopy sets that include a number of aircraft. Seems kind of random, and vacform canopies still intimidate me (don't trust myself that much with a scalpel yet), but I called Tamiya today and they have to request the parts from Japan, so 8-12 weeks out.

On the Bench: 1/32 Trumpeter P-47 | 1/32 Hasegawa Bf 109G | 1/144 Eduard MiG-21MF x2

On Deck:  1/350 HMS Dreadnought

Blog/Completed Builds: doogsmodels.com


  • Member since
    November 2008
  • From: Crawfordsville, Indiana
Posted by Wabashwheels on Thursday, September 9, 2010 1:02 PM

I've got a good start on the AMT F7F Tigercat. I've put together the landing gear and gave the cockpit a basic paint job.  The cockpit is narrow and I'm going to sit a pilot in this one.  I took a standard Tamiya guy and realigned his head to give him a little interest.  With him strapped in there and a dry brushed IP, I think the cockpit will look pretty good.  I'm debating about a radar operator.  I had mentioned earlier about how nicely the kit was molded (except for a lot of flash).  Well, the two radial engines are impressive.  I couldn't resist wiring them up with some 26 gauge copper.  I love the look.  It really gives a lot of depth to the engine.  This kit comes with the real rubber tires that I've not heard anything good about.  So... I think I'll put a good coat of enamel on the inside of the hubs and see if they look good and last.  The rubber really does look pretty nice.  I'm gonna try to set the cat on three feet with weight in the nose.  We'll see if those spindly looking legs are up to it.  Here are a few pictures of the start:

Bare bones, nothing fancy.

Erector set landing gear.

The muscle of the beast.


  • Member since
    June 2010
  • From: Austin, TX
Posted by DoogsATX on Thursday, September 9, 2010 3:09 PM

DoogsATX

Thanks Rick! I did a half-hearted search for Squadron canopies late last night and didn't see anything. Do you happen to know the part #?

Nevermind. Tracked down some standalone canopies and ordered ones for the Monogram kit, since I've seen them used on Hobbyboss 'cats here and there.

On the Bench: 1/32 Trumpeter P-47 | 1/32 Hasegawa Bf 109G | 1/144 Eduard MiG-21MF x2

On Deck:  1/350 HMS Dreadnought

Blog/Completed Builds: doogsmodels.com


  • Member since
    June 2010
  • From: Austin, TX
Posted by DoogsATX on Thursday, September 9, 2010 3:12 PM

Rick - those engines sure do look impressive! Great job! And that landing gear...I thought the Wildcat's landing gear was janky and fragile, but geez! Here I thought Navy birds had their landing gear strengthened to withstand the stresses of carrier operations!

On the Bench: 1/32 Trumpeter P-47 | 1/32 Hasegawa Bf 109G | 1/144 Eduard MiG-21MF x2

On Deck:  1/350 HMS Dreadnought

Blog/Completed Builds: doogsmodels.com


  • Member since
    March 2010
  • From: New Zealand
Posted by Scorpiomikey on Thursday, September 9, 2010 8:01 PM

Nice work everyone. Ive seen a couple photos of tomcats with those winglets out. But ive got no idea what theyre for. I might glue them in and putty over them maybe. who knows. As for the wings i kinda have to choose early on if im gonna go wings out or wings in. Its a reasonably old Hasegawa 1:72 kit. (photo below) More detail than ive ever worked with before and to make things harder a younger me managed to butcher alot of the cockpit parts early on lol.

"I am a leaf on the wind, watch how i soar"

Recite the litanies, fire up the Gellar field, a poo storm is coming Hmm 

My signature

Check out my blog here.

  • Member since
    October 2008
Posted by eatthis on Thursday, September 9, 2010 9:10 PM

Scorpiomikey

Nice work everyone. Ive seen a couple photos of tomcats with those winglets out. But ive got no idea what theyre for. I might glue them in and putty over them maybe. who knows. As for the wings i kinda have to choose early on if im gonna go wings out or wings in. Its a reasonably old Hasegawa 1:72 kit. (photo below) More detail than ive ever worked with before and to make things harder a younger me managed to butcher alot of the cockpit parts early on lol.

http://www.scalemodelling.com/wp-content/uploads/2009/07/857.jpg


the winglets came out at supersonic speed to add lift and counteract the change of cog. it was found that they just wernt needed and added weight and complexity for no real gain so they deleted them i dont know when though


snow + 4wd + escessive hp = :)  http://www.youtube.com/watch?v=x7egUIS70YM

  • Member since
    October 2008
Posted by eatthis on Thursday, September 9, 2010 9:41 PM

a few progress pics


as you can see iv done that wrong so il do it again


snow + 4wd + escessive hp = :)  http://www.youtube.com/watch?v=x7egUIS70YM

  • Member since
    June 2009
  • From: Netherlands
Posted by kermit on Friday, September 10, 2010 2:07 AM

Eatthis, Still going strong i seeWink. Looking great!!

Wabashwheels,

Love the engine work! Been thinking about doing something like that myself if and when i build a model with an engine that is worth the effort. It does make things come to life tremendously. Love it!Yes

Well,.... Had the opportunity to work on my own cat all day yesterday and finished her up. Just now, with better lighting conditions i took my final pics of the folded wing Hellcat:

As you can see i took quite some time trying to weather and fade the whole lot a bit using the white in my tamyia weathering set and a drybrush with white paint. Also used the black and brown in the same set to dirty her up a bit and add exhaust streaks on her belly.

Finally, i always do a couple in sepiaBig Smile:

Have to say that this cat is and has been just as much fun and easy to build as the hobby boss Wildcats. As Doogs is pointing out these kits do have their little quirks but if you work with some care these kits build into fine models worthy of a VIP space on your shelfWink

Had great fun with the group here and most likely will attempt another build in the future. Thank you all for your comments and thanks for watching!Toast

Richard

"Success is the ability to go from one failure to another with no loss of enthusiasm." - Sir Winston Churchill

  • Member since
    June 2010
  • From: Austin, TX
Posted by DoogsATX on Friday, September 10, 2010 9:56 AM

Wow, Richard! Even if I had all day, every day to work on them, I don't think I could churn out one of these Wildcats as fast as you did that Hellcat! Very impressive!

And I have to admit I snickered at the stencils that just say "GUNS". Makes me wonder if there's another that says "ENGINE"!

kermit

Have to say that this cat is and has been just as much fun and easy to build as the hobby boss Wildcats. As Doogs is pointing out these kits do have their little quirks but if you work with some care these kits build into fine models worthy of a VIP space on your shelfWink

Richard

Don't mind my griping! Probably half of it is because I'm currently slogging through my least favorite part of the build - sanding, filling, sanding again, debating what little bits to attach now, and what to keep off until at least the yellow gets sprayed, etc. And I don't even have canopies to mask yet!

The one thing I will say about the kits is that they seem kind of randomly inconsistent. For example, the cockpit fits together like a dream, and can stay up on its own without any sort of adhesive. The wings, too, fit together with Tamiya-like perfection. Same with the cowl over the forward fuselage. And unlike the Accurate Dauntless I'm coming off of, it seats in with a lot of contact surface for your adhesive of choice. But then you have the crankcase, which only kind of vaguely locates over the rest of the engine. Or the too-tall windscreen, etc. 

Speaking of the Wildcats...more filling fun last night. Squadron putty has been acting all crumbly and stupid, so I switched over to DAP spackling compound, which I've seen recommended here and there. Mixed a few drops of water in to soften things up, and it went on pretty well. Also managed to get the engine and inside of the cowl primed since the rain finally cleared out. Hoping to get those pieces painted tonight in between sanding.

On the Bench: 1/32 Trumpeter P-47 | 1/32 Hasegawa Bf 109G | 1/144 Eduard MiG-21MF x2

On Deck:  1/350 HMS Dreadnought

Blog/Completed Builds: doogsmodels.com


  • Member since
    October 2008
Posted by eatthis on Friday, September 10, 2010 2:52 PM

the 1/32 tomcat is on hold till i get hold of the missing part i need. heres where its at now

the antiglare is oh so slightly out the camera is brilliant for picking things like that up!


iv started an italeri 1/48 tomcat heres the progress on that


for those of you whove never heard of tsr2 here it is side by side really shows its size off here


snow + 4wd + escessive hp = :)  http://www.youtube.com/watch?v=x7egUIS70YM

  • Member since
    November 2008
  • From: Crawfordsville, Indiana
Posted by Wabashwheels on Saturday, September 11, 2010 7:44 AM

BODY PUTTY 101:  Do not use Squadron Green putty to embed your nose weights.

I got some Painting done in the gear bays and then proceeded to find the weight needed to get the Tigercat to set on all three.  I dry fitted all the components onto the airframe and put a fulcrum where the landing gear will attach.  I found a couple of bolts and some lead tape that fit into the nose.  I secured the bolts with Squadron green putty.  Big mistake!  The starboard side nose now has a big soft spot from the instrument panel line to the front gear bulkhead.  It'll have to set until the putty and plastic harden and the I'll get to some body work on the fenders in 1/48.  Does any one know a good source for lead tape?  What I had  came from a ceiling fan kit.  It was kind of nice to work with.  Rick


  • Member since
    October 2009
  • From: Texas
Posted by Gregbbear on Saturday, September 11, 2010 3:29 PM

As for lead tape, the owner of my LHS gets his at Bass Pro-Shops.  He also found a bunch of lead line in different thicknesses too.  That stuff looks like it could have a million uses.  I don't know if that helps.

Wow, I am impressed with all the progress everybody is making.  You guys are blowing me out of the water.  Kermit is even done!  Awesome looking hellcat!  With any luck, I will get some time with the paint booth this week.  Then I should make some photographable progress.  I am really enjoying all the builds here, good stuff.

Cheers,

Greg

- yat yas!


  • Member since
    June 2008
Posted by lewbud on Saturday, September 11, 2010 9:15 PM

Rick,

Check the golf section of your local sporting goods store as well.

Buddy- Those who say there are no stupid questions have never worked in customer service.

  • Member since
    March 2010
  • From: New Zealand
Posted by Scorpiomikey on Saturday, September 11, 2010 10:31 PM

Hey guys. sorry for my absence lately. Nice to know about the lead tape guys. could come in handy. As for the putty melting the plastic. i had a similar experience when i was first starting out. I was building a 1:48 Golster Meteor. Id painted it before i built it (as id been taught by various cousins/family members/family friends) and during the building process i came to the conclusion (as most kids do) "More glue equals More sticky" so i put buckets of glue in to hold the engine in place (it kept coming off) i went to check on it the next day and found a little spot of paint with no plastic behind it. Thought it was pretty cool actually lol.

As for my cats it might take me a while to get started. Ive been really unmotivated lately and been trying a couple new kits to try out new methods (NMF to be exact) Hopefully ill get into them at the end of the month. September kinda snuck up on me a little. Oh well.

Nice to see everybody's working hard (except me). Check the front page. kermits up.Your welcome to the badge now kermit if you haven't grabbed it already. (you made it so i assume you've got it lol) Thats all on my front for now guys. Keep up the good work. 

"I am a leaf on the wind, watch how i soar"

Recite the litanies, fire up the Gellar field, a poo storm is coming Hmm 

My signature

Check out my blog here.

  • Member since
    June 2010
  • From: Austin, TX
Posted by DoogsATX on Sunday, September 12, 2010 9:35 AM

I melted the nose of an A-6 once upon a time trying to secure some nose weights...one reason I prefer taildraggers!

Got the engines done on the Wildcats last night. Nothing special...MM Magnesium cylinders, dark gray crankcase, etc. 

Not much more I can do until the Gunze paint and vacform canopies arrive, now. And I don't even have shipping confirmation for either yet, so further Wildcat updates may be several days away...

On the Bench: 1/32 Trumpeter P-47 | 1/32 Hasegawa Bf 109G | 1/144 Eduard MiG-21MF x2

On Deck:  1/350 HMS Dreadnought

Blog/Completed Builds: doogsmodels.com


  • Member since
    October 2008
Posted by eatthis on Monday, September 13, 2010 12:43 PM

heres where the 1/48 tomcat is atm


some size comparisons with the 1/48 tsr 2


imho theyr both fantastic looking airplanes :)


snow + 4wd + escessive hp = :)  http://www.youtube.com/watch?v=x7egUIS70YM

JOIN OUR COMMUNITY!

Our community is FREE to join. To participate you must either login or register for an account.

SEARCH FORUMS
FREE NEWSLETTER
By signing up you may also receive reader surveys and occasional special offers. We do not sell, rent or trade our email lists. View our Privacy Policy.