SEARCH FINESCALE.COM

Enter keywords or a search phrase below:

Early Jets Group Build 2010

41302 views
443 replies
1 rating 2 rating 3 rating 4 rating 5 rating
  • Member since
    April 2005
Posted by Thunderbolt379 on Sunday, December 19, 2010 5:12 AM

Thanks, Duke! Here's today's progress:

I tackled the cockpit, which amounted to completing painting of seat and stick, and get the decals and clear glue-for-lenses onto the instrument panel. The decals are not the best and don't quite fit the instruments, but they'll do. The cockpit is way under-represented and in future I'll consider the AM set for this kit, but I'll do this one with a closed canopy and concentrate on the exterior, which is my usual MO.

The harness is a decal, and went on okay:

I added the cockpit through the top of the fuselage, then, as some reviewers had noted that the hefty metal counterbalance weight included in the kit is barely enough, I added some more by glueing crushed lead slugs into the space behind the cockpit and under the cockpit rear deck:


The last structural part is the cockpit surround and as I test-fitted it the consequences of too snug a fit made themselves felt -- the seam over the nose sprung open! I had hoped to have the canopy on today, but at this time the nose seam is reglueing, pending redressing of the joint, then I'll file the cockpit surround for a better fit and we'll go again...

Cheers, M/TB379

http://worldinminiature.blogspot.com/

  • Member since
    June 2003
  • From: Rowland Heights, California
Posted by Duke Maddog on Saturday, December 18, 2010 12:01 PM

Way to go Mike! That is one jet I've never built. I still need to find one in 1/72 scale someday. Keep it going man!

  • Member since
    April 2005
Posted by Thunderbolt379 on Saturday, December 18, 2010 8:28 AM

As promised, here's some WIP shots of my Tamiya Meteor.

I finally got back to work on it a few days ago when I realised how close the deadline was, and wasn't about to have a host no-show on two GBs in a row!

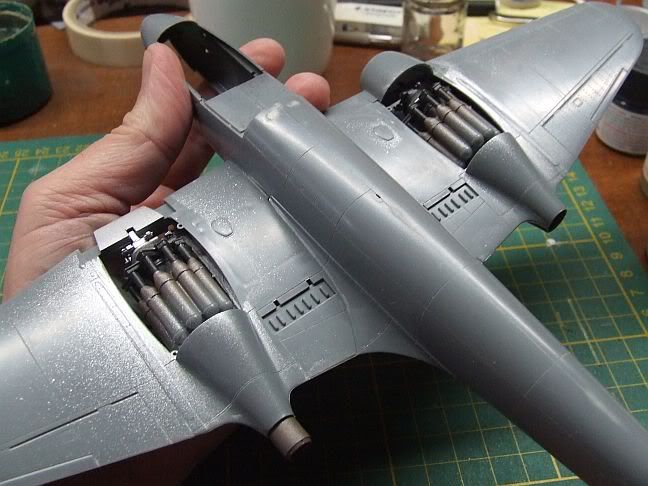
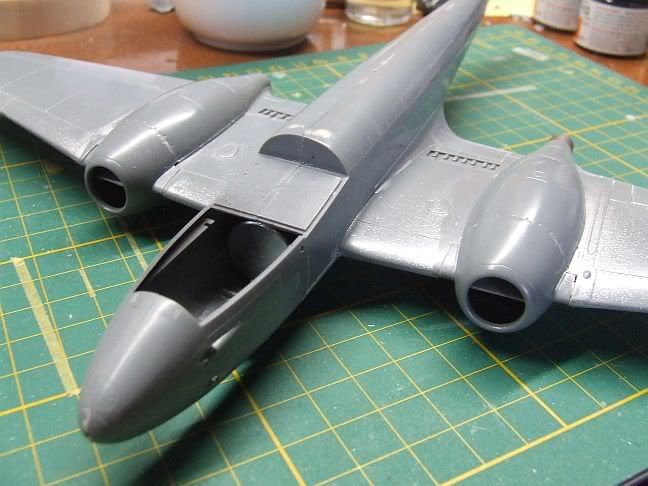
I built the fuselage ages ago and began this round by following the plans and attaching the lower wing, with its counterbalance weight to the fuselage. Right there I would heartily recommend diverging from the plans: if and when I build another I will attach the top wing halves to the bottom, and probably go through the whole nacelle phase too, before mating the assembly to the fuselage, as the slightest misalignment throws the rest out of whack, right down to the fit of the intakes. I'm not thrilled with the fit but it's not bad.

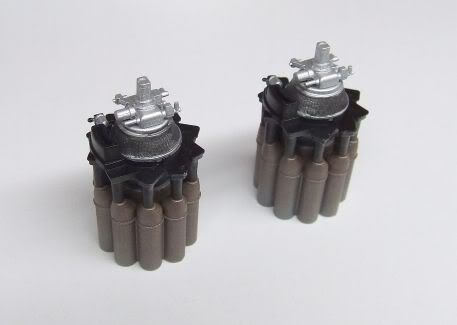
I started the nacelle phase by prepainting the engines. The intakes are open and although I'll be building her with closed nacelles the engines are still visible, so I painted just the front of the engines with Tamiya acrylics. Here are the two units:
Then I went on to building the nacelles around them, the intakes and top panels needing a bit of jiggling into place:


In the end the intakes snugged into place fairly well, there are a couple of joints that could do with a whisker of filler, but nothing compared to the fuselage/wing underside joints. The front one fit great until I committed to glue, then it was a mile out...

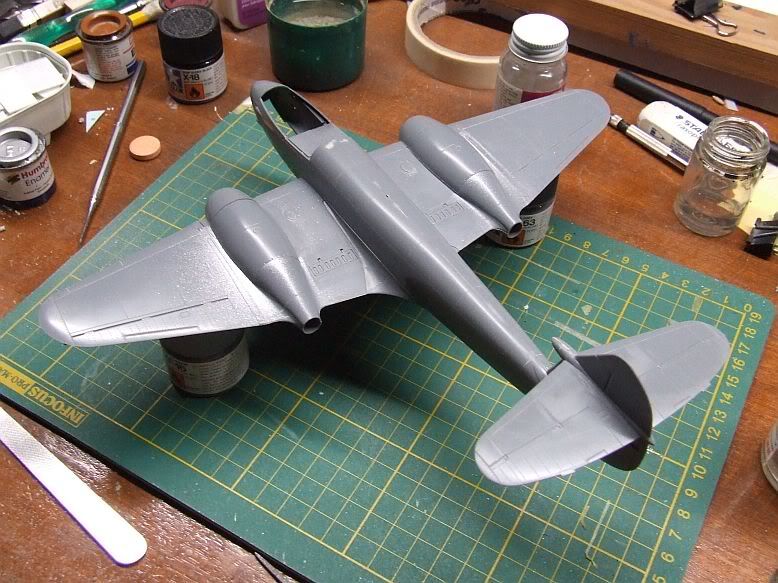
Here she is with the tails and airbrakes fitted:
The cockpit is the next stage, and I have a mask set on its way, due this week. I have one of the three correct shades of paint in stock and will pick up the others next week also...  I want this one on the shelf by New Year!

Cheers, thanks for looking,

Mike/TB379

http://worldinminiature.blogspot.com/

  • Member since
    April 2005
Posted by Thunderbolt379 on Friday, December 17, 2010 10:56 PM

XR81 -- better late than never! Looks like she'll come together pretty swiftly, and we've still got two weeks to the finish line.

I too have made some progress on my Meteor and will have a WIP pic hopefully tonight.

Cheers, Mike/TB379

http://worldinminiature.blogspot.com/

  • Member since
    December 2009
  • From: Weirton, West Virginia
Posted by xradio81 on Friday, December 17, 2010 10:40 PM

I am checking in late on my Hobbycraft 1/48 Ar-234B, but its started.

  • Member since
    June 2003
  • From: Rowland Heights, California
Posted by Duke Maddog on Sunday, December 12, 2010 10:39 AM

Yesterday I spent the day at St. Crispin's Hobby Day and managed to finish one model and get progress on two more.

Here is the progress I've made on the one model for this Group Build. 

This is the F-9F Panther all decaled up. Gonna have this one finished before too long: 


Thanks all for looking in; comments are welcome.

  • Member since
    March 2007
  • From: Atlanta, Ga.
Posted by MrSquid2U on Saturday, December 11, 2010 9:03 PM

TB376,

 I almost stalled right out of the gate! I was looking at my own posted picture and suddenly realized that the rear tires (okay, main tires) were missing? Not wanting to carve up those from a block of styrene, wood or granite, I delved into the stash. The third box I opened, an old Johan ME-262, had a spare set just lying in the box. I started to eyeball them and then even put them up against the sprue in the missing locations. Lo and behold, the cut marks from a nipper even matched up? I know I have looked at this kit several times through the years and I guess at one time or another I cut them from the sprue and held them up against the ME-262's, and, forgot to return them to the right bag!Stick out tongue

Thanks for the welcome!Cool


  • Member since
    April 2005
Posted by Thunderbolt379 on Saturday, December 11, 2010 8:53 PM

Yo, Squidy! Welcome aboard, jump right in with that marvelous kit! Huma is an excellent brand and covered some very unusual subjects, so by all means bring the rare and interesting He 280 to the party!

I'll update p1 right away,

Cheers, Mike/TB379

http://worldinminiature.blogspot.com/

  • Member since
    March 2007
  • From: Atlanta, Ga.
Posted by MrSquid2U on Saturday, December 11, 2010 1:15 AM

Hi Y'all,

 I realize it's getting late in the game but I've enjoyed following this GB and really like the topic. May I join with a 1/72nd HE 280? It's an East German HUMA kit which I bought in a bag years ago in a clearance bin. I don't remember paying much at all, maybe 5.00 or so, yet it's a great subject and a fairly nice lil kit which allows one to build almost any version of this plane. I'd like to do it mostly OOB in order to finally see it built and sitting upon a shelf here.Smile


  • Member since
    April 2005
Posted by Thunderbolt379 on Friday, December 10, 2010 8:30 PM

No worries, hope you get that landing gear fixed up -- looking forward to seeing the decals going on, that's probably my favourite stage!

Cheers, Mike/TB379

http://worldinminiature.blogspot.com/

  • Member since
    June 2003
  • From: Garland, TX
Posted by pepper kay on Friday, December 10, 2010 7:48 PM

Thunderbolt379

Hi guys, great discussion of working with resin parts. For my 2 cents, I always work with a razor saw (rigid blade) and wear a mask. When I'm working with home castings I grind them down wet, using LOTS of water (and a mask!)

Pepper -- crossovers are fine, and started builds are fine, the object of my GBs is to have fun and get models finished, so by all means bring your 1/48 scale Revell F-84G Thunderjet on over this way! I'll add it to page 1.

Cheers, Mike/TB379

Hi again:

I've found, when working with resin, that I've also started wearing latex gloves at the time ... keeps all the bits, pieces and dust off my hands ...

Mike, thanks for inviting my Thunderjet in ... I had a wee bit of an accident with it the other day and am now  in the process of putting the left main gear and the nose gear back on ... when done, I have to mask off the canopy, paint it and install same, add all the decals - geez, I think there are over a hundred of them - and then add all the little fiddly pieces that you always leave for last ... then, walk away from it for a day or two, before doing the panel lines and a touch of weathering ...

I'll try to post some pictures of the T-jet tin te next several days and the beginnings of the F-86 build as well ...

pepper

  • Member since
    April 2005
Posted by Thunderbolt379 on Friday, December 10, 2010 7:05 PM

Hi guys, great discussion of working with resin parts. For my 2 cents, I always work with a razor saw (rigid blade) and wear a mask. When I'm working with home castings I grind them down wet, using LOTS of water (and a mask!)

Duke -- looking good!

Pepper -- crossovers are fine, and started builds are fine, the object of my GBs is to have fun and get models finished, so by all means bring your 1/48 scale Revell F-84G Thunderjet on over this way! I'll add it to page 1.

Cheers, Mike/TB379

http://worldinminiature.blogspot.com/

  • Member since
    November 2009
  • From: SW Virginia
Posted by Gamera on Friday, December 10, 2010 6:52 PM

Oops! I've been scoring and snapping too... Indifferent

Duke: She's lookin' good! Looking forward to seeing her with decals.

Pepper: You'll have to see what Mike/Thunderbolt has to say. My first model was one I'd started and stalled out on. I'm not sure how much progress he'd want in an entry. Of course if you're just posting for us to look at please go ahead.

"I dream in fire but work in clay." -Arthur Machen


  • Member since
    June 2003
  • From: Garland, TX
Posted by pepper kay on Friday, December 10, 2010 6:04 PM

Hi All:

Thanks for all the tips and hints re resin parts ... I'm slowly sawing my way through them, rather than score and snap, welders torch or 500 lb. bomb :-) ...

Duke, the Panther looks great ... everything on this forum looks great ...

It just came to mind that my WIP, F-84G Thunderjet, is certainly an early jet ... would it be OK for me to toss it into the ring of this build ? ... I've been building it for the Korean War GB ...

pepper

PS  If OK to show here, it's a 1/48 scale, Revell F-84G Thunderjet ... great kit, though probably 15 years old - great assembly, tight fitting parts and great decals ...

  • Member since
    June 2003
  • From: Rowland Heights, California
Posted by Duke Maddog on Friday, December 10, 2010 5:54 PM

Hey guys!

I got the paint on the F-9F Panther. Next up: decals!


More pics to come later.

  • Member since
    March 2007
  • From: Atlanta, Ga.
Posted by MrSquid2U on Friday, December 10, 2010 4:09 PM

^^^

Resin is more brittle than plastic when it comes to scoring and snapping and doesn't behave the same as you probably know. Where you can score and snap styrene you're tempting the resin to flex some past the scored pour stub and then crack along a thinner area- such as the hull itself.  I guess that might have been a better way to get my point across- resin will transfer the sheer forces past a scored line and simply look for the thiinnest area for the least resistance to snap at.Wink


Or I might have just said- no, don't do that.Stick out tongue


  • Member since
    October 2006
  • From: Albany, New York
Posted by DrWind on Friday, December 10, 2010 9:09 AM

Ah, resin.

Still experimenting in my relationship with it as well.  All I can say is, as results in this build and others across FSM, the effort is worth it - the added detailing really shows up.

Dremels and resin are a tempting but messy pairing.  I only do my Dremel cutting on resin outdoors, with full respirator.  You'd be amazed at the volume of resin "fluff" that is produced.  I'm thinking of the long pour stubs on Yankee Modelwork submarines - 8 to 12 inches or more of cutting in 1:350 scale.

Razor saws produced some residue, but less than above.  Have used saws on resin indoors, but again with respirator on and vacuum handy.

I'm waiting to try repeated scoring with an X-Acto knife on the line where the stub and part meet.  I suppose this would allow you to snap the stub off rather than cutting all the way through.  Would welcome advice or correction on this.

Daniel


Group Build (Shiver Me Timbers):

1:200 Trumpeter Arizona, 0% complete

1:700 3 Flight Deck Akagi, 10% complete

  • Member since
    November 2009
  • From: SW Virginia
Posted by Gamera on Friday, December 10, 2010 8:50 AM

Pepper: No problem. I like your idea on controlling the resin dust - I'd been either just doing it outside (not to great in the season of freezin') or above a newspaper. Wet sanding it seems a lot safer and cleaner.

"I dream in fire but work in clay." -Arthur Machen


  • Member since
    June 2003
  • From: Garland, TX
Posted by pepper kay on Thursday, December 9, 2010 9:14 PM

I'll try using a stiffer saw blade ... the one I have is so flexible that you can bend it 180 degrees with no damage to it ...

I do have the Atlas track cutter and will try that in the morning ...

For dust management, I found a small cookie sheet which is lipped ... I used double sided tape to place a sheet of sandpaper, wet or dry of course, in the bottom of the pan ... I can fill it with water, put the part in and sand away, with all the dust being contained by the water ... when done, just pour it out into the sink ...

Thanks again for your reply,

pepper

  • Member since
    November 2009
  • From: SW Virginia
Posted by Gamera on Thursday, December 9, 2010 7:29 AM

Pepper: Are you using one of the small one inch or so X-Acto saw blades or the long one? I've been using an Atlas brand 'Snap Saw' which is a six-inch or so razor saw in a molded on plastic mount. One of the longer six-inch X-Acto razor saws would probably work better but the Atlas one works fine for how little I use it. The Atlas saw sells for about five-seven bucks I think and can be found with model railroad supplies.

You can cut them away with a motor tool like a Dremel as well but it throws poison resin dust everywhere so I don't use it very often. I suppose there's no reason you can't use nippers to cut off the parts though if you cut a little bit away from the parts. Just watch out for all the resin dust if you sand it. Just seems to me that by the time I get though all the sandings it would have been just as fast to use the saw in the first place.

Still just my two cents, as you know do it however works best for you! 


"I dream in fire but work in clay." -Arthur Machen


  • Member since
    June 2003
  • From: Garland, TX
Posted by pepper kay on Wednesday, December 8, 2010 9:00 AM

BTW, I've just started the F-86 and am almost finished with an F-84 Thunderjet for the Korean War group build ...

I'll post a few photos of the Thunderjet when complete, though as it is a WIP, I don't think it fair to throw it into the mix of the Early Jets GB ...

pepper

  • Member since
    June 2003
  • From: Garland, TX
Posted by pepper kay on Wednesday, December 8, 2010 8:58 AM

Hi All:

I have a question for the group ...

I'm building up an F-86 and have the True Details resin cockpit set ... as you know, there are large (very large) pour stubs from the resin castings attached to each part ... I've never done resin work before but for wheels and am curious how to get the parts free from these huge pour stubs ...

I've tried using a brand new Xacto razor saw, but it seems that I'd spend a day sawing away ... can some of the larger pour stubs be nibbed off with wire cutters or similar ? ... then, using a sanding block to finish up ? ... or would the cutters break the parts - they seem to be rather fragile to me ...

Thanks,

pepper

  • Member since
    October 2006
  • From: Albany, New York
Posted by DrWind on Tuesday, December 7, 2010 10:13 PM

Duke -

I have this kit as boxed by AMT, featuring Marine Fighter Squadron Captain Ted Williams (Red Sox Hall of Famer) on the box art - decals were for his plane of the 311th.

For my model, lots of putty and sanding needed for those major joints in the wing root, engine intakes and around the nose and tailpipe.  Slight misalignment near the tailpipe for me - the fuesalage halfs were not symetrical.  And I also failed to install the short tailpipe piece before closing the halfs, necessitating some minor surgery. 

Your Matchbox cockpit is more refined than my AMT cockpit.  Different ejector seat - AMT's much more basic, without even a control stick.

My construction stopped after puttying, as I've been assessing rescribing techniques and tools... that's where I'll pick this one up.  Look forward to seeing your assembly for this build.

I've got two Trumpeter 1:48 F-9 variants waiting in the wings.  Amazing upgrade from our versions of this plane!

Group Build (Shiver Me Timbers):

1:200 Trumpeter Arizona, 0% complete

1:700 3 Flight Deck Akagi, 10% complete

  • Member since
    June 2003
  • From: Rowland Heights, California
Posted by Duke Maddog on Tuesday, December 7, 2010 9:43 AM

Thanks Thunderbolt. I got a little more progress done last night; gonna see about getting pics in the next day or so. Thanks also for the heads up on the landing gear. I'll check it out and see what I need to do if anything. After all, like you said; Revell may have fixed it,


Stay tuned for more.

  • Member since
    April 2005
Posted by Thunderbolt379 on Monday, December 6, 2010 3:46 PM

Hi Duke -- hey, that's the old Matchbox kit! I built one about twenty years ago and thoroughly enjoyed it. Of course you can build it here, you're most welcome indeed! I'll add it to page 1 and look forward to seeing it come together.

I built the Matchbox and Hasegawa Panthers back to back (finished in glassy-smooth Humbrol 15, not the right shade but the best gloss paintjob I ever did), just about the only time I've done a twin build, and while the Hasegawa was better, the Matchbox captured the visual dynamism of the plane so well I just loved it. Word of caution from memory -- the main gear legs are short by a millimetre or even two, I ended up scratchbuilding some chocks which actually slipped under the wheels to lift the tail of the plane. Otherwise she sits too low at the back. Revell might have corrected that, or there may be an AM option these days.

Welcome aboard with this build!

Cheers, Mike/TB379

http://worldinminiature.blogspot.com/

  • Member since
    June 2003
  • From: Rowland Heights, California
Posted by Duke Maddog on Monday, December 6, 2010 11:11 AM

hey, I just realized that I have another Early Jet that I started while this was going on. Even though it is started, can I submit it for this Group Build as well? I'll be finished with it soon.It is the Revell 1/72 scale F-9F Panther.


Here are pics of it when I started it. Cockpit first:


Wings and tail:


Here it is with wings dry-fit to the fuselage and the tail attached:


If you don't want to accept this into the Group Build though; I'll understand and will post no more pics of it.


Thanks for considering another one.

  • Member since
    June 2003
  • From: Garland, TX
Posted by pepper kay on Monday, December 6, 2010 8:41 AM

model geek

As promised yesterday the Fury is finished! I was really happy with the results.

Model Geek - that is GORGEOUS !! ...

pepper

  • Member since
    April 2005
Posted by Thunderbolt379 on Monday, December 6, 2010 1:15 AM

Page 1 updated with Model Geek's beautiful Fury, and Julez's change of subject. We have six completions so far and it looks like we're going to have several more!

Cheers, Mike/TB379

http://worldinminiature.blogspot.com/

  • Member since
    November 2009
  • From: SW Virginia
Posted by Gamera on Sunday, December 5, 2010 5:03 PM

Tom: Sharp looking Fury! Really like how the white and grey are set off by the colourful intake and tail.

"I dream in fire but work in clay." -Arthur Machen


  • Member since
    January 2009
  • From: Algonquin, IL
Posted by model geek on Sunday, December 5, 2010 4:32 PM

Thank you very Mike.

Cheers to you as wellToast

Tom  


JOIN OUR COMMUNITY!

Our community is FREE to join. To participate you must either login or register for an account.

SEARCH FORUMS
FREE NEWSLETTER
By signing up you may also receive reader surveys and occasional special offers. We do not sell, rent or trade our email lists. View our Privacy Policy.