SEARCH FINESCALE.COM

Enter keywords or a search phrase below:

The Ostfront (eastern front) GB 2010/11

106899 views
900 replies
1 rating 2 rating 3 rating 4 rating 5 rating
  • Member since
    April 2005
Posted by Thunderbolt379 on Tuesday, September 27, 2011 12:31 AM

Nice work going on here! Pity about ICM going out of business, i find I quite like their product. Never mind, the molds will do service under other labels for many years, I'm sure.

Bit of progress, the Bf 109's yellow areas are now masked:

Tamiya tape against RLM 04 is not easy to spot, but it's all there.

Next, load up some NATO black and refresh the prehsading where the yellow overspray collected.

Cheers, Mike/TB379

http://worldinminiature.blogspot.com/

  • Member since
    June 2010
  • From: Austin, TX
Posted by DoogsATX on Monday, September 26, 2011 11:10 PM

vetteman - diggin' the Yak! Really wish there were more Russian aircraft kits out there. Feels like it's changing, but TOO slow! At the Austin show this weekend, someone showed up with a Craftworks 1/32 La-5. Gorgeous build that immediately had me thinking "WANT" - til I got online and saw it's a whopping $155! 

Are you going aftermarket for the Yak markings? There are some interesting decal sheets out there.

Update on the KV-2 - main construction is done. Been working on the friuls. Got all the way done with one run, then looked and realized the tracks aren't divided by side, but by guide horn/no guide horn. Sigh. Had to dismantle the ENTIRE side and start over again. Almost have one side done again, so it'll probably be a few more days before I can post a pretty "all built up" pic.

On the Bench: 1/32 Trumpeter P-47 | 1/32 Hasegawa Bf 109G | 1/144 Eduard MiG-21MF x2

On Deck:  1/350 HMS Dreadnought

Blog/Completed Builds: doogsmodels.com


  • Member since
    July 2008
  • From: USA California
Posted by vetteman42 on Monday, September 26, 2011 9:20 AM

Doogs man the barrel on your KV looks mean, I like it

Thunderbolt lookin forward to seeing your 109 Eats

I made some progress over the weekend on the Yak, got the wing roots filled, all the cooling scoops are on and the tail is almost finished. Just needs a bit of filling and the rudder added. The canopy is just sitting on it for now, but let me tell you right out of the box it fit perfectly no sanding at all ! The cowl did need a bit of work, well about an hour of fitting and sanding. Looks pretty good now though.

Its getting close to paint time I think.

Randy So many to build.......So little time

  • Member since
    June 2009
  • From: Netherlands
Posted by kermit on Saturday, September 24, 2011 12:40 AM

Thunderbolt,

Rolling it on a tabletop usually works for me. But in general i like to just replace the stuff i dont trust completely lol. Hope you get it sorted mate!Toast

On another note.....

The dunkelgelb on my Panther is curing as we speak and i am getting ready for some serious camo spraying... Still not sure wether i like the camo and markings of the one revell is offering me so i am trying to expand my options a bit.

Can anyone point me out to some profile pictures of panzer V's serving with Pz.Abt. 51 and 52 during Kursk? I know there must be sites where they show you several but sofar i am having limited returns while googling...Embarrassed

Richard

"Success is the ability to go from one failure to another with no loss of enthusiasm." - Sir Winston Churchill

  • Member since
    April 2005
Posted by Thunderbolt379 on Saturday, September 24, 2011 12:18 AM

Kermit -- Very possibly -- I've doctored the tip a few times and can't detect any 'catch' in the point as it drags across a fingertip, but that doesn't mean it's really straight. Maybe time for a new one...

M/TB379

http://worldinminiature.blogspot.com/

  • Member since
    June 2009
  • From: Netherlands
Posted by kermit on Saturday, September 24, 2011 12:08 AM

Paint splatter you say? Might indicate a bent needle... if the tip catches on a fine rag then you might wanna fix or replace the needle

Richard

"Success is the ability to go from one failure to another with no loss of enthusiasm." - Sir Winston Churchill

  • Member since
    April 2005
Posted by Thunderbolt379 on Saturday, September 24, 2011 12:05 AM

Hi DoogsATX,

Yep, thinning at 2:1 or a tad more. Thinning further only seems to contribute to the spatter... Maybe I have a buildup on the needle, but the AB cleans readily enough. Yep, trying to stay away from solvent based chemisry as much as I can, which is a shame as enamels flow on so nicely... They just stink!

Cheers, M/TB379

http://worldinminiature.blogspot.com/

  • Member since
    June 2010
  • From: Austin, TX
Posted by DoogsATX on Friday, September 23, 2011 11:51 PM

How far are you thinning the Tamiya? And what with?

Personally, I've found Tamiya works best thinned AT LEAST 2:1. And I reduce it with lacquer thinner (Gunze Mr. Leveling), but it sounds like you may be going acrylic for getting away from the nasty stuff. Still, thinning it further can really work wonders. 

On the Bench: 1/32 Trumpeter P-47 | 1/32 Hasegawa Bf 109G | 1/144 Eduard MiG-21MF x2

On Deck:  1/350 HMS Dreadnought

Blog/Completed Builds: doogsmodels.com


  • Member since
    April 2005
Posted by Thunderbolt379 on Friday, September 23, 2011 10:42 PM

Hi all,

Well, better late than never -- after a hiatus of months, during which I have worked harder than I seem to have ever done, including (or possibly due to) completing my PhD, I have finally made my tremulous way back to the bench. Today I made some progress on my Hasegawa 1:48 Bf 109 F-2 (Werner Molders, fall, '41):

The yellow is a homebrew, I don't have MM Acryl's 04 yet so I mixed it from Tamiya, XF-3, XF-2, XF-64 and XF-7 (10:17:2:1). You'll notice the AB is splattering a bit, the acrylics never seem to go through as cleanly as enamels used to. maybe a bit of fine sanding is in order, the final clearcoats will help conceal unevenness, and I'll touch up the preshading too. I'll clean the AB thoroughly before I get to the camo, which will be MM Acryl for 74 and 75, and Tamiya homebrew 76. Next up, masking...

Cheers, M/TB379

http://worldinminiature.blogspot.com/

  • Member since
    June 2010
  • From: Austin, TX
Posted by DoogsATX on Friday, September 23, 2011 2:43 PM

deafpanzer

Doogs- Looking great especially the barrel!  I am not sure if its playing a trick on my eyes.  The barrel looks bigger at the end!  Stick out tongue

Loved the picture of Russian's anticraft system... did it really work?  Probably 1 in a million shot!

Andy - it's probably the iPhone at work. That's one thing about it - it shoots at a very wide angle. I use a 35mm lens on my Nikon, which in 35mm (film) equivalency is right around 50mm, which approximates how the human eye sees things. I'd venture the iPhone's lens is operating at something closer to 20-30mm. So it'll capture a wider area (I have to watch out for going past the posterboard), but it distorts the heck out of the subject sometimes. 

I love the antiaircraft pic, too! Would make an awesome diorama, wouldn't it?

On the Bench: 1/32 Trumpeter P-47 | 1/32 Hasegawa Bf 109G | 1/144 Eduard MiG-21MF x2

On Deck:  1/350 HMS Dreadnought

Blog/Completed Builds: doogsmodels.com


  • Member since
    April 2009
  • From: Carmel, IN
Posted by deafpanzer on Friday, September 23, 2011 11:03 AM

Doogs- Looking great especially the barrel!  I am not sure if its playing a trick on my eyes.  The barrel looks bigger at the end!  Stick out tongue

Loved the picture of Russian's anticraft system... did it really work?  Probably 1 in a million shot!

Andy

  • Member since
    December 2002
  • From: Bury St Edmunds, Suffolk, England
Posted by Bish on Friday, September 23, 2011 8:12 AM

Coming along nicely Doog. I am not a fan of Soviet armour, unless it is in German markings, so this one gets a thumbs up from me.

I am a Norfolk man and i glory in being so


On the bench: Airfix 1/72nd Harrier GR.3/Fujimi 1/72nd Ju 87D-3

  • Member since
    June 2010
  • From: Austin, TX
Posted by DoogsATX on Friday, September 23, 2011 2:20 AM

More progress on the KV-2. 

Fenders are mounted. Note to anyone who builds one of these (or I assume the KV-1) - install the triangle things BEFORE mounting the fenders. Ugh. So annoying getting those in.

Also got the metal barrel mounted. I was worried about having to cut the kit barrel and use its base to mount, but the metal barrel fits very snugly within it, with zero possibility for misalignment,

Not too much further to go on the basic buildup. Then its on to the friuls!

On the Bench: 1/32 Trumpeter P-47 | 1/32 Hasegawa Bf 109G | 1/144 Eduard MiG-21MF x2

On Deck:  1/350 HMS Dreadnought

Blog/Completed Builds: doogsmodels.com


  • Member since
    July 2008
  • From: USA California
Posted by vetteman42 on Thursday, September 22, 2011 11:06 PM

Thank you gentleman

Doogs I have used that trick a few times, and it worked very well for me btw. But I find this plastic sensitive to the tamiya glue I use so I opted to fill it with ca glue for strength and will putty over that. I just wicked the ca in so it set below the surface just enough for the putty. Should work out ok.

Kermit the engines in these kits SCREAM to be detailed they are gems I tell ya. Best of all it looks like things will work out with this build so I can display the cowl open or closed. Yeah

Randy So many to build.......So little time

  • Member since
    June 2010
  • From: Austin, TX
Posted by DoogsATX on Thursday, September 22, 2011 11:02 PM

The Atlantic's latest "WWII: In Focus" of wartime photography is up. Today - the Eastern Front. Totally worth a look.

http://www.theatlantic.com/infocus/2011/09/world-war-ii-the-eastern-front/100150/

Captured German tanks outside Stalingrad:

Soviet air defenses

Pretty great shot of a T-34 in Stalingrad from Jan. '43

Talk about a water crossing!

On the Bench: 1/32 Trumpeter P-47 | 1/32 Hasegawa Bf 109G | 1/144 Eduard MiG-21MF x2

On Deck:  1/350 HMS Dreadnought

Blog/Completed Builds: doogsmodels.com


  • Member since
    December 2002
  • From: Bury St Edmunds, Suffolk, England
Posted by Bish on Thursday, September 22, 2011 3:11 AM

deaf, look forward too seeing that Ausf J. And beer always works. I am just glad my modelling is better than my photography, other wise i would just give up.

I am a Norfolk man and i glory in being so


On the bench: Airfix 1/72nd Harrier GR.3/Fujimi 1/72nd Ju 87D-3

  • Member since
    June 2010
  • From: Austin, TX
Posted by DoogsATX on Thursday, September 22, 2011 1:18 AM

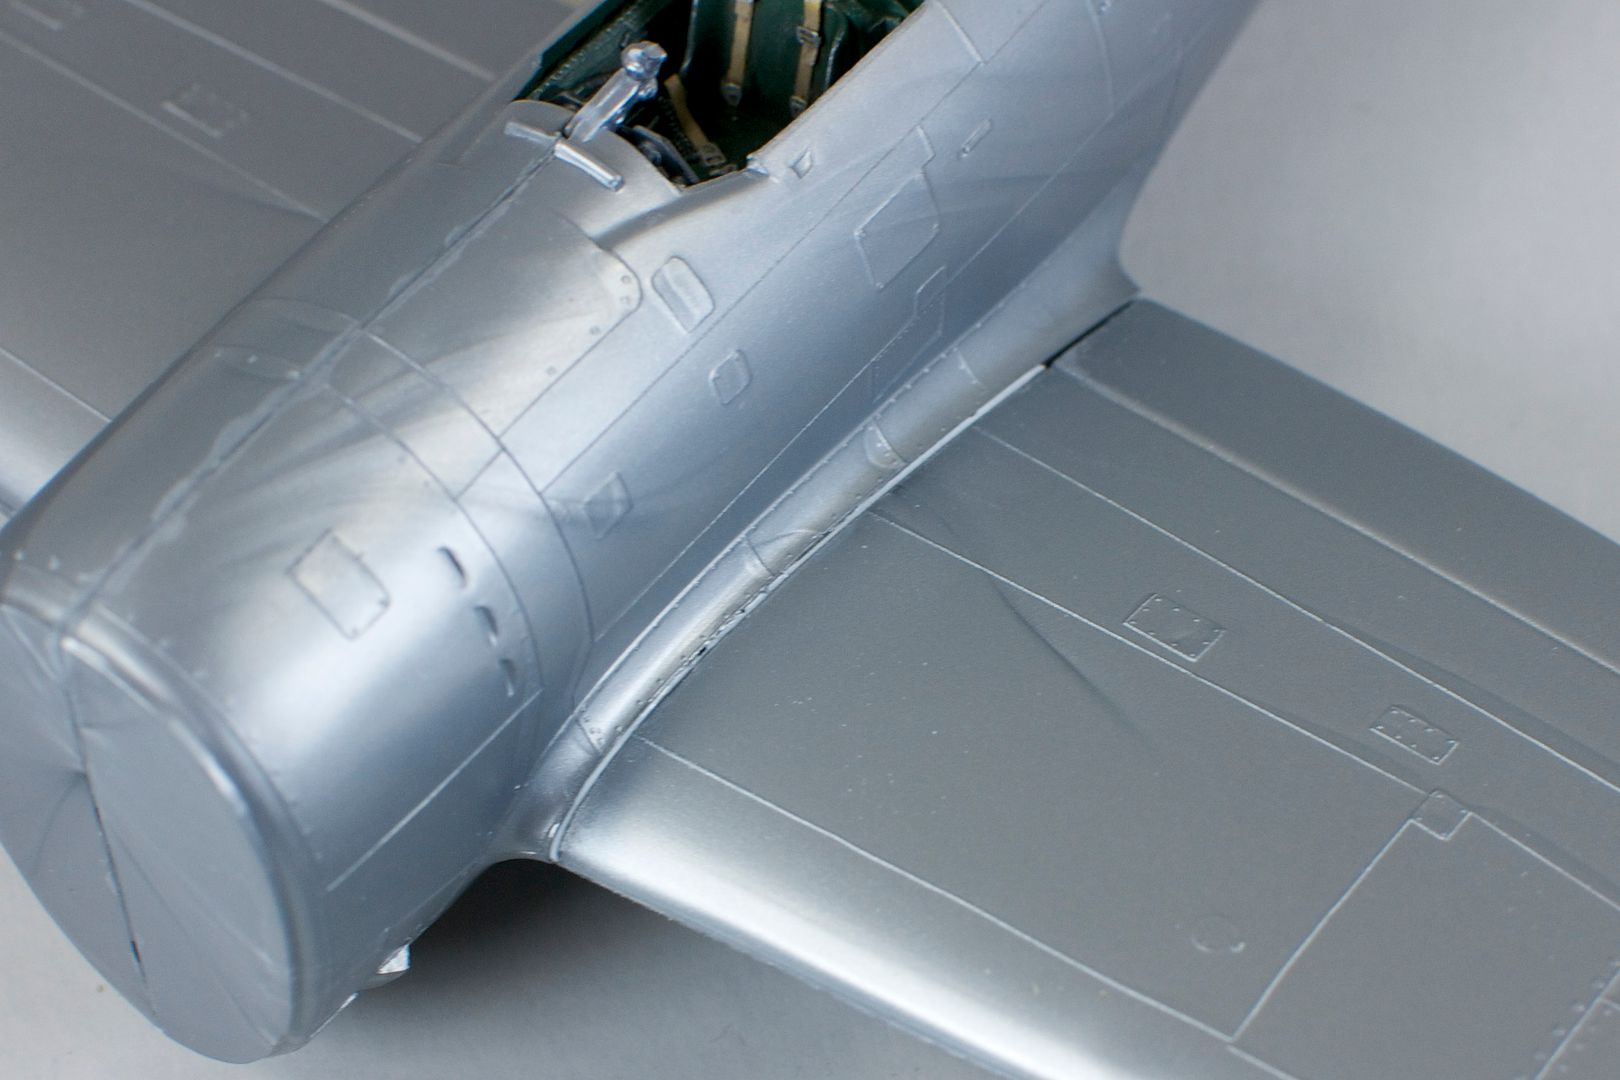
Randy - those are quite the wing gaps!

If I may suggest something to ease your pain at filling those? Get yourself some thin styrene strip, tack it along the wing side of the join, working in small sections bending it to the contour and welding it in place with Tenax or similar solvent. When you're done, test-fit, sand, test-fit, sand, etc until things line up.

I used this trick to great effect on Monogram's P-47 last year and it's now my go-to approach for all nasty wing gaps.

Not much to report on the KV-2. Got caught up in the small bits last night. 

Tonight, well, found out late this afternoon that my brother was in town for a conference, so I met him for a few beers, and that pretty much wrecked me for bench time. Then came across a letter from the insurance company this evening in a stack of unopened mail. Cancellation notice from early August. Nice! They've been sending me e-mail notifications for the last three years, so I'd basically offloaded keeping up with that. And this time they didn't send me one, and with the layoff and job hunt, it was pretty much the last thing on my mind. But yeah, that kinda wrecked my mood. Did get a small start on the friuls tonight, though, and with the wife and kids going out of town this weekend I should be able to make some good progress. If I don't run out of Tenax.

Speaking of Tenax...the LHS was out of it over the weekend, and they recommended some stuff called Plastiweld. Holy cow. Everyone says Tenax is really nasty stuff, but it's tonic water next to this stuff. The smell when I unscrewed the cap was like lacquer paint, lacquer thinner, turpentine and differential oil all rolled into one. Made my eyes burn. Yeah, not using that stuff. If I run out of Tenax and nobody's selling any at the show on Saturday, Great Models is sending me some that should arrive Monday, so the weekend can be happy friul fun time...

On the Bench: 1/32 Trumpeter P-47 | 1/32 Hasegawa Bf 109G | 1/144 Eduard MiG-21MF x2

On Deck:  1/350 HMS Dreadnought

Blog/Completed Builds: doogsmodels.com


  • Member since
    June 2009
  • From: Netherlands
Posted by kermit on Wednesday, September 21, 2011 11:49 PM

Randy,

Youre never too late and u can have a dollar and a beer on me anydayWink Beautiful detailing on that engine man! Wow.... Must have taken you awhile but i can see the v-man touch thereWink Excellent work!

And theres a nasty seam for you..... are you gonna fill it with styrene or do the multiple layer puttying? Read this trick from someone awhile back about saving up all the styrene scrapings you get when sanding and cleaning parts and make that into a styrene paste... Your pics just reminded me of that tip...

But anyway you go i am sure you will find a way to have the wings where you want em and nice and baby butt smoothWink

Richard

"Success is the ability to go from one failure to another with no loss of enthusiasm." - Sir Winston Churchill

  • Member since
    July 2008
  • From: USA California
Posted by vetteman42 on Wednesday, September 21, 2011 10:36 PM

Ok guys WIP time Surprise I know, I know, a day late an a dollar short but hey here they are.

Got the top of the engine all detailed, didnt worry about the sides as they can't be seen once it is installed. The magnetos and header tank were made on my lathe out of sprue. I even discovered I can index the chuck so drilling the holes for plug wires in the mags was a breeze. The coolant lines are .020 solder and the plug wires are .007 copper wire.

Sorry about my lousey drawing but you will get the idea. I had to remove up to .050 of plastic from these surfaces so the wing would sit where its supose to. There is no step at the wing root now but as you will see I have some gaps to fill. This plastic is very very soft and sands quickly so care must be taken, learned that trick on my MiG-3 the hard way.

Thats all for now, hopefully I will have more soon. On to the chin, cowl and, radiator, then the tail planes.

Randy So many to build.......So little time

  • Member since
    July 2008
  • From: USA California
Posted by vetteman42 on Tuesday, September 20, 2011 2:13 PM

Kermit did I say Yak-3 ?? Oops Embarrassed

Yes those screen shots answered my question perfectly. Just as I thought closing the wingroot gaps will cause the model to have excessive dihedral so I will have to fill them. Thank you my lil green buddy.

WIP pictures this evening

Randy So many to build.......So little time

  • Member since
    June 2009
  • From: Netherlands
Posted by kermit on Tuesday, September 20, 2011 2:03 PM

V-man,

Froggie to the resque!Wink

I did have to take a look at the rollcall to see what plane you were referring to. Just to get it straighth.... Wasnt it a Yak7 you were building and not the yak 3? If i am wrong i can take some new screens....

But anyways. Took a moment to fire up Il2 and take a few specific screens of the Yak 7A for you:

This sim is usually pretty darn accurate, even with interior colors so i take it this will be no different. To me it seems like theres no angle the wings have to the fuselage or very littleSmile

Hope it helped a little Randy. Lemme know if you need more or different pics.

Richard

"Success is the ability to go from one failure to another with no loss of enthusiasm." - Sir Winston Churchill

  • Member since
    July 2008
  • From: USA California
Posted by vetteman42 on Tuesday, September 20, 2011 1:25 PM

Kermit those ICM kits are a challange for sure, gotta learn to think a differant way it seems when building them. Lookin good so far my friend.

Doogs I too like the KV tanks, lookin forward to seeing what you do with yours.

I am hoping to have a few pictures of the Yak this evening. Does anyone here know if the Yak 3 had a bunch of dihedral in the wing ? When I pull the wing up to where it should be it seems excessive to me. I havent been able to find any pictures of one on the net showing the full wing from the front.


Randy So many to build.......So little time

  • Member since
    November 2009
  • From: LaSalle, Ontario, Canada
Posted by bouttime on Tuesday, September 20, 2011 11:00 AM

Doogs,

I have been following your work and must say it is outstanding!


Kermit,

Great to hear there will be round 2.

I'm thinking for something different I will do the Italeri Carro Armato L6/40 from the Regia Esercito LXVII Battaglione Bersaglieri in Russia 1942.


Jeff


  • Member since
    June 2010
  • From: Austin, TX
Posted by DoogsATX on Tuesday, September 20, 2011 7:58 AM

Andy...those late-war Panzer IV J's have some sweet camo. Kinda makes you wonder where the Germans' heads were at!

Got started on the KV-2 last night. So far...it's a pretty solid kit. I'm obviously a bit spoiled with my recent Dragon/Cyber-Hobby/Tasca builds, and there is a significant step in quality between those and the Trumpeter. But IMO the KV is better by the same degree than the AFV Club Achilles I built. 

Biggest (but slightly frustrating) problem I've encountered so far has been the fit of the upper decks onto the hull pan.

Here's where it's at so far. The fenders and turret are test-fitted, as are the suspension arms (I'm waiting to glue those down until after painting). And oh, this sucker is BIG! Once it's a bit further along, I'll have to shoot it next to something else to give the scale. But geez. HUGE.


On the Bench: 1/32 Trumpeter P-47 | 1/32 Hasegawa Bf 109G | 1/144 Eduard MiG-21MF x2

On Deck:  1/350 HMS Dreadnought

Blog/Completed Builds: doogsmodels.com


  • Member since
    April 2009
  • From: Carmel, IN
Posted by deafpanzer on Monday, September 19, 2011 12:31 PM

Richard- Many thanks!  I will add the GB badge when I have the chance.  Glad you enjoyed my WIP and thank you for hosting the GB.  I am hosting one right now for Panzer IIIs and I realize it requires more work but I have been enjoying it. 

Your panther is coming out real good! Yes  Looking forward to see it with paint next...

Bish- I still admire the paint scheme... glad I went for this.  You remembered the first scheme I wanted but with Manny's he stated that it was used during late war not in Russia so it was out.  That what lead me to use this scheme...

I still want to do the dots scheme one day on my future build Pz IV Ausf J I have in the stash.  I am glad I am not alone about those high tech cameras.  I am going to contact my friend who is a professional photographer to help me out.  I am sure he will accept several beer in lieu of cash...

Doogs- OHHH!  I always liked those KV-2 tanks because it reminds me one of those sci-fi armors... but I don't think I will ever build a Russian tank.  Not my thing... you have my attention once again.


Andy

  • Member since
    June 2009
  • From: Netherlands
Posted by kermit on Monday, September 19, 2011 10:31 AM

Doogs,

I agree the chains look very fitting on that juggernaut. Wonder what they were used for though... Maybe this vehicle had been used as towing truck...? Sure would be something to see the repo-man drive up in that rideStick out tongue.

Are you sure that KV is painted pz.grey and not russian green? It is so hard to tell from b&w pics but i guess the panzer grey makes more sense as it is a captured tank...

Anyways, i can tell you have some very interesting plans for this one and personally can't wait to see your progress pics!

Richard

"Success is the ability to go from one failure to another with no loss of enthusiasm." - Sir Winston Churchill

  • Member since
    June 2010
  • From: Austin, TX
Posted by DoogsATX on Monday, September 19, 2011 2:22 AM

Well, I don't see anything about it to inspire hate yet... Huh?

However, the Aber barrel's going to require cutting the kit part, which should be fun! I was also thrown by the presence of drive sprockets in the friul pack. They won't fit on the Trumpy mounts, but a bit of googling has revealed that they're designed to fix the incorrect sprockets on the Tamiya kit (which I also have), and the kit ones should work fine with the metal links.

I've also been looking around on Google at captured KV-2s, and found the one on the box.

But I also found this one, which strikes me as fascinating...

I know the Panzer Gray is a lot more boring than the tri-color, but those chains are awesome and random!

On the Bench: 1/32 Trumpeter P-47 | 1/32 Hasegawa Bf 109G | 1/144 Eduard MiG-21MF x2

On Deck:  1/350 HMS Dreadnought

Blog/Completed Builds: doogsmodels.com


  • Member since
    June 2009
  • From: Netherlands
Posted by kermit on Sunday, September 18, 2011 3:08 PM

Doogs,

You have NO idea how much it pleases me to see your take on trumpy's KV2. Some hate it, some like it. And me personally i adore this kitSmile Cheap...simple....but rather accurate and really easy to build up. The friuls are bound to give this beast the sag it needs on those heavy tracks.

Would love to hear your thoughts on the kit.

Richard

"Success is the ability to go from one failure to another with no loss of enthusiasm." - Sir Winston Churchill

  • Member since
    June 2010
  • From: Austin, TX
Posted by DoogsATX on Sunday, September 18, 2011 2:31 PM

Looking good, Richard! I agree, that suspension is weird! I really need to learn more about German armor.

Also...I'm about to give you some company! Packing up the bench, so right now I'm limited to building tanks up to the paint stage. Who knows how many I'll build between now and Thanksgiving-ish?

But next up is Trumpy's KV-2 in German service.

Same old hideous KV-2 we all know and love, with German-cool paint scheme! I've even got a set of friuls for this bad mother. And a metal barrel. 

I'll probably kick her off tomorrow...have to finish up the VVSS bogies on the Tasca Sherman first, and I'm guessing that'll take most of tonight.

On the Bench: 1/32 Trumpeter P-47 | 1/32 Hasegawa Bf 109G | 1/144 Eduard MiG-21MF x2

On Deck:  1/350 HMS Dreadnought

Blog/Completed Builds: doogsmodels.com


  • Member since
    December 2002
  • From: Bury St Edmunds, Suffolk, England
Posted by Bish on Sunday, September 18, 2011 10:43 AM

Coming along nidcely Richard. Nice to see one of these kits get built up and get some pointers, you see many ICM kits.

I am a Norfolk man and i glory in being so


On the bench: Airfix 1/72nd Harrier GR.3/Fujimi 1/72nd Ju 87D-3

JOIN OUR COMMUNITY!

Our community is FREE to join. To participate you must either login or register for an account.

SEARCH FORUMS
FREE NEWSLETTER
By signing up you may also receive reader surveys and occasional special offers. We do not sell, rent or trade our email lists. View our Privacy Policy.