SEARCH FINESCALE.COM

Enter keywords or a search phrase below:

Hunting After Dark, 2011-2012 Night Fighter Group Build

251623 views
1422 replies
1 rating 2 rating 3 rating 4 rating 5 rating
  • Member since
    June 2010
Posted by Night Fighter Nut on Thursday, October 4, 2012 8:17 AM

Thanks Trey.  Before you continue, which version of planes are you going to do, an A model or B?  I have a lot or reference material for both.  This kit has the cowl flaps open on one side and closed on the other.  Will you be switching cowlings between the planes?  How detailed do you want to get?  I'll get you the information you need.  

Cheers..

  • Member since
    August 2009
  • From: Borlando Fla home of the rat
Posted by TREYZX10R on Saturday, October 6, 2012 2:51 PM

NFN I'm going to do B's with turrets. I've got some aftermarket goodies coming to remedy the engine cowls and props. I want to do a dio wth one on the ground and the other doing a low level fly by. Do you know if there were olive drab B's with a turret. Would be neat to do one of each color . I'm also curious about the interior colors any input would be great Thanks Trey

  • Member since
    June 2010
Posted by Night Fighter Nut on Saturday, October 6, 2012 3:22 PM

P-61B's all came in shiney black.  For a great reference for the RO compartment, go to MAAM.org.  The Mid Atlantic Air Museum is currently restoring a P-61B and there are tons of what a P-61B looks like.  For the plane on the ground, the cowling flaps would be open.  For the plane in the air, the flaps would be closed.  If you are doing the Eduard photo etched exterior, be careful because part of what they did is wrong for this plane.  The kits themselves are molded after the P-61A.  What other references do you have?

  • Member since
    August 2009
  • From: Borlando Fla home of the rat
Posted by TREYZX10R on Saturday, October 6, 2012 7:41 PM

Thanks NFN I saw that web site while searching for pics,great restore project! No I've got the old non painted Eduard interior upgrade and just some replacement cowls. Do you know if the A version in olive drab with the turret served in the Pacific alongside the B? I have very limited reference on hand just a few pics from some google searches,very little interior color shots. I'm geussing from what I've seen the interiors were mainly green zinc in color not the yellow zinc shown on the restore project?

  • Member since
    June 2010
Posted by Night Fighter Nut on Saturday, October 6, 2012 9:13 PM

Yes, the A in Olive Drab did serve in the Pacific along side the B's. I have a couple of books I read that talk about the history of the P-61.  It also has a list of serial numbers and what the mods were associated with them.  I also was given a cd with Black Widow information from Airframes (Terry).  The Black Widow interiors were Zinc Chromate Green, both front and back areas.  A lot of the "A"s had their turret removed because of buffeting but there were some that kept them for the fire power forward.  I have tons of photos I've found over the years of P-61 on the internet.  Just let me know what area you want to start on and I'll see what I have.  One area you will not see but in only one picture is just behind the pilot's seat.  There is a push lever to the back right that connect to some cable and allowed the pilot to tilt his chair back while in flight so that he could parachute out if he had to.  Hope this helps.

  • Member since
    June 2010
Posted by Night Fighter Nut on Saturday, October 6, 2012 9:14 PM

Which planes in particular do you want to do?

  • Member since
    August 2009
  • From: Borlando Fla home of the rat
Posted by TREYZX10R on Saturday, October 6, 2012 9:44 PM

NFN thats great info already thanks! I'm not sure yet about  which particular aircraft but have a decal sheet with multiple options on the way. I 'm really hoping to find a B and A that would've shared the same airfield. A pic of the interior would be great to start. I'm also curious as to what color the insides of the gear bays,eng cowls,radar area ect. in the nose would've been and were they the same on both A&B? I was aware of the Turret being deleted and also that it was later redesigned to address the buffeting problem,was there a major outward appearrance between the 2 designs?Thanks again for the help and sadly you're pics are no longer up on the thread. Cheers Trey

  • Member since
    June 2010
Posted by Night Fighter Nut on Sunday, October 7, 2012 11:13 AM

If memory serves correctly, Any place the crew resided, (cockpit, and R/O compartment) was Zinc Chromate Green, the Wheel wells were Zinc Chromate yellow.  Give me a list of the decals you have and I'll look the up in my references and tell you which ones shared the same airfield if any.  As for pics on the thread, I know that you also frequent ww2aircraft.net.  You will find all my pictures and what I did posted in the group build area, common wealth/ nightfigher build.  It's listed under Nocturnal Nemesis.  The pictures are visible when you are signed in.  Following the directions, your first part of the build after fitting is the chairs.  Fishing/aquarium plant weights and epoxy stick will weight down the nose.  As you build the plane, just keep in mind that not all the weight needs to be in the nose.  As long as the weight is in front of the rear wheels, it will work.  That means directly behind the wall behind the gunners seat and just behind the engine bulkheads are open for weight.  Weight can also be added between the cockpit floor and the gun bay beneath.  I'll find some pictures to send now.

  • Member since
    June 2010
Posted by Night Fighter Nut on Sunday, October 7, 2012 12:01 PM

Just to clearify on the zinc chromate.  Green was in the front wheel well, yellow was in the side wheel wells.

  • Member since
    August 2009
  • From: Borlando Fla home of the rat
Posted by TREYZX10R on Sunday, October 7, 2012 2:54 PM

Thanks again NFN I'll post up a pic of the decal sheet when it arrives!

  • Member since
    August 2009
  • From: Borlando Fla home of the rat
Posted by TREYZX10R on Tuesday, October 9, 2012 7:41 PM

Some interior painting completed

Pilots seat detail scratched in support and release lever

Hate having to work around fixed gear early in the build process so I notched one side of the gear mounting point ,this will allow me to instal the gear after glueing the boom halves. Less chance of damage and easier to finish !

Since one build will be gear up fitted the doors closed on a set of booms,pretty nice fit actually,required very little sanding to get a snug fit. I also went ahead and removed the seams and blemishes,filled with some thinned Green putty and finished with 1000 wet .

  • Member since
    June 2010
Posted by Night Fighter Nut on Tuesday, October 9, 2012 8:34 PM

Nicely done.  :)

  • Member since
    August 2009
  • From: Borlando Fla home of the rat
Posted by TREYZX10R on Saturday, October 13, 2012 9:53 PM

I'de given up waiting for my interior upgrade to arrive it was tracked to the local post office and then vanished. So right after glueing the fuse halve together it turns up today  along with the decals that I ordered. To add insult to injury the decals are for some 1/32 scale jet! Oh well I perservere on and this is how far I've gotten.


The Pilot and crew are a mixed bag from different kits so they had to be tweaked a bit
Before

after

the rest of the Crew

  • Member since
    August 2009
  • From: Borlando Fla home of the rat
Posted by TREYZX10R on Sunday, October 14, 2012 3:49 PM

First dry fit of the sub assemblies on ship 1

Nose gear doors in place

I've put off the dreaded Canopy fit issues long enough so here goes. Strips of styrene added and more will be needed.

The very front port side also has a very nasty gap and to make it even more fun its not even across the join.

Cut and filed to shape

The rest can now be fixed with a small bead of Green putty


  • Member since
    June 2010
Posted by Night Fighter Nut on Monday, October 15, 2012 9:29 AM

Very good.  I'm thinking of adding a crew to one at some point as well.  check out Zotz decals for some other P-61 decals.  I know they did have a release some time ago.  I believe other companies have started releasing more decals as well.  I still have a few sets in my stash but some didn't have turrets.

  • Member since
    October 2009
  • From: Texas
Posted by Gregbbear on Monday, October 15, 2012 7:07 PM

Looks good Trey.  I've always wondered why nobody in the after market has designed a fix for some of the P-61's problems??? 

I would like a P-61 (or two) in my collection, but I just don't have the room to display 48th scale beasts.  One would look nice next to my P-70....

Cheers,

Greg

- yat yas!


  • Member since
    June 2010
Posted by Night Fighter Nut on Tuesday, October 16, 2012 8:17 AM

It has finally arrived.  The P-61A from Great Wall, 1/48th scale.   :)  Looking it over it looks very nice.  I did note some incorrect or incomplete parts but over all it looks very nice.  :)  Decals feature either Lady Gen or Sweaten Wally.  Hmmmm which do I want to do next.?  I know, first finish the Russian plane.  I should have a lot of time this weekend to work on the Pe3 Bis.  :)

  • Member since
    August 2009
  • From: Borlando Fla home of the rat
Posted by TREYZX10R on Tuesday, October 16, 2012 8:31 PM

Greg thanks I did see a replacement canopy on evil bay but it was in Russia and costs $27 + the same for shipping!!! I decided to just deal with the Demon I know.

NFN Thank you as well,and ca'nt wait to see you work your magic on the Great wall offering!

I continue to battle the ill fitting canopy. I've made it worse by having one in flight as the pilots upper section has a gap all around. The part literally just falls through the opening,not even close to being a fit!

I've used foam safe ca to glue some styrene strips around the edges

The front strip wound up not being needed

The crew is now in place

Some serious tedious cleaning up is going to be needed,I need a break for a pint(or 2)

Ship 2 canopy is up next and as it will have the hatches in the open position it should go quicker(I hope)

  • Member since
    June 2010
Posted by Night Fighter Nut on Wednesday, October 17, 2012 1:14 PM

The glass over the pilot was hindged on one side with something like a piano hindge.  That's why they made it the way they did.  I've tried to use stretched sprue to make something like the piano hinge to take up that gap on one side.  I'll try to check some other references.  You're still doing very well Trey.

  • Member since
    February 2003
  • From: Rothesay, NB Canada
Posted by VanceCrozier on Wednesday, October 17, 2012 1:28 PM

(hmmm, I've kinda lost track of this one!) Trey - building a pair of Black Widows at the same time?!?! Where do you put all these things when you're done?!?! Looking good, nice workaround on the the framing.

On the bench: Airfix 1/72 Wildcat; Airfix 1/72 Vampire T11; Airfix 1/72 Fouga Magister

  • Member since
    June 2010
Posted by Night Fighter Nut on Wednesday, October 17, 2012 1:42 PM

I just thought...  you probably mean the gap between the front and back of this cover.  The best way I did this was biasing the cover toward the rear and filling in the front part with stretched clear sprue.  I seem to remember that there was a small window in that area.  The extra stretched sprue would act as a frame edge to the rounded glass part.  Still it's tricky.  Looks like you're doing just fine.

  • Member since
    August 2009
  • From: Borlando Fla home of the rat
Posted by TREYZX10R on Friday, October 19, 2012 4:02 PM

Vance thanks space is running a bit sparse now,going to have to expand my shelf space for sure.

NFN thanks it has been a fight getting this canopy in place ,think I've got it whipped(almost)

I've gotten the canopy in place and filled the gap at the front with green putty

Next I masked off the canopy and added more green putty to cure the step on the starboard side

after sanding,then masked again and applied some testors flat black enamel to the area

this filled in the minor defects and its on its way to being ready for some added sub assemblies now

  • Member since
    August 2009
  • From: Borlando Fla home of the rat
Posted by TREYZX10R on Sunday, October 21, 2012 9:07 PM

I'm on to tackling the engines ,first the gear up booms. I ordered some a/m resin nacelles and thought they came with the end adjustable cooling cowls as pictured in the ad(not!) be forwarned ordering stuff ask questions!
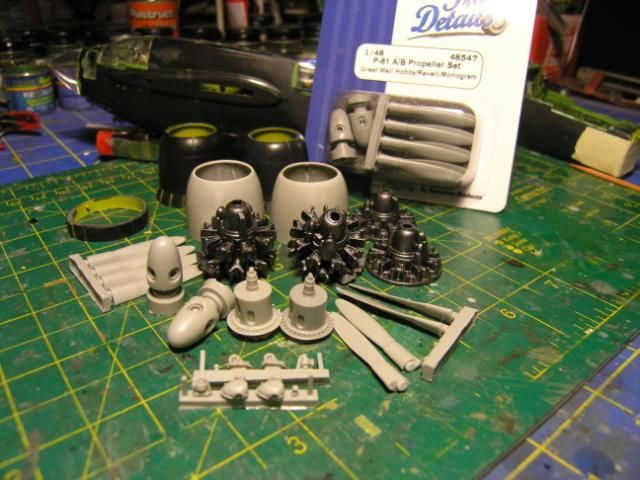
 

they also need lots of sanding and trimming,even had to remove a blob of resin that dribbled down each side,hey at least it was the same on both parts!

Next I had to do some surgery as the kit supplies an open and closed cooling cowl on each boom,WHY!?

Card stock added over the lower cowl area,later I'll add some mesh back in

Closed cowl from the gear down boom needs a plug to get the correct length back and a strong glueing point

The cowl ring side needs the same

Trimmed and sanded

Glued in place with the better looking side turned out.the blems will be sanded out later. I left the nasty ones inboard so they wo'nt stick out as bad.

I'm starting to get a grip on ship 1,now I need to research the engine mounting detail and figure out how much ship 2 cowls will be opened up, if at all! I really want to have an engine in mid removal for the finished build but wondering how authentic i can make it look. Any pics of an engine removal would be great not having much luck finding any on line.


  • Member since
    August 2009
  • From: Borlando Fla home of the rat
Posted by TREYZX10R on Monday, October 22, 2012 9:39 PM

Next up prepping the cowls and engines . The kit supplied engines were too small in diameter for the new cowls causing them to sit too far forward. I remedied this with a strip of tamiya tape around the engine base then ca glued it in place once I was sastified it was square.

While that cured I started adding the resin bits to the other engines. Required some minor surgery but a straight forward modification. Cut away the area to be replaced and sanded to fit.

Engines ready to mount on ship 1 booms,the other engines need more work yet.

Ca glued in place ,there are a few small gaps to fill and some sanding yet to be done


  • Member since
    June 2010
Posted by Night Fighter Nut on Wednesday, October 24, 2012 5:43 AM

Great work Trey!  :)  I have a couple of pics on the engine itself.  I know the Mid Atlantic Air Museum has a shot of the engine outside the widow.  It was in the process of being renovated.  All other pics I have show the nose cone off and being worked on.  I may have one in a book but I need to get back to you on that one.

  • Member since
    August 2009
  • From: Borlando Fla home of the rat
Posted by TREYZX10R on Wednesday, October 24, 2012 7:07 PM

Thanks NFN that would be a big help! The pics on the MAM site just do'nt show enough detail at this point for an engine instal.


Ship 2 canopy time,same as the first set with the exception of the open hatcehs. Surprisingly this seems to fit a bit better than the other one . I'm geussing not having the canopies closed leaves enough free surface area for the assembly to flex more?


Decided to start working on the Eduard resin wheels,must say these things are nicely cast.


Next up the dreaded canopy mask session!

  • Member since
    June 2010
Posted by Night Fighter Nut on Thursday, October 25, 2012 5:26 AM

www.warbirdsandairshows.com/.../reading-2011.htm

This site will help a little. Also this

Northrop P-61 Black Widow night fighter cutaway

  • Member since
    June 2010
Posted by Night Fighter Nut on Thursday, October 25, 2012 5:30 AM

As for the canopies, it usually has to do with the molding of the aircraft halves.  This is an old mold and were talking several thousand casts made from these molds.

  • Member since
    April 2011
  • From: Caput Mundi (Rome,Italy)
Posted by Italian Starfighter on Thursday, October 25, 2012 8:14 AM

Treyzx10r:......good work on both models.....!!Enrico.

http://img.photobucket.com/albums/v381/tigerman12/ThatsAmoreGBBadge.jpg


  • Member since
    August 2009
  • From: Borlando Fla home of the rat
Posted by TREYZX10R on Saturday, October 27, 2012 10:17 PM

NFN thanks thats a great link,I suppose you're right about the mold being used so much did'nt take that into consideration!

Enrico appreciate the kind words!

Wing s for ship one have the flaps up and ready to mount onto the pod.

Canopy masked

Starting to gather up some equipment for the Dio

JOIN OUR COMMUNITY!

Our community is FREE to join. To participate you must either login or register for an account.

SEARCH FORUMS
FREE NEWSLETTER
By signing up you may also receive reader surveys and occasional special offers. We do not sell, rent or trade our email lists. View our Privacy Policy.