SEARCH FINESCALE.COM

Enter keywords or a search phrase below:

5TH ANNUAL SECRET SANTA GROUP BUILD - Santa's Ace

16560 views
179 replies
1 rating 2 rating 3 rating 4 rating 5 rating
  • Member since
    May 2009
  • From: Hobart, Tasmania
Posted by Konigwolf13 on Sunday, January 2, 2011 6:55 PM

Australia Post have told me they have just recieved some delayed presents from Santa and they should be able to deliver mine tomorrow. Yay

Andrew

  • Member since
    May 2009
  • From: Hobart, Tasmania
Posted by Konigwolf13 on Tuesday, January 4, 2011 2:51 AM

Received mine today

Tamiya F-51 Korean War Mustang With Aero Master AM decals.

My Santa was DiscoStu whom I thank very much for my first set set of AM decals.

Andrew

  • Member since
    June 2008
  • From: Iowa
Posted by Hans von Hammer on Monday, January 10, 2011 12:14 AM

Well, it's on the bench and the Hurri's construction has started with the cockpit... So far, I've added the harness and a seat cushion made from some A+B putty...  I also cut out the molded-in radiator "screen" from the rad intake, and then added a piece of brass screen in it's place (I buy 11 x 14 inch sheets of the fine brass mesh sold for making book covers and such), and also added a slice of brass tubing on it's face for the oil cooler intake... Here's the actual radiator:

The Huricane's aluminum tubing airframe makes for some interesting construction in the cockpit... There're just some molded-in "tube" details instead of the proper A-frames that hold the fuel selctor switch, rudder-trim controls, gear/flap levers etc., but that's an easy fix with some stretched sprue... Here's the actual 'pit:

I'll get some WIP-pics posted soon.. I want to document this one rather closely as it's easily my "favorite" kit right now...


  • Member since
    December 2003
  • From: Prince George B.C., Canada
Posted by Bullet21 on Tuesday, January 11, 2011 8:46 PM

Glad to hear you like the kit Hans. We don't have much of a LHS here, and they tend to lean towards the RC fanatics, but they are slowly getting some modeling and train stuff. That was the only kit in the store in that scale. Are you going with that Hurricat idea? Sounded like a cool idea.

Cheers

 Keep SmilinLiberation of Western Europe'--it makes this world a nicer place.

  • Member since
    June 2008
  • From: Iowa
Posted by Hans von Hammer on Wednesday, January 12, 2011 9:16 PM

Love it, and thanks again, Bullet...

Too soon to tell if I'm gonna stick with the Hurricat plan... I went uptown today and my regular "Mom & Pop LHS is closed up tighter 'n a tick... Not a warning at all, didn't see it coming either... No one's answering the phone, not even a machine, and that was my local Plastruct source, which has the catapault materials I wanted..

I'll have to decide soon though, as there're some modifications I have to make to fuselage, both for the A-frame tailhook and the cat spool...


  • Member since
    December 2009
Posted by ww2psycho on Sunday, January 16, 2011 12:57 AM

Well I origonally planned on doing the P-39 first, but after test fitting the fusalage to the wings Ive noticed a big fit problem. I'm going to take some time to figure out wha to do. while I do that Ive started work on the zero. I have the cockipit done and I have glued the fusalage halves together, I willt try to get pics up tomorrow.

  • Member since
    September 2008
  • From: World Champions! Not anymore..
Posted by swingr1121 on Sunday, January 16, 2011 11:41 AM

Hans:  That doesn't sound too good about your LHS.  I know that one of mine is going to weekend only hours starting next month.  I'm not too happy about that as I would stop in from time to time while I was at work driving around.  Speaking of which, I picked up a mid 90s release of the Monogram P-38 for $7 while I stopped on Friday.  It's a shame that it too will probably be gone before too long.


WW2Psycho:  As far as the fuselage fit is concerned, I would do a search for some builds of that kit.  I'm actually building it right now and I used a piece of sprue as a spreader down near the wing to fuse join area.  Unfortunately I don't believe I have any pictures of it at this time.  Basically, the idea was to keep the fuse wide near the bottom so there was virtually no wing gap.  


Does anyone know a source for some aftermarket decals for the F8F Bearcat?  When I opened the box I found that the decal sheet had more or less fused to the plastic bag that the parts were in.  Needless to say, there was nothing I could do to salvage them.  

  • Member since
    March 2010
  • From: New Zealand
Posted by Scorpiomikey on Sunday, January 16, 2011 2:03 PM

http://www.hannants.co.uk/search/index.php?product_category_id=&product_division_id=&manufacturer_id=&code=&product_type_id=all_decals&scale_id=&keyword_search=f8f&setPerPage=25 th

theres a few there, not sure if its quite what your after though. With hannants if your just ordering decals (ors tuff that fits in an envelope) they dont worry about the 30 pound export minimum order.

"I am a leaf on the wind, watch how i soar"

Recite the litanies, fire up the Gellar field, a poo storm is coming Hmm 

My signature

Check out my blog here.

  • Member since
    June 2008
  • From: Iowa
Posted by Hans von Hammer on Saturday, January 22, 2011 2:40 AM

Dies it have to be F8F decals? There're a number of generic US Navy "Stars & Bars" sets out there...  If you need something specific, like Post-war US Navy Reserve markings or such, then you might have a tough time, but most Bearcats didn't have much in the way of special markings, outsde some ID numbers/letters, and the BuNo... 

SNJs and P-51s have the same sized US markings as the F8Fs...  Unless you're going French or Vietnamese, you should be able to scrounge some up... If you have a problem though, contact me back-channel and we'll see what I got in the spares box... I think I have a spare set of Navy Reserve markings since I did mine as a Blue Angels'  "Number One" and the other as the  "Beetle Bomb" all-yellow Bearcat...


  • Member since
    September 2008
  • From: World Champions! Not anymore..
Posted by swingr1121 on Sunday, January 23, 2011 12:53 PM

Hans, thanks for the info.  I'll check to see what I have available.  i know that I've got 2 of the R/M T-6 kits so I'll definitely have some spares from those.  If I have any trouble finding something I'll be sure to say something.  Thanks Hans!

  • Member since
    June 2008
  • From: Iowa
Posted by Hans von Hammer on Sunday, January 23, 2011 1:10 PM

No sweat, Pard... IIRC, there's two sets of US insignia for that one...  Either set will work on the Bearcat since it was in service before 14 January 47, when the red bars were added to the national insignia...

Now, boys & girls,  have some progress to report on the "Hurricat"...

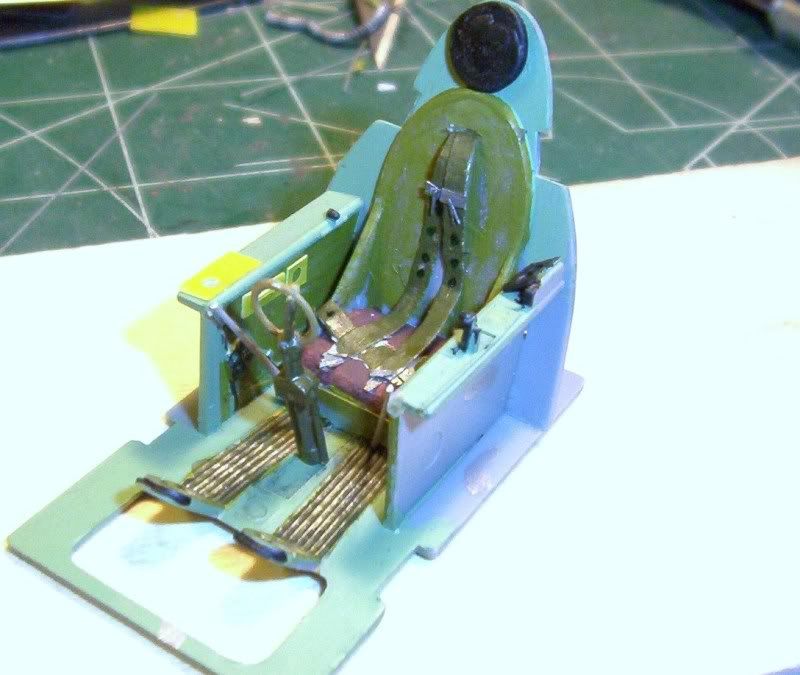
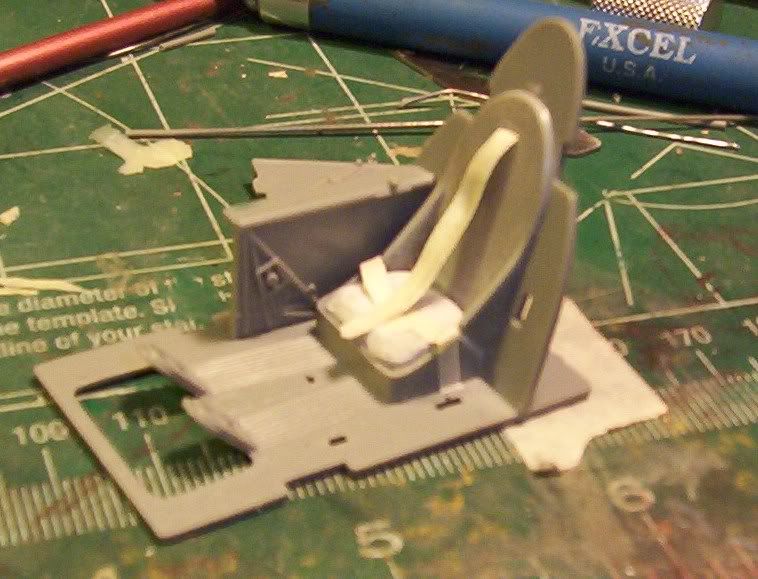
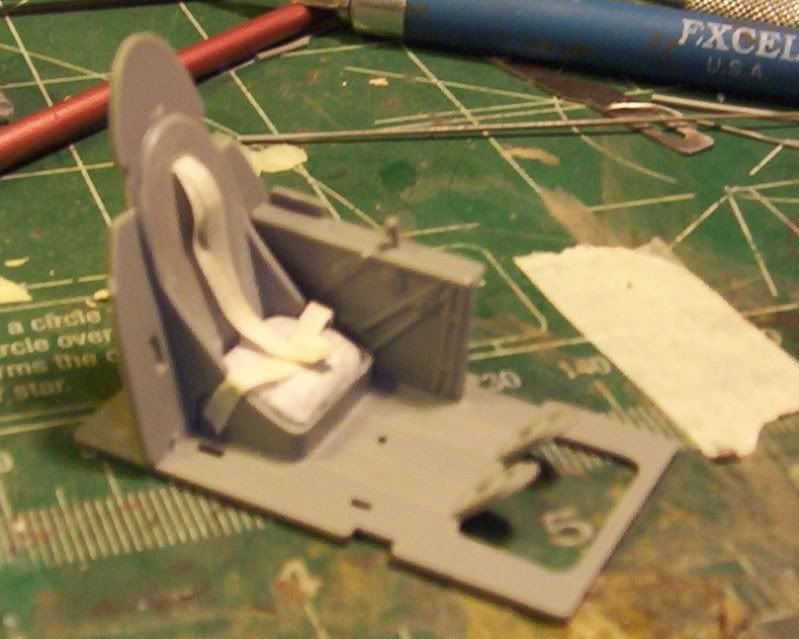
I've finished up with the cockpit (almost)... I got a little crazy on the amount of interior detail I added, since once the pit's closed up, most of the sidewall detail will be impossible to see without actually handling the aircraft..Indifferent  The tubular aluminum framing of the foreward part of the Hurricane lent itself to some unique mounting points for the fuel selector and flap/gear controls, so I added the "A" frame-pieces for that stuff , since the kit parts are molded flat onto the cockpit sidewalls as 2D detail, and I wanted 3D in order to show it off more accurately.  I started by sanding off the seat-pans's  molded-on harness detail, which was pretty poor anyway... Here's the 'pit with the naked sidewalls and it's 2D landing gear, flaps, and windscreen de-icing controls and the start of the masking tape seat harness.

I drilled a series of holes in a straight line across the back of the seat-pan, then cut them into a slot to pass the shoulder-harness through.
 I made some stretched-sprue tubing for the oxygen supply lines, added "garage-sale sign" sheet-styrene O2 regulator, lamp rheostat with a "salami-sliced" piece of sprue for the knob, the cockpit lamp, etc, on the port side, and an epoxy putty map case, some switch panels, and a GNDN (Goes Nowhere, Does Nothing) wiring harness on the starboard side, as well as other fiddly-bits, just to busy things up a bit more. The fuel selector switch goes onto that frame on the left side... I also added some flattened solder buckles and hardware to the seat harness:
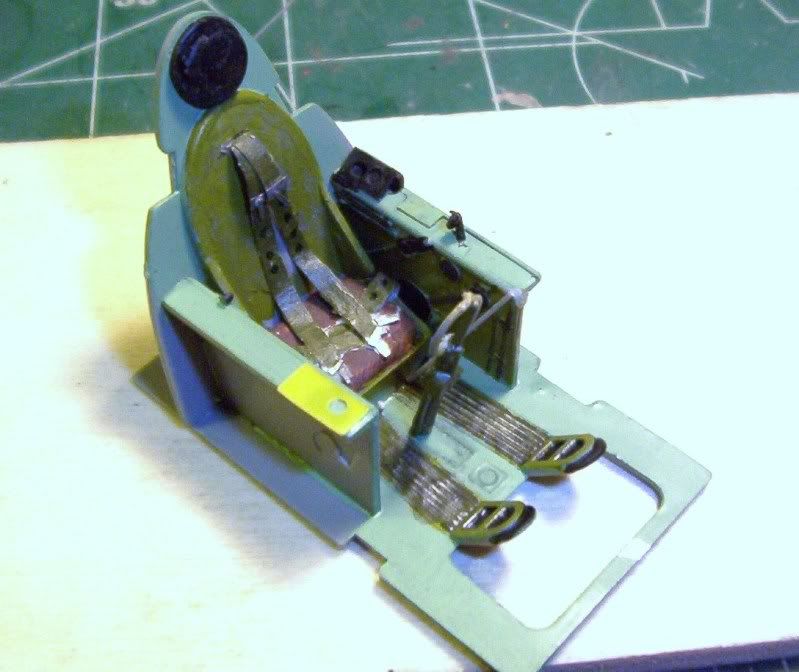


 I added a padded headrest made from Sculpy Clay. Since the kit is an RAF Mk IIC, but the "Hurricat" is a Mk IA Sea Hurricane which is catapault-launched, we needed the headrest to keep our hero from crackin' his gourd on the rear bulkhead during a launch.  Since the photos were taken, I've also added a hand-hold forward of the throttle quadrant (to keep the pilot from inadvertantly pulling the throttle back on launch), which was re-done as well to a little higher degree of detail than the kit's.
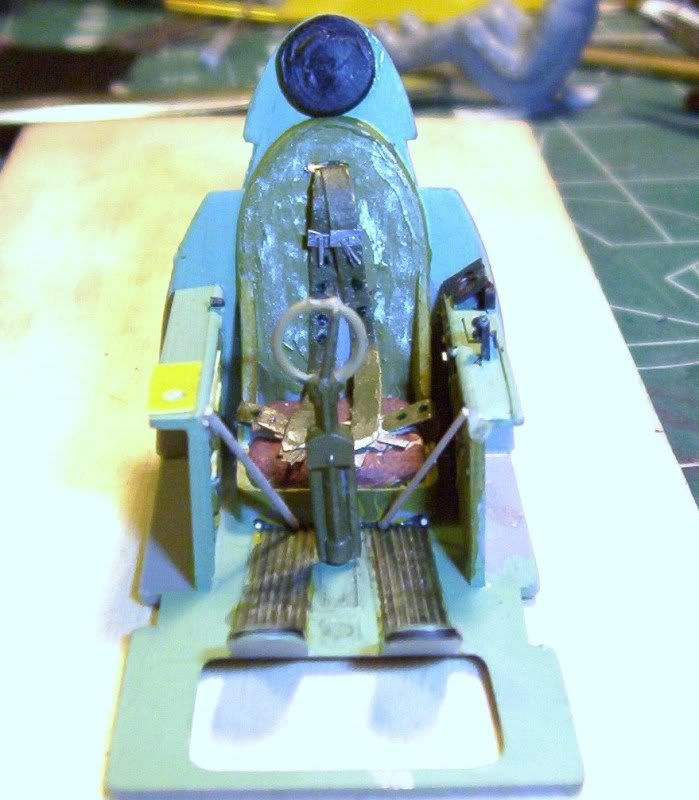
I didn't like the way the paint on the seat turned out though (I skimped and tried to get away with brush-painting Tamiya.. Dummy), so I stripped and repainted it with Testor's MM Enamel, as I should have in the frst place...

It's a mix of Model Master Olive Drab and Testor's Yellow Zinc Chromate, which I also used on the rudder pedals and side-panels.  The rear bulkhead, floor, and interior sidewalls are an RAF Interior Grey-Green from my own mix of MM paints, and I gave the floor channels a wash of thinned black to pop out the relief detail, with a little silver here & there to wear them and the rudder pedals...
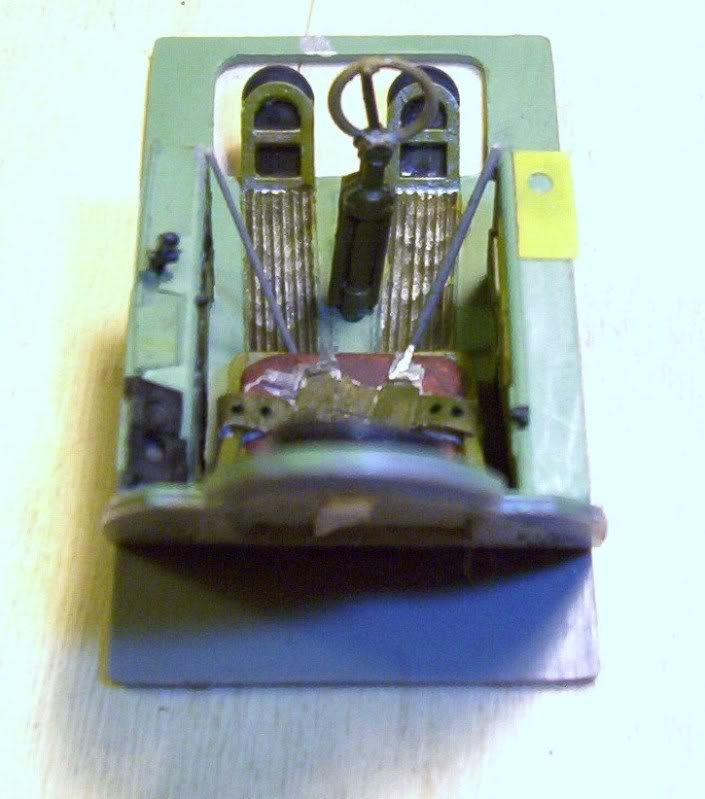
I test-fit the cockpit to make sure that I didn't have sprue sticking into the joints to cause a fit-problem later, and I also finished up the instrument panel.  I usually do these big Revell fighter-panels another way, painting them white first, then coloriing them with a black Sharpie.  After the ink dries, I remove the ink on the raised detail and reveal the white by using an alcohol-dampened (not wet) paintbrush, but this kit's panel had a decal, so I opted to use it instead.  I just "Sharpied" the panel black, then applied the decal with some vinegar (my prefered decal setting-solution) to snuggle it down, and then shot some Dullcoat over it to seal it in place. The Sharpie leaves a gloss finish, so no clear gloss-coat was needed for decaling the panel.
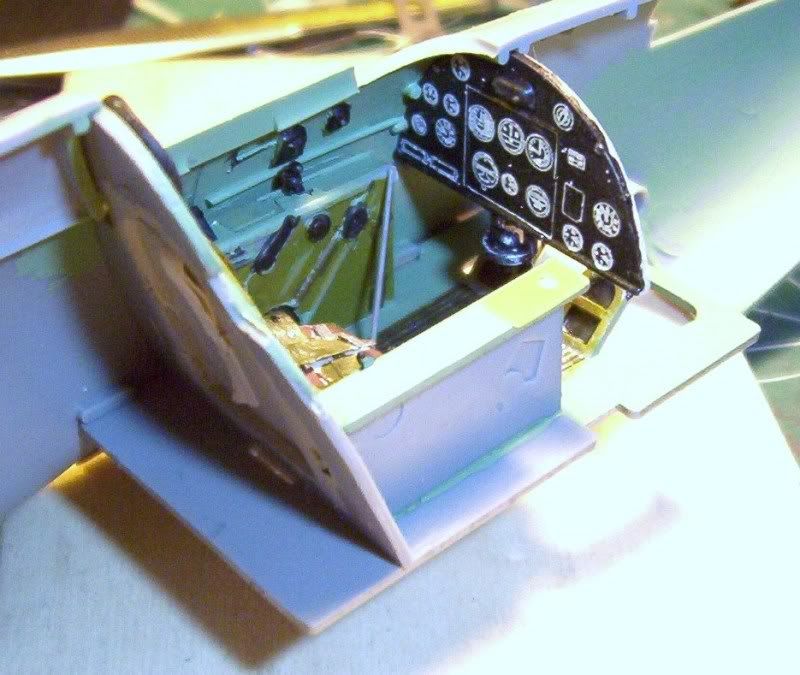
I just need to finish the detail painting now, and add the fuel and flap control panels to the A-frames on each side of the seat, an O2 hose (I made one by wrapping thin wire around a drill-bit of the appropriate size), and the cockpit will be finished... Then I'll start scratchbuilding the gunsight and the catapault spools.


BTW, speaking of catapault spools...

ANYONE know what th' hell they look like? Or where they're located?Hmm

  • Member since
    December 2009
Posted by ww2psycho on Sunday, January 23, 2011 3:30 PM

The fit problem isnt along the wings. Its right under the nose where the intakes are I want to say? I'll get a pic later today.

  • Member since
    June 2008
  • From: Iowa
Posted by Hans von Hammer on Friday, January 28, 2011 12:35 PM

Shameless bump...

  • Member since
    June 2008
  • From: Iowa
Posted by Hans von Hammer on Thursday, February 3, 2011 5:17 AM

More progress on the Hurricat...

Hree's a shot of ther radiator. I cut out the molded-in screen, and add a piece of fine brass mesh for the radiator grille, along with another piece of that stuff for the rear.  I then put a slice of brass tubing into the face of it for the oil cooler intake.  It should actuall be recessed, instead of protruding, but I don't have a decent punch & die set anymore to cut a clean hole in screening ( I like it anyway)... I also added a piece of brass rod for the brace, then painted in aluminum.  As you can see, there was some shifting of the oil-cooler intake, but you can't see the "plugged" hole in normal light.

I cut the 20mm cannons off the wings, plugged the holes with sprue, the drilled out the new holes for the .303 guns.  Using an X-Acto knife, I didn't have much in the way of precision, so as you can see, I got one a little big and had to insert a stretched Q-Tip handle to make the opening a bit smaller.  A little putty to blend it, and close up those gaps, a few swipes with some sandpaper, and it's fine now...

I sanded the exhaust stacks, which had some flash and pretty big parting lines, then drilled out the ends with a steel-cutter bit in the Dremel.  The important part wasn't depth, it was keep the openings in the center, which was no easy task, as you can see...

 I finished up the cockpit, after adding the O2 hose made from a wire wrapped around a drill bit, then bent into shape and installed.  I painted it Testor's rubber, drybrushed with Testor's dark tan, and I drybrushed the greeblies on the A-frames on each side of the cockpit, as well as giving the other greeblies around the area a wash of dark something or orther (the goop in the bottom of the thinner jar).

The document bag is made of epoxy and painted with Testor's MM Leather, given a dark wash, and then drybrushed with dark tan

Rather than drill adjustment holes in the seat's Sutton Harness, I opted to just add them with a Sharpie.  The instrument panel is a decal, and it looks like one in this light, but is sufficiently subtle in normal room light, and is easy to make out without jumping at you..

I've added the wings and horizontal stabs, and have started on the catapult spools, which I finally found a picture of...  They're just little, "Square-U"-shaped straps holding a small wheel about the twice size of a castor wheel on a shop-table, and much smaller than I thought something that takes that kind of abuse would be.   They  get mounted on either side of the wing-bottom next to the radiator... I'm making them out a a PE parts-fret and a slice of sprue, and adding a nut/bolt/washer shaved from a tank roadwheel.. Simple, right?  Well, wanna bet? 

I need two of the Censoredin'  little buggers and so far, I've shot five of them into space and into the waiting, gaping maw of the Carpet Monster while trying to bend them into shape with my tweezers and a needle-nose pliers or adding that one final drop of CA...  Bang Head They're starting to REALLY pizz me off, lol... I did manage to make one so far though...  I called it quits for the day right there, and will attempt to make ONE more spool before it becomes a regular RAF Hurricane...  Or worse... A Hangar Queen..

  • Member since
    June 2008
  • From: Iowa
Posted by Hans von Hammer on Wednesday, February 9, 2011 10:38 PM

Got the paint on and started weathering the Hurricane... I shot the basic colors for the camo with rattle-cans, Testor's Model Master Camouflage grey for the undersides and Kylon Moss and Earth for the top-side.  I'm post-shading the aircaft's panel lines ands rivets (and there's a LOT of those) with artist's charcoal powdered on piece of sandpaper and applied with a brush.  Did the ezhaust anf gun-stains the same way, although the gun-stains need to be darkend some more, and the exhaust needs more color, a bit of grey, burnt sieann, and raw umber..

I've only completed the right wing, and a portion of the left, to show the differnce between shaded/unshaded panels:

I drilled out the leading edges of the wings for the eight machinegun's blast tubes, then used a section of red decal to tape over the muzzles:


Well, back to shading..

  • Member since
    June 2008
  • From: Iowa
Posted by Hans von Hammer on Wednesday, February 9, 2011 10:39 PM

I'm the only one who's posted here since 23 JAN.. Anybody still working on theirs?

  • Member since
    August 2009
  • From: Toledo Area OH
Posted by Sparrowhyperion on Wednesday, February 9, 2011 10:45 PM

I am holding until April to start.  I'm doing a crossover with the BF110 with the Too Many Props Build.


Hans von Hammer

I'm the only one who's posted here since 23 JAN.. Anybody still working on theirs?

In the Hangar: 1/48 Hobby Boss F/A-18D RAAF Hornet,

On the Tarmac:  F4U-1D RNZAF Corsair 1/48 Scale.

  • Member since
    January 2006
  • From: Earth
Posted by DiscoStu on Thursday, February 10, 2011 10:43 AM
Yeah, I'm still here. Most of my tools are in storage so I've been making due with what I have. Just haven't had "sit-down" time lately. I did manage to soak and scrub the plastic of the A-20 in prep for priming and assembly......that was about a month ago. I also used a 40% Hobby Lobby Coupon on a new Pasche airbrush since all of mine are, again, in storage. This is taking me back to my early days modelling on a card table with only the tools that came with one of those Testor's Starter kits.

"Ahh the Luftwaffe. The Washington Generals of the History Channel" -Homer Simpson


  • Member since
    March 2010
  • From: New Zealand
Posted by Scorpiomikey on Thursday, February 10, 2011 1:50 PM

Im still here, just got so much else on at the moment. Also i know nothing about tanks and im scared of it lol.

"I am a leaf on the wind, watch how i soar"

Recite the litanies, fire up the Gellar field, a poo storm is coming Hmm 

My signature

Check out my blog here.

  • Member since
    June 2008
  • From: Iowa
Posted by Hans von Hammer on Thursday, February 10, 2011 1:52 PM

Gotcha.. I was just worried cuz all I heard for a couple weeks was echoes...

  • Member since
    December 2003
  • From: Prince George B.C., Canada
Posted by Bullet21 on Monday, February 14, 2011 2:18 PM

I'm still here too. Almost got enough bench cleared off to start on my Mig.

 Keep SmilinLiberation of Western Europe'--it makes this world a nicer place.

  • Member since
    December 2009
Posted by ww2psycho on Tuesday, May 3, 2011 6:11 PM

Hey, been working on one of the models for awhile, I'll have pics up by this weekend. Anyone forget about this GB?

  • Member since
    August 2009
  • From: Toledo Area OH
Posted by Sparrowhyperion on Tuesday, May 3, 2011 6:29 PM

I was planning on starting my BF110 next week after I finish up a couple of other projects.

Rich


ww2psycho

Hey, been working on one of the models for awhile, I'll have pics up by this weekend. Anyone forget about this GB?

In the Hangar: 1/48 Hobby Boss F/A-18D RAAF Hornet,

On the Tarmac:  F4U-1D RNZAF Corsair 1/48 Scale.

  • Member since
    March 2010
  • From: New Zealand
Posted by Scorpiomikey on Tuesday, May 3, 2011 6:43 PM

The next secret santa will be on us before most of us are finished this one lol.

"I am a leaf on the wind, watch how i soar"

Recite the litanies, fire up the Gellar field, a poo storm is coming Hmm 

My signature

Check out my blog here.

  • Member since
    January 2006
  • From: Earth
Posted by DiscoStu on Wednesday, May 4, 2011 11:26 AM
I'm still plugging away. I have the cockpit components of the A-20 painted and weathered and I scratch built the liferaft, but haven't progressed much beyond that. I think I'm going to forgo any additional scratchbuiling and just get going on this as OOB from here on out.

"Ahh the Luftwaffe. The Washington Generals of the History Channel" -Homer Simpson


  • Member since
    December 2009
Posted by ww2psycho on Sunday, May 29, 2011 10:15 AM

Started decaling the Zero today. It wont be my best model ever, but its deffinatly been a learning experiance. Decals are giving me a bit of a problem but im not too worried.

  • Member since
    December 2009
Posted by ww2psycho on Monday, May 30, 2011 9:08 AM

Ok so heres where Im at, still a few decals to put on still

  • Member since
    December 2003
  • From: Prince George B.C., Canada
Posted by Bullet21 on Monday, May 30, 2011 7:43 PM

Lookin' good there psycho, lookin' good.

 Keep SmilinLiberation of Western Europe'--it makes this world a nicer place.

  • Member since
    March 2010
  • From: New Zealand
Posted by Scorpiomikey on Thursday, June 2, 2011 5:35 PM

Well, i started the tank last night, i think itle be quite an easy build once i get going. Im doing it as a silver tank for the NMF 3 GB. Just thought it might be fun to do it up like a comander has his own private tank and likes shiny things lol.

"I am a leaf on the wind, watch how i soar"

Recite the litanies, fire up the Gellar field, a poo storm is coming Hmm 

My signature

Check out my blog here.

  • Member since
    December 2009
Posted by ww2psycho on Saturday, June 4, 2011 12:15 PM

I finished the Zero today, I'll have pics up later with my own little review.

JOIN OUR COMMUNITY!

Our community is FREE to join. To participate you must either login or register for an account.

SEARCH FORUMS
FREE NEWSLETTER
By signing up you may also receive reader surveys and occasional special offers. We do not sell, rent or trade our email lists. View our Privacy Policy.