SEARCH FINESCALE.COM

Enter keywords or a search phrase below:

The Official F-4 Phantom II Group Build 2011

618744 views
2992 replies
1 rating 2 rating 3 rating 4 rating 5 rating
  • Member since
    November 2010
  • From: Lafayette, Indiana
Posted by Son Of Medicine Man on Sunday, July 24, 2011 12:44 PM

Hi Everyone,

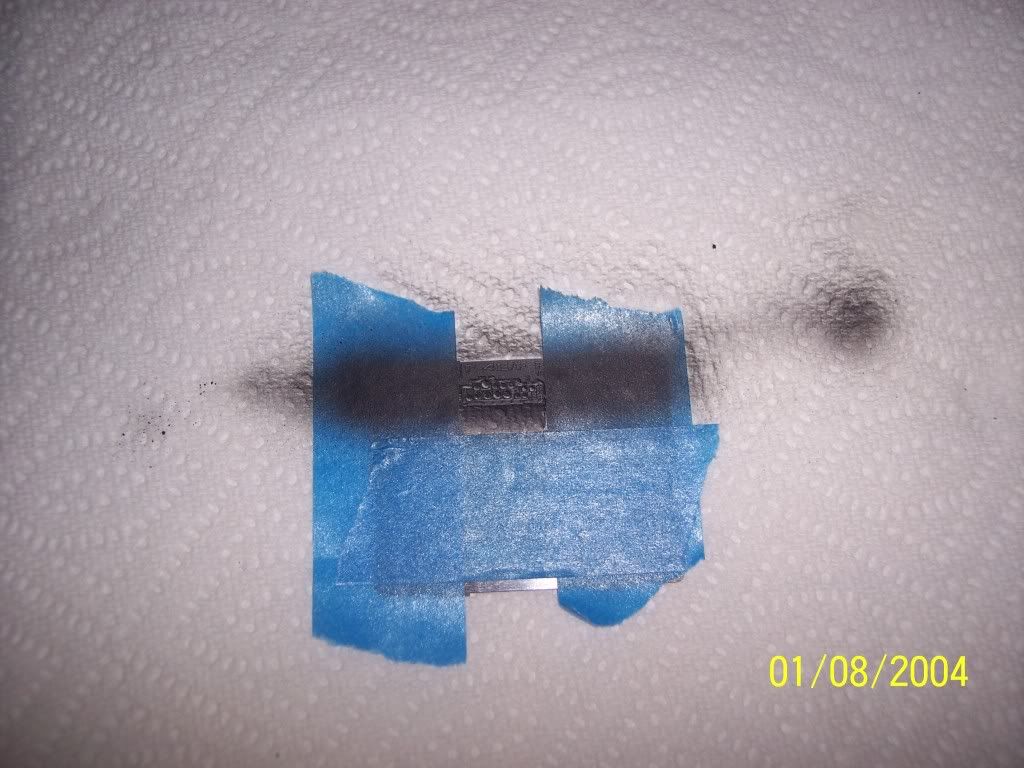
It is not finished, requires a little touch up, but it turned out so well that I just have to show it.  If you remember, I was taking a non-color photo-etch of the rear cockpit's front panel, and adding color.  Namely, grey and black.  The panel is supposed to be grey (FS36231), and the bezels around the gauges are supposed to be black.  I followed the instructions posted by Robert Kwikkel (http://www.aircraftresourcecenter.com/tnt1/001-100/TNT033_PE-Painting_Kwikkel/tnt033.htm).  First I cleaned the photo-etch using laquer thinner then masked off the panel that I was working with.  Then I applied Model Master Acryl flat black.  Here is a picture:


I let that dry for a couple of days, then I sprayed Model Master Acryl gloss clear.  I waited a couple more days for that to dry then I applied a second coat of clear.  Here is a picture:


After I let the second coat dry a couple of days, I sprayed the Xtracolor enamel FS16231 grey.  After a couple of days I sprayed a second coat of grey.  Here is a picture:


Then after letting that dry a couple of days, I took a small flat glazing spreader, wrapped a very light cotton handkerchief damp with mineral spirits, and began carefully scraping it across the photo etch.  It took a few strokes, but it finally took the grey paint off of the raised areas, exposing the black underneath.  Here is a picture:


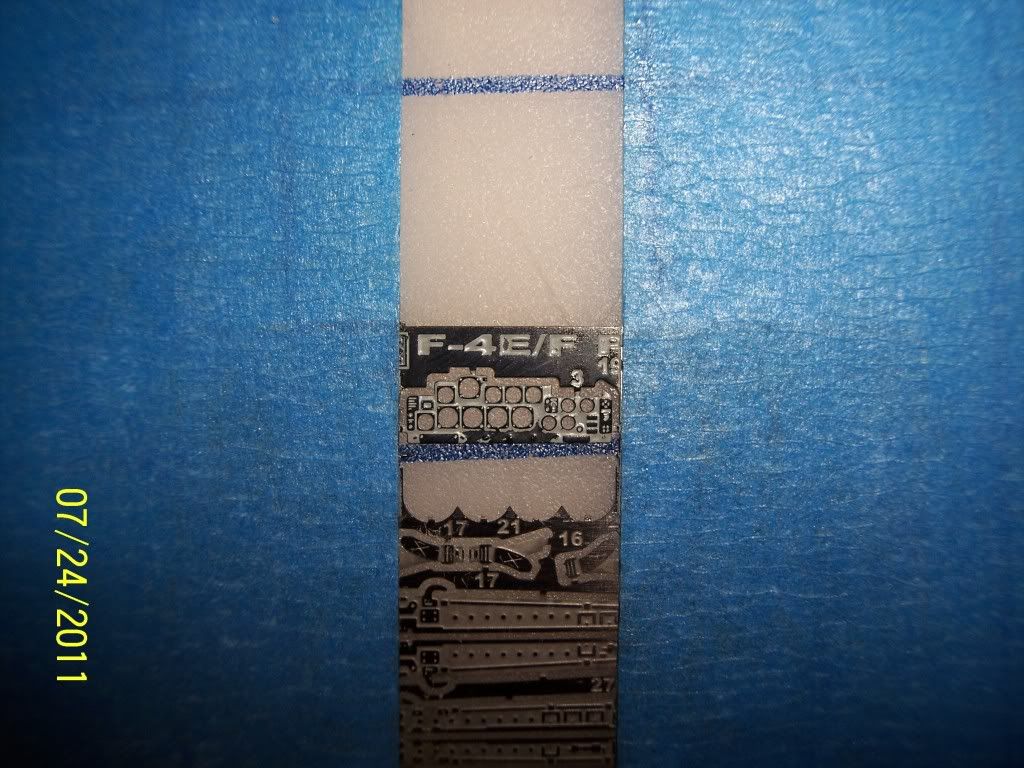
The strip at the bottom of the panel had a large area without any instruments, so the grey was removed exposing the black where it should still be grey.  But I expected that since it was a large area without detail.  I will touch it up with some grey.  But check out how clean the gauge bezels look!  This is a great technique if you have the patience for such detail.

Ken

  • Member since
    February 2010
  • From: Ontario, Canada
Posted by Bockscar on Sunday, July 24, 2011 1:05 PM

Ken:

Very persnickity work, but your patience has payed off, that looks great! -Thanks for the link and tips on the detailing.

  • Member since
    June 2009
Posted by jimbot58 on Sunday, July 24, 2011 2:00 PM

Ken, just looking at that makes my head hurt! I have some older kits with unpainted PE stuff in it and have put it off because of this. Don't know if I could master this or not!

*******

On my workbench now:

It's all about classic cars now!

Why can't I find the "Any" key on my keyboard?


  • Member since
    February 2010
  • From: Ontario, Canada
Posted by Bockscar on Sunday, July 24, 2011 2:14 PM

Hey Jim....practice on a few less worthy kits.....lol.....

  • Member since
    November 2010
  • From: Lafayette, Indiana
Posted by Son Of Medicine Man on Sunday, July 24, 2011 2:41 PM

jimbot58

Ken, just looking at that makes my head hurt! I have some older kits with unpainted PE stuff in it and have put it off because of this. Don't know if I could master this or not!

Thank you for the compliments everyone.  Jim, I would give it a try.  If it doesn't look good when you are done, you can always strip the paint all the way off and try again.

Here is a picture of the glazing spreader I used:


And here is a picture of how I held it wrapped with the handkerchief damp with mineral spirits:


Just take your time and check it out as you go to see the progress.  This was my first try at it.  Also be sure to let the paint dry thoroughly between coats.  In the link I posted Robert did his in only two sessions, but I used different paint for the acrylic.  I wanted the clear to be completely cured to be sure it would hold up to the mineral spirits.

Ken

  • Member since
    November 2010
  • From: Lafayette, Indiana
Posted by Son Of Medicine Man on Sunday, July 24, 2011 3:55 PM

One other note.  When I went to use the spreader to remove the grey from the raised detail, I taped the photo-etch directly to a hard surface without the paper towel underneath.  I don't know if that would make a difference, but I figured the hard surface was better to keep the photo-etch flat.

Ken

  • Member since
    February 2010
  • From: Ontario, Canada
Posted by Bockscar on Sunday, July 24, 2011 4:23 PM

Thanks for the pointers Ken, saves a lot of experimentation. That is a nice little link too, very helpful.

  • Member since
    February 2010
  • From: Ontario, Canada
Posted by Bockscar on Sunday, July 24, 2011 4:27 PM

Ladders - I managed to cut out and shape the last fuselage bulkhead in preparation for the J-79 scratch. I'll post a shot when I get the cans placed a little later.

Snakes - I had real difficulty shaping the intake ducts, I mentioned the thin plastic snapped and so I'm back to the snakes part of the game.

  • Member since
    November 2010
  • From: Lafayette, Indiana
Posted by Son Of Medicine Man on Sunday, July 24, 2011 6:00 PM

Bockscar

Ladders - I managed to cut out and shape the last fuselage bulkhead in preparation for the J-79 scratch. I'll post a shot when I get the cans placed a little later.

Snakes - I had real difficulty shaping the intake ducts, I mentioned the thin plastic snapped and so I'm back to the snakes part of the game.

Hi Dom,

Sorry to hear about the intake ducts.  You were moving quite well on those.

Ken

  • Member since
    April 2005
Posted by Thunderbolt379 on Sunday, July 24, 2011 6:19 PM

Ken -- remarkable technique! It looks amazing!

M/TB379

http://worldinminiature.blogspot.com/

  • Member since
    November 2010
  • From: Lafayette, Indiana
Posted by Son Of Medicine Man on Sunday, July 24, 2011 7:27 PM

Thunderbolt379

Ken -- remarkable technique! It looks amazing!

M/TB379

Thank you Mike, I appreciate the compliment!

Ken

  • Member since
    February 2010
  • From: Ontario, Canada
Posted by Bockscar on Sunday, July 24, 2011 7:33 PM

Here's my Sunday Summary:

What it looked like:

Today's advance ('progress' is now a dirty word):

Once I get the J-79's done, I can glue the wing section in and shore up those nasty intake ducts......

Stay tuned, same scratch hour, same scratch channel....

  • Member since
    August 2007
  • From: n/w indiana
Posted by some assembly required on Monday, July 25, 2011 10:43 AM

TB/379 i was wondering if i can jump in with an accurate min. 1/72 f4 b/c? ive just recieved aftermarket decals from aeromaster # 72-206. i cant wait to crack plastic, you all are just amazing.Bow Down

  • Member since
    February 2003
  • From: Between LA and OC, SoCal
Posted by oortiz10 on Monday, July 25, 2011 11:00 AM

Hey everyone,

I'm really having a tough go with this GB.  The first Phantom GB was a breeze compared to this one.  I did two Hase Phantoms and a Revellogram -J for the last one, and those three went so much smoother than these two.  I picked up the Revellogram -C hoping for a quick and easy build to distract me from the Hase -C, but man, the Revellogram -C's just as much work, if not more, than the scribe and rivet job on my Hase -C! 

The comparison between the Revellogram -J from last year and this Revellogram -C is interesting.  The Revellogram -C fuse is warped.  All the parts have thick flash, and the sprue attachment points are as thick as the sprue themselves!  Lets not even talk about parts fit.  The intake to fuse joint is terrible.  And in regards to fit issues, a quick dry-fit of the fuse halves and cockpit tub reveals the fit problems at the rear of the 'pit tub where the rear deck's supposed to make up part of the spine where the rear canopy attaches. 

With all the prep work involved (rivets and scribing on the Hase, and clean up on fit on the -C) I haven't even had the chance to spray any paint.  I tried to paint the tubs last week, but for some reason the paint never dried on the Hase tub, so I had to strip it.  I ended up stripping both, just in case it was a problem with my batch of paint. 

I'll try again later...if I don't decide to throw in the towel first.  The only thing that's keeping me motivated is the great work that's being posted here.  Guys, there is some nice stuff being shown.  I'm enjoying the builds!  Keep up the great work! 

Cheers,

-O

-It's Omar, but they call me "O".

  • Member since
    August 2007
  • From: n/w indiana
Posted by some assembly required on Monday, July 25, 2011 12:02 PM

ortiz, hang in there man. you are one of the reasons i joined this GB. the J you did last time really stoked me to do one myself .Saying, that i made a mistake on my entry-- its not a b/c but a c/d.  sigh.... and...I cant use my afytermarket decals becuse they go to a J.Bang Head the kit has some nice decals so ill just use them. but boy i want a diamond back phantom!! This my entry

  • Member since
    February 2003
  • From: Between LA and OC, SoCal
Posted by oortiz10 on Monday, July 25, 2011 6:13 PM

Hey some assembly,

Thanks for the encouragement.  I'll keep on keepin' on with these.  It just feels good to mitch and boan about it once in a while, ya know?  Anyway, I'll plug along in hopes of getting them done before the deadline. 

I don't know if I'm a masochist or crazy...or both!

-O


-It's Omar, but they call me "O".

  • Member since
    April 2005
Posted by Thunderbolt379 on Monday, July 25, 2011 6:30 PM

Some assembly required -- you sure can, the Rhino Wing is always recruiting! I'll update p1 with your details. As I recall, VF-102 Diamondbacks transitioned from the -B to the -J and kept their markings in the process -- I can't swear to that without checking my references. I have the Hasegawa -J in their markings on its way, but I'm positive the old Revell kit wore that scheme and was officially a -B... Still, your kit is the -C/D, which is neither!

Omar -- sorry you're having such a hard go. I'm sure there's be a Rhinos III at some point, so if you wanted to put them away for the future...? That said, I hope you keep going!

Cheers, M/TB379

http://worldinminiature.blogspot.com/

  • Member since
    February 2010
  • From: Ontario, Canada
Posted by Bockscar on Monday, July 25, 2011 6:49 PM

Omar;

You can't possibly be building slower than me man.Huh?

I know, you are like me, a rivet specialist, so just work in an hour or so a week...lol...

Try and keep up to me pal, I may sprint in a year or two....lol....

Yeah, I had to skip a few weeks...lol...

Besides, it wouldn't be fair to deny us your updates man,...you just cannot drop out and go away....lol...my people will knock on your door at 2:00 am....lol....

  • Member since
    November 2010
  • From: Lafayette, Indiana
Posted by Son Of Medicine Man on Tuesday, July 26, 2011 9:52 PM

Greetings everyone,

Tonight I talked with Berny.  He told me he hasn't been here for the last few days because of a combination of nasty weather (he lives close to the lightning capitol of the world) and bad headaches.  He unplugs his computer when there is bad storms (a very smart move).  But he said he is doing better today.  He asked about what has been going on the last few days in this group build and I gave him a brief overview.

I touched up the photo-etch instrument panel and I am very happy with how it turned out.  I also painted the last coat of white on the resin piece for the background of the instrument dials.  I can't wait to put it all together to see the end result.  Here is a picture of the photo-etch:


Ken

  • Member since
    November 2010
  • From: Lafayette, Indiana
Posted by Son Of Medicine Man on Friday, July 29, 2011 3:37 PM

Hi Everyone,

Well, I am pissed off.  Angry  After finding that the color photo-etch that I had purchased was a little out of scale with the Aires cockpit I decided to go through the trouble of painting the non colored photo etch that came with the Aires cockpit.  I just took it for granted that photo-etch that came with the Aires cockpit would be the correct scale.  Wrong!  Apparently the Aires resin piece is the problem.  And I have a second Aires cockpit so I checked it.  It is the same size as the first.  All that time and effort just to end up with the same problem.  Bang Head  Time to drink beer and take a break.  I will deal with it tomorrow.

Ken

  • Member since
    February 2010
  • From: Ontario, Canada
Posted by Bockscar on Friday, July 29, 2011 4:21 PM

Ouch!

Remind me not to get an Aires resin cockpit set.....Beer 

  • Member since
    November 2010
  • From: Lafayette, Indiana
Posted by Son Of Medicine Man on Friday, July 29, 2011 5:47 PM

Bockscar

Ouch!

Remind me not to get an Aires resin cockpit set.....Beer 

Yes, I am now wondering about the fit when installed in the kit.  I am going to check that out next before I get too much farther along.  Does anyone have any experience with the Aires cockpit for the 1/48 Hasegawa F-4E?

Ken

  • Member since
    February 2010
  • From: Ontario, Canada
Posted by Bockscar on Friday, July 29, 2011 6:06 PM

Here's the bright side Ken;

We got great tips from you as you learned to detail the photo etch.....lolWink

  • Member since
    April 2005
Posted by Thunderbolt379 on Friday, July 29, 2011 7:28 PM

Ken -- jeez, bad luck, mate. All that work and still to be stuck on the same detail... The more I hear about AM parts, the more I think it's better to close the lid and have done... The number of projects that have gone on the rocks at the cockpit and intakes stage is considerable. At least when instrument decals are too big for the panels, it's easy to shave away the excess when they're dry. Sure, they aren't in the same league as the PE, but by the same token they also cost nothing...

M/TB379

http://worldinminiature.blogspot.com/

  • Member since
    February 2010
  • From: New Jersey
Posted by 68GT on Saturday, July 30, 2011 12:49 PM

Got a little more done to the F-4J.  Once this is done I'll get back to that RF-4E thats been a real pain in the A.


On Ed's bench, ???


  • Member since
    February 2003
  • From: Between LA and OC, SoCal
Posted by oortiz10 on Monday, August 1, 2011 1:35 PM

Hey gang,

I have a question about the triangular reinforcement plates on the stabilators.  I know the "later" Phantoms had 'em while the "early" ones didn't.  Would anyone (Berny) know when those plates started being added to jets?  I'm interested in building a -D (66-7501) as it served in Vietnam.  Before I burden myself with sanding off Revellogram's plates and replacing the panel lines, I wanna make sure the plates weren't on that jet.

Thanks!

-O


-It's Omar, but they call me "O".

  • Member since
    February 2010
  • From: Ontario, Canada
Posted by Bockscar on Tuesday, August 2, 2011 6:25 PM

68GT;

Ummm....that's looking like it's wortha 'pain' or two...lol...

http://i67.photobucket.com/albums/h304/Scode68/Models/ABC033.jpg

Nice robo-stand!

  • Member since
    February 2010
  • From: Ontario, Canada
Posted by Bockscar on Tuesday, August 2, 2011 6:27 PM

Hey big 'O', nice to see you're still in the game!

Every 2 months or so I'll try to send you inspirational shots of what real snails do for a living!...lol...Big Smile

  • Member since
    November 2010
  • From: Lafayette, Indiana
Posted by Son Of Medicine Man on Tuesday, August 2, 2011 7:07 PM

oortiz10

Hey gang,

I have a question about the triangular reinforcement plates on the stabilators.  I know the "later" Phantoms had 'em while the "early" ones didn't.  Would anyone (Berny) know when those plates started being added to jets?  I'm interested in building a -D (66-7501) as it served in Vietnam.  Before I burden myself with sanding off Revellogram's plates and replacing the panel lines, I wanna make sure the plates weren't on that jet.

Thanks!

-O


Hi O,

I just talked to Berny.  He apologizes for not being on here to chat with everyone personally.  The medication he is on makes him sleep alot.

I asked the question you posted, and he said it was more of a time frame than a model.  All the models eventually got the reinforcement plates.  They started putting them on in 1969 and by 1973 almost all of the Phantoms had them installed.  If you wanted to be exactly accurate, you would have to find a picture of your aircraft at the particular point in time that you are modeling.

Ken

  • Member since
    February 2010
  • From: New Jersey
Posted by 68GT on Tuesday, August 2, 2011 7:23 PM

That stand is the old Black and Decker Workmate Hobbycrafter.

I love this thing and have had it forever. 

This is the kit that is a pain.

But I'm turning the corner on it!

On Ed's bench, ???


JOIN OUR COMMUNITY!

Our community is FREE to join. To participate you must either login or register for an account.

SEARCH FORUMS
FREE NEWSLETTER
By signing up you may also receive reader surveys and occasional special offers. We do not sell, rent or trade our email lists. View our Privacy Policy.