SEARCH FINESCALE.COM

Enter keywords or a search phrase below:

Falklands/Malvinas War 30th Anniversary GB

244448 views
1492 replies
1 rating 2 rating 3 rating 4 rating 5 rating
  • Member since
    January 2003
Posted by el_jere on Sunday, November 6, 2011 4:07 PM

Hi there guys,

So sorry for being out of the radar for so long, my work, then my vacactions, then work again have keeping me away from the bench LOL.

I´m glaad to see that the GB is moving along.

I made very little progress on my SUE but I´m close to finish the paint job. I used an Humbrol 01 primer and then gloss white for the undersides. For th topside gray I will use Humbrol 125 plus some drops of blue.

I also finished the Exocet missile and the pylon. I made some improvements in those items.

Well my friends that´s all for now, I hop to mask and paint the gray today.

Best regards to all


Jeremias


Res non verba

  • Member since
    December 2002
  • From: Bury St Edmunds, Suffolk, England
Posted by Bish on Sunday, November 6, 2011 4:29 PM

vance, thanks. I am rather proud of that 17 myself. Was looking like it was going to be a disater at one point. Bit it was saved with the help of the forum. Looking forward to seeing another Pucara. I had never really paid much attantion to that aircraft before, but i rather like the look of it.

I will get some pics up of the Chinook sprues later this week. I am not planning a diorama for this one, more something to commemorate the 30th of both the falklands war and JHSU. I still have a few other things to get. One thing is a decent base for it. The GR.3 is coming along nicely.

I am a Norfolk man and i glory in being so


On the bench: Airfix 1/72nd Harrier GR.3/Fujimi 1/72nd Ju 87D-3

  • Member since
    January 2003
Posted by el_jere on Sunday, November 6, 2011 7:02 PM

Azorean

Almost there!

The weight on the nose was not enough...

The solution is to glue the front tire on the base.

Until the finish here is more pictures.

http://i1200.photobucket.com/albums/bb328/pacheco1976/t109.jpg

http://i1200.photobucket.com/albums/bb328/pacheco1976/t104.jpg

http://i1200.photobucket.com/albums/bb328/pacheco1976/t103.jpg

http://i1200.photobucket.com/albums/bb328/pacheco1976/t108.jpg

http://i1200.photobucket.com/albums/bb328/pacheco1976/t105.jpg

http://i1200.photobucket.com/albums/bb328/pacheco1976/t106.jpg

http://i1200.photobucket.com/albums/bb328/pacheco1976/t107.jpg


Great work on this one! I love the scheme. Now if some manufacturer would care to make one in 1/48....

Res non verba

  • Member since
    February 2003
  • From: Rothesay, NB Canada
Posted by VanceCrozier on Monday, November 7, 2011 6:53 AM

The SUE is coming along nicely Jeremias - very nice work on the Exocet as well.
details details details!!! Yes

On the bench: Airfix 1/72 Wildcat; Airfix 1/72 Vampire T11; Airfix 1/72 Fouga Magister

  • Member since
    December 2002
  • From: Bury St Edmunds, Suffolk, England
Posted by Bish on Monday, November 7, 2011 2:50 PM

Azorean, sorry, i missed this one. That is looking amazing. I have given up with adding weight to nose wheel aircraft and i glue them all to the base now.

Jeremias, coming along great, very nice work on the Exocet.

I am a Norfolk man and i glory in being so


On the bench: Airfix 1/72nd Harrier GR.3/Fujimi 1/72nd Ju 87D-3

  • Member since
    December 2009
  • From: San Miguel Island, Azores, Portugal
Posted by Azorean on Monday, November 7, 2011 3:40 PM

The SUE looking very good El Jere!

  • Member since
    November 2011
Posted by Mochilote on Monday, November 7, 2011 7:38 PM

Hi everybody, I'm new at this forum . Thanks to El Jere, that invited everyone in another forum to participate in this GB, I'm here to show you my 1:6 scale bust of an argentinian soldier in Malvinas/ Falklands war.

These ar pics of the bust as it is up to now:


I hope you enjoy them.

  • Member since
    March 2007
  • From: Carmel, CA
Posted by bondoman on Tuesday, November 8, 2011 12:13 AM

Mochilote- welcome and judging from your avatar, the background in your pictures and your bust, you are a head expert!


  • Member since
    October 2008
  • From: italy
Posted by bsyamato on Tuesday, November 8, 2011 4:47 AM

Azorean

The SUE looking very good El Jere!

Ditto great !!

Mochilote magnific work on the head Bow Down it seems to me that you use milliput , i try something years ago with some 90 and 120mm figures scratched with it

  • Member since
    December 2002
  • From: Bury St Edmunds, Suffolk, England
Posted by Bish on Tuesday, November 8, 2011 6:37 AM

Welcome to the forum, and more importantly to the GB.  Have i got this right, this isn't a kit, you have made it yourself.

I am a Norfolk man and i glory in being so


On the bench: Airfix 1/72nd Harrier GR.3/Fujimi 1/72nd Ju 87D-3

  • Member since
    February 2003
  • From: Rothesay, NB Canada
Posted by VanceCrozier on Tuesday, November 8, 2011 6:55 AM

Mochilote

Hi everybody, I'm new at this forum . Thanks to El Jere, that invited everyone in another forum to participate in this GB, I'm here to show you my 1:6 scale bust of an argentinian soldier in Malvinas/ Falklands war.

These ar pics of the bust as it is up to now:

I hope you enjoy them.

Mochilote - welcome aboard, looking forward to looking at your figures, when I get clear of the office web-filter!! And thanks to el Jere for spreading the word - the more the merrier!

On the bench: Airfix 1/72 Wildcat; Airfix 1/72 Vampire T11; Airfix 1/72 Fouga Magister

  • Member since
    November 2011
Posted by Mochilote on Tuesday, November 8, 2011 2:37 PM

Thanks to all of you. Yes Bish, I make my own busts, but I don't think I'm a head expert, Bondoman. I'm still learning. Grazie mille Bsyamato, I don't use milliput, instead, I use a two component epoxy putty, not as good as Duro but it works for me anyway. You should try with Duro. Thanks Vance, I really hope you enjoy them.


Bye.

  • Member since
    January 2003
Posted by el_jere on Thursday, November 10, 2011 7:34 AM

Thanks for the coments guys,

I just painted the gray topside using Humbrol 125 plus a few drops of blue, it looks more or less right... I will post some pics when I get back home.

Mochilote! So nice to see you here, the bust looks great! looking forward to see it painted.

best regards

Jere

Res non verba

  • Member since
    December 2009
  • From: San Miguel Island, Azores, Portugal
Posted by Azorean on Thursday, November 10, 2011 10:32 AM

Welcome Mochilote. I already saw your figure at Kalkin. Looking forward to see the developments.

I hope to start my second built in this GB next month.

  • Member since
    December 2002
  • From: Bury St Edmunds, Suffolk, England
Posted by Bish on Thursday, November 10, 2011 11:41 AM

Well thats some talent you have there Bow Down Really glad to have you on board.

I am a Norfolk man and i glory in being so


On the bench: Airfix 1/72nd Harrier GR.3/Fujimi 1/72nd Ju 87D-3

  • Member since
    October 2008
  • From: italy
Posted by bsyamato on Friday, November 11, 2011 9:09 AM

Mochilote never heard about duro Wink ( "duro" can be confused with some other things in italy Whistling ) but if cheaper than the milliput ...Stick out tongue will search trough my vendors.

waiting to see more scratches  Toast

Updates from the gr3 

i washed the cockpit.

On the ip tried something differents , i read here (don't remember the post) someone used gloss coat as glue for little pices, then searchin a good way to simulate instruments glass i proceded so:

after scratched the ip details on the black background i painted it with clear gloss and put on the upper part of ip Propeller

Also added and drybrushed the rudder pedals (scratched too)

Also added the ejection handle on the seat (a metal wire)

then i drilled the lateral camera "eye", and put from the inner side a piece of heated clear sprue ,removed the IR sensor on the nose to put something after .

and painted the inner nose with flat black .

then all main parts are glued!

the fit is not perfect here Sad

that's all for now Headphones


  • Member since
    January 2003
Posted by el_jere on Saturday, November 12, 2011 9:44 AM

A couple of days ago I panted the topside gray on my SUE but I´m not so sure to leave it like that, I used humbrol 125 plus somo drop of blue to chenge the hue a little...

When yu see som pictures it looks great, but then compared to another pictures it looks too dark! I´m not so sure about what to do...

best regards

Jere

ps:

Bsymato, the cammera looks good!

I think that if you used painted masking tape for the ejection seat harnneses will look better... I often use a thin lead (?) sheet fir that, I got those in my dentist office, the use it for taking radigraphys

Res non verba

  • Member since
    December 2009
  • From: San Miguel Island, Azores, Portugal
Posted by Azorean on Saturday, November 12, 2011 10:00 AM

  • Member since
    December 2002
  • From: Bury St Edmunds, Suffolk, England
Posted by Bish on Saturday, November 12, 2011 10:00 AM

How does it look to your eyes, thats the main thing. I have learnt not to judge colours straight from photos. Its looking nice from here.

bsymato, thats coming along very nice.

I am a Norfolk man and i glory in being so


On the bench: Airfix 1/72nd Harrier GR.3/Fujimi 1/72nd Ju 87D-3

  • Member since
    October 2008
  • From: italy
Posted by bsyamato on Saturday, November 12, 2011 1:01 PM

thanx guys .

Jere, this time not used tape because the ejection seat have it printed, really not good as the tape Sad but now are painted, at least i leave the glue of ejection seat for last, in case i change mind. Also toothpaste jar or even the same tamiya putty ,when finished can be used as belt media. I need to check some dentist , i have lots of lead pieces but not in sheets Crying

Sue looks good ,on mine i used a mix of humbrol 77 and 144. Honestly dunno if correct was ,pictures was really differents between others. Azorean picture seems to be from a really used sue.

Then.. 

GR3 updates.

Consulting some reference on internet, the italeri kit miss some piece from the falkland operative harriers,

mainly a sensor cover on the nose with an antenna, and chaffs dispenser rear the airbrake, both resolved, but the front fuselage really have a baaaad fitting, lots of putty needed to resolve and also a plastic piece to resolve a step under the cockpit between the two semi-fuselage pieces. And another inaccuracy (not only from falkland units) . The front gear have a too large little well door, when the gear is out the space opened is just the middle than on the kit . Iresolved with a plastic piece on the back of the gear and reduced the rear hole.

the pictures

the step and the gear correction

after sanding and added the nose sensor cover

lots of putty

the chaff dispensers

also started to engrave more the panel lines, they are perfect for the airbrush but with brushes i risk to cover all the lines Sad 

a last shot before to paint it with 144 that will go even as primer

that's all folks (Whistling) !

  • Member since
    December 2009
  • From: San Miguel Island, Azores, Portugal
Posted by Azorean on Tuesday, November 15, 2011 8:21 AM

  • Member since
    December 2009
  • From: San Miguel Island, Azores, Portugal
Posted by Azorean on Wednesday, November 16, 2011 3:43 PM

I´m ready to start my second built.

  • Member since
    December 2002
  • From: Bury St Edmunds, Suffolk, England
Posted by Bish on Wednesday, November 16, 2011 3:54 PM

bsyamato  Thats a lot of filler you have had to use. I am sure there's a harrier under it all some where. Theres a lot of work going into that.

I am a Norfolk man and i glory in being so


On the bench: Airfix 1/72nd Harrier GR.3/Fujimi 1/72nd Ju 87D-3

  • Member since
    October 2008
  • From: italy
Posted by bsyamato on Wednesday, November 16, 2011 4:16 PM

Yes bish here are an harrier Cool just now painting the green camoufage parts after the grey Stick out tongue

Also had re-engraved ll the panel lines :too fine engraved as the super etendard. If had time take some picture after finishing the session.

Azoren the 3rd academy (italeri) sue on this forum in short time Yes 

Good goodies you add to it


Edit:

The gr3 updates

basic camo is on (humbrol 144 grey and 116 green), also re-engraved panels detail
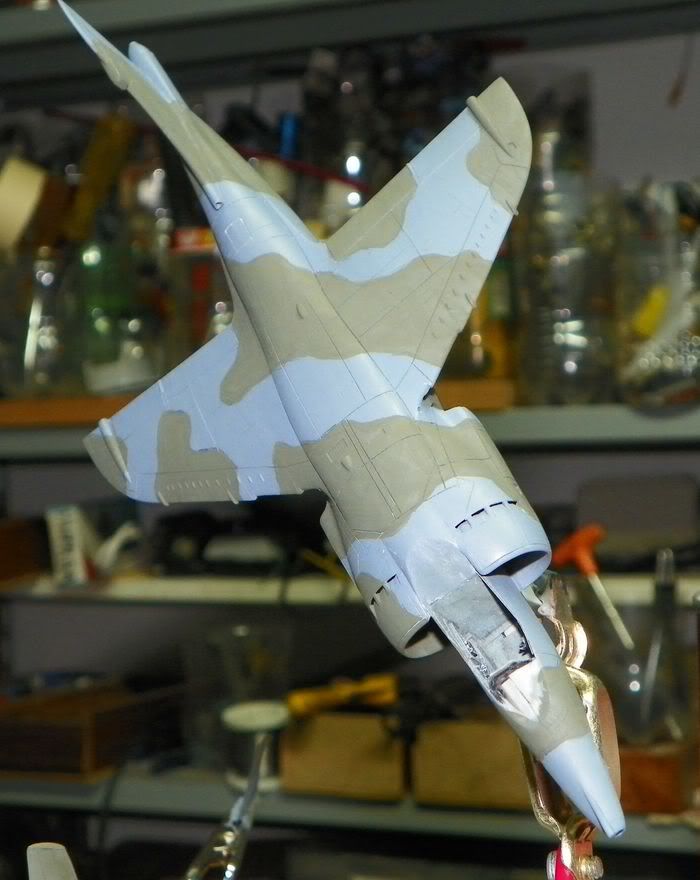
Added the two holes near the wings base, engraved also A.p.u. doors and  other important panels missing on the kit in the above engine zone


  • Member since
    January 2003
Posted by el_jere on Wednesday, November 16, 2011 6:45 PM

Azorean

Thanks for the link, I didn´t know about tht interview.

rgards

Jere


ps: great second project. Ihave built one of those some years ago, it´s a easy build, and he Eduard PE set add a lot to a bsic kit. Great you have the aerocalcas decal sheet, the kit´s decals are useless

Res non verba

  • Member since
    January 2003
Posted by el_jere on Wednesday, November 16, 2011 6:50 PM

bsyamato

Yes bish here are an harrier Cool just now painting the green camoufage parts after the grey Stick out tongue

Also had re-engraved ll the panel lines :too fine engraved as the super etendard. If had time take some picture after finishing the session.

Azoren the 3rd academy (italeri) sue on this forum in short time Yes 

Good goodies you add to it


Edit:

The gr3 updates

basic camo is on (humbrol 144 grey and 116 green), also re-engraved panels detail

http://i405.photobucket.com/albums/pp139/bsyamato/modellismo/harrier%20gr3%20italeri72/100_8805.jpg

http://i405.photobucket.com/albums/pp139/bsyamato/modellismo/harrier%20gr3%20italeri72/100_8807.jpg

Added the two holes near the wings base, engraved also A.p.u. doors and  other important panels missing on the kit in the above engine zone


Looks great from here, a gloss coat, decals and you are almost done!

Res non verba

  • Member since
    January 2003
Posted by el_jere on Wednesday, November 16, 2011 6:57 PM

I just have to paint my SUE again, the first colour seems to gray for me. The most tim consuming thing was to mask it again, I use th same colour than before lightned with white.

It´s close to the first one, but I´m much more happy with it now.

I also have decaled the main parts, I still have to add he stencils tomorrow. I used th kit´s decals, wich are quite poor, a bit translucent, some are off register and some are complety wrong, like the sun on the tail (wich should be golden instead of yellow and it do not have such an idiot look!!) The squad logo is algo wrog but I didn´t have a rplacemnt.

I used some decals from the aeroclcas sheet wich is a suplement for th kit´s decals.

Tomorrow I will post some more pics.

bst regards


Jere

Res non verba

  • Member since
    October 2008
  • From: italy
Posted by bsyamato on Thursday, November 17, 2011 4:01 AM

there's again lots of pieces to paint but most work yes done Surprise

Sue blue/gray looks good as worn with year, lots of pictures looks so Yes

  • Member since
    December 2002
  • From: Bury St Edmunds, Suffolk, England
Posted by Bish on Thursday, November 17, 2011 5:09 AM

Two lovely looking builds there guys. Great engraveing work on the panel lines, thats really some great work on the panel lines, what did you use to engrave them. Thats really somethin to do.

I am a Norfolk man and i glory in being so


On the bench: Airfix 1/72nd Harrier GR.3/Fujimi 1/72nd Ju 87D-3

  • Member since
    February 2003
  • From: Rothesay, NB Canada
Posted by VanceCrozier on Thursday, November 17, 2011 7:38 AM

bsyamato - nice work on the Harrier, I'm really liking the paint, it has a nice worn look to it already.

el jere, good job on the colour match, that seems to be a tricky one to deal with as the photos from that time can be quite different from one to the next.

Azorean - setting up for a Super Etandard as well! Looking forward to seeing another.


Alright, I'm calling my Sea Harrier 98% done. I didn't like how the Sidewinders turned out so I'm re-painting them. And as always after pics are taken, there are a couple of tiny little things that are bugging me, a little touch of paint here & there before moving into the display case....


On the bench: Airfix 1/72 Wildcat; Airfix 1/72 Vampire T11; Airfix 1/72 Fouga Magister

JOIN OUR COMMUNITY!

Our community is FREE to join. To participate you must either login or register for an account.

SEARCH FORUMS
FREE NEWSLETTER
By signing up you may also receive reader surveys and occasional special offers. We do not sell, rent or trade our email lists. View our Privacy Policy.