SEARCH FINESCALE.COM

Enter keywords or a search phrase below:

The group build to end all group builds - THE GREAT WAR

157482 views
1091 replies
1 rating 2 rating 3 rating 4 rating 5 rating
  • Member since
    February 2006
  • From: Smithers, BC, Canada
Posted by ruddratt on Saturday, March 26, 2011 7:20 PM

Doogs, I hear ya about those tabs........and it's not just the fuselage halves - a few other parts have 'em too. As you said though, they're not too big a deal. I use a 1/2" wide flat metal file with a really fine grit - cleans 'em up nice without buggering up the seams too much.

...and ditto what Marc said about your first attempt at the wood grain. Very nice! Yes

Mike

 "We have our own ammunition. It's filled with paint. When we fire it, it makes pretty pictures....scares the hell outta people."


  • Member since
    April 2005
  • From: Piscataway, NJ!
Posted by wing_nut on Saturday, March 26, 2011 3:09 PM

The wood looks great.  You should be happy, that great for any try, not just a first.

Marc  

  • Member since
    June 2010
  • From: Austin, TX
Posted by DoogsATX on Saturday, March 26, 2011 1:08 PM

ruddratt

Fine work Doogs. Nice to see some progress pics here. So, how you liking the kit so far?

Can't make too many judgements thus far. The detail is pretty great, though, and my only criticism is that the fuselage halves have sprue tab connections on the connection seam. Only other kit I've encountered this on are Hobby Boss' F4F Wildcats, and I find it frustrating because reducing those tabs almost always messes with the straight seam line. But that's a minor thing.

Also did the wood graining last night. Very happy with the results, especially for my first try at it. Have to let it cure a few days before I do the clear yellow/orange thing to it, though.

On the Bench: 1/32 Trumpeter P-47 | 1/32 Hasegawa Bf 109G | 1/144 Eduard MiG-21MF x2

On Deck:  1/350 HMS Dreadnought

Blog/Completed Builds: doogsmodels.com


  • Member since
    April 2005
  • From: Piscataway, NJ!
Posted by wing_nut on Saturday, March 26, 2011 6:24 AM

Great mementos Bockscar.  I just watched a few episodes of an old series, narrated by Walter Cronkite, that I had never heard of call "War and Civilization".  It was sort of a chronology of war going way way back.  Wat I got out of it is that it simply never end.  It's in us to do it.  Someone will be fighting someone else somewhere all the time,  You mention the gas of WWI and when they talked about it in the show it reminded me of when I was a kid in high school about 1970 and was in the hospital for my appendix.  I was in a 4 bed ward with 1 old guy who was smoking Churchills... remember when someone could smoke literally anywhere... and he was there because of the his lungs form being gassed in the trenches.   I was just a dopey kid that couldn't care less.  What a waste.  Sure would love to talk to him now.

Marc  

  • Member since
    August 2003
  • From: Connecticut, USA
Posted by Nachtflieger on Saturday, March 26, 2011 5:21 AM

Nice start, Doogs!

Nate


  • Member since
    February 2010
  • From: Ontario, Canada
Posted by Bockscar on Friday, March 25, 2011 10:38 PM

Wing_nut: An associate just came back from a tour of WW I sites, and I sent the Vimy pins over with him. He got the medallions over there.

The Canada pins were on the uniform sleeves of my wife's grandad's. He was a sapper, and was familiar with the motivating power of Amatol. The button came from his overcoat, he was gassed and luckily survived.

The spent cartridges allegedly came from his firing at the enemy.  He eventually came back to Canada to convalesce, and never fully recovered from the gas.

Yeah, ammonia is bad, and sulphur is bad, but it takes the Lord of Hades to combine them into a breathable gas.

The war to enhance all wars. 

My mother-in-law was overcome to see the medallions, she often spoke of her dad's troubles with his lungs.

We do what we do because they did what they did.

I wonder who the guy was on the other end of those precious cartridges. God bless them all.


  • Member since
    February 2006
  • From: Smithers, BC, Canada
Posted by ruddratt on Friday, March 25, 2011 7:43 PM

Right on. I knew this GB would just continue to grow! Yes


Fine work Doogs. Nice to see some progress pics here. So, how you liking the kit so far?


Began work on the engine yesterday, and got some paint on 'er too. Added a bunch of stuff to what is already a very nice little powerplant OOB. Should have some pics up sometime this weekend.

Mike

 "We have our own ammunition. It's filled with paint. When we fire it, it makes pretty pictures....scares the hell outta people."


  • Member since
    April 2005
  • From: Piscataway, NJ!
Posted by wing_nut on Friday, March 25, 2011 4:01 PM

And FYI... Sean brings us to 27 participants and 36 models

Marc  

  • Member since
    April 2005
  • From: Piscataway, NJ!
Posted by wing_nut on Friday, March 25, 2011 3:54 PM

All right doogs.... painted parts...WOOHOO!  Nice.


I would also like to welcome u-69 to the build.  He... of course I am assuming he's a he, I know, sexist of me, right?...is planning on a Friedrichshafen FF-33 in 1/48 by Techmod.

Bienvenue, Willkommen, Benvenuti, ようこそ, Vítej, 歡迎, Tervetuloa, Добро пожаловать

Marc  

  • Member since
    June 2010
  • From: Austin, TX
Posted by DoogsATX on Friday, March 25, 2011 11:26 AM

Okay, here we go. Proof that I am actually working on the Pup:

On the Bench: 1/32 Trumpeter P-47 | 1/32 Hasegawa Bf 109G | 1/144 Eduard MiG-21MF x2

On Deck:  1/350 HMS Dreadnought

Blog/Completed Builds: doogsmodels.com


  • Member since
    April 2005
  • From: Piscataway, NJ!
Posted by wing_nut on Thursday, March 24, 2011 6:34 AM

Nah, nothing to be sorry for.  It was all me.  Yesterday I didn't know my a$$ from my elbow.  It started when I sat in my truck and was about to turn the key and the phone rang canceling my morning job.    Just threw me off for the day.Tongue Tied  I knew you are doing the SE.5 now.Whistling  Imagine if I didn't have modeling to keep me calmIndifferent

Marc  

  • Member since
    February 2006
  • From: Smithers, BC, Canada
Posted by ruddratt on Wednesday, March 23, 2011 7:00 PM

Marc, actually I was speaking in reference to the SE.5. The eyelets you want to use for the Alby's should be fine. Sorry for the confusion buddy.

Mike

 "We have our own ammunition. It's filled with paint. When we fire it, it makes pretty pictures....scares the hell outta people."


  • Member since
    April 2005
  • From: Piscataway, NJ!
Posted by wing_nut on Wednesday, March 23, 2011 1:01 PM

Mike, looks like a bit of tit for tat.  You point about the eyelets is well taken as well.  Since the difference between the D.V and the D.Va is likely minimal, I will check those ref pics as well.  I don't want to start making something like 45 eyelets if they are gpoing to be wrong.

Marc  

  • Member since
    June 2010
  • From: Austin, TX
Posted by DoogsATX on Wednesday, March 23, 2011 10:56 AM

ruddratt

Doogs, if you're not keen on using oils, one technique I've used with success is after the base coat and a heavy, well-cured coat of Future, I'll mix up a thick, flat enamel 'wash' of the grain color, usually a few shades darker than the base color and apply it sparingly with a small piece of that squishy foam packing stuff in the direction of the grain until I get the look I want. Then a generous overcoat of tamiya clear yellow or orange (again, depending on the effect you're looking for) seals the deal. Really cuts down on 'cure' time. HTH.

Oh, I have no problem using oils...I just like to keep my eyes peeled for different options. 

I actually ended up testing the Vallejo woodgrain on some pioneer tools and a 17-pounder ammo box that are going on the Achilles. It's basically a transparent brown/red...not sure I like the effect on lighter wood, but it looks pretty friggin' good on a piece of "dark" wood with Tamiya NATO brown as a base. Will have to wait for a final coat of Tamiya clears to be sure.

On the Bench: 1/32 Trumpeter P-47 | 1/32 Hasegawa Bf 109G | 1/144 Eduard MiG-21MF x2

On Deck:  1/350 HMS Dreadnought

Blog/Completed Builds: doogsmodels.com


  • Member since
    February 2006
  • From: Smithers, BC, Canada
Posted by ruddratt on Wednesday, March 23, 2011 10:44 AM

Marc, you bring up an excellent point. I just did a test run on one pair and sure enough they were way too close. However, when I CA'd a 1/16" long shim between them, flush with one end (cut from a PE fret attachment point), they were spot on - matched up perfectly with the pre-drilled holes on the kit.

WnW site has some excellent close-ups of their restoration. The sleeves (my 1/8" x .05mm brass pieces) will almost have to butt up against the aircraft's surface, so there will not be much room for eyelets unfortunately. I'll most likely be going with the origional plan, but with the added shims. I do appreciate the tip though, and the heads up on the spacing! Yes

Mike

 "We have our own ammunition. It's filled with paint. When we fire it, it makes pretty pictures....scares the hell outta people."


  • Member since
    April 2005
  • From: Piscataway, NJ!
Posted by wing_nut on Wednesday, March 23, 2011 6:44 AM

Dupes, I love my Ultra Wire and want to marry it.

Mike, I like the double tube idea but won't the wires be too close together?  What about using the twisted wire eyelets like the ones made on the ww1aircarftmodels web site?  With the level of quality and care in the way you build I think they will probably turn out right the first time anyway.  But if they are a tiny bit off all you would have to do would be to slightly bend the eyelets to adjust.

Marc  

  • Member since
    February 2006
  • From: Smithers, BC, Canada
Posted by ruddratt on Tuesday, March 22, 2011 9:09 PM

Even though the rigging on the SE.5 is a loooong ways away, been toying around with a few ideas to do the double wires and keeping them parallel to each other and maintain uniform spacing for each of the double runs. My idea is to cut the .05mm brass tubing into the 1/8" segments, then CA two of them side by side. Copper wires will be CA'd into one end to allow for angle adjustments where they attach to the fuselage/wings, and the rigging wires will be done with the .003" EZLine. Sounds good on paper anyway - we'll see how it pans out.

Mike

 "We have our own ammunition. It's filled with paint. When we fire it, it makes pretty pictures....scares the hell outta people."


  • Member since
    February 2006
  • From: Smithers, BC, Canada
Posted by ruddratt on Tuesday, March 22, 2011 8:34 PM

Doogs, if you're not keen on using oils, one technique I've used with success is after the base coat and a heavy, well-cured coat of Future, I'll mix up a thick, flat enamel 'wash' of the grain color, usually a few shades darker than the base color and apply it sparingly with a small piece of that squishy foam packing stuff in the direction of the grain until I get the look I want. Then a generous overcoat of tamiya clear yellow or orange (again, depending on the effect you're looking for) seals the deal. Really cuts down on 'cure' time. HTH.

Mike

 "We have our own ammunition. It's filled with paint. When we fire it, it makes pretty pictures....scares the hell outta people."


  • Member since
    November 2006
  • From: Coastal Maine
Posted by dupes on Tuesday, March 22, 2011 6:19 PM

Howdy! Just got my loot from the fly tying joint this morning - have to say that that tubing looks AWESOME. I can think of all kinds of uses for that stuff! May have to place another order just to get all of the different sizes.

Ditto with the lead wire...not sure about the ultra wire yet, pretty small gauge stuff. Not sure if it has quite as many applications for (non-rigged) other projects.

  • Member since
    June 2010
  • From: Austin, TX
Posted by DoogsATX on Tuesday, March 22, 2011 4:41 PM

Aaronw


 DoogsATX:


Hey Marc - can I add a second build? 

Just picked up the 1/32 Academy/Hobbycraft/whatever Nieuport 17. 
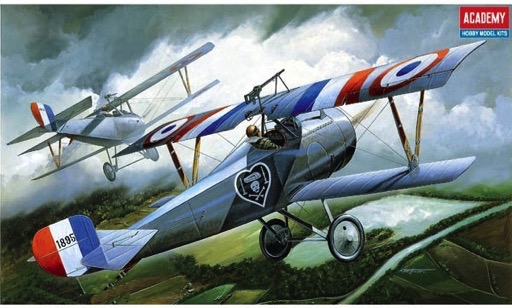
http://www.scalehobbyist.com/images/products/ACD/ACD00002190/ACD00002190_0_l.jpg

Wish I had more choices on the markings front...but the kit looks like a clean, easy build.


I believe those markings would be for Charles Nungesser, one of France's top aces. It they don't do anything for you though almost everybody flew the Nieuport 17, French, British, Russians, Italians, Belgians, even the Germans had a few.

If you are still worried about building a biplane this would be an easier plane to build than the Pup, as a sesquiplane, the struts come to a V on the lower wing making them much less fiddly to assemble than the individual struts on the Pup. The rigging should be simpler too. 

Sorry man, meant to respond earlier and then the pages advanced on me...

It's not that it's Nungesser, it's that I've seen plenty of other, more colorful Nieuport 17's, and it's kind of disappointing that the only options in the box are silver dope. That and...Academy decals.

On the Bench: 1/32 Trumpeter P-47 | 1/32 Hasegawa Bf 109G | 1/144 Eduard MiG-21MF x2

On Deck:  1/350 HMS Dreadnought

Blog/Completed Builds: doogsmodels.com


  • Member since
    June 2010
  • From: Austin, TX
Posted by DoogsATX on Tuesday, March 22, 2011 3:13 PM

wing_nut

Sean... some interesting schemes there, thanks.


OK aircraft guys.  If you have not seen this site already... WOW.  check it out.

http://www.ww1aircraftmodels.com/

Dude, that site is full of win. Bookmarked!

Slight progress on the Pup. Last night I turned all the interior pieces over and...primed the other sides! Basecoating starts this evening, with wood grain not far behind!

Between this and the Achilles, I think I may need to crack open a simple build that I can turn to when my eyes start aching from all the detail work.

Speaking of which, a few questions:

- For parts that need wood grain on two sides, any holding/positioning/whatnot suggestions? I'm not too keen on wooding one side, then waiting several days for the oils to cure up a bit.

- Has anyone ever tried Vallejo's "woodgrain" transparent color? Picked some up at the LHS today. Looks interesting...like if it works it could make a nice shortcut to the usual oils + Tamiya clear orange approach.

On the Bench: 1/32 Trumpeter P-47 | 1/32 Hasegawa Bf 109G | 1/144 Eduard MiG-21MF x2

On Deck:  1/350 HMS Dreadnought

Blog/Completed Builds: doogsmodels.com


  • Member since
    August 2005
  • From: Oshawa, Ontario
Posted by u-69 on Tuesday, March 22, 2011 10:40 AM

I'm hoping they come out with their "Master" kits soon....  


just googled around a little....  found this:


Special Edition Kits:

The first Special Edition kits will come out this year but there are no dates set yet. The photo etched content will be extensive. Richard showed me a proof of the LVG photo etched fret and it is very impressive. Lots of extra detail for the engine and the interior. Some of the PE sets for Special Edition kits will run to 200-250 pieces! Wahoo! This will be a tough decision for the modellers who already built the basic kits because the desire to pick up the Special Edition version will be very strong. 

BigBlock Studios web design:
http://www.bigblockstudios.ca

My Models:
http://www.onetofortyeight.com

  • Member since
    February 2006
  • From: Smithers, BC, Canada
Posted by ruddratt on Tuesday, March 22, 2011 10:25 AM

wing_nut

I've been back to the WNW site to look at that Pup 1/2 dz times.  I may pull the trigger soon.

Marc, I may not be too far behind you. Been eyeballing that one for a while along with the Roland, all the while keeping my eyes peeled for the D.VII.

Mike

 "We have our own ammunition. It's filled with paint. When we fire it, it makes pretty pictures....scares the hell outta people."


  • Member since
    February 2010
  • From: Berkeley CA/St. Paul MN
Posted by EBergerud on Monday, March 21, 2011 10:38 PM

Thankee for the Wings Palette site - that's a goodie. Even gave them a couple of bucks. The WWIaircraft site is a real gem: the guy that runs the thing is very genial and would not mind helping out with if you're stuck on something. He's very good.

Eric


A model boat is much cheaper than a real one and won't sink with you in it.

  • Member since
    February 2006
  • From: Smithers, BC, Canada
Posted by ruddratt on Monday, March 21, 2011 9:09 PM

Sean, those are some colorful birds! Thanks for posting that! Yes

Doogs, that mount with the black cowl is a looker for sure! Yes Good point about the color contrast too.

Marc, great website! Got it bookmarked!


...and what's all this about Ernest building a plane - and it's a bipe to boot?! Surprise Told ya these suckers can be addicting! Stick out tongue

Mike

 "We have our own ammunition. It's filled with paint. When we fire it, it makes pretty pictures....scares the hell outta people."


  • Member since
    April 2005
  • From: Piscataway, NJ!
Posted by wing_nut on Monday, March 21, 2011 5:56 PM

Sean... some interesting schemes there, thanks.


OK aircraft guys.  If you have not seen this site already... WOW.  check it out.

http://www.ww1aircraftmodels.com/

Marc  

  • Member since
    August 2005
  • From: Oshawa, Ontario
Posted by u-69 on Monday, March 21, 2011 10:50 AM

@wing_nut

if you wanted to go a little outside the box, quite a number of the pups were quite colorful, http://wp.scn.ru/en/ww1/f/530/9 windsock datafiles have quite a few profiles of checkered ones, striped ones, one with a diamond lozenge and another that looks something like a rising sun motif....  

-sean

BigBlock Studios web design:
http://www.bigblockstudios.ca

My Models:
http://www.onetofortyeight.com

  • Member since
    June 2010
  • From: Austin, TX
Posted by DoogsATX on Monday, March 21, 2011 10:48 AM

wing_nut

I like the black cowl.  With just about every Sopwith anything is green, it's tough to pick.  I agree that will make the engine stand out more.

Question for the WWI experts.   I see a lot of WWI planes modeled with the tail up and a wood sawhorse.  Is there a reason?  Was it commonly done?  Gun testing?

You mean like this?

Think the sawhorse in this case is to help with the really, really short takeoff space!

On the Bench: 1/32 Trumpeter P-47 | 1/32 Hasegawa Bf 109G | 1/144 Eduard MiG-21MF x2

On Deck:  1/350 HMS Dreadnought

Blog/Completed Builds: doogsmodels.com


  • Member since
    April 2005
  • From: Piscataway, NJ!
Posted by wing_nut on Monday, March 21, 2011 10:32 AM

I like the black cowl.  With just about every Sopwith anything is green, it's tough to pick.  I agree that will make the engine stand out more.

Question for the WWI experts.   I see a lot of WWI planes modeled with the tail up and a wood sawhorse.  Is there a reason?  Was it commonly done?  Gun testing?


Marc  

  • Member since
    June 2010
  • From: Austin, TX
Posted by DoogsATX on Monday, March 21, 2011 10:20 AM

ruddratt

Doogs, ya got me antsy to see some WIP pics!

It'll probably be a few more days yet. I officially "started" - as in, cutting parts off the sprue - on Saturday. So far, all I've got are a bunch of different parts white-tacked to cardboard squares, with a coat of primer on one side. I'll be primering the other sides tonight, then moving on to shooting the base colors for the wood on Tuesday. Good thing, too, since I realized last night I didn't have any Tamiya XF-59 that WnW recommends for the light wood.

I've also decided I'm going to build "Black Arrow" rather than the 9901a. I like the Vickers gun better than the Lewis, and that weathered black cowl should look pretty slick. I think it'll set the engine off a bit more, too.

There's actually a pic in the instructions showing Black Arrow flipped over on its back from a strong gust of wind...tempting diorama fodder for sure!

On the Bench: 1/32 Trumpeter P-47 | 1/32 Hasegawa Bf 109G | 1/144 Eduard MiG-21MF x2

On Deck:  1/350 HMS Dreadnought

Blog/Completed Builds: doogsmodels.com


JOIN OUR COMMUNITY!

Our community is FREE to join. To participate you must either login or register for an account.

SEARCH FORUMS
FREE NEWSLETTER
By signing up you may also receive reader surveys and occasional special offers. We do not sell, rent or trade our email lists. View our Privacy Policy.