SEARCH FINESCALE.COM

Enter keywords or a search phrase below:

Made In USSR GB

61749 views
430 replies
1 rating 2 rating 3 rating 4 rating 5 rating
  • Member since
    October 2008
  • From: italy
Posted by bsyamato on Sunday, July 3, 2011 5:25 AM

lots of updates here!

Khalee2 nice finished sukhoi, some more paint detail should easy improve the finish

castelnuovo the Katyusha looks good

KJ200 the fagot come great

terry35 the artillery piece have a terrific level of details Indifferent

no update pictures for me, just second corrective layer of light gray and two clear gloss layers for decals.

Waiting to complete doors to finish fuselage


  • Member since
    May 2005
  • From: Dublin Rep Of Ireland
Posted by terry35 on Saturday, July 2, 2011 6:32 PM

Hey Guys great work going on, bsyamato, Sir yess I will be washing out theh wood but stay tuned it may take a while, Castlenuavo great Katyusha.

I really like what I'm seeing in this GB, I obviously had tunnel vision when I joined in. I had not taken into account all the wonderful stuff turned out by the former soviet union.

Well heres my update.

Well its been a week of working on the Gun. I have the Tractor complete and ready for paint, The tractor is really a shake and bake kit, falls together.

The gun is really a beautiful kit but between bad fitting parts and flash it is slower going. I got the guntube done and was surprised that it took two evenings to get the barrel right, lots of Humbrol filler thinned with humbrol cement.

Well on with the pic's.

The carriage so far, this is a bit fiddly to get straightened, thet locating tabs are very loose so getting everything lined up is touch and go, the easy way out was to assemble the front axle which is in the final stages of constructtion and use it to secure the front of the carriage ensuring proper alignment.  This assembly beside placed behind the tractor gives you a 16 inch model, so it will be bigger with the barrel.

The spade in travel mode.

The bottom of the spade required a lot of filling.

The limber assembly.

Some of the detail on the carriage, there is no shortage of detail so weathering will be a pleasure, even drybrushed lightly to bring up some rivets.

The detail on the ammunition winch, its a beauty.

Thanks to every body who replied and I hope to update ASAP.

Terry.


  • Member since
    July 2003
  • From: Bicester, England
Posted by KJ200 on Saturday, July 2, 2011 8:11 AM

Castenuovo, nice job on the Katyusha! Yes

Khalee, the little Sukhoi looks great.

Bsyamato, apologies for spelling your name wrong again.Embarrassed

The helo is looking stunning. Sure looks tiny.

Made some progress on the Mig this week, spending most of my evenings tinkering with the NMF to get something interesting.

The Mig 15s were painted with a clear varnish, so that the variations in the metal were still visible. I've noticed this in a lot of pictures of Korean war Migs. Even the camo'd machines appear to have been varnished as they exhibit a high sheen.

I

I started off with a base coat of Tamiya Chrome Silver, which was left to dry for an hour before being buffed with a cotton wool pad. This helps remove the slightly rough finish you sometimes get with Tamiya acrylics, before applying a coat of Future.

I then masked off various access panels, as well as the flight surfaces and sprayed Tamiya Metallic Grey, by way of some variation.

The red intake is just tacked in place, but adds a welcome splash of colour.

Next stop decals.

Karl


Currently on the bench: AZ Models 1/72 Mig 17PF

  • Member since
    July 2008
  • From: Vancouver, the "wet coast"
Posted by castelnuovo on Saturday, July 2, 2011 2:10 AM

Well, lets call this one done. Not my most glorious model but there we go...

The Katyusha and three NKVD dudes...


  • Member since
    October 2009
  • From: Oklahoma USA
Posted by Khalee2 on Wednesday, June 29, 2011 9:48 PM

Well here it is done not a bad kit decals did a little better than the 302.


  • Member since
    October 2008
  • From: italy
Posted by bsyamato on Wednesday, June 29, 2011 6:10 PM

ka18 updates

a new red layer (used 220 ferrari red humbrol Whistling ) almost resolved the "begginer" mistake

i not lost  time to mask the fuselage, the line between the two colors will be covered (if all goes good) by the decorative decals.

the tail rudders almost finished (right now completed with the white the gap between the decals)

that's all for now

  • Member since
    October 2008
  • From: italy
Posted by bsyamato on Wednesday, June 29, 2011 5:31 AM

nice to see the links was usefull. The site is in russian and have a huge quantity of references but not so simple to find.

I'm on painting red on the kamov. Some mistake occurred... stupid beginer mistake Bang Head on painting the lower light gray i not covered the whole helo, so the upper red show some differences between the area covered in gray and the not covered area.. Also completed the rudders area with decals and one of id numbers was destroyed Crying

ASAP i'll post pictures.

  • Member since
    May 2011
Posted by Jeff_G on Tuesday, June 28, 2011 1:09 PM

Excellent links bsyamato, that's just what I need!  These will be helpful when it comes time to do the rigging as well.  Yes

  • Member since
    October 2008
  • From: italy
Posted by bsyamato on Tuesday, June 28, 2011 12:07 PM

this link can be usefull

http://www.airwar.ru/other/draw/i5.html

and here

http://www.airwar.ru/enc/fww1/i5.html

some detail of cockpit and paint scheme too

another pretty subject on the gb! Yes

  • Member since
    May 2011
Posted by Jeff_G on Tuesday, June 28, 2011 12:02 AM

Progress at last!  It took a while to get started, but things are rolling along now with the ICM I-5 (early) that I'm building.

I got the fuselage populated and ready to go:

The seat was a bit strange and fiddly (for me at least).  It started out as a mostly flat piece of styrene and the instructions had me "fold" it along two seams and glue it in the center to make the final part.  It went easier after I applied a bit of solvent to the creases to soften them up.  Anyone know what that black piece is at the bottom/front?  Bomb sight maybe?

Anyway, here it is all buttoned up:

Next was the engine cowling and nose:
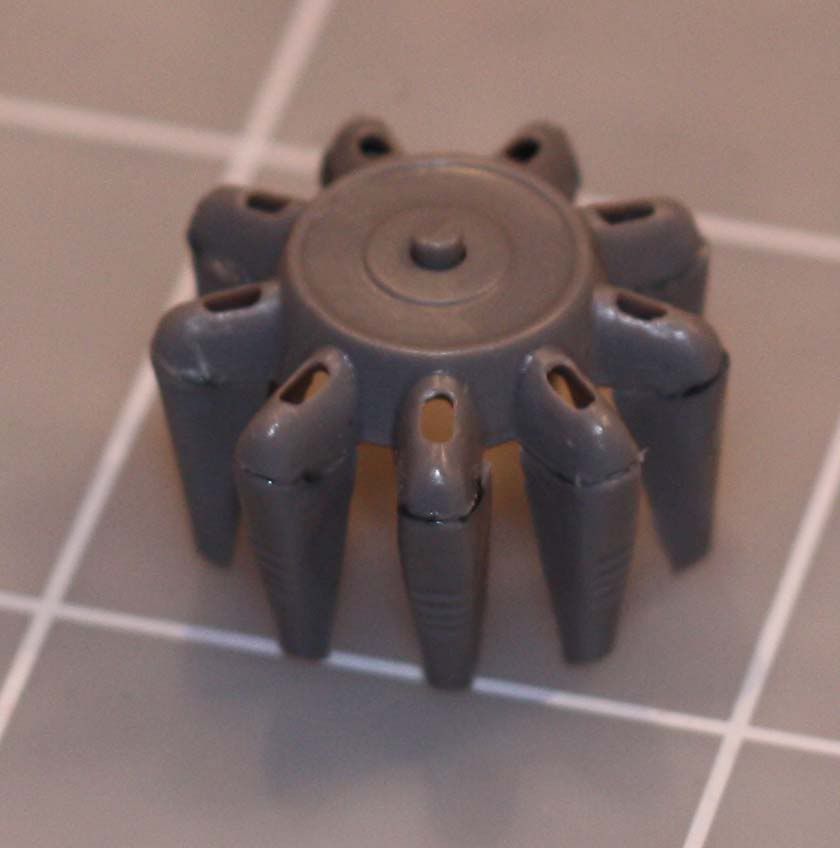
This piece was very challenging for me.  It consisted of the nose part where the spinner goes, then I had to glue on the aft sections of each cowling.  One of these cowlings is different from the others, but has the same part # and the difference is not called out in the instructions (it's the one on top).  As you can see, this arrangement leaves some fun seams to clean up.  Those grid lines are 1" square, so that gives you an idea of how tiny the parts are!  My cheaters got a workout on this one.

I would have preferred that they made each cowling ONE part that was then glued onto the nose.  Seems to me it would have been easier to manufacture and easier to build.  Hi ho...

And here's the cowling installed on the fuselage along with the tail section and top machine guns.

See that little gap just behind the top cowling?  The part that goes there was a bit short.  I have to build that up and fill it before I get too much further.  Lots of cleanup to do as well.

This kit includes two rudders, but I'm not sure what they are for since the instructions don't give any clues and my research was fruitless.  I used the one that matches the box art.  The other one is more pointy at the top of the rudder.

That's as far as I got this weekend.  Next I'll glue up the lower wings and start the paint.  During dry fitting, these parts didn't go together too well.  There were big gaps and steps all over the place.  

But hey, what fun would it be if everything just glued up perfect the first time.  Not much I say!  Geeked

--Jeff

  • Member since
    July 2008
  • From: Vancouver, the "wet coast"
Posted by castelnuovo on Monday, June 27, 2011 10:41 PM

OK, here is a bit more of a progress. Some paint touch-ups are needed. Funny how it is, some paint incorrectnesses show up when I use the flash on the camera...Confused

Cheers...


  • Member since
    October 2008
  • From: italy
Posted by bsyamato on Monday, June 27, 2011 4:05 AM

this kit seems have better fits Yes

need more strange kits from amodel


  • Member since
    October 2009
  • From: Oklahoma USA
Posted by Khalee2 on Sunday, June 26, 2011 6:43 PM

And here is where I am at now.

  • Member since
    October 2008
  • From: italy
Posted by bsyamato on Sunday, June 26, 2011 6:04 AM

terry35


Jeff and Bsyamoto, you guys are showing me aircraft I've never even heard of its great to see that these unusual models are available.


http://i20.photobucket.com/albums/b242/terryburke/russian%20tractor/russiantractor010.jpg


KJ200

Bsyamoto, sorry I got your name wrong.

i give up Sad .. i just copy the name when not sure to write correct.

.... 

Terry great weathering on the tracked transport , you will accentuate the planks lines with a black whashing?

Karl the fagot come really great, nice template for the nose Yes

no updates on my kits


  • Member since
    May 2005
  • From: Dublin Rep Of Ireland
Posted by terry35 on Saturday, June 25, 2011 6:23 PM

Well where to start,

Dre the Mig is looking smart, and you have really got that T34 together quick.

Jeff and Bsyamoto, you guys are showing me aircraft I've never even heard of its great to see that these unusual models are available.

Maj Mike the T62 is shaping up well.

Khalee2 the Su 1 and the rocket plane are very unuisual and I look forward to seeing you get them together.

Castelnuovo that stedebaker is looking sweet I presume it's thet old Italeri. Never built it but always wanted to.

Well heres my update. its basically the same update that I will be posting over in Armor.

I'll just go through the photos as  there is no modifications made and no trouble at all.

The paint progress so far I ran out of my rattle can and had to buy two more on thursday.

Those roadwheels

track assembly took about an hour and a half.

I have done some highlighting and some washes, I'm going to hold out on further weathering until all base coating is done and all the weathering may be better done all together.

The tracks were painted with humbrol polished steel from a rattle can.

I must give the story as it happened. I thought all week that this monster needed something to tow and as I was going out to buy paint on thursday at lunchtime I thought that if the shop had a lovely big piece of Russian artillery to pull then I would invest. €50 by the way but worth it.


I have started construction on this gun but have no pics readyy as yet but I will say that it is not of the same quality as the tractor.

So heres the sprues .........

I will try to get updates done ASAP.

Thanks for dropping by.

Regards,

Terry.

  • Member since
    July 2003
  • From: Bicester, England
Posted by KJ200 on Saturday, June 25, 2011 4:06 PM

Khalee, nice job on the rocket interceptor.

I keep looking at those A-model kits, especially the Yak 25 Flashlight, as I just think it looks so cool.

Made some progress on the Airfix Mig.

I ended re-scribing the nose avionics bay hatch again, as it came out a little crooked, so filled, and re-scribed.

In order to get the curve consistent, I made a scribing template out of plastic sheet, having first used a piece of tape over the kit scribing to get the correct pattern.

This was held in place with Tamiya tape, and first a line was drawn around it to determine how accurate my template was.

Good enough for me, so I re-scribed.

The Mig was then re-primed, and several coats of gloss black applied to show up any faults which the primer had not made obvious.

It was at this point I realised that I was almost out of gloss black, hence the highly thinned paint.

The wheel bays had previously been painted with a pale blue, along with the undercarriage components, then masked with Blu Tack.

I'll let that harden over night, then give it a polish in the morning before applying the NMF tomorrow.

Karl


Currently on the bench: AZ Models 1/72 Mig 17PF

Dre
  • Member since
    June 2007
  • From: here, not over there
Posted by Dre on Friday, June 24, 2011 1:00 PM

Nice work, guys.  

That I 302 interceptor looks interesting, I might need to find one for myself.   Looks like it might be a terminal ride, though.

No updates from me for a while, work and vacation are eating into my bench time...

  • Member since
    July 2008
  • From: Vancouver, the "wet coast"
Posted by castelnuovo on Tuesday, June 21, 2011 10:43 PM

joeviz

Looking great!  What shade of green are you using?  If you mixed it yourself would you mind sharing colors and ratios used?

Joeviz, the colour is a mix of Tamiya dark green xf-73 and nato green xf-67 50-50% with a little white and some german gray, all by Tamiya. I added white utill it was a bit lighter and added gray untill it was grayish enough. It turned out a bit too dark but will be good enough Smile

Cheers...

  • Member since
    October 2008
  • From: italy
Posted by bsyamato on Tuesday, June 21, 2011 5:40 PM

edit ... i confuse something Indifferent need to post before two or three of morning ..


Good progress on truck Castelnuovo -

Khalee2 you speed up on the i-302, not too bad, but with some more sanding an putty steps you easily  get better result on it, don't fear to apply more strength when sanding amodel kits, the plastic as i see ir really hard.

Take more time with the other kit, i know are short-run kits but we have again about a year of time to end the gb Yes

KG200 don't mess up with it Cool 

Joeviz hope to get some other russian tank before the gb end, on the su-85 i applied less weathering that needed, need more practice again on tanks.


  • Member since
    July 2010
  • From: Tornado Alley
Posted by Echo139er on Tuesday, June 21, 2011 9:07 AM

castelnuovo

Gentlemen,

Some progress here on Stalin's organ.

Cheers...

That rod on the back is a piston that will go into a cilinder...in case you were wandering what it is Smile

Looking great!  What shade of green are you using?  If you mixed it yourself would you mind sharing colors and ratios used?

  • Member since
    October 2009
  • From: Oklahoma USA
Posted by Khalee2 on Tuesday, June 21, 2011 2:44 AM

Here is the I 302 rocket interceptor

And here it is done not a lot too it I used what I had on hand  as in the other post in the rocket group build thread

Landing gear too long decals not very good And I still need to work on sanding and puttying  But it got finished.

  • Member since
    February 2011
  • From: San Antonio
Posted by MAJ Mike on Monday, June 20, 2011 11:21 PM

castelnuovo

Gentlemen,

Some progress here on Stalin's organ.

Cheers...

http://i405.photobucket.com/albums/pp140/softrun/009.jpg

http://i405.photobucket.com/albums/pp140/softrun/008.jpg

That rod on the back is a piston that will go into a cilinder...in case you were wandering what it is Smile

Looking sweet!!!


 "I'd "I'd rather be historically accurate than politically correct."

"Sic gorgiamus allos subjectatos nunc!"

  • Member since
    July 2008
  • From: Vancouver, the "wet coast"
Posted by castelnuovo on Monday, June 20, 2011 10:54 PM

Gentlemen,

Some progress here on Stalin's organ.

Cheers...

That rod on the back is a piston that will go into a cilinder...in case you were wandering what it is Smile

  • Member since
    July 2003
  • From: Bicester, England
Posted by KJ200 on Monday, June 20, 2011 2:29 PM

Bsyamoto, sorry I got your name wrong.

Nice job on the Su-85.

Karl

Currently on the bench: AZ Models 1/72 Mig 17PF

  • Member since
    October 2008
  • From: italy
Posted by bsyamato on Monday, June 20, 2011 6:03 AM

joeviz


 bsyamato:


joeviz i put my su-85 (1/72)  some page ago . I'm a newbe too on armors kits Surprise your practice will be good even for me.


We can compare notes.  I don't even know where to start.  I have a lot reading (research) ahead of me. I am actually looking forward to it.

unfortunately when can compare only the armor color used, i posted here for this, my little su-85 is already finished

i used humbrol enamels, the green is 116, seems work fine but not the correct color.

The kit is a low price offer i found , from um model. Kit was really good, but have tha black wheel parts in rubber Hmm , why rubber is used on model kits?? after few year it's probably rubber lost his properties and can break into pieces without touch it

  • Member since
    July 2010
  • From: Tornado Alley
Posted by Echo139er on Sunday, June 19, 2011 9:15 PM

bsyamato

joeviz i put my su-85 (1/72)  some page ago . I'm a newbe too on armors kits Surprise your practice will be good even for me.

We can compare notes.  I don't even know where to start.  I have a lot reading (research) ahead of me. I am actually looking forward to it.

  • Member since
    October 2008
  • From: italy
Posted by bsyamato on Saturday, June 18, 2011 5:35 PM

Thanx KJ200 Big Smile but you probably wrong my nickname , and you're not the first with samoto.. probably samoto is some sumo fighter but not me , my nick name probably refere to battleship yamato 

your mig-15 look good, and confirm the good way the airfix is actually runnig Yes

joeviz i put my su-85 (1/72)  some page ago . I'm a newbe too on armors kits Surprise your practice will be good even for me.

Khalee2 sorry but i don't find none on your two subject Sad you successfully found two really rare birds Tongue Tied


  • Member since
    July 2003
  • From: Bicester, England
Posted by KJ200 on Saturday, June 18, 2011 4:31 PM

Looking forward to more pics of the Su-1.

Is that a supercharger either side of the engine?

Bysamoto, that is a cute looking 'copter.

Have made a lot progress on the Mig 15 over the last week.

I've just popped the canopy on, and will leave that to set overnight.

Karl

Currently on the bench: AZ Models 1/72 Mig 17PF

  • Member since
    July 2010
  • From: Tornado Alley
Posted by Echo139er on Saturday, June 18, 2011 12:43 PM

Ok, here is my GB entry.  Never done armor before so we'll just have to see how it turns out.


Tags: SU-85
  • Member since
    October 2008
  • From: italy
Posted by bsyamato on Friday, June 17, 2011 5:04 AM

I can try to find some reference for these rare bird Khalee2 but i can't assure it because site i foud russian resources ,are in russian.. i try. On the kamov was really hard to find something and only few pictures was out.

For the sukhoi you can try to cut the canopy to show more inside.

Goung to research

JOIN OUR COMMUNITY!

Our community is FREE to join. To participate you must either login or register for an account.

SEARCH FORUMS
FREE NEWSLETTER
By signing up you may also receive reader surveys and occasional special offers. We do not sell, rent or trade our email lists. View our Privacy Policy.