SEARCH FINESCALE.COM

Enter keywords or a search phrase below:

The OFFICIAL Panzer III and Its Variants GB

298266 views
2308 replies
1 rating 2 rating 3 rating 4 rating 5 rating
  • Member since
    March 2006
  • From: Right Side of a Left State
Posted by Shellback on Wednesday, May 23, 2012 7:26 PM

Andt , I', liking them tools and cables also my friend !!! YesBeer

  • Member since
    April 2009
  • From: Carmel, IN
Posted by deafpanzer on Wednesday, May 23, 2012 7:49 PM

Carl- Thanks my Gunny's friend! Beer Glad you stopped by. 

Ben- I agree!  Am afraid there are judges out there with mini flashlights and mirrors looking for small faults.  So it didn't hurt to take the chance and work on the mufflers. Glad you liked the tools and tow cables!  Always appreciate your feedback.  Thanks mate!!! Beer


Andy

  • Member since
    April 2009
  • From: Carmel, IN
Posted by deafpanzer on Thursday, May 24, 2012 2:53 PM

Guys- Quick update... applied rust to the spare tracks and they are attached in the rear.  I think I am going to add few Jerry cans... only had one completed can and I liked where it is so I need to find more cans to be used as stowage. 

Here's the mufflers.  If I had to do it again, I would have added styrene to close the invisible gap just above the mufflers.  I am going to spray black paint inside when I have the chance.

Thanks for looking!

Andy

  • Member since
    September 2009
  • From: Rugby, England
Posted by Hinksy on Thursday, May 24, 2012 3:27 PM

Hello lads,

Looking superb Andy! Beautiful work as always my friend!

Update for today: It's been hot, REALLY DAMN HOT! Crying (that is a sweating smiley)!

I am so glad that I booked this week off as I phoned one of my team members to ask them to send me an Email and they said it was horrific in the office! Before you ask we dont have Air Con, only the computer server room gets that treatment!

Anyway, I've commenced the heavy weathering of the StuG III C/D. Last night I added a light wash of Raw Umber. Using the supplied kit Magic Tracks I put a few links together and mounted them up-front to use as additional armour. It was then I noticed that in my haste I had totally forgot to smooth off the EP marks Bang Head so I'll have to do that tomorrow. Apart from that, the only real error I made was trying to add some bent corners to the fenders - I used a hairdryer to soften the plastic but it wasn't that good an idea. The fender bent ok but both rear idlers are now out of shape and might need replacing - I've got some spares but I'll see how it looks with the tracks fitted as they aren't that bad Embarrassed x 10

I've added a nice looking small calibre gun hit on the right side using a pin vise & small bit and weathered it, that worked well. I've started to chip quite heavily around the obvious places i.e. hatches and hinges etc.  I've added a Green colour to the 4 squares on the rear Notek and Red to the rear lamp. AK Rust and Grime Streaking effects were used all over. There was a big gap in the section of armour plating above the driver's vision slit so that got filled with Milliput and a weld bead effect was put in all round the putty.

The plan now is to tomorrow firstly primer the tools andfinish up this portion of the weathering - the left side looks a little tidy and needs a tad more work on it to balance things up. I'm then going to paint the tools and fit them then hit it with a Dull Coat. Some pigment work will hopefully tie it all together and take the edge off the heavy chipping and make it less 'stark'. I tried this method on my old StuG III B and that worked really well. Finally I'll paint the wheel rims and with a bust weekend coming I doubt there will be much time for any more work until next weekend as I'm back at work on Monday (the horror, the horror)! I do want to make up two Jerry cans to be used as stowage. I'll use the antennae trough to mount them to and I'll make a canvas sheet to drape somewhere. There are a few ares where I want to tone down the chipping so I'll put some basecoat back over the top of these areas with a small brush.

Next weekend I'll get the tracks painted up and make a start on the lower hull. I'll take things from there at that point. Yes

I hope you like her so far - just remember she's nowhere near complete and is still wearing a gloss coat!


Thanks for looking guys,

I'd love to hear any comments or suggestions etc?

Update tomorrow,

Take care,

Ben Toast 

On the Bench - Dragon Pz. IV Ausf. G (L.A.H.) Yes

Your image is loading...


  • Member since
    February 2003
  • From: Allentown, PA
Posted by BaBill212 on Thursday, May 24, 2012 3:52 PM

Hi guys,,,,,   I've been a bit preoccupied for a while,,,   but I am so glad to see this GB still going strong!

I would start naming and complimenting all the great work,,, but I'd be afraid I would miss someone (I just spent quite a bit of time catching up).

Suffice to say,,,,,,,,,   EXCELLENT      to you all,,,  


Bill

Enjoy the ride!


  • Member since
    April 2005
Posted by Thunderbolt379 on Thursday, May 24, 2012 7:01 PM

Andy -- your weathering effects are mouth-watering!

Mike/TB379

http://worldinminiature.blogspot.com/

  • Member since
    April 2009
  • From: Carmel, IN
Posted by deafpanzer on Thursday, May 24, 2012 9:19 PM

Ben- Thanks!  Glad you like what I have done with my StuG. Beer

I really dig your heavy chipping on the edges and hatches! Yes Glad we both are big fans of AK products.  I think you should add little more streaks on the sides.  Unless you are planning to do more weathering on the hull because the white on numbers and marks look clean.

Do you really have to go back to work on Monday? LOL

Andy

  • Member since
    April 2009
  • From: Carmel, IN
Posted by deafpanzer on Thursday, May 24, 2012 9:23 PM

Mike- Thanks buddy!!!  Glad you liked it... it just takes a lot of patience and more time to do few layers at a time.  Attending the workshop at AMPS Auburn really helped watching the master Mig use his Interactive AK products.  Did I ever tell that I spent nearly $200 at his booth?  It includes his second edition book which was $85 alone and it is my new bible for now. 

Bill- Hey there!  Glad you stopped by.  Figured you are spending more time at the golf courses since the weather has been great until now.  Thanks for stopping by... it is always good hearing from you my friend! Drinks


Andy

  • Member since
    February 2003
  • From: Allentown, PA
Posted by BaBill212 on Friday, May 25, 2012 4:57 AM

Andy,,  my friend,,,,  so very true. Been getting out to the links fairly often. Between that and working around the house my bench time has been severely depleted.           Hope you are doing well.            And thanks for the Drinks,     two Beer  Beer  right back atcha!

Enjoy the ride!


  • Member since
    May 2011
  • From: Illinois
Posted by armor86 on Friday, May 25, 2012 6:37 PM

Deafpanzer, rust streaks, grim weathering and chipping along the way ... oh my ... effects looking good, have you found some jerry cans ... I've used several differnt brands i.e. Dragon, Tamiya, Legend (resin), and found something new ... Great Wall Jerry can set. Armor86

Ongoing Jerry Can Mass Production on the bench - Legend set has about 12 jerry cans, installed handles ... 


Dan

  • Member since
    April 2009
  • From: Carmel, IN
Posted by deafpanzer on Friday, May 25, 2012 7:07 PM

Armor86- Thanks man!  You are way too nice! Beer I learned so much from others here and it has been three years since I joined.  I owe it to those guys who took their time to teach me all of tricks.

I must have that stowage set from Legend for my future Pz or StuG builds.  A local shop usually stock Legend products so I am thinking about going over there.  I have plenty of Jerry cans here... Dragon, Tamiya & Verlinden.  I think I am going to use Dragon because they come with PE... they were a leftover from earlier 234/1 build. 

Guys- Little update on the StuG.  I know you guys love DIRT!  Applied MIG pigment 'Russian Earth' on the lower hull, tracks and wheels.  For some reason it came out much lighter and it was supposed to be very dark brown.  I am not sure if there is something with the pigments. 

Closer shot...

I am going to try another pigment 'Dark Mud' to see if it works better.  More to come... not going anywhere for the long weekend so I hope to have more bench time!

Happy Memorial day! Beer

Andy

  • Member since
    April 2005
Posted by Thunderbolt379 on Saturday, May 26, 2012 3:11 AM

Andy -- looking incredible! Just stunning!

Can anyone recommend a mixing ratio for Panzer Interior Beige? I didn't write down my formula last time I used this shade, and I'll need to make up some soon. I'm doing the scratched bulkhead/sponson closure on the StuH 42 at this time.

Cheers, Mike/TB379

http://worldinminiature.blogspot.com/

  • Member since
    September 2009
  • From: Rugby, England
Posted by Hinksy on Saturday, May 26, 2012 6:04 AM

deafpanzer

Ben- Thanks!  Glad you like what I have done with my StuG. Beer

I really dig your heavy chipping on the edges and hatches! Yes Glad we both are big fans of AK products.  I think you should add little more streaks on the sides.  Unless you are planning to do more weathering on the hull because the white on numbers and marks look clean.

Do you really have to go back to work on Monday? LOL

Hi Andy,

She's nowhere near done yet matey - I've only used a Raw Umber wash and AK Rust Streaks. I've added the chipping that I want at the minute then I'll be painting and fitting the tools.

The dullcoat will then be added and further streaking will be added as I've found that some straks work a hell of a lot better on a matt surface.

I've replaced the warped rear idlers and the suspension arms with stuff left over from that second Tamiya StuG III B from ages ago so all is good!

I'm working from home today and fishing tomorrow so next update - next weekend Crying

StuG is looking great buddy!

Ben Toast

On the Bench - Dragon Pz. IV Ausf. G (L.A.H.) Yes

Your image is loading...


  • Member since
    September 2009
  • From: Rugby, England
Posted by Hinksy on Saturday, May 26, 2012 6:09 AM

Thunderbolt379

Andy -- looking incredible! Just stunning!

Can anyone recommend a mixing ratio for Panzer Interior Beige? I didn't write down my formula last time I used this shade, and I'll need to make up some soon. I'm doing the scratched bulkhead/sponson closure on the StuH 42 at this time.

Cheers, Mike/TB379

I'm assumin when you say 'beige' you are referring to the off white colour you see on interiors of mainly earlier panzers?

I find Vallejo Model Colour Off White to be excellent and a very good airbrushable paint.

Hope this helps!

Ben Toast 

On the Bench - Dragon Pz. IV Ausf. G (L.A.H.) Yes

Your image is loading...


  • Member since
    April 2009
  • From: Carmel, IN
Posted by deafpanzer on Saturday, May 26, 2012 2:56 PM

Thunderbolt379

Can anyone recommend a mixing ratio for Panzer Interior Beige? I didn't write down my formula last time I used this shade, and I'll need to make up some soon. I'm doing the scratched bulkhead/sponson closure on the StuH 42 at this time.

Mike- Ditto to Ben's comment... you can get away using off white or ivory paint.  I use MM Panzer Interior Buff right out of its bottle. 

Andy

  • Member since
    April 2005
Posted by Thunderbolt379 on Saturday, May 26, 2012 6:23 PM

Thanks, Andy -- will add a couple of spots of tint to white. What's the lustre? IIRC interior paints were glossy, presumably to make it possible to keep the interior cleaner with minimum effort. We can get MM Acryls here but it's not a shade I'll use a lot of, until I do that Tiger with full interior, so I don't have it in my range yet (or were Tigers pure white inside?!)

I got the rear bulkhead done yesterday, just a bit more rubbing down to do, I'll do the sponson blankinjg plates today, then spray the interior colour. The inside of the hatches are a point in question, they were at first the interior colour but crews overpainted them with exterior colours in the field as a matter of course, and I believe the factories adopted this practice, so a vehicle as late as early '45 should have camo hatch interiors, right?

Cheers, Mike/TB379

http://worldinminiature.blogspot.com/

  • Member since
    April 2009
  • From: Carmel, IN
Posted by deafpanzer on Sunday, May 27, 2012 9:08 AM

Mike- I am really looking forward to your next photo updates!  Sounds like you are almost halfway with your build? 

Andy

  • Member since
    April 2009
  • From: Carmel, IN
Posted by deafpanzer on Sunday, May 27, 2012 9:12 AM

Guys- I think you guys better SIT DOWN because I am calling it D-O-N-E finally... it has to be my new record working on it for nearly eight months but I took a break to do a commission build on the Huey for a friend's 50th birthday.

It has been a fun build... I will not hesitate to build an old Dragon Imperial kit again. Thank you my friend detailfreak (Greg) for sending me this great kit.  I owe you BIG time! Beer

http://i713.photobucket.com/albums/ww137/aleffler/StuG%20III%20Ausf%20F-8/photo-2-22.jpg

http://i713.photobucket.com/albums/ww137/aleffler/StuG%20III%20Ausf%20F-8/photo-9-2.jpg

http://i713.photobucket.com/albums/ww137/aleffler/StuG%20III%20Ausf%20F-8/photo-3-14.jpg

http://i713.photobucket.com/albums/ww137/aleffler/StuG%20III%20Ausf%20F-8/photo-4-10.jpg

http://i713.photobucket.com/albums/ww137/aleffler/StuG%20III%20Ausf%20F-8/photo-5-8.jpg

http://i713.photobucket.com/albums/ww137/aleffler/StuG%20III%20Ausf%20F-8/photo-6-8.jpg

http://i713.photobucket.com/albums/ww137/aleffler/StuG%20III%20Ausf%20F-8/photo-10-2.jpg

http://i713.photobucket.com/albums/ww137/aleffler/StuG%20III%20Ausf%20F-8/photo-11-1.jpg

http://i713.photobucket.com/albums/ww137/aleffler/StuG%20III%20Ausf%20F-8/photo-8-2.jpg

http://i713.photobucket.com/albums/ww137/aleffler/StuG%20III%20Ausf%20F-8/photo-13-1.jpg

http://i713.photobucket.com/albums/ww137/aleffler/StuG%20III%20Ausf%20F-8/photo-12-1.jpg

Again, thank you for your comments & feedback you have shared.  I wouldn't have done without your support.

Off to build another Imperial kit for this GB... Pz III Ausf K to close that gap!!!


Andy

  • Member since
    September 2009
  • From: Rugby, England
Posted by Hinksy on Sunday, May 27, 2012 1:55 PM

Good afternoon folks,

That looks really, really good Andy Beer If I were to pick you up on something Wink I'd have to say the teeth on the drive sprocket aren't showing any wear but the guide horns look spot-on. That aside, the tracks look great, perfect weathering great figure and this kit wil definately be my next StuG III!

A quick update - I worked yesterday so got the tools prepped and that was about it.

Today I've added a light matt coat onto the upper hull and casemate. The tools have been finished up and fixed in place and more AK Streaking Effects and thinned Mig grease/fuel mixture around the engine hatches and on the rear deck with a few specks of unthinned fuel mix added in the centre of the thinned mix.

Basically, everything from the fender surfaces up are nigh on done. Next week the lower hull walls and running gear will be done. A usual Mig Pigment muck layer on fixer along with some AK Dark Mud which I'm yet to try. Also the spare track links on the casemate need rusting up along with the mufflers, the wheel hubs painted DY then an another final layer of matt and some pigments.The Friul tracks will need painting up as when I tried the Black Track treatment which had used been once (it's supposed to be good for about 2-3 tracks and at least two Pz III tracks definately) it just didn't quite work so I'm going to have to paint them and from now on I'll stick with the blue AK stuff as it's far easier. I'm also planning on adding one of my RB Brass Antennae as I've left the base at about 30 degrees so I can leave the whole antennae just showing above the holder. I've got two Jerry cans to paint up and mount to the antennae holder which I've shown in the photo.

With the StuG complete I'm feeling compelled to put her on a base and paint up a couple of figures BUT I then think of the Willys MB Jeep with driver figure which will need a TINY base and take up FAR less room in the cabinet. I'm then thinking about a base for my new Flakpanzer I and a couple of crewmen? Being very small this will need a smaller base than the StuG too. I could put it on a base and put it on my shelf but there is always the ever-present dust problem! Hmmmm?

Here we are so far:

Note the Jerry Cans in their intended spots:


These are the four supplied figures that come with the StuG kit. There are loads of kit and ammo / weapons.


Sorry about the poor photo quality guys - I'm still in the process of getting a new photography set-up / light box. I've got the camera on order so I'm well on the way. 

I hope you like her so far chaps,

have a good week,

Ben Cool

On the Bench - Dragon Pz. IV Ausf. G (L.A.H.) Yes

Your image is loading...


  • Member since
    April 2009
  • From: Carmel, IN
Posted by deafpanzer on Sunday, May 27, 2012 4:11 PM

Ben- Gosh!  How can I forget about the sprocket teeth!??!?!  Glad you caught it... this is something I will fix easily tonight.  Thank you so much for the good catch!  Beer  Dragon recently released new tooled StuG III Ausf F/8 kit and it comes with Magic Track winterkettens too.  Thanks for the tip about AK Interactive Blue set!

Love those figures!!!  Remember... just take your time and paint all of details using different shades of paint.  One shade of paint will never work. 

GREAT job adding more streaks!  They do look very realistic now.  And the tools look pretty good too!

Looking forward to your next update my English mate!

Andy

  • Member since
    April 2005
Posted by Thunderbolt379 on Sunday, May 27, 2012 7:11 PM

Andy and Ben -- incredible work! True artistry in three dimesnions, builds like these are inspirational! Andy, I have rarely seen plastic look so much like rusty steel!

I was going to post update shots last night but FSM seemed to have a problem, I couldn't get to forum pages at all!

Anyway, here we are, scratchbuilding the sponson blanking plates and rear partial bulkhead:


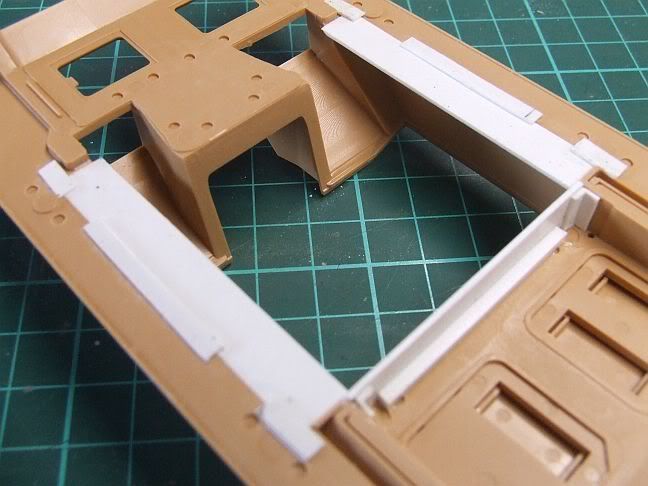
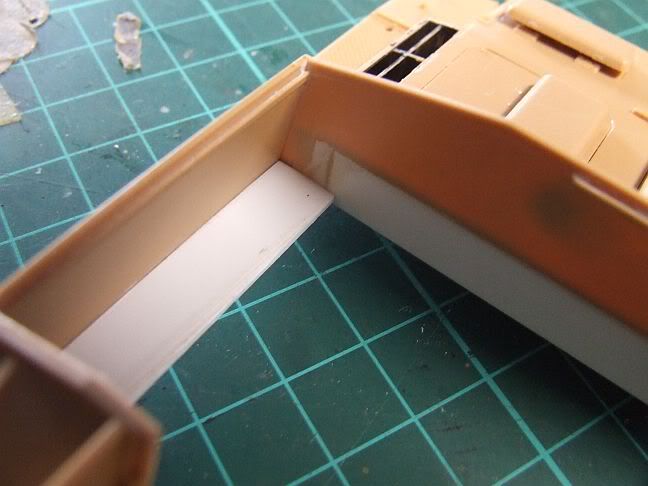
The object is not to build an interior, but to create enough to be painted and glimpsed around figures in the hatches to suggest an interior.

After this I went on to start the zim job. Wow, I had forgotten just how rediculously easy the Cavalier product is to use!


The junctures will take some putty and knife work to make them look less regular, it's a long time since I did zim and that time I used a generic sheet rather than precut parts, so a few tricks are still being learned.

I'll hopefully spray the interior shade today, then I'm very close to being able to close up the hull, install the gun and close the roof, so yep, I reckon the basic build is about halfway along. After this stage will come skirt rails, and I'll be on the lookout for stowage and figures.

What's this about Winterketten Magic Tracks??? IIRC, you can buy stuff seperately from Dragoncare??? The Imperial F/8 is about half done but the indie links beat me -- I pulled it out yesterday for a look but have to say the short run I assembled way back broke up in my fingers at once so I have zip confidence. Magic Track might be an other matter, and a way to get this one out of limbo...

Cheers, Mike/TB379

http://worldinminiature.blogspot.com/

  • Member since
    September 2009
  • From: Rugby, England
Posted by Hinksy on Monday, May 28, 2012 6:15 AM

deafpanzer

Ben- Gosh!  How can I forget about the sprocket teeth!??!?!  Glad you caught it... this is something I will fix easily tonight.  Thank you so much for the good catch!  Beer  Dragon recently released new tooled StuG III Ausf F/8 kit and it comes with Magic Track winterkettens too.  Thanks for the tip about AK Interactive Blue set!

Love those figures!!!  Remember... just take your time and paint all of details using different shades of paint.  One shade of paint will never work. 

GREAT job adding more streaks!  They do look very realistic now.  And the tools look pretty good too!

Looking forward to your next update my English mate!

LOL!

Easily forgotten but luckily easily sorted!

The figures are a treat - looking forward to at least trying them out.

I'nm fairly happy with the tools but not 'well chuffed'! I might have to but some of that MM stuff you use as I can't get the colours to look real enough in Acrylics Toast Too 'monotone'.

I'm VERY glad a new F8 is out as I tried to order your F8 and was told it was out of production now.

Back to work today Andy so update next weekend No

Take care my American chum!

Ben Toast

On the Bench - Dragon Pz. IV Ausf. G (L.A.H.) Yes

Your image is loading...


  • Member since
    April 2005
Posted by Thunderbolt379 on Monday, May 28, 2012 7:06 AM

Today's progress -- I mixed the interior beige (14 parts XF-2 to 4 parts XF-57 to 10 parts X-22, then thinned 1:1 due to the cold here making normal thinning ratio (.5) untennable) and sprayed a few coats, then remasked and sprayed the cutaway for the mantlet, plus the manlet itself, XF-60. I used the leftover XF-60 on the underside.

I should be clear to start closing her up now.

Cheers, Mike/TB379

http://worldinminiature.blogspot.com/

  • Member since
    April 2009
  • From: Carmel, IN
Posted by deafpanzer on Monday, May 28, 2012 8:12 AM

Mike- WOW!  That ZImm resin set looks just GREAT!  Forgot if its Cavalier or Atak?  It would be very difficult to make waffle Zimm using putty. 

I wish we could buy Winterketten Magic Track!!!  I looked everywhere and it was difficult to find.  I bid for one on eBay few months ago and lost because it was going over $20!  I agree Dragon should be selling MT separarely if they want to make more money... 

But trust me you will love the Winterketten from Friuls... read somewhere that Friuls have raised the selling price of their tracks everywhere.  Sad

Thank you for the nice words about my StuG.  I will be with you for another build shortly...


Andy

  • Member since
    April 2005
Posted by Thunderbolt379 on Monday, May 28, 2012 8:32 AM

Andy -- Thanks! It's the Cavalier set, and I couldn't be prouder of this amazing Australian product! I look forward to doing more models with this stuff, must do some Tigers...

I've closed up the hull this evening, and added the roof and periscope, am now starting on the cupola.

I just did some research and that new F/8 will be Dragon 6644. That's a $72 item on the shelf in this country, I found one going about $20 less than that but that's way out of my price range. I might drop a line to Dragoncare and explain the situation to them, maybe I'll get lucky and they'll sell me a set of the MTs...

I was just doing some research for the extras, and Legend's marvelous set of StuG stowage is available through LuckyModel postage-free, though it's not actually in-stock at the moment. There's way more than I'd want to add, enough to do a whole build around at a later date, and I do have an extra Tamiya -G in my stash anyway, perhaps a candidate for an ambush scheme with "everything on." I might be able to cobble something together from Tamiya German cans and some bits and pieces from Verlinden.

I also found the Tank figures from an outlet here in Aus and they'd be the single most expensive addition, I might have to chew on them a bit to justify the costs to myself...

Still, there's a while to go -- let's see what can be done!

Cheers, Mike/TB379

http://worldinminiature.blogspot.com/

  • Member since
    April 2009
  • From: Carmel, IN
Posted by deafpanzer on Monday, May 28, 2012 8:42 AM

Mike- You will like the figures from Tank... I used one on my StuG and I do agree they were expensive.  $28 for two figures!  Unlike most Dragon sets I like to use are only $15-$18 and they come with 4 figures or more.

Thanks for the info about Cavalier Zimm set.  I better grab it next time I see it on sale at future model shows. Whistling

Check this out... it is on sale at DragonUSA Online.  Maybe you can have it shipped oversea and it is still cheaper?

http://www.dragonusaonline.com/item_detail.aspx?ItemCode=DRA6644

Andy

  • Member since
    April 2005
Posted by Thunderbolt379 on Monday, May 28, 2012 8:55 AM

Wow, at that price it's VERY tempting... For its own sake, not just the tracks. I could potentially pass on the Imperial to whomever wasn't afraid of the old indies, and go with the Smart version...

I know what you mean about figures, I have the DR "Panzer Survivers Kursk" set to use in a diorama and they were only a fraction the cost.

Oh, if you fancy Cavalier zim, consider the generic sheets. I did a StuG IV a year or so back, for which there is no designed set, and the generic sheet of standard pattern zim was so economical I would guess I could get something like FOUR projects of that complexity from the one purchase (and though more time consuming than a purpose-produced set, it was uber-easy to use.)

Cheers, Mike/TB379

http://worldinminiature.blogspot.com/

  • Member since
    April 2009
  • From: Carmel, IN
Posted by deafpanzer on Monday, May 28, 2012 9:17 AM

Mike- Thanks!!!  You have been very helpful. Beer  Looking forward to your updates!

Guys- I have started another build... everybody knows how slow I build but I hope to do better this summer since things at work are much slower and hopefully it will stay that way.

Another old Imperial kit... Panzer III Ausf K Command.  Now I have lost count how many Imperial kits we have build for this GB. LOL

So many pieces but unfortunately...

Will use less than half according to the instructions...

Plenty of aftermarkets for improvements.  I am planning to use AK Interactive color modulation for the first time on the panzer...

I plan not to use those Indy tracks that came with the set.  Plan to stop by local shop that stocks Friul tracks to see if I can find a good match later this week. If not, then I will use Magic Tracks that were not used from past builds.

This book will be my best friend... information about Pz III Ausf K is very limited but this book has covered it pretty good. You will find only few pictures if you google...

More to come...

Andy

  • Member since
    April 2005
  • From: Monster Island-but vacationing in So. Fla
Posted by carsanab on Tuesday, May 29, 2012 10:38 AM

Deaf...your Stug looks great!!!!! Congrats on a great build! Toast

now I really want to get back to my III..Crying


Carlos


 Photobucket

  • Member since
    April 2009
  • From: Carmel, IN
Posted by deafpanzer on Tuesday, May 29, 2012 1:01 PM

carsanab

Deaf...your Stug looks great!!!!! Congrats on a great build! Toast

now I really want to get back to my III..Crying

Carlos- Thank you man!  I thought about you few days ago when I was reviewing the list of ongoing models.  Hope your move has been smooth so far!  In case you didn't see my comment earlier the GB has been extended thru the summer til August or so because we still have at least ten ongoing builds.  I just started my second build here too...

Andy

JOIN OUR COMMUNITY!

Our community is FREE to join. To participate you must either login or register for an account.

SEARCH FORUMS
FREE NEWSLETTER
By signing up you may also receive reader surveys and occasional special offers. We do not sell, rent or trade our email lists. View our Privacy Policy.