SEARCH FINESCALE.COM

Enter keywords or a search phrase below:

Blitzkrieg in the West (France 1940) Sept. 18 2011 - March 1 2012

144689 views
2290 replies
1 rating 2 rating 3 rating 4 rating 5 rating
  • Member since
    October 2010
  • From: Buenos Aires, Argentina
Posted by Kveldulfr on Sunday, December 18, 2011 9:09 PM

Hi guys, I have catch at last with the posts, since my last one I only has two or three hours to work in my model, and not even has read the forum until tonight

It´s has been a pleasure to see too many exelent works, I hope to be at least as half good as you are.

I'll have two or three days after xmas to work on my munitionsschlepper and finish at least the suspension. Tomorrow night I´ll post some new photos.

And now I like to ask something: Someone have a drawing or photos of the part that joins the two leaf springs in every wheel? The best images I have are from the vehicle at Littlefield museum that I found in Toadmans Tank pictures site, The photos are excellent, but I can´t find one that show the part.

I´s past midnight, so I´m going to sleep.

Good modelling!

  • Member since
    March 2003
  • From: Rain USA, Vancouver WA
Posted by tigerman on Sunday, December 18, 2011 8:55 PM

detailfreak

                                  Tigerman, the hotchkiss turned out very nice. Very unique paint schemes on those french vehicles.

                                  Panzerwaffe the little carrier looks pretty sharp,nice little added details.

                                  Great builds all around everyone.Will update the panzer II shortly.

Thanks Greg and you are correct about those unique schemes. I admit that I wussed out and chose a simpler striped scheme. I probably should have used the numbers, but wrecked them. Plus those hearts were just calling my name.

   http://i7.photobucket.com/albums/y269/wing_nut_5o/PANZERJAGERGB.jpg

 Eric 

  • Member since
    December 2006
  • From: t.r.f. mn.
Posted by detailfreak on Sunday, December 18, 2011 8:39 PM

                                  Tigerman, the hotchkiss turned out very nice. Very unique paint schemes on those french vehicles.

                                  Panzerwaffe the little carrier looks pretty sharp,nice little added details.

                                  Great builds all around everyone.Will update the panzer II shortly.

[View:http://s172.photobucket.com/albums/w1/g-earl828/]  http://i158.photobucket.com/albums/t104/cycledupes/1000Roadwheels4BuildBadge.jpg

  • Member since
    March 2003
  • From: Rain USA, Vancouver WA
Posted by tigerman on Sunday, December 18, 2011 12:48 PM

Thanks Carl, Rob, Bob and Cliff. Appreciate it.

Rob, I can't wait to this see build done.

As for the next GB, hmmmm, haven't made up my mind yet, but there is a Tiger I that keeps looking at me and I did score some Cavalier zimmerit which is very hard to get. Not sure what I could do with that. I could go for a Tiger Family GB perhaps?

Stay tuned.

   http://i7.photobucket.com/albums/y269/wing_nut_5o/PANZERJAGERGB.jpg

 Eric 

  • Member since
    November 2009
  • From: SW Virginia
Posted by Gamera on Sunday, December 18, 2011 11:46 AM

Eric: She looks really good to me, I think the weathering came out great. Looks used but not overdone.

Rob: Super job on both the UC and the figures.

Terry, Merry Christmas to you sir!


"I dream in fire but work in clay." -Arthur Machen


  • Member since
    November 2003
  • From: Nashville, TN area
Posted by bobbaily on Sunday, December 18, 2011 7:31 AM

Eric-very nice job...then throw in the difficulty level of the kit, makes it even more impressive....I'd be proud to add that one to my shelf.

Rob-your carrier and figures are outstanding.  Can't wait to see the final product.  And I'm glad that you finished the head of the one figure....it was starting to freak me out....the 'half a head' thing...

Sorry for the absence....however I have been lurking and admiring all of the great work being done....and a bit overwhelmed by the group's quality of work.

I finally opened the Airfix 109 and washed the spruce.....quality levels aren't quite Tamiya/Hasegawa levels, but neither is the price.  I think I'm going to go OOB for this one to save time and sanity.  Also, I'm going to attempt a different approach-assemble the interior components (that would be the cockpit) and then paint...dunno if it will work any better, but change is good, right?

Bob


  • Member since
    March 2006
  • From: Right Side of a Left State
Posted by Shellback on Sunday, December 18, 2011 3:12 AM

Rob , paint job looks just fine . Those figures are coming along just fine also . I like the "flat top " ..........hee hee .

I dont remember the complaint about your A.B. right now Hmmand i'm too lazy to go back and lookStick out tongue but if cleaning didnt solve it the only other things i can think of would be paint consistency or air presure , unless your A.B. crapped out .Sad What make is it ?

  • Member since
    October 2009
Posted by PANZERWAFFE on Sunday, December 18, 2011 2:08 AM

CARL, WBILL - Thanks.  Agree, always fun finding photo's of details and sometimes surprising seeing what people actually came up with.

ERIC - AHHH NICE!  Was worth the wait, I love it!  Think your construction looks great and can't see or tell you had any problems at all.  It seems that I can't see your seams Yes  Really like your weathering.  Very happy to see you finish this one up! YesBeer

Very happy I had the pieces you needed.  Glad you could use them on such a great build.

What could your next GB be......the world wonders.............???

TERRY - Thank you much.  Hope to see some more of your beautiful B1 soon.  Have a Merry Christmas Gift


Update:

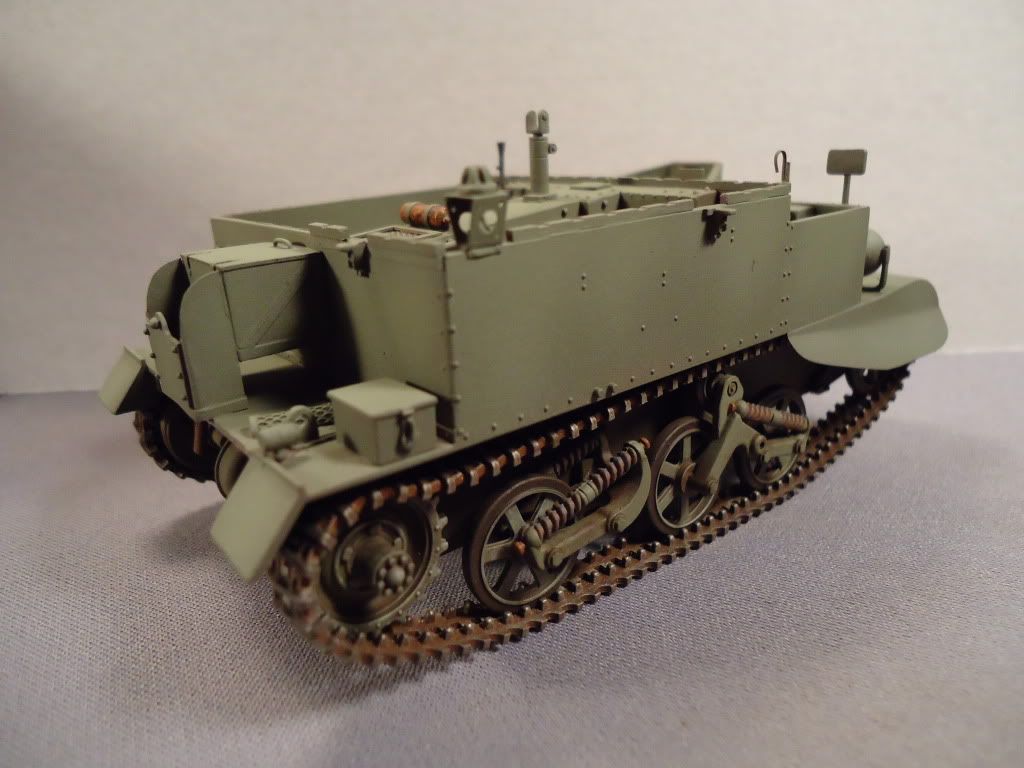
Got a late start tonight but was able to get some paint put down.  Still have the same complaint as earlier, problems with the AB.  WBill, Carl did clean the tips and there was a little build up but that did not completely solve the problem.  Still waiting to get the brush I want, hopefully soon!

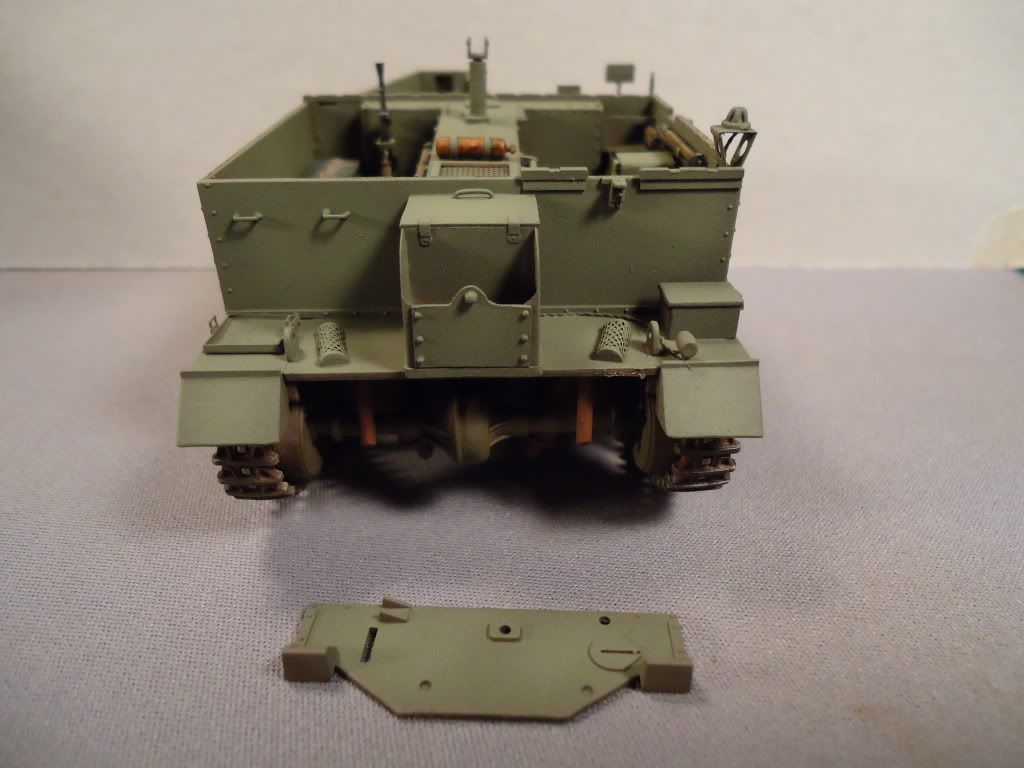
Used a dark olive drab for the base and then tried to post shade with faded olive drab.  Does not really show and I blame this largely on the AB.

Had the rear plate break off when removing the mask, was surprised but broke clean and should go right back on.

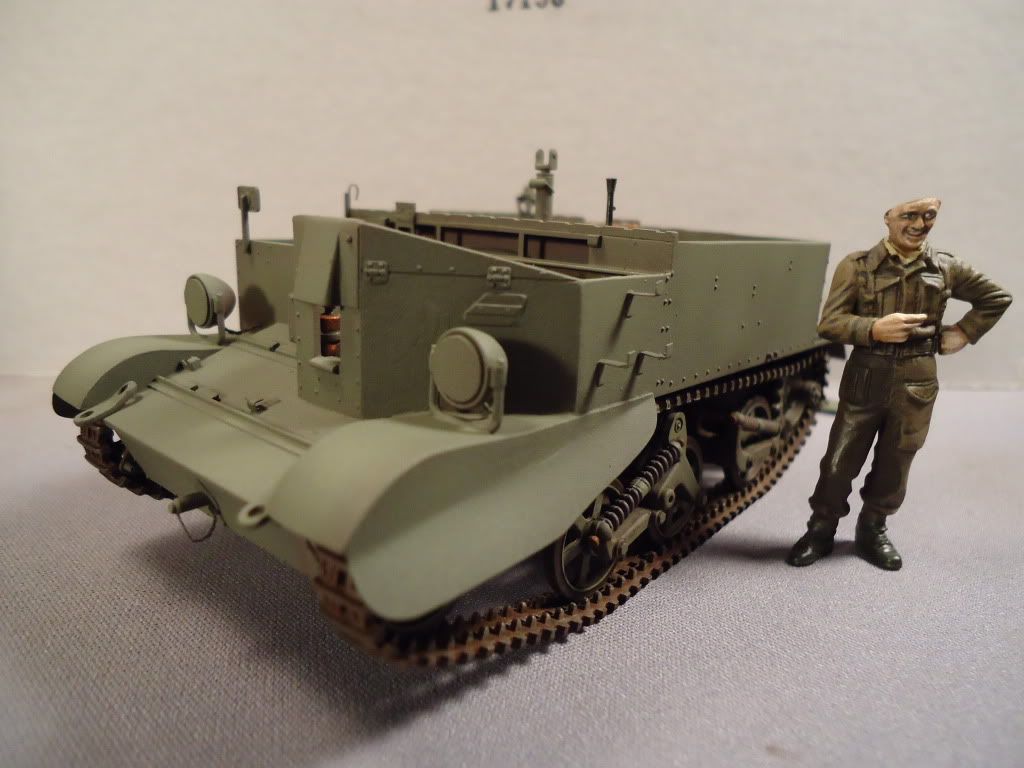
Was originally thinking of going with a earth brown camo job but have only found this pattern on early British vehicles, all Commonwealth later war.  Still plan on putting Canadian markings so believe will leave it the solid olive green.

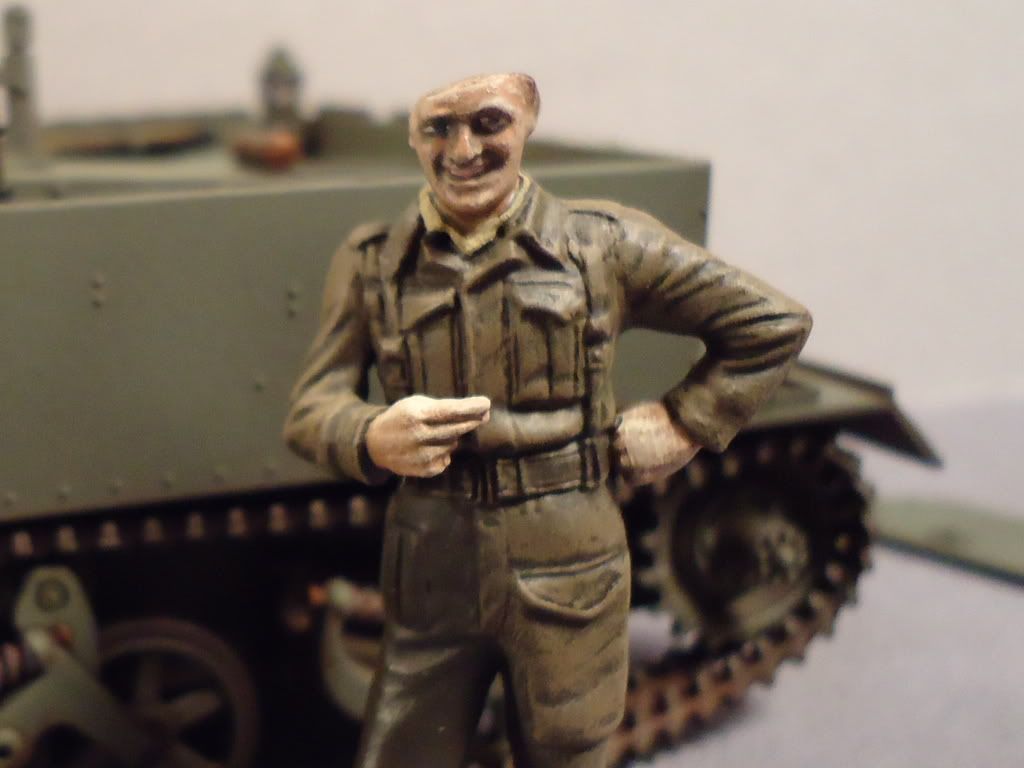
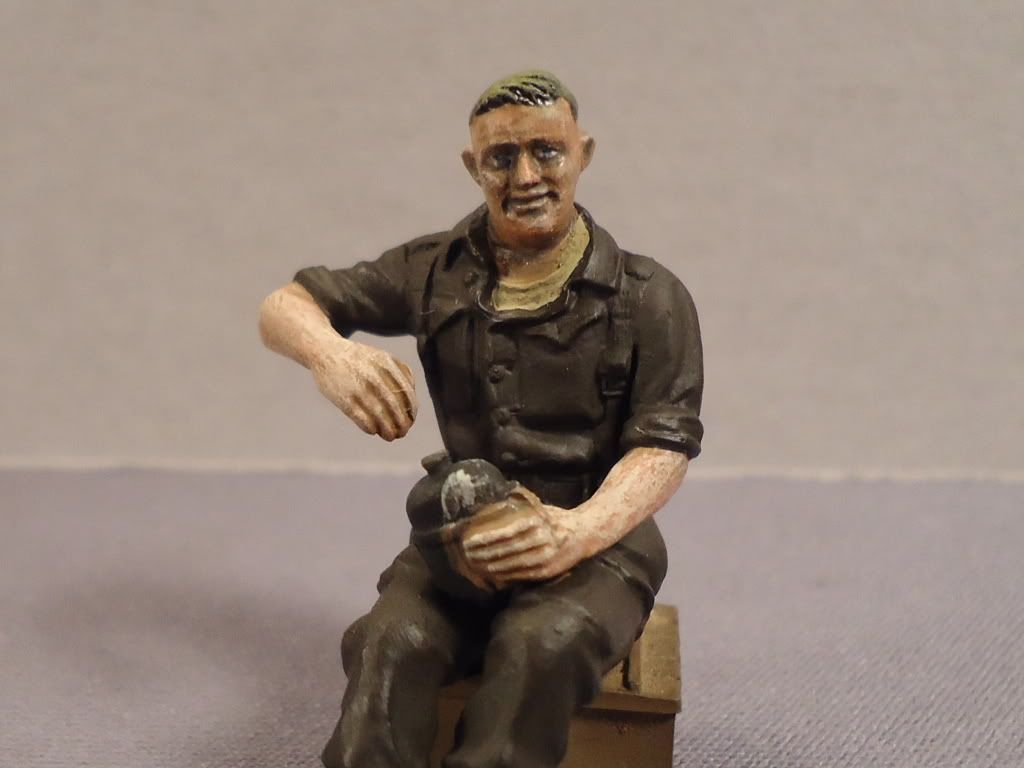
More work on the figs.  Touched up their faces, gave them some hair, base coat on uniforms and started with the uniform color coat.  Much left to do to these fellows.

That's it for tonight.

Rob

  • Member since
    March 2006
  • From: Right Side of a Left State
Posted by Shellback on Saturday, December 17, 2011 8:20 PM

tigerman

Okay, here we go. Please be kind. LOL I missed some seams. It seemed as though every piece had a seams on them. This again was Bronco's first kit. I don't claim to be a good weatherer either. Okay, enough pity party.

http://img.photobucket.com/albums/v381/tigerman12/DSC02139.jpg

http://img.photobucket.com/albums/v381/tigerman12/DSC02138.jpg

http://img.photobucket.com/albums/v381/tigerman12/DSC02137.jpg

http://img.photobucket.com/albums/v381/tigerman12/DSC02136.jpg

http://img.photobucket.com/albums/v381/tigerman12/DSC02131.jpg

http://img.photobucket.com/albums/v381/tigerman12/DSC02130.jpg

http://img.photobucket.com/albums/v381/tigerman12/DSC02122.jpg

All I can say is that I've enjoyed this build very much and have learned a great deal as well. Stay tuned for another GB. Wink

OH MY ! OH MY GOSH ! Look at them seamsWink !   Actually ...............Confused.................i dont see any seams that look out of the ordinary for a tank Eric . After your disaster the other day i'm glad to see your model done and looking good . Nice work my friend .Yes

  • Member since
    March 2003
  • From: Rain USA, Vancouver WA
Posted by tigerman on Saturday, December 17, 2011 8:15 PM

Merry Christmas and thanks for stopping in Terry.

   http://i7.photobucket.com/albums/y269/wing_nut_5o/PANZERJAGERGB.jpg

 Eric 

  • Member since
    May 2005
  • From: Dublin Rep Of Ireland
Posted by terry35 on Saturday, December 17, 2011 6:57 PM

Rob the little carrier is certainly taking on a life of its own, excellent work there.

Eric what can I say except I love th hotchkiss, just excellent work. As I only got a chance to go back over a couple of pages it seems to me that people are starting to close in on the finish line, gotta get my finger out too. 

If I don't get back to the GB soon may I take this opportunity to wish everybody a Merry Christmas. Hope you all get those additions to the stash that you want..

Terry.

  • Member since
    March 2003
  • From: Rain USA, Vancouver WA
Posted by tigerman on Saturday, December 17, 2011 5:29 PM

deafpanzer

You already did over the markings?  Maybe your love for us is much stronger than you think... Beer

LOL You know it Andy!

   http://i7.photobucket.com/albums/y269/wing_nut_5o/PANZERJAGERGB.jpg

 Eric 

  • Member since
    April 2009
  • From: Carmel, IN
Posted by deafpanzer on Saturday, December 17, 2011 5:19 PM

You already did over the markings?  Maybe your love for us is much stronger than you think... Beer

Andy

  • Member since
    March 2003
  • From: Rain USA, Vancouver WA
Posted by tigerman on Saturday, December 17, 2011 5:11 PM

Stik, thanks bud. Andy too.

I put washes and dot-filters on the whole vehicle, markings too. I'm not sure why they look so fresh. i'll go over it with a light pigment wash or straight out of the bottle.

   http://i7.photobucket.com/albums/y269/wing_nut_5o/PANZERJAGERGB.jpg

 Eric 

  • Member since
    March 2003
  • From: Rain USA, Vancouver WA
Posted by tigerman on Saturday, December 17, 2011 5:09 PM

Thanks for the kind words Bill, and yes, we do tend to critique ourselves the hardest. 

Thanks again to Rob for the cupola pieces. 

This was my first and hopefully last experience painting tracks on the vehicle. It came out okay, but when I weathered, some of the rust pigments got all over the wheels. All-in-all, it was an enjoyably frustrating build.

   http://i7.photobucket.com/albums/y269/wing_nut_5o/PANZERJAGERGB.jpg

 Eric 

  • Member since
    July 2004
  • From: Sonora Desert
Posted by stikpusher on Saturday, December 17, 2011 5:08 PM

Pretty nice TigermanYes It looks really good to my eye. If I must add a critique, I would suggest another bit of weathering over the markings to tone them down a bit and tie them in to the rest of the build. But you got the hardest weathering parts: the running gear, exhausts, and tools nailed!Toast


F is for FIRE, That burns down the whole town!

U is for URANIUM... BOMBS!

N is for NO SURVIVORS...

       - Plankton

LSM


  • Member since
    April 2009
  • From: Carmel, IN
Posted by deafpanzer on Saturday, December 17, 2011 5:07 PM

What seams?  I didn't see any in the pictures.  It looks GREAT!!!  The heart sign is very eye catching... bright and untouched which I liked left unweathered in some way.   Is it your way telling us how much you love us?  AWWW  I love you too! Indifferent


Andy

  • Member since
    July 2004
  • From: Texas
Posted by wbill76 on Saturday, December 17, 2011 5:05 PM

Eric,

I think as modelers we tend to be our own worst critics because we already know every tiny little flaw/detail in the build because we experienced it as we go along. Wink Having said that, there's nothing here for you to feel bad about, you did a stand-up job on a less then perfect kit (and had some deconstruction events along the way as well!) and should be proud to have this one in the "completed" column IMHO. Yes Yes

  • Member since
    March 2003
  • From: Rain USA, Vancouver WA
Posted by tigerman on Saturday, December 17, 2011 5:01 PM

Okay, here we go. Please be kind. LOL I missed some seams. It seemed as though every piece had a seams on them. This again was Bronco's first kit. I don't claim to be a good weatherer either. Okay, enough pity party.

All I can say is that I've enjoyed this build very much and have learned a great deal as well. Stay tuned for another GB. Wink

   http://i7.photobucket.com/albums/y269/wing_nut_5o/PANZERJAGERGB.jpg

 Eric 

  • Member since
    July 2004
  • From: Texas
Posted by wbill76 on Saturday, December 17, 2011 1:54 PM

Rob,

That's the great thing about doing photo research...all kinds of neat littel details like that wheel surface and provide opportunities for adding "character" to a build. Crews on all sides were fairly resourceful when it came to gear and stowage which makes life interesting for us as modelers. Beer

  • Member since
    March 2006
  • From: Right Side of a Left State
Posted by Shellback on Saturday, December 17, 2011 1:00 PM

Rob , i like the wheel mounted there . Nice research . Your wife will appreciate your help .Yes

  • Member since
    October 2009
Posted by PANZERWAFFE on Saturday, December 17, 2011 12:37 PM

Yes, found lots of pics of the MK I with spare wheels on the sides of the cab area.  Probably a field mod because some had brackets, some strung with wire or rope, etc...  The only thing that may not be accurate is that most (if there was only one wheel) was on the drivers side.  I would assume this was not only a place to put them but maybe offered a little protection.  I mounted mine on the side it's on because this is the side I will display.  If I had two extra wheels would have put on both sides.

Nothing done yet today.  Decided to clean the house, dishes, floors, etc... while the wife sleep in.  She has been working all week and I have just been sitting around taking it easy ... Embarrassed

Hope to get her painted by tonight...maybe

Rob

  • Member since
    March 2006
  • From: Right Side of a Left State
Posted by Shellback on Saturday, December 17, 2011 10:44 AM

Rob , that spare wheel  is a nice addition .Yes   Did you find that in your research ? 

  • Member since
    October 2009
Posted by PANZERWAFFE on Saturday, December 17, 2011 1:52 AM

CARL, ERIC, CLIFF - Thanks guys for the comments on the figs.  Been going slow on them and have now started on their uniforms.  Hope to have them done soon.

DAVID - Nice looking start and interesting.  Like the lines of it.


Could not help it, one more small addition before the paint.

Now things will start coming together after the primer.

Were only 2 small imperfections found after the primer.  Should be able to remedy quickly and tomorrow start with the base color.

Rob

  • Member since
    March 2003
  • From: Rain USA, Vancouver WA
Posted by tigerman on Friday, December 16, 2011 6:14 PM

Sorry, no pics today. There was a large layer of fog hovering over the area, so no good sunlight.

   http://i7.photobucket.com/albums/y269/wing_nut_5o/PANZERJAGERGB.jpg

 Eric 

  • Member since
    November 2009
  • From: SW Virginia
Posted by Gamera on Friday, December 16, 2011 1:47 PM

Dave: I think the Pe-2 came out ok, but I wasn't able to fix the warped fusilage and it came out lopsided. Still it was an interesting build...

Cool, never seen the Goodyear blimp myself- give 'em a wave for me next time they fly over!

Cliff


"I dream in fire but work in clay." -Arthur Machen


  • Member since
    December 2009
  • From: NE Ohio
Posted by DaveB on Friday, December 16, 2011 1:41 PM

Gamera: I was probably kinder in my description of the build so far than the kit actually deserves. Still, it wasn't the nightmare you describe for the Pe-2. Kudos for persevering and finishing it. I notice the Pe-2 is still available from Great Models. As big a fan as I am of WWII Russian stuff I  think I'll profit from your experience and pass on that one.  Cool! I just looked out the window and saw a Goodyear blimp fly low over my back yard.  Their docking area is about 15 miles south and occasionally they use this same pattern to get home.

  • Member since
    March 2003
  • From: Rain USA, Vancouver WA
Posted by tigerman on Friday, December 16, 2011 11:59 AM

Sorry Theuns, I will make the change.

David. That looks mighty interesting. That will certainly stand out among the GB crowd.

   http://i7.photobucket.com/albums/y269/wing_nut_5o/PANZERJAGERGB.jpg

 Eric 

  • Member since
    April 2010
Posted by Theuns on Friday, December 16, 2011 9:28 AM

Hi guys. I have finaly decided to re-box my 1/72 Airfix Huricane after my 3 rd attempt at re-scribing the pannellines that were raised and then sanded off.

Things with this darn model just seems to not be going like plannes ,so bak in the drawr it goes till I figure out how to get it sorted. I might even fill all the lines , paint and then just draw them in with a pencil or something

I might join in wit my 1/72 Airfix BF 110 as it seems to be a way better model than the Hurri!

So could the mod please rectify the fornt page concerning my build please.


Thanx


Theuns

  • Member since
    November 2009
  • From: SW Virginia
Posted by Gamera on Friday, December 16, 2011 9:12 AM

Eric: Ack, hate to hear you're still having problems. Maybe put the model back and box and step away for a little while?

Tim: Happy to see things fitting much better after you 'removed the design'. Reminds me of a FineMolds kit I did awhile back with a 'jack lack'. Not sure exactly what it was but went ahead and glued it to the model.

Rob: Yeah nice job of the figures, they work great with the UC, showing off how small the vehicle really was.

Dave: Good luck to you buddy. I built a Historic Models 1/48th Soviet Pe-2 medium bomber some years ago. That kit was pure evil. I should have burned it. The fusilage was warped, nothing fit, I think if I'd grabbed a few random parts from every kit in my stash and tossed them in a box the results would have fit together better than this. I've built several short run kits but this one was in a class all by itself. I am happy to see that your kit seems to be fitting much better than mine so far, I wish you the best of luck with her. I hope to all things good and decent that my kit was the one bad kit they did and the rest aren't like it.

"I dream in fire but work in clay." -Arthur Machen


JOIN OUR COMMUNITY!

Our community is FREE to join. To participate you must either login or register for an account.

SEARCH FORUMS
FREE NEWSLETTER
By signing up you may also receive reader surveys and occasional special offers. We do not sell, rent or trade our email lists. View our Privacy Policy.