SEARCH FINESCALE.COM

Enter keywords or a search phrase below:

Big Beautiful Jugs - OFFICIAL P-47 GROUP BUILD

200798 views
1248 replies
1 rating 2 rating 3 rating 4 rating 5 rating
  • Member since
    November 2009
  • From: SW Virginia
Posted by Gamera on Saturday, December 8, 2012 5:34 PM

B-17: Looks perfect to me, can't even see where the problems were.

"I dream in fire but work in clay." -Arthur Machen


  • Member since
    January 2012
  • From: East Peoria, IL
Posted by stoutfella on Saturday, December 8, 2012 10:23 PM

B-17: Ditto. Looks like a great recovery.

Doogs: As always, beautiful work. Good luck on those seams, but I'm sure your efforts will be, um, seamless :-)

I've been using good old vinyl spackle for small seams. I know it's too porous and delicate for big repairs, but it works great to fill a fairly small gap, as you can just wipe away all the excess and minimize sanding away detail.

Cheers,

Stoutfella

On the bench: 1/48 Tamiya Bristol Beaufighter

On deck: 1/48 Tamiya P51-B

  • Member since
    January 2012
  • From: East Peoria, IL
Posted by stoutfella on Saturday, December 8, 2012 10:41 PM

Greetings,

With the new workbench operational, I've made some progress on my Gabreski Jug. My airbrush has continued to fight me tooth and nail every step of the way -- spitting, clogging, orange-peeling, you name it. I was able to get an acceptable coat of MM enamel light sea gray on the underside (I'll hit the stabilizers with a metal finish later), but had to do some sanding on my ocean gray upper and wasn't at all happy.

After playing around with different formulas, I mixed some Tamiya close to the ocean gray, thinned the heck out of it with 91 percent alcohol and was able to smooth out the upper surface a bit.

I decided to use some Badger dark green acrylic for the camo and figured I'd try the alcohol to thin it, since it seems to work so well with the Tamiya. BIG mistake. Note to self: Do not thin Badger acryl with alcohol. I got a clumpy mess that immediately clogged up the .25 tip of my Paasche Talon. I threw that batch away and switched back to the .38 tip and needle. Thinned out the green with Testors acryl thinner, then thinned it some more. When the brush started to clog again, I flushed it out and thinned the paint even more. Finally, I got a mix that I could work with for a while and was able to get the camo down.

I'm still in Geof's shadow, on the camo, but I ended up feeling pretty good about the result considering all the hassle. I'm really hoping Santa brings me that Iwata!

Anyway, here's where I'm at so far:

Next up: Masking stripes, etc.

Cheers,

Stoutfella

On the bench: 1/48 Tamiya Bristol Beaufighter

On deck: 1/48 Tamiya P51-B

  • Member since
    December 2010
  • From: Colorado Springs
Posted by Geof on Sunday, December 9, 2012 3:09 AM

B-17... Beautiful save! Wouldn't know the difference!

Gamera, love how that NMF turned out! What did you use? Did you do some shading work with that or just spray right over your black? Looks fully weathered already!

Doogs, some of the lines look like "fun"... Not. I too have been experiencing some serious redo of panel lines on the A-10 I'm working on. Frustrating.

Stoutfella: looking good! Keep it up! You are going with a more grey overall pattern. Cool! That's one cool thing about the Gabreski, all sorts of interpretations out there! Don't get too frustrated with that airbrush. They can all be finicky at times. Also, when doing detail work like that I use either tamiya paints or enamels. I used enamels on my Jug. Acryls and some of the others are a lesson in creative sentence enhancers even with the iwata...

Keep up the goods guys!

Photobucket

On the Bench: Tamiya's 1/48 A-10a Thunderbolt 

In the Hangar:  Hmmm???


  • Member since
    August 2009
  • From: MOAB, UTAH
Posted by JOE RIX on Sunday, December 9, 2012 7:42 AM

B-17 - I see my post was a might bit on the late side. Absolutely excellent save.

"Not only do I not know what's going on, I wouldn't know what to do about it if I did". George Carlin

  • Member since
    November 2009
  • From: SW Virginia
Posted by Gamera on Sunday, December 9, 2012 9:20 AM

SF: looks good to me!

Geof: I sprayed her gloss black and then Alclad airframe aluminium. Then I sprayed the centers of the panels with plain aluminum. Then a light misting of aluminum to bring down the contrast.

Doogs got me started on this technique. He has a few posts on his blog where he goes into more detail.

"I dream in fire but work in clay." -Arthur Machen


  • Member since
    January 2012
  • From: East Peoria, IL
Posted by stoutfella on Sunday, December 9, 2012 9:33 AM

Geof: Yeah, mine's a bit less green than yours, but the photos really seem to accentuate that. I also didn't do much green in the areas I knew would be covered by stripes and such. I'll get some new pics up tonight or tomorrow.

I probably would have done a bit more green, but with all the trouble I was having with the brush, I figured I'd quit while I was ahead before I messed it up. In general, I've had more bad experiences with MM enamels than anything else, but I think my airbrush just demands exactly the right mix or it gunks up. Trouble is I feel like I do the exact same thing on two different days and have totally different experiences.

It does seem to me that I've had the most consistent success with Tamiya paints. And I've had very good luck recently thinning it with the 91% alcohol. Trouble is I've got tons of bottles of other paints and Tamiya isn't sold anywhere nearby, so I either have to order it or plan ahead for when we're out of town near a "real" hobby shop.

Anyway, I laid down stripes and red last night, so I'll post those pics soon. I just might get this thing done by year-end, after all.

Cheers,

Stoutfella

On the bench: 1/48 Tamiya Bristol Beaufighter

On deck: 1/48 Tamiya P51-B

  • Member since
    December 2010
  • From: Colorado Springs
Posted by Geof on Monday, December 10, 2012 1:30 AM

SF what thinner do you use with MM enamels? I use their airbrush thinner and have never had a issue with it. I use generic lacquer thinner though. With tamiya paints it depends. If I'm doing a large spray I will usually use alcohol. But with fine work I use tamiya thinner. Supposedly it has a dry time reducer in it. I've not had an issue with that, but it does seem that the proper mixture is always key. Also, how do you clean your airbrush? I use lacquer thinner usually and dismantle it fully before any serious fine work. Before I did my jug I did a full tear down of my brush. It's amazing how much gunk can get  stuck into those little spaces!

Photobucket

On the Bench: Tamiya's 1/48 A-10a Thunderbolt 

In the Hangar:  Hmmm???


  • Member since
    January 2012
  • From: East Peoria, IL
Posted by stoutfella on Tuesday, December 11, 2012 8:22 AM

Geof: I use MM thinner, as well. I think I've sometimes gotten bad bottles of paint that have sat on the shelf for too long. Some bottles just seem to spray gritty and pebbly no matter what I do, whereas others do just fine. Again, I think my brush is just super-finicky about the mix. I have to force myself to keep thinning. I look at the mix and think it looks just fine, and then thin make myself thin it some more. You'd think that after a couple of years of using this thing I'd have it down, but it seems to be alchemy every time. But the Tamiya paint really does seem to be the most forgiving and have the best shelf life. I've got a couple of bottles of Tamiya that must be 15 years old and they're still smooth and lump-free.

I'm starting to get with the program on the lacquer thinner. It does seem to do the best job of cutting through everything, and I now routinely soak the tip in it for a while after I'm done spraying. I pull the needle, of course, and clean it, and slosh some more lacquer thinner into the brush and run the cleaning brushes through it. I do that every time. I also periodically tear the whole thing down and run it through an ultrasonic cleaner with an ammonia/Mr. Clean mix.

Cheers,

Stoutfella

On the bench: 1/48 Tamiya Bristol Beaufighter

On deck: 1/48 Tamiya P51-B

  • Member since
    January 2012
  • From: East Peoria, IL
Posted by stoutfella on Tuesday, December 11, 2012 8:36 AM

Greetings,

Here are a few pics of the Gabreski jug after some more painting.

The patient awaits removal of the bandages:

Mr. Gabreski is an interested onlooker:

Where, you may be wondering are the rest of the fuselage stripes? I'll probably get some grief for this, but I'm going to give the kit decals a shot on those. This was my first try at invasion stripes. I ended up quite pleased with the wing stripes, but I was having a devil of a time wrapping the tape around the fuselage and wasn't looking forward to masking those black borders on the white stripes, so I decided to just shoot the black and go with the decals. Academy did the stripe decals in only two pieces instead of a dozen little segments, so I'm giving 'em a try. Worst that happens is they just don't work and I go back to masking and spraying.

And for the record, the stripes were sprayed with Tamiya paint, thinned like heck with 91 alcohol, and it behaved beautifully. And, of course, Tamiya tape is the most amazing stuff ever. I still remember trying to mask stuff with scotch tape as a kid, shudder Crying

I think Tamiya tape ranks up there with indoor plumbing and GPS as mankind's most important inventions.

Cheers,

Stoutfella

On the bench: 1/48 Tamiya Bristol Beaufighter

On deck: 1/48 Tamiya P51-B

  • Member since
    November 2009
  • From: SW Virginia
Posted by Gamera on Tuesday, December 11, 2012 10:20 AM

Nice work! Looking forward to seeing how the fuselage invasion stripe decals work out. Honestly, I've found masking them less trouble than fighting decals to lie down flat on a complex curve like that.

"I dream in fire but work in clay." -Arthur Machen


  • Member since
    December 2010
  • From: Colorado Springs
Posted by Geof on Tuesday, December 11, 2012 9:27 PM

SF, I'm with Gamera on the stripes thing. The more I looked at the decals and the underside if the plane, the more I realized masking them was the better bet. The good thing is the stripes are almost the exact same width as Tamiya 10mm tape. I did cheat a little. I have a roll of 3mm 3m stripe tape as well as some 2mm in the same material. Works great to define the lines on compound curves. The other option is to cut strips of tamiya tape. I actually laid down the black first, masked my black line, then painted the white inner. That requires a bit of patience layering the white to cover the black well. I sprayed the outer where the lines would be darker on the outside than the inner so they looked like the black stripes but inverted, then did white.

Funny you mention the plane looking more grey than green. Mine was sort of like that too, until it all came together! Keep it up!

Photobucket

On the Bench: Tamiya's 1/48 A-10a Thunderbolt 

In the Hangar:  Hmmm???


  • Member since
    January 2012
  • From: East Peoria, IL
Posted by stoutfella on Wednesday, December 12, 2012 11:48 AM

Greetings,

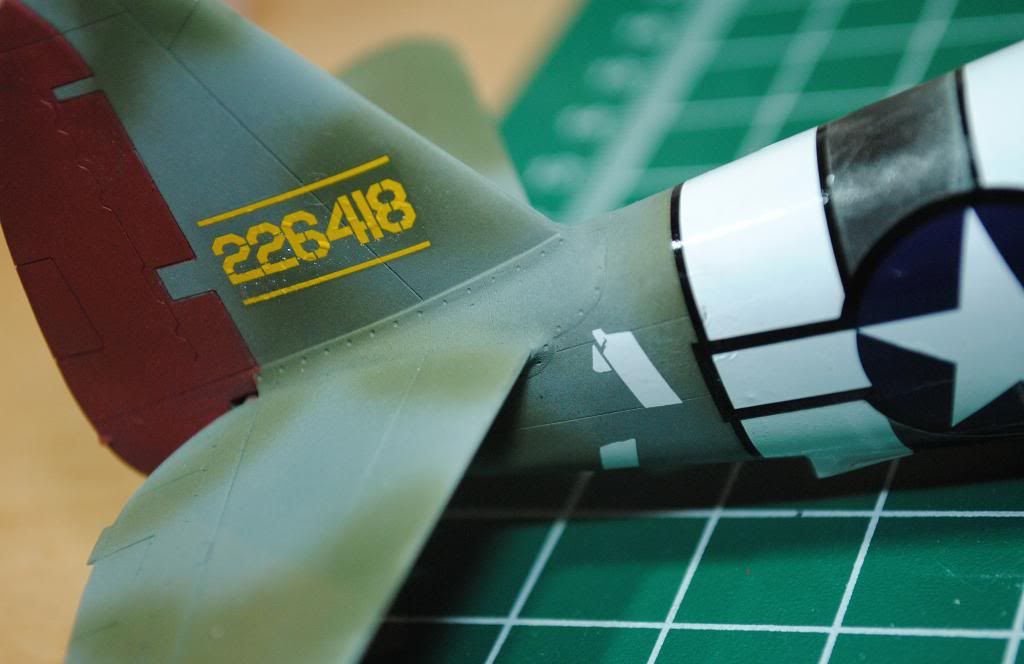
Dove in on the stripe decals yesterday. And yes, having it to do over again, I'd suck it up and paint them, borders and all. However, they weren't as bad as you might imagine. Bear in mind that these are very much in-progress photos. I've got a few little wrinkles and bubbles and such that I'll be working on with more Microsol and probably some Solvaset as well, and the decal film is shiny as heck. But I think once I finish massaging and get a good smooth flat coat on, the results will be acceptable. Again, next time, I'll paint 'em all. I can see the difference between the painted wing stripes and the fuselage decals and the painted stripes are clearly superior.
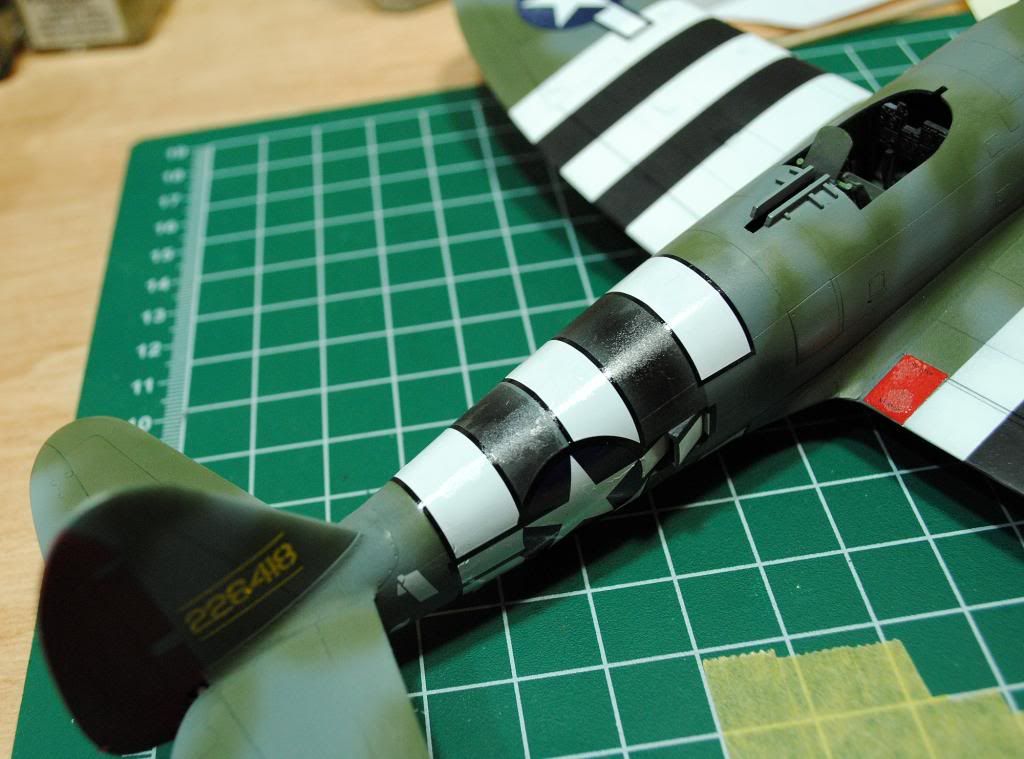
The hardest thing about these decals was actually working with the material itself. The film is almost vinyl-like, sorta like working with Saran Wrap. Meaning that once you put it down, it doesn't want to move, and being able to move it around is pretty critical with something like this. But I mostly managed with lots of water and Microset.

I put on some of the other decals, then decided to tackle the dry transfer letters. I had a pretty good idea what to expect, and I wasn't disappointed Crying

Can someone, somewhere, explain Academy's, um, curious choice to include a sheet of Cartograph decals, but to throw in dry transfers for the big letters on the curved surface Propeller

Having worked in newspapers for 40 years and still having my old collection of dry-transfer Presstype lettering from the 80s, I can tell you there's a very, very good reason this stuff pretty much died as soon as desktop computer publishing became viable: Dry transfers suck! Sheesh! I managed to get the "HV" on both sides applied acceptably, but barely. Both of the "A" transfers, though, were nightmares. The first one went down, but slipped during the process and is uneven between the stencil segments. The second one, as you can see above, just disintegrated. I immediately threw in the towel and started Googling USAAF letter decals, then took a deep breath, went back downstairs and tried to piece in the rest of the "A." I ended up with this:
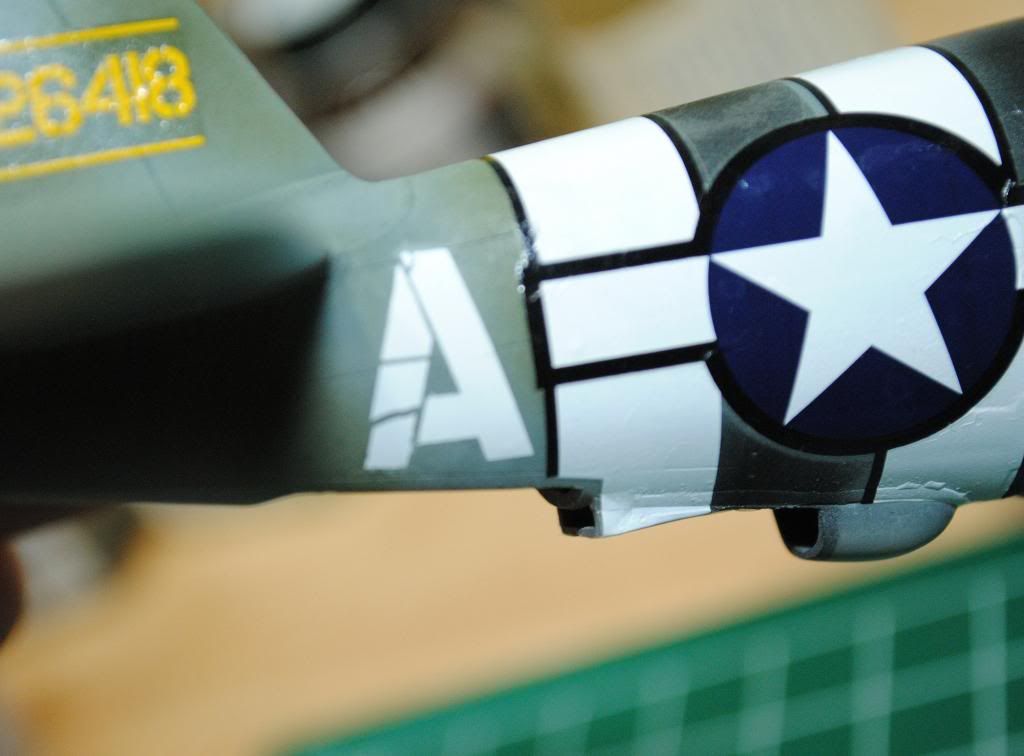
I'm figuring I can hit it with some dullcote, then try to mask and paint some repairs. I'll make it work, but this whole debacle is just another reason to leave me pretty cold to building any Academy kits in the future.
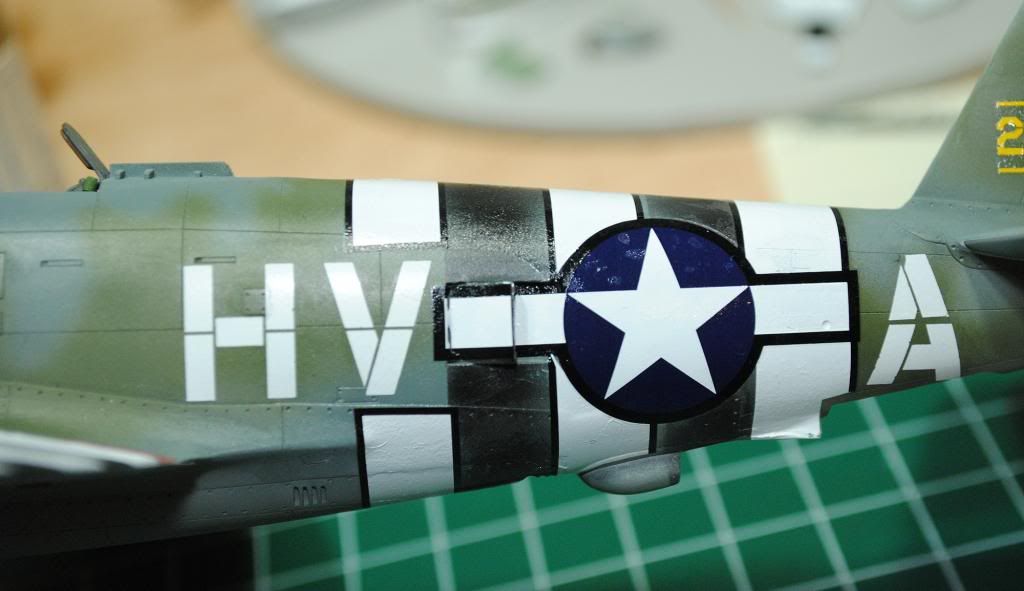
Updates to follow.

Cheers,

Stoutfella

On the bench: 1/48 Tamiya Bristol Beaufighter

On deck: 1/48 Tamiya P51-B

  • Member since
    November 2009
  • From: SW Virginia
Posted by Gamera on Wednesday, December 12, 2012 12:53 PM

SF: Actually the fuselage stripes look pretty darn good to me, much better than I could manage.

Gee, I haven't seen any dry transfers in any of my Academy kits, guess I'm lucky there. Best way I've seen to use them is to stick them on a clear sheet of decal film and then apply them as decals. Never had much luck with dry transfers since I can never get the decal right at first and have to slide it around.

"I dream in fire but work in clay." -Arthur Machen


  • Member since
    January 2012
  • From: East Peoria, IL
Posted by stoutfella on Wednesday, December 12, 2012 1:12 PM

Gamera: That's a good tip on the transfers and decal film. I'll definitely keep that one in mind if I'm faced with it again.

Cheers,

Stoutfella

On the bench: 1/48 Tamiya Bristol Beaufighter

On deck: 1/48 Tamiya P51-B

  • Member since
    December 2010
  • From: Colorado Springs
Posted by Geof on Wednesday, December 12, 2012 3:45 PM

SF... Stripes look really good. Nice work! Bummer on the dry transfers. I do wish they had thought to put BOTH types in the kit like they did with the yellow decals, just in case. Looks like you are well on your way to a good save. I almost painted them... The biggest a downer for me with the kit decals is the are a little too transparent. In your case, the star insignia  match your decals nicely. On mine if you look close you can see the stripes under the white of the insignia.

The dry transfer trick is a baby's butt smooth clear coat (like normal decals) and taping the edges down of the plastic sheet. Then as you rub you can actually see the dry transfer leaving the release film. Then (hopefully) it all sticks...

Photobucket

On the Bench: Tamiya's 1/48 A-10a Thunderbolt 

In the Hangar:  Hmmm???


  • Member since
    August 2009
  • From: Borlando Fla home of the rat
Posted by TREYZX10R on Thursday, December 13, 2012 9:27 PM

Great save B-17!

SF thats looking awesome! Strange they would put dry transfer in among the waterslide stuff!

I hope its not too late to join in? Got a Monogram D in 1/48 sitting in the stash

  • Member since
    August 2009
  • From: Borlando Fla home of the rat
Posted by TREYZX10R on Monday, December 17, 2012 10:21 PM

Basic Dry fit looks promising

Trying not to go hog wild with a/m goodies on this one so making the most out of whats in the box is a must. First up I gave the wheels a retread and then 'weighted' them,may have weighted them a tad much but I'll roll with it!

Next I opened up the vents behind the cowl flap area

Cleaned up and thinned the aft fuse vents

More cleaning and drilling,will be straying from the oob by adding some tubing here

Razor sawed the cowl flaps ,filed them a bit and thinned the trailing edges

Rescribed and cleaned up the front cowl

I'm seeing 2 different zinc chromates on the inside wheel bays and engine cowls which would be correct the yellow or green?

on to the office next! cheers Trey

  • Member since
    December 2010
  • From: Colorado Springs
Posted by Geof on Monday, December 17, 2012 11:49 PM

Trey, looks good. I should have done some of those little mods on mine. Is that the Academy kit? I went with yellow ZC on mine, seems to be what I see in pics mostly. I went straight OOB on mine, but I just ordered a seat for the 'pit. Just couldn't leave the kit seat with no belts so visible in the cockpit.

If anyone needs a true details 1/48 p-47 seat with belts let me know... I have an extra. It's all yours, just need your address.

Photobucket

On the Bench: Tamiya's 1/48 A-10a Thunderbolt 

In the Hangar:  Hmmm???


  • Member since
    April 2005
  • From: Australia
Posted by taxtp on Monday, December 17, 2012 11:55 PM

Good job Trey. I like to see real modelling in action. Great refinement of the kit parts.

Cheers

Tony

I'm just taking it one GB at a time.

  • Member since
    August 2009
  • From: Borlando Fla home of the rat
Posted by TREYZX10R on Tuesday, December 18, 2012 12:18 PM

Geof thanks p/m sent about the seat;)

Tony appreciate the kind words!

  • Member since
    August 2009
  • From: Borlando Fla home of the rat
Posted by TREYZX10R on Tuesday, December 18, 2012 9:32 PM

Monogram kit Geoff,sorry forgot to mention that earlier

Office is a wrap,not a very accurate molding I might add. A lot of missing and misplaced components .Still trying to avoid resin replacements with this build so in it goes.

  • Member since
    August 2009
  • From: Borlando Fla home of the rat
Posted by TREYZX10R on Wednesday, December 19, 2012 9:18 AM

I'm still cleaning up the fuse and opening up tiny vents

Does anyone have a good detail picture of this area?Been searching for hours and coming up dry. Would be greatly appreciated

cheers Trey

  • Member since
    August 2009
  • From: Borlando Fla home of the rat
Posted by TREYZX10R on Thursday, December 20, 2012 12:54 AM

Disregard the pic request B-17 in the stash gave up a turbo(more to come on that build later) and using the donated part I finished up the aft turbo vents.


 I also used some sheet styrene painted black to block light from passing thru the opened vents and installed the office.


Glued the fuse halves together


started working on the gun sight

after it sets up it will be time to decide what to do about the raised panel lines,not really wanting to rescribe this thing. Geuss it depends on how much detail I loose sanding the seams

  • Member since
    August 2009
  • From: Borlando Fla home of the rat
Posted by TREYZX10R on Friday, December 21, 2012 4:57 PM

The wings next,opened the spent shell ports ,landing lights and ID light holes

Cleaned up the engine and firewall,opened the intakes and removed areas around the cylinder heads

Joined the wings and set the dehedral,its close but not exact

filled the minor gaps with green squadron putty

smoothed out the filler and painted a guide coat of thinned grey to highlight imperfections

I just had to touch up a few panel lines at the seams avoiding a major rescribe job.

Thinned MM enamel applied to get a uniform base before the NMF

canopy added

NMF is next,cheers Trey

  • Member since
    November 2009
  • From: SW Virginia
Posted by Gamera on Saturday, December 22, 2012 7:47 AM

Hey nice work there Trey! All ready for the NM now.

"I dream in fire but work in clay." -Arthur Machen


  • Member since
    November 2008
  • From: Crawfordsville, Indiana
Posted by Wabashwheels on Saturday, December 22, 2012 9:33 AM

Trey, That's a good old kit to start with, but you have done some great looking work to bring the level of detail way up.  Keep up the good work.  Rick.


  • Member since
    August 2009
  • From: Borlando Fla home of the rat
Posted by TREYZX10R on Saturday, December 22, 2012 8:56 PM

Cliff,Rick thanks very much for the kind words.

Doogs well all the coin I saved not buying resin goodies for this build I just spent on a Tamiya Razorback to get the aforementioned blast tubes,thanks buddy. Really just kidding it was a great suggestion ,that Tamiya kit is the shiznit! Well worth the coin spent.

I'm going with Testors aluminum for the base of the NMF. First shot some Testors clear over the canopy to help seal down the mask and avoid 'creep'. Followed by a shot of the green interior color. Then the aluminum went on. I had to stop and fix some blems inspite of all the extra care I still missed a few spots. I then shot some Testors clear over the aluminum ,hopefully this will keep me from damaging the finish as I add some various tints to access panels and the anti glare areas.

The props almost ready to hang

Panel color modulation followed by Invasion stripes and anti glare next,cheers Trey

  • Member since
    November 2009
  • From: SW Virginia
Posted by Gamera on Sunday, December 23, 2012 7:58 AM

Nice!!! Super shiny! The paint looks flawless!  

"I dream in fire but work in clay." -Arthur Machen


  • Member since
    September 2009
  • From: Frisco, TX
Posted by B17Pilot on Sunday, December 23, 2012 4:42 PM

Good job Trey!

Well my painting is done! Had a couple of problem areas in the tail as well so that set me back a bit. With the nice weather I got all the painting done! Decal time!


Some panels are diferent shades, but I went with a light variation so they might not show up in the pictures.


JOIN OUR COMMUNITY!

Our community is FREE to join. To participate you must either login or register for an account.

SEARCH FORUMS
FREE NEWSLETTER
By signing up you may also receive reader surveys and occasional special offers. We do not sell, rent or trade our email lists. View our Privacy Policy.