SEARCH FINESCALE.COM

Enter keywords or a search phrase below:

B-36 Peacemaker Group Build

173791 views
818 replies
1 rating 2 rating 3 rating 4 rating 5 rating
  • Member since
    December 2002
  • From: Northern California
Posted by jeaton01 on Saturday, January 7, 2012 12:59 PM

Here is a picture of the separated wing roots and fuselage.  I used a dental tool to scribe along the wing/fuselage intersection, then after the scribe line was almost all the way through I sawed through the remainder with a small saw made by Exacto that fits in a #11 holder.  It took about a half hour to do it.

John

To see build logs for my models:  http://goldeneramodel.com/mymodels/mymodels.html


  • Member since
    December 2002
  • From: Northern California
Posted by jeaton01 on Tuesday, January 3, 2012 12:25 AM

I've started on my B-36, and the first step is done, cutting the wing roots loose from the fuselage.  I'm going to build up the wings next.  Starting on that I can see that as Bill said the engine cooling inlets need some help.  Still thinking about how but those center parts are just too blunt and the top part of the scoop could use some milliput to make it look more like a duct.  Pictures soon.

John

To see build logs for my models:  http://goldeneramodel.com/mymodels/mymodels.html


  • Member since
    September 2011
  • From: North Texas
Posted by lajntx on Monday, January 2, 2012 8:33 PM

Also, FYI....

For those concerned about  a weight issue on a 1/72 build, or for those that would like a more realistic look, Scale Aircraft Conversions of Dallas, TX offers the landing gear in white metal

http://scaleaircraftconversions.com/moreinfo.cfm?KIT=140

They do ask that you first try to purchase through your local hobby shop in order to support you local shops. However, they will sell direct to the public if your local shop wont order it, or you dont have a local hobby shop. Also, Texas residents will pay all applicable sales taxes. For those that travel to the DFW area, they will allow a pick up.

B-36 Peacemaker Builds 

On the Bench: B-36 paint test  fusealge & RB-36E assembly test build

In Que: YB-36 Conversion Build & B-36 carries B-58 Airframe to Wright Patterson

Conceptual Planning: RB-36 X-15 Mothership

  • Member since
    September 2011
  • From: North Texas
Posted by lajntx on Monday, January 2, 2012 8:12 PM

Hi Glen,

Thank you for you input on the balancing issue. I`m hoping when it comes time to get back to work on my B-36/B-58 combo build that simply hanging the B-58 fuselage to the bomb bay of the 36 that the weight of the 58 balances the thing out. With that build as you can see in the photos above of the B-36 I will be using that is demonstrating the 110" main gear that will go on the YB-36 that I have cut out the long bombay true to the bomber and removed the FWD Radome as it was true to the 36 used in this build. It`s going to make for an interesting counter weight issue if it doesnt because there wont be very much room in the forward to add any weight

B-36 Peacemaker Builds 

On the Bench: B-36 paint test  fusealge & RB-36E assembly test build

In Que: YB-36 Conversion Build & B-36 carries B-58 Airframe to Wright Patterson

Conceptual Planning: RB-36 X-15 Mothership

  • Member since
    November 2003
  • From: State of Mississippi. State motto: Virtute et armis (By valor and arms)
Posted by mississippivol on Monday, January 2, 2012 7:23 PM

lajntx

Also, when building the 1/72 put some counter weight/ballast in the forward fuselage such as some metal washers in the lower radome because model or real thing, when this happens it isnt pretty. Wink

http://i820.photobucket.com/albums/zz123/lajntx/100MEDIA_IMAG0126.jpg

Pardon me for snooping; I built one of these last year, and my curiosity was peaked at how folks were doing. I wanted to comment on the balancing issue; I ended up using a heavy long-shank padlock white glued between the bomb bay and cockpit area. Even with that and a lot of lead shot, the center of gravity is still only just in front of the rear wheels. I tacked on the wings and elevators while putting the weight in because they will move the COG back past the rear wheels if you don't factor those items in. Fortunately the kit gear handles the weight well, no bow legs as of yet!

Glenn

  • Member since
    September 2011
  • From: North Texas
Posted by lajntx on Thursday, December 29, 2011 9:19 PM

Also, when building the 1/72 put some counter weight/ballast in the forward fuselage such as some metal washers in the lower radome because model or real thing, when this happens it isnt pretty. Wink

B-36 Peacemaker Builds 

On the Bench: B-36 paint test  fusealge & RB-36E assembly test build

In Que: YB-36 Conversion Build & B-36 carries B-58 Airframe to Wright Patterson

Conceptual Planning: RB-36 X-15 Mothership

  • Member since
    September 2011
  • From: North Texas
Posted by lajntx on Thursday, December 29, 2011 3:38 PM

Hope everyone is having a good holiday break. I thought I would have time to do some work this week, and that has turned into nothing more than wishful thinking.

Some of my YB-36 parts from Click2detail.com have arrived, and thought I would share them.  Here is the 110" landing gear being modeled by SN 49-2677, B36F-1-CF  I will be using later for the B-36/B-58 combo build. With this one you can see the work done to modify the bombay to represent the bomber version.

The 110" wheel:


An underside view which also shows the bombay work for the SN 49-2677, B36F-1-CF build. Notice also the outer cover to the new wheel wells that will be installled on the actual YB-36 build

Some side views:


I do have a problem with the kit I will be using for the first build of a stock build RB-36. When putting the fuselage together, the cockpit area seems a little warped from spending 20+ years in tight fitting box at the wrong angle. When you put it together, you get a gap in the forward part which can be seen here:

The model will conform to the propper fitting when enough pressure is applied to the fuselage. My best idea so far is when it comes time to glue the fuselage together is to use a high strength glue such as super glue and instead of tape to hold the fuselage pieces together until they dry is some wire tie cables.

Any ideas on what to do here?

B-36 Peacemaker Builds 

On the Bench: B-36 paint test  fusealge & RB-36E assembly test build

In Que: YB-36 Conversion Build & B-36 carries B-58 Airframe to Wright Patterson

Conceptual Planning: RB-36 X-15 Mothership

  • Member since
    September 2011
  • From: North Texas
Posted by lajntx on Friday, December 16, 2011 4:16 PM

jeaton01

Looking a Monogram kit over, all my props are fine. 

I'm noodling on fixing the wing/fuselage join by lowering the wing some.  I have a number of the kits and one is going to donate wings for the XC-99 so I can afford to goof up.  I think I will put the fuselage together with white glue and then cut along the wing to fuselage intersection lines which are very definite.  After that I will join the wings to the root segments and jig the wing up true and fit that assembly back to the fuselage, trimming the bottom of the root on the fuselage until the wing is lowered to the proper level.  After that I may make a resin mold of the new center where the wing joins so I can use that on other builds.  The new part would be an insert for the upper fuselage out of resin that replaces the removed area between some of the panel lines so it is easier to fit.

My hat is off to you if you accomplish that. As for me, I`m going to just add the walkway stripes and help create the optical allusion of the the proper wing to fuselage joint..

For those unfamilar with the current 1/72 wing issue... here it is in picture form:

First a real B-36 Wing Joint

Notice how the wings barely touch at the top of the fuseage

Here is the actual model I am using to build SN 49-2677, B36F-1-CF


B-36 Peacemaker Builds 

On the Bench: B-36 paint test  fusealge & RB-36E assembly test build

In Que: YB-36 Conversion Build & B-36 carries B-58 Airframe to Wright Patterson

Conceptual Planning: RB-36 X-15 Mothership

  • Member since
    December 2002
  • From: Northern California
Posted by jeaton01 on Friday, December 16, 2011 2:14 PM

Sounds like a fun trip, Bill.  I have photos of the inside of the Castle B-36. Panels were pretty bare at that time in the cockpit though.

I don't remember if there is a C-124 at Castle either, but there is one at Travis.


John

To see build logs for my models:  http://goldeneramodel.com/mymodels/mymodels.html


  • Member since
    March 2007
  • From: Carmel, CA
Posted by bondoman on Friday, December 16, 2011 12:20 AM

This sounds like a sensible plan. You will need to replace the upper half of the fuselage on the master, but I think it's a true cylinder so it should not be too difficult. It really needs the spar too, which would be difficult to cut a slot for in your resin part, so plan on that.

The intakes are wrong, but filing them open makes them look better, a "by eye" project.

There's an RB-36H at Castle. Let's make plans to go over there and see her, along with the Vulcan. I thought they had a C-124, but I don't see it on the website.

  • Member since
    December 2002
  • From: Northern California
Posted by jeaton01 on Thursday, December 15, 2011 8:48 PM

Looking a Monogram kit over, all my props are fine. 

I'm noodling on fixing the wing/fuselage join by lowering the wing some.  I have a number of the kits and one is going to donate wings for the XC-99 so I can afford to goof up.  I think I will put the fuselage together with white glue and then cut along the wing to fuselage intersection lines which are very definite.  After that I will join the wings to the root segments and jig the wing up true and fit that assembly back to the fuselage, trimming the bottom of the root on the fuselage until the wing is lowered to the proper level.  After that I may make a resin mold of the new center where the wing joins so I can use that on other builds.  The new part would be an insert for the upper fuselage out of resin that replaces the removed area between some of the panel lines so it is easier to fit.

John

To see build logs for my models:  http://goldeneramodel.com/mymodels/mymodels.html


  • Member since
    September 2011
  • From: North Texas
Posted by lajntx on Monday, December 12, 2011 8:10 PM

bondoman

Not having the nose is a problem. I messed mine up by wiping it briefly with lacquer thinner, and could not find a new one. I ended up painting it green, and it looked pretty good.

It should be clear green like the other glass.

RIP Harry Morgan. What,  you haven't done your homework?

If you don't have wing walk decals,  start by painting the wing black, then lay down tape and do the aluminum.


Hi Bondoman,

What specific kit did you have? All the revell/mongrams I have are clear plastic parts. I know there was an older kit made that had the retro coke bottle clear green tint. Was the the kit you built?

B-36 Peacemaker Builds 

On the Bench: B-36 paint test  fusealge & RB-36E assembly test build

In Que: YB-36 Conversion Build & B-36 carries B-58 Airframe to Wright Patterson

Conceptual Planning: RB-36 X-15 Mothership

  • Member since
    December 2002
  • From: Northern California
Posted by jeaton01 on Friday, December 9, 2011 11:03 PM

lajntx


Next question for you... Have you ever scratch built the enternal bombay componets of your builds?

No.  Haven't done that yet.  I generally build because I like the models to display sort of as a technical and operational history of aviation and going too far in detail cuts down my already slow production.  But the B-36 is a natural for display with GSE and a few bombs about.

John

To see build logs for my models:  http://goldeneramodel.com/mymodels/mymodels.html


  • Member since
    March 2007
  • From: Carmel, CA
Posted by bondoman on Friday, December 9, 2011 10:52 PM

Not having the nose is a problem. I messed mine up by wiping it briefly with lacquer thinner, and could not find a new one. I ended up painting it green, and it looked pretty good.

It should be clear green like the other glass.

RIP Harry Morgan. What,  you haven't done your homework?

If you don't have wing walk decals,  start by painting the wing black, then lay down tape and do the aluminum.

  • Member since
    July 2003
  • From: Huntington, WV
Posted by Kugai on Friday, December 9, 2011 10:06 PM

Thanks for the info and offers, guys.

As far as the props are concerned, I'm taking into account that we're not going to be getting a house anytime soon ( so packing this thing for a move is a consideration ), I'm okay with the "spinning props" idea with clear styrene.  The original parts just seem too fragile to survive a move, especially since I think the plastic's a bit brittle from age.

I took a second look at the kit and spotted another problem: the clear dome for the nose is missing as well.  I'm hoping it'll turn up, but if not I'll have to come up with a solution.  At worst, I can buy another kit if my son's interested in trying this thing someday ( or, if he's not interested, it can be something for the spare parts/greeblies box, a big "what if" build at some point, or something I can hand off to another modeler in 20 years ) and cast a clear resin copy of the part.

http://i712.photobucket.com/albums/ww122/randysmodels/No%20After%20Market%20Build%20Group/Group%20Badge/GBbadge2.jpghttp://i6.photobucket.com/albums/y211/razordws/GB%20Badges/WMIIIGBsmall.jpg

  • Member since
    September 2011
  • From: North Texas
Posted by lajntx on Friday, December 9, 2011 9:46 PM

Cadet Chuck

I built the Revell-ogram kit last year.  Bad kit.  I did the best I could with it, and hung it over my basement workshop.  Don't try to follow the painting instructions of various metallic shades-  mine really looks bad, but probably my own fault.  Not recommended for any but the most experienced modelers.

Hello again Chuck,

You do bring up some very good points about the paint schemes- esp concerning the metallic shades.

There are some builds out there on the net that provide pointers on how to accomplish the metallic coloring...

http://modelingmadness.com/reviews/korean/kolb36.htm

http://aircraftresourcecenter.com/Gal7/6701-6800/gal6758-B-35-Irving/00.shtm

http://airfixtributeforum.myfastforum.org/archive/revell-monogram-1-72-rb-36-peacemaker-5712__o_t__t_15705.html

And from our very own Lucien Harpress

/forums/p/67963/677619.aspx

B-36 Peacemaker Builds 

On the Bench: B-36 paint test  fusealge & RB-36E assembly test build

In Que: YB-36 Conversion Build & B-36 carries B-58 Airframe to Wright Patterson

Conceptual Planning: RB-36 X-15 Mothership

  • Member since
    April 2009
  • From: Longmont, Colorado
Posted by Cadet Chuck on Friday, December 9, 2011 9:03 PM

I built the Revell-ogram kit last year.  Bad kit.  I did the best I could with it, and hung it over my basement workshop.  Don't try to follow the painting instructions of various metallic shades-  mine really looks bad, but probably my own fault.  Not recommended for any but the most experienced modelers.

Gimme a pigfoot, and a bottle of beer...

  • Member since
    September 2011
  • From: North Texas
Posted by lajntx on Friday, December 9, 2011 7:58 PM

jeaton01

I scanned the instructions and put them on my website.  Right click to download.

The link will be:

http://yolo.net/~jeaton/fsmforum/b36monoinst/b36inst.html

I will get the pages up later this evening.

Cool! Thanks John.

Next question for you... Have you ever scratch built the enternal bombay componets of your builds?

B-36 Peacemaker Builds 

On the Bench: B-36 paint test  fusealge & RB-36E assembly test build

In Que: YB-36 Conversion Build & B-36 carries B-58 Airframe to Wright Patterson

Conceptual Planning: RB-36 X-15 Mothership

  • Member since
    December 2002
  • From: Northern California
Posted by jeaton01 on Friday, December 9, 2011 5:25 PM

I scanned the instructions and put them on my website.  Right click to download.

The link will be:

http://yolo.net/~jeaton/fsmforum/b36monoinst/b36inst.html

Edit:I will get have the pages up later this evening.

John

To see build logs for my models:  http://goldeneramodel.com/mymodels/mymodels.html


  • Member since
    September 2011
  • From: North Texas
Posted by lajntx on Friday, December 9, 2011 12:04 PM

Hi John,

I was like a drooling kid in a candy store looking at your builds. Smile

As far as being like the other GB`s and making a list of participants with what they are going to build, I decided against that, and to make this GB a come as your are - and when you can - GB due to the model being built.

The B-36 model ( esp the 1/72 ) is kind of like the "Christmas Puppy" everyone gets, and then it ends up unwanted at the pound within 6 months. Yes, the kit looks big and enticing and exciting to buy. The problem is when most people get it home they just cant get around to getting started because it`s so "big", and it gets put off and off. Other kits one can typically build in a few free days spread over a month, but not this one, and thus it gets put off and eventually forgotten. I`m willing to bet that most garages/storage closets of homes in the USA have at least one of the two of the following in them: A tennis racket, and an unstarted B-36 Kit. 

Aint that right Kugai? LOL!  Stick out tongue

Most people I have communicated with online whom build their 1/72 to completion have given construction times of actual clock hours of between 40-80 hours. I`m willing to guess most people just dont have that much free time to devote in large chuncks. Most people can do an hour here, 30 minutes there, and maybe half a day every couple of months. With that being said, this GB will allow everyone to share their progress and to give/get tips, spare parts, info, stay moticated, etc.

Also, anyone whom doesnt plan to build but wants to talk about the B-36 or even the kit in generaly is allowed to join.

As for myself, here are my projects:

Build #1 -- Stock RB-36 Build to become aquainted with the kit- Starting over Christmas Holiday

Build #2 - YB-36 as it appeared in 1947/48 - Sponsored by Click2detail.com. To be dedicated in memory of the late Walter Soplata

Build #3 - restart my B-36 carries B-58 to Wright Patterson in `57. To be donated to a local Museum

Builds 4- 7 - B-36B with Artic red tips, WWII "what if" build, and BM-015 - The City of Ft Worth, The last peacemaker at peacemaker park in 1959.

That should keep me occupied for 2-3 years. LOL

Would enjoy having you join are group and share your modeling insight even if you dont ever plan to build

John

B-36 Peacemaker Builds 

On the Bench: B-36 paint test  fusealge & RB-36E assembly test build

In Que: YB-36 Conversion Build & B-36 carries B-58 Airframe to Wright Patterson

Conceptual Planning: RB-36 X-15 Mothership

  • Member since
    September 2011
  • From: North Texas
Posted by lajntx on Friday, December 9, 2011 11:37 AM

Hello again Kugai,

I can help you on all 3. 

1.) The instructions.... I looked online for the instructions, and they are not there unless you want to pay for them. The only 1980 kit I have is still factory shrink wrap sealed, and that`s how its going to stay as I let it age like a fine wine and climb in re-sale vale! lol However, I am in negotiations with a scrap kit, that is a 1980 kit, and I would be more than happy to stick that in an evelope and mail it too you. Also, if I dont win that I have several 1997 kits to which I can send one of those if it comes to that. The only thing that should be different is the decal application..

2.) I have 2 extra props as one of my builds ( the 36/58 combo ) only requires 4, and would be more than happy to send you one. Plus I`ll have 6 more if I manage to get that "scrap" kit at the right price.

3.) The broken prop... You are going to have to construct some sort of jig to hold that thing in place while you glue that broken blade(s) back on until the glue dries and it sits. Ive purchased 8 kits in the last year and only one of the them has ever arrived with all 6 props intact.... It was a 2008 relase btw. I  have another `08 in route that will be here next week, if that arrrive intact then we`ll know it`s true that Monogram used a better plastic composit blend for kit molding. The plastic looks a little different color wise when you compare the parts out ofthe box of an `08 to any of the previously released versions.

Let me know on the instructions and blade

John

B-36 Peacemaker Builds 

On the Bench: B-36 paint test  fusealge & RB-36E assembly test build

In Que: YB-36 Conversion Build & B-36 carries B-58 Airframe to Wright Patterson

Conceptual Planning: RB-36 X-15 Mothership

  • Member since
    December 2002
  • From: Northern California
Posted by jeaton01 on Wednesday, December 7, 2011 10:07 PM

Is there going to be a list of participants on the front page?

John

To see build logs for my models:  http://goldeneramodel.com/mymodels/mymodels.html


  • Member since
    July 2003
  • From: Huntington, WV
Posted by Kugai on Wednesday, December 7, 2011 9:52 PM

After more than 10 years, I finally looked in the box.  As I said, this was a free kit given to me by someone who'd decided 20 years collecting dust on his shelf was enough time to decide he wouldn't be building it.

Apparently, he had considered it, though, and not put the instructions back in the box.

On top of that, of the 6 props this thing's supposed to have, there are only 5 that I could find, and 2 of those are broken.

So, even if I hadn't originally intended to do a little customizing, I'll be doing it now.  I'll have to check in more detail once I get a set of instructions to make sure that there are no more parts missing, but worst -case scenario I see is gear up and doors open will be the plan with the old clear styrene disks painted for the blurry pinning props look.

But, hey, this kind of fun is what this hobby's all about, right?

http://i712.photobucket.com/albums/ww122/randysmodels/No%20After%20Market%20Build%20Group/Group%20Badge/GBbadge2.jpghttp://i6.photobucket.com/albums/y211/razordws/GB%20Badges/WMIIIGBsmall.jpg

  • Member since
    July 2003
  • From: Huntington, WV
Posted by Kugai on Wednesday, December 7, 2011 1:23 PM

Okay, guys, here's where mine has been for the past few years...

IMG_0237.jpg

Given the experimenting I'll be doing on the bomb bay, I doubt I'll be able to get this done by the time we'll be moving in the summer.  At this point, I plan on getting this down from the shelf and the easily-lost parts in some containers.  I'll also get to work on some sub-assemblies ( props, crew areas, etc. ) here pretty soon with the idea being to have the small stuff and maybe some bay work done before the move, and be ready to get the big stuff done after the move.

http://i712.photobucket.com/albums/ww122/randysmodels/No%20After%20Market%20Build%20Group/Group%20Badge/GBbadge2.jpghttp://i6.photobucket.com/albums/y211/razordws/GB%20Badges/WMIIIGBsmall.jpg

  • Member since
    June 2008
  • From: Iowa
Posted by Hans von Hammer on Friday, December 2, 2011 3:37 PM

You might want to consider re-sizing the badges in your siggy... Or just using the thumbnails.. The ones you have on there right now are forcing me to use the slider-bar to even begin to read any of the posts...

This is the thumbnail.. Might have to re-do the lettering too, to make easier to read in this size...

  • Member since
    June 2008
  • From: Iowa
Posted by Hans von Hammer on Friday, December 2, 2011 3:33 PM

By request, a copy of a PM I wrote regarding old decals and Testor's decal bonder:

The product I use is called Testor's Decal Bonder... Runs about 4.50-5.00 for a 3oz rattle-can... I buy mine at Hobby Lobby..

 I won't say it's 100%, but it's 99.9% effective, at least... If the paper is curled badly and the decals crack when you flatten the sheet, then they're probably goners, although I have sucessfully "saved" some cracked ones that were first cut out of the sheet, then sprayed individually...

I spray it on a couple of light coats, letting about 15-20 minutes elapse between them, then let it dry for a couple hours, and it's ready to use... Just be sure to apply it heavily enough that it completely covers the sheet, but light enough that it doesn't run or puddle...

The stuff is actually a clear decal film... It turns the whole sheet into one giant decal...So don't just drop the decal in the water without trimming it close to the ink... I've used it on decals that're easily 20-30 years old.. It reacts well with Testor's Decal Set (or a 60-40 mix of white vinegar/water ), it's flexible, and it doesn't crack like clear laquers enamels when you apply them to compound curves...

Be sure to keep it off the back of the paper, since if you get it back there, it'll lock the decal and paper together for all eternity...


  • Member since
    September 2011
  • From: North Texas
Posted by lajntx on Friday, December 2, 2011 12:31 PM

bondoman


You'll want to see it. Most of the movie is in and around B-36's, quite a bit and some beautiful inflight sequences.

B-47 figures in at the end, and also I believe a KC-97. Also toss in F-84s, C-47,s, a C-97 and glory be, a great sequence with C-124s being loaded with spare engines and taxi-ing away. In that one, look for the spotter standing up in the opened nav dome.

Agreed!

This movie can also be difficult to find in the US as only one supplier sells it in DVD format. Lots of places to buy it in VHS though.  I checked and TCM doesnt have a planned airing anytime soon. Hopefuly that will change, and I`ll post on here should they every schedule it to be aired

http://www.tcm.com/tcmdb/title/4246/Strategic-Air-Command/


B-36 Peacemaker Builds 

On the Bench: B-36 paint test  fusealge & RB-36E assembly test build

In Que: YB-36 Conversion Build & B-36 carries B-58 Airframe to Wright Patterson

Conceptual Planning: RB-36 X-15 Mothership

  • Member since
    March 2007
  • From: Carmel, CA
Posted by bondoman on Friday, December 2, 2011 11:47 AM

sub revolution

Bondo-

Thanks for the info! Aside from the small amount on Wikipedia and other websites, I have found very little about the plane. Is it the Magnesium Overcast or the Photoscrapbook one?

Also, I thought the Jimmy Stewart movie featured B47s, not B36s. Or is it both? Never actually seen it.

Thanks

You'll want to see it. Most of the movie is in and around B-36's, quite a bit and some beautiful inflight sequences.

B-47 figures in at the end, and also I believe a KC-97. Also toss in F-84s, C-47,s, a C-97 and glory be, a great sequence with C-124s being loaded with spare engines and taxi-ing away. In that one, look for the spotter standing up in the opened nav dome.

  • Member since
    September 2011
  • From: North Texas
Posted by lajntx on Friday, December 2, 2011 10:54 AM

It`s looking like I am going to be pressed for time for the next few weeks due to this being the busy season at work, and thought I would go ahead and punch this one out since this will be one of my last days off before the fun at work begins.

Today I will be covering the various 1/72 kits through Revell/Monogram since I am most familiar with them. Hopefully others with experience on the 1/188 & 1/144 scales will chime in on their expeience with them. Also, I`ll cover how to buy/sell the 1/72 kit on ebay to help others whom cannot find this locally get a kit at a reasonable price, and tips to help those whom decide to sell theirs to maximise the profit margin.

For a good history about the various model kits since the early 1950`s the best resource out there is this book:
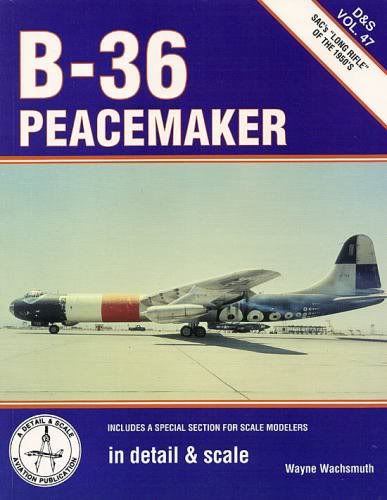
It can be a bit pricey if purchased "new" from a place that still has them, but with a little looking buying used on ebay or amazon brings a significant savings. I purchased mine on ebay for $15 & free shipping.

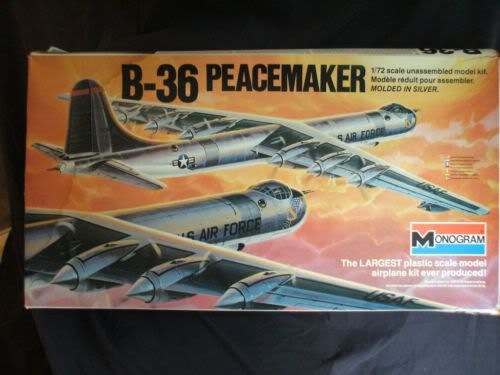
In 1980, Monogram release the first issue of its current 1/72 offering. Though it wasnt the first manufacturer to offer 1/72, the marketing line used at the time was " The LARGEST plastic scale model airplane kit ever produced! ". This would be a title it held for several years until the 1:48 B-1 kit was released. Also, used in advertisements of the era was the "great buy" this rather large kit was as it was only $15 at your local retailer or hobby store.

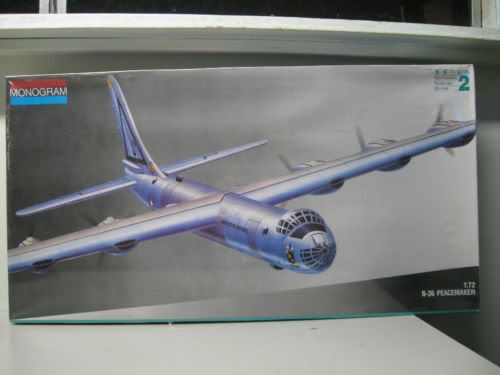
The Box Art was adequate:
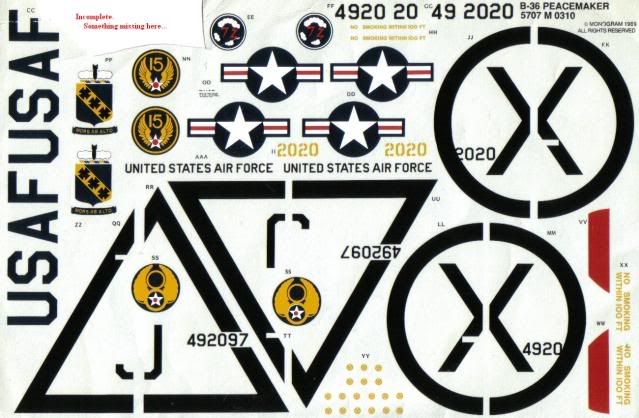
And it came with a basic set of decals
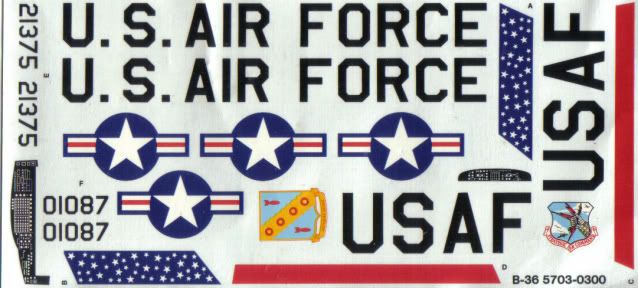
Soon thereafter a few companies began to produce some aftermarket parts for this kit -- esp decals so one was not limited to just a stock build.

In 1989, the second release was released with a new box art, but a new decal sheet ( same as 1991 ).

This kit though not the best for the person whom actually wants to build it, is perhaps the best to sell on ebay- esp if it is still enclosed in the shrink wrap. It always seems to draw a higher price than the 1980 kit unless the 1980 kit is in far better condition.  Consesquently, those looking to buy a kit should not engage in a bidding war for this kit unless they like to spend too much money.
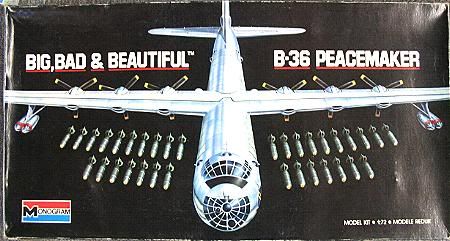
In 1991, the third release followed with a carry over on the decals
In 1997, the fourth release was marketed as a Revell/Monogram and came in two offerings with the same box art with decal offerings standard to both `97 kits
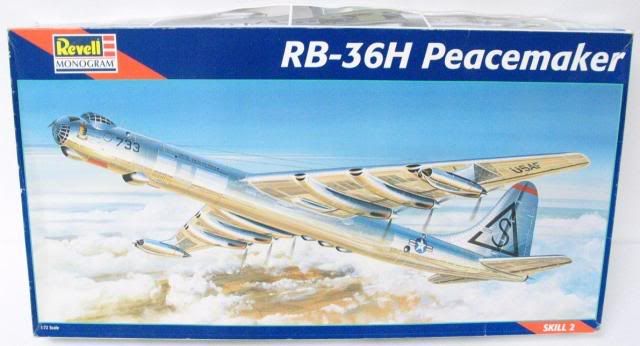
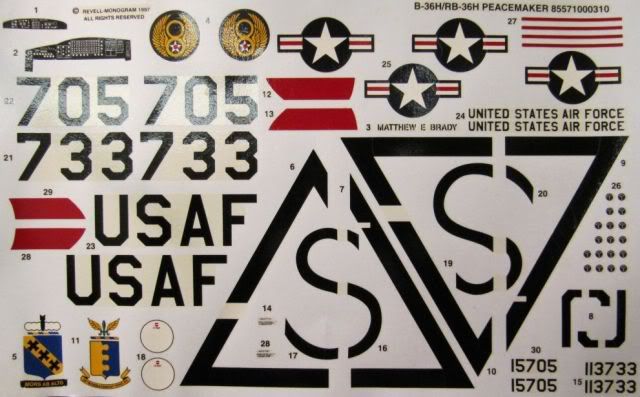
Though both kits were identical, the only difference was in box size. Here is a picture of my collection of both kits to illustrate the size difference:

In  2002, Revell Germany released perhaps the best 1/72 kit to date simply because the decal sheet finally included the walkway and other common marking stripes saving the consumer another $15-$20 USD from buying this sheet aftermarket. This kit usually costs a little more, but is worth it due to the savings in having to buy that extra sheet.
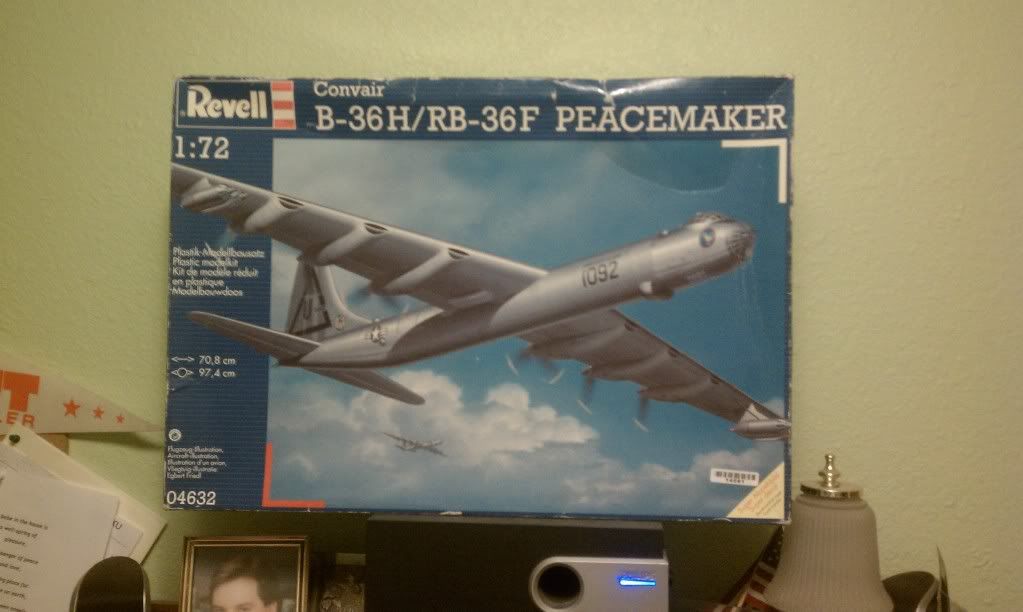
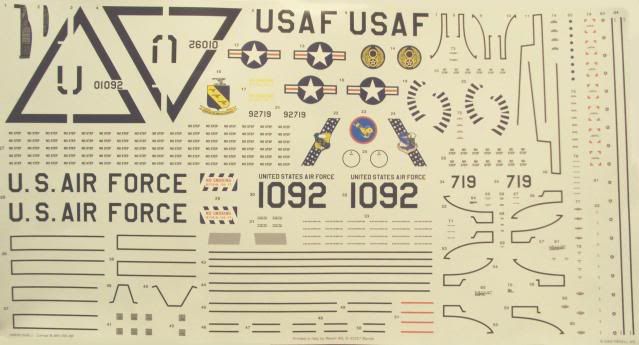
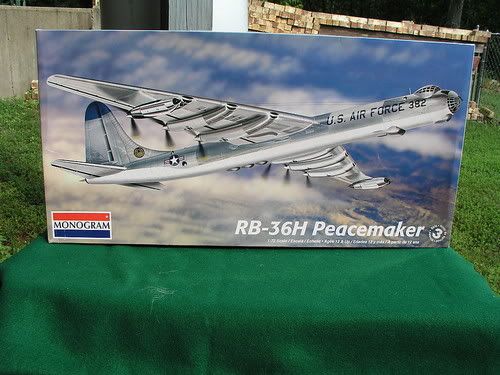
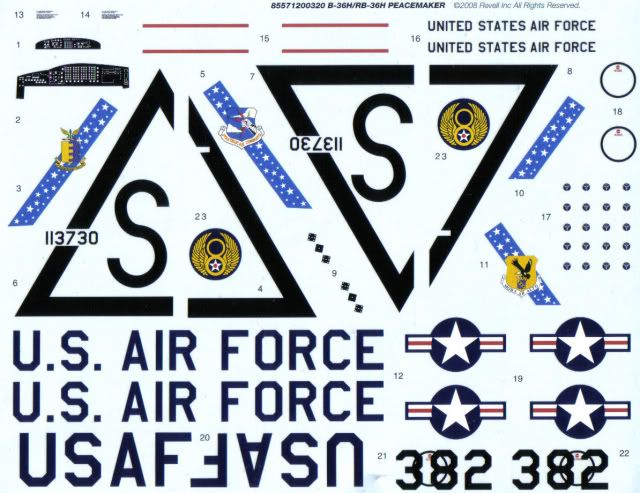
 Finally, In 2008, the most current kit was release with new box art and a new decal sheet that DID NOT include the walkway stripes and misc commom B-36 markings.


Now that the various kits are covered, lets cover the aspects of aquiring on ebay should your local stores be sold out and unable to get any through their suppliers. Here are some pointers. All prices in USD

1. An online dealer with a kit in stock ( if you are lucky to find one ) is going to want around $49.95 +/- $10 and around $20 +/ $5 for shipping. Most online dealers selling will likely have either the `97 or `08 kits

2. An online dealer selling "vintage kits " ( `80 & `89`s ) will want between $75-$200 for theirs. Dont waste your time as there are better deals to be had on ebay competing with them for those kits and the various others that will be on there as well.

3. Pictures tell a 1000 words ( and the story ) always look at the pictures displayed closely

4. ALWAYS read the ad in its entirety before bidding. You dont want to buy someone else`s half started scrap set do you? Look for kits with ALOT of pictures, if there arent many pictures and the box doesnt appear to still have the factory shrink wrap intact.. .ask the seller questions about the kit

So now you have decided to look on ebay and watch for the best deal.

1. Just like poker, dont play your best hand at first. Someone will always be willing to spend a little more than you. Patience is key, and waiting until the last few minutes is best.

2. Look for kits ended at odd times to reduce the chance that someone else will be waiting in the wings the last few minutes as well. By odd times I mean those times when most people are at work or spending family time. Ebay ( in the US ) is set to Pacific time. Keep that time change in mind when looking to bid. Ive noticed that kits set to end on sundays before most people get out of church or away from the families are often the best ones to snatch up at a bargain.

3. Always search with differnent search terms: B-36 Peacemaker, Convair B-36, Monogram B-36... and most importantly look for #3a

3 A. These days a lot of people are selling their stuff through a reseller. The ebay reseller will often simply use the title on the box of the item being offered which is a boon for you as most people dont search this one: RB-36H Peacemaker Monogram ( or Revell ). Ive snatched up three kits relatively cheap with this trick. The first 2 I only paid $20 because nobody else knew the listing was there. Here is the example of the Third where I paid a little more for an `08 kit, because someone else figured out the trick, but still got it under the $29 price I wanted to pay.

Here is the listing, Notice it is now < 4 minutes to go and nobody has bid with the starting bid still at $20. As you will notice as you look around on ebay and watch the auctions for these kits by this time the bidding war has already started and is in full effect. However since the reseller listed it as a " RB-36H Peacemaker Monogram Airplane Kit " nobody has seen it yet. I know I dont want to pay more than $29 for this, so I make my opening bid of $21 and wait until the last minute to make my move.
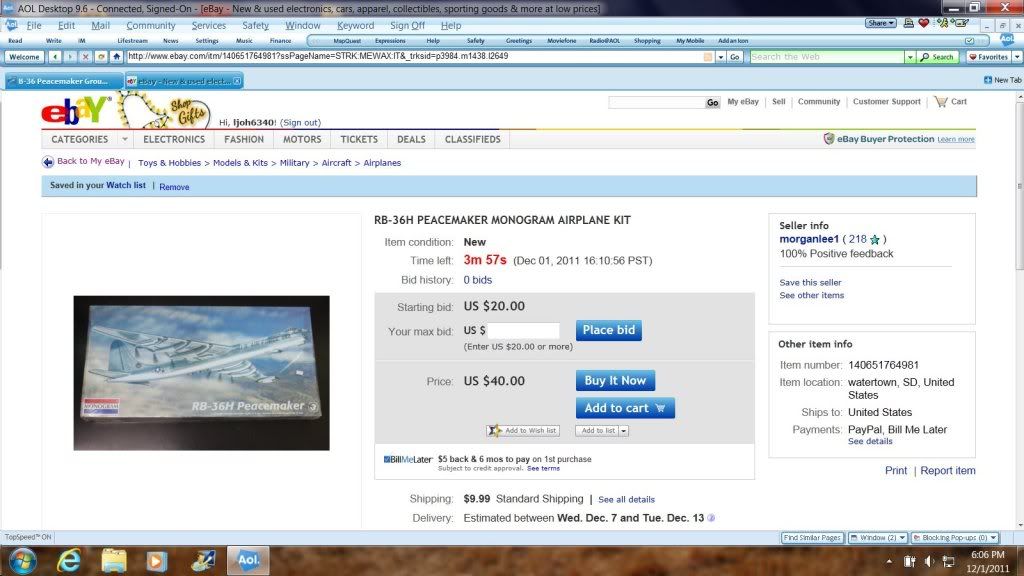
At this time I will go over how I buy kits on ebay. Before bidding I put a price in my head of the most I am willing to pay with the price of shipping being offered by the seller. In this case It`s only $9.99 via UPS,  which is rather reasonable seeing most auctions tend to be around $15. On this one I decided I only wanted to spend $29 tops. I placed my opening bid of $21 as the first bidder with < 4 min to go. At this time, if someone else already had the price up ( or over ) the price I had in mind... I would simply walk away.

Now comes the next step... How to beat those other potential pesky "other bidders". I`m at $21... the listing in this case was still $20.... I know $29 is my max.... I go back in and up my bid to $25 with 45 seconds to go thinking nobody else is on this ( as I thought )... I place $25 stil expecting it to say $20 and nope.. it say $23.55 - We have a competitor and it`s game on. In this case most bidders will start to increase in slow upward increments. If you find yourself trailing, now would be a good time to put all your cards on the table and place you maximum bid, In my case I know I am ahead ( right now ) and the other bidder is either likely the seller trying to increase the price, or a 9/10 chance they will only likely go up a few dollars to try and beat me at the end.....

At 28 seconds... I upped my bid to $27... sell price increased to $25.50 -- I beat him again!

I`m not done... I`m still winning. At this time if its the seller, they most likely will back off, another bidder is probablly going to up it a couple of dollars.... around 15 seconds on the counter I plance my maximum bid of $29 to wait and see, and...........

Success!

I beat the other bidder because I felt they would only go up a few dollars at a time ( and guessed right ). Always if you are trailing in the last minute.... bid your max to see if you can overtake the high bidder.

Looking at the other end. Let`s say you have a kit that you want to sell on ebay.

1. If the kit is still in shrink wrap --- DO NOT OPEN IT! Insead take several pictures of the box at differnt angles ( sides ) to show the box`s condition with intact wrap... Intact wrap = more $$

2. Use the broadest generic title and search time such as B-36 Peacemaker. Dont make the $20+ mistake resellers do by listing it as a "RB-36 peacemaker Monogram".  Myself ( and now a few others ) will be happy to buy it cheaply from you. ;)

3. Sell it at the right time. Ensure the ending time is between 9 & 10Pm Pacific time. This way everyone looking in the eastern time zones will see your listing as well. Thursday & Sunday nights at 9/10Pm Pacific seem to be the difference between $27.70 & $40+

4. Pictures! Pictures! Pictures! When you think you have enough... take 3 more. display the most ebay will let you. If the kit is open and still on the trees... Take pictures of every tree

5. Be honest... Dont call your kit pristine when it isnt. Even broken/Started kits also have a market on ebay by those looking for a started kit or ones just for the spare parts value... sell those at the suggested times for maximum price

6. Shipping... Average charge on ebay is around $15. Be aware that the US Post Office Considers this to be an "Oversized Package" by about 2 inches. Expect to pay $12-$15 in actual cost to ship it to the buyer ( more if its overseas or in a distant zone. UPS for mainland US Shipping for this box is about $7-$12 pending rate class & distance.

That covers the basics of the kit and ebay selling and buying... Post me a question on here if you have any about this subject

B-36 Peacemaker Builds 

On the Bench: B-36 paint test  fusealge & RB-36E assembly test build

In Que: YB-36 Conversion Build & B-36 carries B-58 Airframe to Wright Patterson

Conceptual Planning: RB-36 X-15 Mothership

  • Member since
    September 2011
  • From: North Texas
Posted by lajntx on Friday, December 2, 2011 10:04 AM

Hi Sub Revolution,

To answer your questions, the best book I have seen to date about the XC-99 & the proposed airline versions of it ( but never built ) was: Warbird Tech Series`s Vol. 24, Convair B-36 "Peacemaker" also by Dennis R. Jenkins


It can be a bit pricey new, but can be had almost for a song and a dance used on Amazon or ebay.

http://www.amazon.com/Convair-B-36-Peacemaker-Warbird-Tech/dp/1580070191

Also see the end of Part 1 and begining of Part 2 of Convair B-36 peacemaker for some video of the XC-99. After running out of use, the XC was litterally parked and abandoned for nearly 50 years. Today it is undergoing full restoration at the National Museum of the Air Force at Wright-Patterson AFB in Dayton, OH

As for your other question. In Strategic Air Command Jimmy Stewart also flies B-36`s and if memory serves me correct later transfers to B-47`s. Here is the scene where he is simply an observer on his first B-36 flight.

http://www.youtube.com/watch?v=ruE8yhkHke8


As for the NB-36, an online  friend of mine also makes the aftermarket kits to convert a stock kit at: click2detail.com

1:44

http://click2detail.com/products-details.php?pro_id=246

1/72

He said he would be joining us later with his XB-36 & NB-36 conversion builds.

B-36 Peacemaker Builds 

On the Bench: B-36 paint test  fusealge & RB-36E assembly test build

In Que: YB-36 Conversion Build & B-36 carries B-58 Airframe to Wright Patterson

Conceptual Planning: RB-36 X-15 Mothership

JOIN OUR COMMUNITY!

Our community is FREE to join. To participate you must either login or register for an account.

SEARCH FORUMS
FREE NEWSLETTER
By signing up you may also receive reader surveys and occasional special offers. We do not sell, rent or trade our email lists. View our Privacy Policy.