SEARCH FINESCALE.COM

Enter keywords or a search phrase below:

Semper Fi War in the Pacific

66479 views
854 replies
1 rating 2 rating 3 rating 4 rating 5 rating
  • Member since
    October 2009
Posted by PANZERWAFFE on Wednesday, January 18, 2012 7:57 PM

DEATTILIONICE!!Big SmileBeerBeer  Thanks for the pictures!  Those are great with some nice details.  They are already answering my questions and curiosity!  Glad you like the tracks.  I will be getting more sets of these myself.  When you work on these tracks just make sure you use some patiences.

Great news getting your papers submitted and I hope the best with your BAYes  Good to hear your getting some bench time in now.

CARL - The wheels look Great and thanks for the explanation of how.  Looks like your off to another masterpiece.


Well have been trying to cast the hatch ...........no luckSad  Have made three hatches and none pass quality control.  Not sure if I'm doing something wrong or what?  Not the only but the biggest problem seems to be many small air bubbles.  Cant get them not to appear and it leaves divets all over in the cast piece destroying the detail.  Will keep practicing  but may now just try to cut the existing hatch off and move it forward?

Rob

  • Member since
    March 2006
  • From: Right Side of a Left State
Posted by Shellback on Wednesday, January 18, 2012 8:41 PM

Rob , first thanks on the wheels . About casting , I remember that bubbles are the big problem . There must of been some how too article about that here at fsm . I'll look .

  • Member since
    March 2006
  • From: Right Side of a Left State
Posted by Shellback on Wednesday, January 18, 2012 9:00 PM

Rob , are you reffering to bubbles im the mold or the cast part ? What i found so far says to poor slowly ......i suppose your already doing that .

  • Member since
    October 2009
Posted by PANZERWAFFE on Wednesday, January 18, 2012 10:42 PM

Hey Carl, was busy making a LVT picture disk.  Bubbles are in the cast part.  I told you I made 3 of them.  Two of them I used the flat stir stick and poured the resign in having it run off the stick.  One of them I poured straight into the mold from the cup.  The one poured from the cup worked best but it still had bubbles.  Two problems I may be having is the mold and the size of the hatch I'm trying to make?  The mold is only a one part and is made out of the molding clay not the RTV.  Did not use the RTV because the hatch is small, and the pattern of it is still on the original hull of the model.  The instructions said that the clay could be used for stuff like this by just pushing the clay onto the part.  After doing this the clay mold does look smooth and has good detail in it but I'm sure it is not as good as the RTV mold?  The size may be a problem because there really isn't any slow pour.  About the time something comes out of the cup the mold is full.  Thats why when I poured the first one and it had bubbles I tried to pour off the stick for the other tries.  Off the stick I believe added even more air making more bubbles.  I had also poured some sandbags just to use up the resign and they are no top quality high dollar part but overall they are not to bad either and I am going to keep them and use them some time or another.  The sandbags were also made with the clay mold but they are a bit bigger and deeper molds which I believe may have accepted being able to handle the pouring process because of the size ?  They came out with no bubbles.   Will still try some more tomorrow, maybe even try a RTV mold of the hatches and see what happens.  Just did not want to use the RTV for such a small thin part but might have too? 

Rob

  • Member since
    October 2005
  • From: New Port Richey
Semper Fi LVT YAT YAS
Posted by deattilio on Wednesday, January 18, 2012 10:47 PM

Here is the start on what I imagine will be an eye-crossing headache.  I am cutting the a-driver’s hatch from the cab and moving it forward.  This will give me an opportunity to sand away the over-emphasized welds running along all the edges.  I am also removing the cab glacis and replacing it with the similar part from an LVTA4 part, after some more scribing and sanding anyway.


WIP:
Trying to get my hobby stuff sorted - just moved and still unpacking.


"Gator, Green Catskill....Charlie On Time"


  • Member since
    March 2006
  • From: Right Side of a Left State
Posted by Shellback on Wednesday, January 18, 2012 10:57 PM

Rob........i didnt realize you were using clay as the mold . doesnt make any difference in what i know aboutit though . I tried using the search for how to here but it seem to understand anything i ask it .Anyway i googled and there are lots of tutorials but so far none answered the question . Still loooking . Yes

  • Member since
    October 2009
Posted by PANZERWAFFE on Wednesday, January 18, 2012 11:01 PM

Interested in seeing your surgery.  I may yet be doing the same by just cutting the hatch and moving it forward also.  1/72 scale should be a little more challenging then my 1/35.  The weld beads are more prominent on that kit, I'm surprised.  Nice that you have the donor kit for the drivers visor..

Rob

  • Member since
    December 2009
Posted by ww2psycho on Friday, January 20, 2012 12:52 PM

I will post a picture today of where im at. I have two questions though.

1. What color would everyone agree the camo being? I dont think its black, never seen a black/OD camo on a sherman (yet). Im thinking of going with a brown.

2. How do you paint your tracks? Ive always followed the instructions and used flat black or metalic grey, but I know this really isnt realistic.

  • Member since
    March 2006
  • From: Right Side of a Left State
Posted by Shellback on Friday, January 20, 2012 7:45 PM

WW2 as far as the color here's a link . Looks like green and black to me .

http://sm87.carbonmade.com/projects/2469608

The tracks , if your protraying the tank in dry / dusty conditions i paint mine flat black over all first then go over that with a dry brushing of an earth color then if your tracks have steel tread i dry brush them with a steel color , if rubber tread i lightly dry brush them with a dark dark gray .

  • Member since
    February 2003
  • From: Allentown, PA
Posted by BaBill212 on Friday, January 20, 2012 7:52 PM

Green and black or green and very dark green,,,    I agree

Enjoy the ride!


  • Member since
    October 2009
Posted by PANZERWAFFE on Friday, January 20, 2012 8:41 PM

Whats up with the subject / title change??

WW2 - Could not tell you what the real color on that M4 was?  Brown or a brownish red was a common color in the Pacific.  The only black / green camo pattern I know of for sure was for Operation Cobra in Normandy.

Little bit done on the cab area.  First scribed the fender lines into the upper deck.  In this picture can see the original with no line on the left and on the right scribed lines.

Was able to cut out the a-drivers hatch and move forward.  Put on a periscope assembly on the drivers hatch.  Not happy with it so will try something else to replace the cast one.  Made a simple drivers vision flap.  Finally had re puttied the original vision block location holes and re sanded to get things smoother.  All parts are dry fit at the moment and more work is to come on the cab area before any parts are permanently attached.

Rob

  • Member since
    March 2006
  • From: Right Side of a Left State
Posted by Shellback on Friday, January 20, 2012 9:00 PM

Whats up with the subject / title change??".......................What ?

Modifications all over the place Rob . Looks good . Did you solve the bubbles in the resin ?

  • Member since
    October 2009
Posted by PANZERWAFFE on Friday, January 20, 2012 9:19 PM

You didn't notice the title?  Look at the post at the top of this page and at the last few on the page before??

Have not had much time to do much with the casting today or yesterday.  With the weekend here now, will try making some new molds but this time will try making them with the RTV.

Rob

  • Member since
    March 2006
  • From: Right Side of a Left State
Posted by Shellback on Friday, January 20, 2012 10:08 PM

After i read your reply i saw what you mentioned so i went back to the next page and it had the crazy RE:  blah blah blah there also . Then i came back to this page and its correct now .............................????? The moderstors must be restless .

  • Member since
    February 2003
  • From: Allentown, PA
Posted by BaBill212 on Saturday, January 21, 2012 7:52 PM

Same thing,,   I looked,,  checked back a few pages,,,,  looked again - - - - a mystery I guess,,,    not sure (?)

Enjoy the ride!


  • Member since
    April 2009
  • From: Carmel, IN
Posted by deafpanzer on Saturday, January 21, 2012 8:00 PM

Hey guys!  I have been lurking for last few days.  Busy building a Huey which I hope to finish it ASAP so I can finish my StuG and start M8 Howitzer sooner!!!

Guess what arrived today via mail... figures for my M8.

Of course I had to order other sets... I'd be stupid to spend a fortune on shipping for one set.  That what I always tell my wife... heh!  I think I will not use those guns.  They are in the artillery so they don't carry big guns around...

Andy

  • Member since
    October 2009
Posted by PANZERWAFFE on Saturday, January 21, 2012 8:58 PM

Nice figures AndyYes  What weapons does the USMC figures have on them?  Cant see them, too small.  Are they pistols?  Most armored crew carried pistols are carbines because of there stowage limitations and lack of space to move them around.   The other figure sets look real nice.  Do you already have a plan for them?


Been adding some more detail to the cab area.  Drilled holes and screwed in the cab deck screws.  Hatch, periscope assembly, lift eye and handle added permanently now.  Two questions for yall, the screws should go down the sides of the cab plate also but have run out of screws.  Have not been able to find anyone who sells anything near this size either.  So do I just not put the screws down the sides or do I drill out the holes and put in the same diameter rod to give the impression of screws?  Not sure if the screws will even show after paint and finish?  Second question:  The periscope assemblies on the hatches are different.  Making a new one is not to difficult so should I make another one and replace the kit molded one, the one on the starboard hatch?  Also going to try to make the Plexiglas domes that go over the periscope assemblies.  Was thinking if these could be made successfully it would hide the differences in the two periscope assemblies.

Here is now what things look like.

Close up of the added cab deck screws.


Rob

  • Member since
    March 2006
  • From: Right Side of a Left State
Posted by Shellback on Saturday, January 21, 2012 9:38 PM

Nice ! I try to make my order over a $100 with sprue bros . Andy . That way i figure i can break even with half off on the shipping . My shipping charge is a lot higher way out here in the wild northwest ..................Whistling I ordered those M4 tracks (T49's) today ....along with that DML 7.5 cm pak 40 on an RSO chasis today ............looks like a cool little German WW 2 cobbled up self propelled gun . Reviews on it arent to bad . DML put seats in it from a M113 though ?I guess thtw what the museum piece had on it . There were a couple of other kits ordered also ............just to get over a hundred bucks !

Heres some of what ive been doing .

The M4 bogey trucks , drive sprockets .

Some of the stowage i found for the jeep , from my spares junk pile .

I found these in that pile also , M3 "grease gun ", M19928a Thompson , M1 carbine and a M1 Garand . Rob will correct me if i'm wrong . I'm going to use them around the jeep and dio .

  • Member since
    March 2006
  • From: Right Side of a Left State
Posted by Shellback on Saturday, January 21, 2012 9:51 PM

Rob ,where the heck did you get those little screws ????  Theres an outfit that makes nuts and bots for model railroading ...........cant think of the name now ............their stuff is real small .Grant Line maybe ? Super details Yes I would say you could use plastic rod and maybe even put a notch acroos the top .


  • Member since
    March 2006
  • From: Right Side of a Left State
Posted by Shellback on Saturday, January 21, 2012 9:53 PM

Yes i would scratch build both periscopes . Thats way the would match for sure .

  • Member since
    March 2006
  • From: Right Side of a Left State
Posted by Shellback on Saturday, January 21, 2012 9:56 PM

Its Grandt Line

http://www.grandtline.com/

  • Member since
    April 2009
  • From: Carmel, IN
Posted by deafpanzer on Saturday, January 21, 2012 10:04 PM

Rob- that's what I thought.  The set comes with Thompson MG and M1 garand.  Like your idea holding a pistol. Maybe a bottle of sake! Heh Whistling

Love the screws.  You are officially crazy! 

Carl- wish I can order that many!  That's when my wife will kill me.  I only ordered two at most if they are on big sale like recently for Xmas. 

You are doing great.  Nice details on the wheels.  The pic of all guns you had... The top one is actually MP40.  My fav German toy!  Let me know if you need a grease gun. I think I have couple here... 


Andy

  • Member since
    March 2006
  • From: Right Side of a Left State
Posted by Shellback on Saturday, January 21, 2012 10:08 PM

They dont "Got any screws ."..........................No

  • Member since
    March 2006
  • From: Right Side of a Left State
Posted by Shellback on Saturday, January 21, 2012 10:12 PM

Well that MP 40 aint going in this build Andy ! Thanks .Now that i look at it again i dont know what i was seeing b4 ...................i even looked it up for petes sake ! Can i go back and edit it b4 Rob reads it ..................Embarrassed

  • Member since
    March 2006
  • From: Right Side of a Left State
Posted by Shellback on Saturday, January 21, 2012 10:16 PM

My wife says its fine with her Andy . I'll back off buying any more kits though . i'm going to get rid of a bunch of aircrft models this year . The store up in Spokane where i bought those half tracks buys collections .

  • Member since
    October 2009
Posted by PANZERWAFFE on Saturday, January 21, 2012 10:52 PM

WW2 - How did your paint come out?

CARL - Andy is right, thats an MP40.  The M1928A1 and the M1 will work fine.  The rest of the gear will also look good in the jeep.  Have you tried making tissue bedrolls, blankets, etc?  It's not hard and then you could custom fit everything and have as many as you want.

Nicely done on the boogiesYes

The screws were from an old jeweler, gave me a handful of them but these were the last of them.  Think there is a jeweler / watch maker close by my house here, will go out and look tomorrow.  Had tried slotting the end of the styrene rod but with not much luck.  It's just sooo small, will try some more.  The rod and head of the screw is .028 so not a lot of room to put in a slot.  Thats what I was thinking too, make both periscope assemblies the same.  Will let the hatch dry overnight, just glued on before the picture, and then sand off the molded one and put the new scratch made one on.

ANDY - The M1 and Thompson will both work tankers did have them but it was more sought after to have a M1 carbine, 45 1911, or if late war a T26 carbine.  The T26 was the M1 Garand turned into a carbine.


Rob

  • Member since
    March 2006
  • From: Right Side of a Left State
Posted by Shellback on Saturday, January 21, 2012 11:16 PM

The bogeys still have a lot of work left to do on them . Thought i'd post a pic to show i'm still in this build .

Rob , no , i havent ever tried the tissue paper for bed rolls and such . It gets soaked in diluted white glue right ? I remember "G" said he uses a heavier paper when he does his . I may experiment ...................Hmm......not sure . Yah .028 isnt much to work with . Is the M1 carbine appropriate for this theatre of was ?

"G", hope you can get the time to start building . That model in the link i posted must of been a wild guess at what is in the B&W photo .

All is good in our little part of the world .............Toast

  • Member since
    October 2009
Posted by PANZERWAFFE on Sunday, January 22, 2012 12:31 AM

 When making the bedrolls and such use facial tissue paper.  Think people use many different methods but I find the easiest is to cut, roll and get the rough shape when the tissue is dry.  Tie or strap / bind the roll and when happy with the shape then lightly brush some diluted white glue / water onto the roll.  the glue / water mix is like 50 /50 ratio.  You first just give it a light coat of the glue because you will be able to shape it more once wet but wait a few minutes after you first apply the glue.  If you dont wait and touch it right away the tissue will stick to your fingers.  After it has dried 2 -5 minutes you can do the final shaping and can push or shape onto a vehicle or pack, etc.  Once it has it's final shape you can remove from the model, leave in place if you want it to dry there but it will be permanent and will have to paint in place, and brush a heaver coat of the glue / water on still being careful not to rip or tear the tissue.  Let dry overnight then paint.  Binding you can use many things, string, yarn, PE but the easiest is to cut skinny strips of Tamiya tape and just wrap around like a strap.

The heavier paper that "G" was speaking of is good for things like flags, tarps covering MG's and gear.  It may take a few tries but once you get the hang of it its pretty easy.

Yes, the M1 carbine was made for airborne units and for amphibious assaults and was a weapon of choice because of the small size and light weight (its negative side was the lack of penetration and stopping power).  There were many M1 carbines in the Pacific and was given more to Officers, ammo bearers, MG teams and mortar teams, supply and support personnel, forward observers, and vehicle personnel.  There were some mixed into the front line infantry units also.

Rob

  • Member since
    March 2006
  • From: Right Side of a Left State
Posted by Shellback on Sunday, January 22, 2012 12:48 AM

Thats great Rob . Thanks so much for taking your time to give me a in depth answer .Yes

The M1 carbine will work well in my dio since these guys are not going to front line types .

Again thanks Rob   Toast

  • Member since
    February 2003
  • From: Allentown, PA
Posted by BaBill212 on Sunday, January 22, 2012 4:27 AM

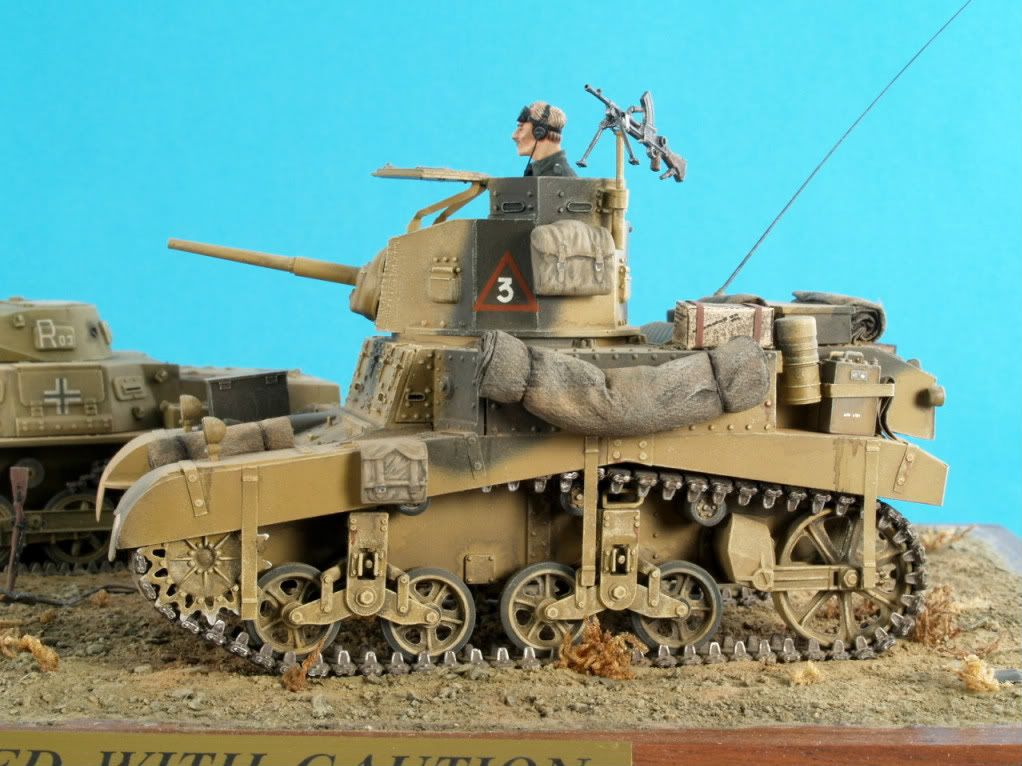
Rob,,   first I wanted to say how well you did with relocating the hatch...   I knew you would not be happy with it the other way,,  excellent work!     I agree with the thought of making another periscope too,,  to keep both uniform.        As far as the screws,,   they look very cool and I am betting you will find some more.

Andy,,  nice haul there,,,  I am thinking about doing a little online shopping myself. I try to limit my purchases to one every few months...     It is much too easy to get into a buying frenzy,,   for me anyway.

Carl,,   the bogies look good as well as the firearms.........

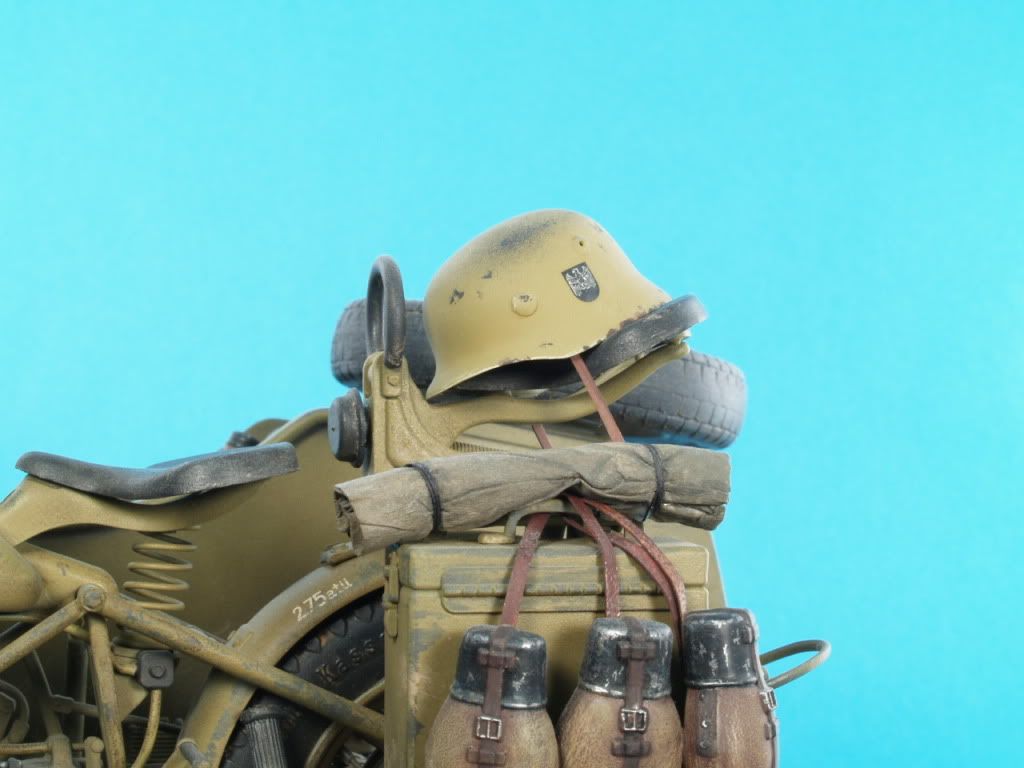
I wanted to throw my tarp / bedroll method into the mix too. Much like Rob, I use tissue and, eventually, diluted white glue. . . .    I will take a whole sheet of tissue and lay it on a, larger, sheet of tin foil. Using my Polly S or similar acrylic paint, I slop onto the entire tissue. No need to be precise, just make sure that the sheet is covered.    I have a funky old japanese Polly S green ( PCJ91 Green A3 - no idea what it was meant for) but it makes a great base coat for bedrolls or tarps.   Use whatever nuetral-ish base coat you like.     Once the tissue is totally painted I clip two ends and hang it up to dry. You can use the tin foil as a drip catcher to be safe.           After drying you can cut sections and roll or fold them up for whatever you need to make.   One sheet lasts for some time...   [For making a bedroll or rolled tarp]  After I roll a section up I use a little water to soften and tie the ends appropriately (using thread).  You can paint and highlight as needed. Add straps, buckles and when placing on your subject vehicle, etc. again plain water witl soften and let it conform to the area it's being placed. You can use a little diluted white glue here too if you want it to hold a shape a bit better.       Once dry you can attach with white glue, ties, straps, etc.

Couple of samples - -


Enjoy the ride!


JOIN OUR COMMUNITY!

Our community is FREE to join. To participate you must either login or register for an account.

SEARCH FORUMS
FREE NEWSLETTER
By signing up you may also receive reader surveys and occasional special offers. We do not sell, rent or trade our email lists. View our Privacy Policy.