SEARCH FINESCALE.COM

Enter keywords or a search phrase below:

Semper Fi War in the Pacific

66482 views
854 replies
1 rating 2 rating 3 rating 4 rating 5 rating
  • Member since
    February 2003
  • From: Allentown, PA
Posted by BaBill212 on Monday, January 9, 2012 7:43 PM

Rob,,,    that is a bucketfull of work you are doing on your LVT,,,  wow. Great work on the Friul / conversion aspect(s).  Very nice innovation indeed. Your efforts sure seems to have paid off....      now, repositioning the co-dr-hatch           (another wow)          I remember when you pointed it out, that it was off-set.      Again, I would not have known unless I studied photos or specs....   BUT, I know you will dive in and rectify the innacuracies.      I cannot offer any casting alternatives my friend...  but I know you will do a smashing job on it and I wish you the very best.           Always an adventure dipping into new ponds, so to speak.      I will absolutely be watching for updates.

Enjoy the ride!


  • Member since
    October 2009
Posted by PANZERWAFFE on Monday, January 9, 2012 7:03 PM

ANDY  - Thanks Yes  Would like to see you build one of the LVT's.  Just think of all the figures you could then paint.  These things would carry 30 in the back and then you had the crew also.

Small LVT update

Quick fix for the night.  Had small problem with mounting the front sprockets.  If I did not use the Friulmodel tracks and used the kit supplied, the kit sprocket was missing the end part of the shaft.  This is the part that would have protruded through the hull enabling one to attach the retaining ring thus holding the sprocket on.  This would not have been much of a problem because I would have just glued the kit sprocket on permanently because the sprocket shaft was long enough to initially go into the beginning of the hole and just would have not used the retaining ring.

The real problem, because I'm using the Friulmodel tracks I must also use the Friul sprocket.  The Friul sprockets entire shaft is a smaller diameter then the kit supplied one.  It does have the extended section of the shaft and does protrude through the hole like it is suppose to.  But because the shaft is smaller it is to lose and the retaining ring will not hold the sprocket shaft firmly enough allowing the sprocket to sag.  Looks bad, looks like the sprocket is about to fall off.  To fix this, decided to use a piece of brass tubing and cut to length making a one piece axle.  Had to drill the mounting hole out on the inside of the LVT because this part is actually pretty small and was originally designed to just accept the pin for the retaining ring to attach to.  This works out to my advantage because it allows me to drill the hole to the size of the copper tubing which is 5/64.  Once the holes where drilled and the tube cut to the correct length and inserted into position I then had to slightly file down the diameter of the Friul sprocket mounting pins in order to fit inside of the tubing.  This did not take much filing to achieve the correct diameter.

Next simply push the two sprockets into place.

This is now a much tighter fit and it is straight and strong.  This is the end result.

Have also finished putting and sanding all the seems / gaps, mostly on the bottom.  Have added the track tensioning guard, and installed the interior to the right side completing all the interior until the top goes on.

My next big project on this is to decide if I should reposition the co-drivers hatch?  The best way I see to do this is to make a mold of the hatch before cutting it off and then cast a new one .  Once the new one is cast cut off the old hatch, fill in the cut and then add the new hatch.  I have never done any casting but am thinking about ordering a starter set from Micro Mark.  Any suggestions on casting material from Micro Mark or a better way to fix the hatch?  I have done foundry work and I imagine this is basically the same thing.  Would just have to learn how to use the new medium.

Rob

  • Member since
    October 2009
Posted by PANZERWAFFE on Sunday, January 8, 2012 8:42 PM

I think of you as my friend too Carl BeerYesBeer  It's good to have friends like you, ThanksBig Smile

Good to hear everything worked out and look forward to more of your workYes  I have often had problems such as you described but a little determination and patience seems to be what gets some of these builds through.  In the end It seems to make the finished model that much more appealing to me, even if I am the only one that knows of the struggles with it.  The really good stuff usually doesn't come easy.

Rob

  • Member since
    February 2003
  • From: Allentown, PA
Posted by BaBill212 on Sunday, January 8, 2012 8:11 PM

Always welcome Carl,,,,,,,      and                    glad all is ok with the "bugs".......   

Enjoy the ride!


  • Member since
    March 2006
  • From: Right Side of a Left State
Posted by Shellback on Sunday, January 8, 2012 7:19 PM

Guys , i'm kind of embarassed about how i got things confused with my post about the finger marks . What i should of made clear was that i was having trouble with another part of the model , not the marks on the windshield . Actually i used thin strips of masking tape to make the finger marks . I should of said hand marks . I was thinking like Rob that a Marine would naturally grab the edge og the windshield when entering the the jeep .I masked the passenger side also but it does not show up that well in the pic .

The problem i had was that the steering wheel enterferred with windshield frame when said windshield was put in the upright position , due to the weapons holder i made . I removed the steering wheel but it also removed the dashboard with it ....................Super Angry....then the gas can came off ! Super AngrySuper Angry Thats why i got close to the trash casn with this model. All is ok now , i have shimmed the steering wheel and re attached everything else .Beer

Thanks again my friends . Bill thanks for your suggestions .........i may use them yet on this build my friend ......but i hope not !

  • Member since
    February 2003
  • From: Allentown, PA
Posted by BaBill212 on Sunday, January 8, 2012 7:16 PM

Beer  Yes  Beer  right back atcha!!!

Enjoy the ride!


  • Member since
    March 2006
  • From: Right Side of a Left State
Posted by Shellback on Sunday, January 8, 2012 7:01 PM

Thanks my friends for your comments , and i mean that ! You guys are my friends !YesBillBeerRobBeerEricBeerAndyBeer

  • Member since
    April 2009
  • From: Carmel, IN
Posted by deafpanzer on Sunday, January 8, 2012 5:18 PM

Rob-  Great process on the LVT!  Always wanted to build one.  Someday I will... You are on roll here. 

Carl-  Nice work on the windshield!!!  Can't wait to see your next update master...

Andy

  • Member since
    February 2003
  • From: Allentown, PA
Posted by BaBill212 on Sunday, January 8, 2012 4:18 PM

Another good point Rob,, I agree,,  grabbing to exit the vehicle.         Don't toss,,,  no way!

Enjoy the ride!


  • Member since
    March 2003
  • From: Rain USA, Vancouver WA
Posted by tigerman on Sunday, January 8, 2012 4:15 PM

Great stuff Carl.

   http://i7.photobucket.com/albums/y269/wing_nut_5o/PANZERJAGERGB.jpg

 Eric 

  • Member since
    October 2009
Posted by PANZERWAFFE on Sunday, January 8, 2012 3:56 PM

I use MM Clear Parts Cement & Window Maker.  Basicly whit glue but it alows you to pull the glue say for like a headlight, and make the glass part out of the glue.

DONT THROW - CONTINUE!  I really think it looks good as is.  When I first saw it, it gave me the impression that the driver grabed the edge of the windshield to get out of the jeep, something most jeep owners would get PO about.  I really like the painted black edge.  Have not seen that before and really like the effect it gives.

Rob

  • Member since
    February 2003
  • From: Allentown, PA
Posted by BaBill212 on Sunday, January 8, 2012 3:33 PM

Carl,,    I use the white glue method too.  troublesome at times, i know....      I do see the print marks, but they are not that pronounced, in my opinion.       Couple of ways to combat or tone down....   a bit of a mud splatter,,,  some dusting pastels,,,  if the jeep is to be in a calm setting, a little rag hanging down covering the area,,   or (a tricky method),,, a bit of thinner on a dampened brush, and gently streak the area. You would also have to gently streak a few other areas to make it look uniform so to speak.

To be honest, it really doesn't look all that bad as is.            But, I have the feeling you are like me, and it will jump out at you everytime you see it.

Best of luck (don't scrap!)


Enjoy the ride!


  • Member since
    March 2006
  • From: Right Side of a Left State
Posted by Shellback on Sunday, January 8, 2012 2:59 PM

Here's a pic of this mornings adventure into the world of modeling .............a world of conflicting emotions ...............highs and lows .................to trash it or continue ...............you've been there .

Anyway i masked the windshield and over sprayed it with a dull coat . Bill i used a white glue to hold the windshield in . It toook 2 attempts . I dont know of a better method though . I painted the edge of the windshield black before glueing it in place , thinking that this would cut down on the reflectivety of the edge and yet simulate the sealant that holds the glass in .

Can you see the finger marks in the windshield dust on the edges ?


  • Member since
    March 2006
  • From: Right Side of a Left State
Posted by Shellback on Sunday, January 8, 2012 2:45 PM

WW2 thanks for the complement . Yes

Rob , the chalks are a lot of fun , thanks . Looks like the Fruils presented a few fit problems but your modifications to get them to fit wont be seen after the tracks are on . Gotta do what you gotta do . Nice work on getting the fit kinks taken care of and the added scratch details came out nice also .Yes

Bill , yes you do !Yes

  • Member since
    February 2003
  • From: Allentown, PA
Posted by BaBill212 on Sunday, January 8, 2012 1:13 PM

I call em like I see em Carl..........


Rob,,   glad to see you back at the bench..   also glad you were able to leap those few glitches too...   And, agreed, that is one big boy!         Great progress!

Enjoy the ride!


  • Member since
    October 2009
Posted by PANZERWAFFE on Sunday, January 8, 2012 12:53 PM

Hey guys, sorry for being MIA work has really picked up after the holidays.  Great looking work in here!

SKI - Love the Sherman so far.  The concrete and wood really makes it pop and grabs the attention.  Your already making me want to pull my M4A2 out.  Really look forward to more.

CARL - Great work Yes  Gages, interior, seats, and the rear - NICE details.  Still, love how you blend your colors!!  You are the master with the pastels making a beautiful finishBeerBeer

WW2 - Primer Yes

Was able to put some bench time in late last night and here are the results.

Return rollers before any mod

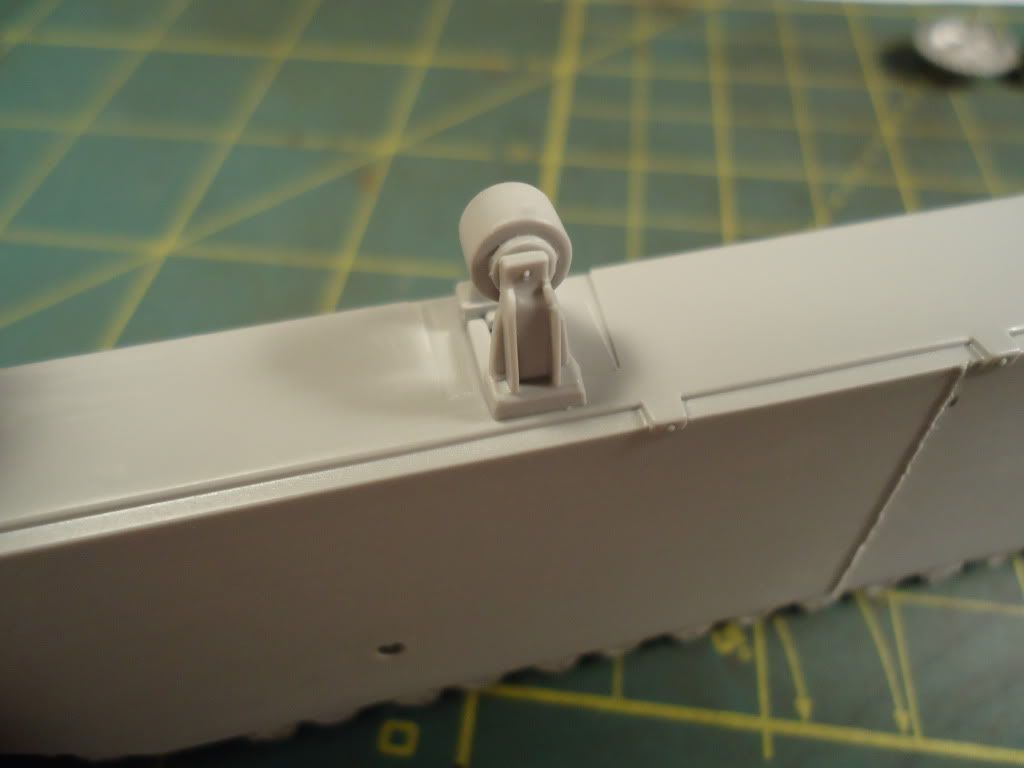
The kit, the rollers support arms are high almost to the center of the roller.  They were also thick.  This is probably accurate but this would not let the Friuls sit down onto them.  So thinning out the arms had to be done.  This could have probably been done better if they were still in pieces.

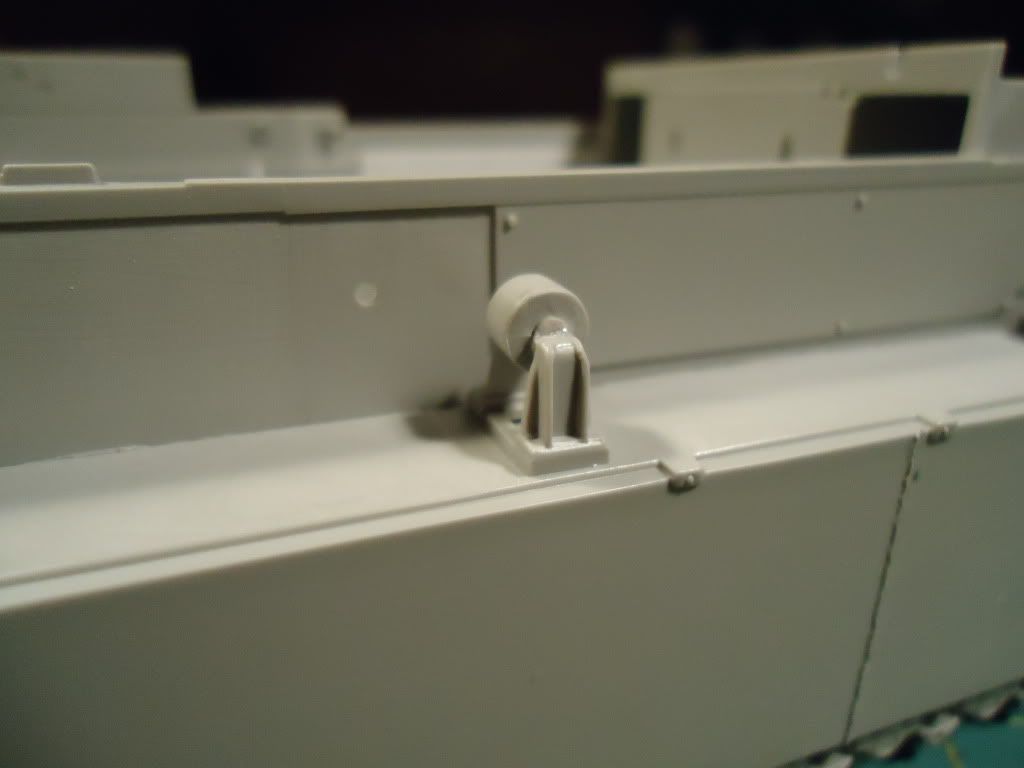
Here is how the the track link now sits.  The roller now fits into the track.

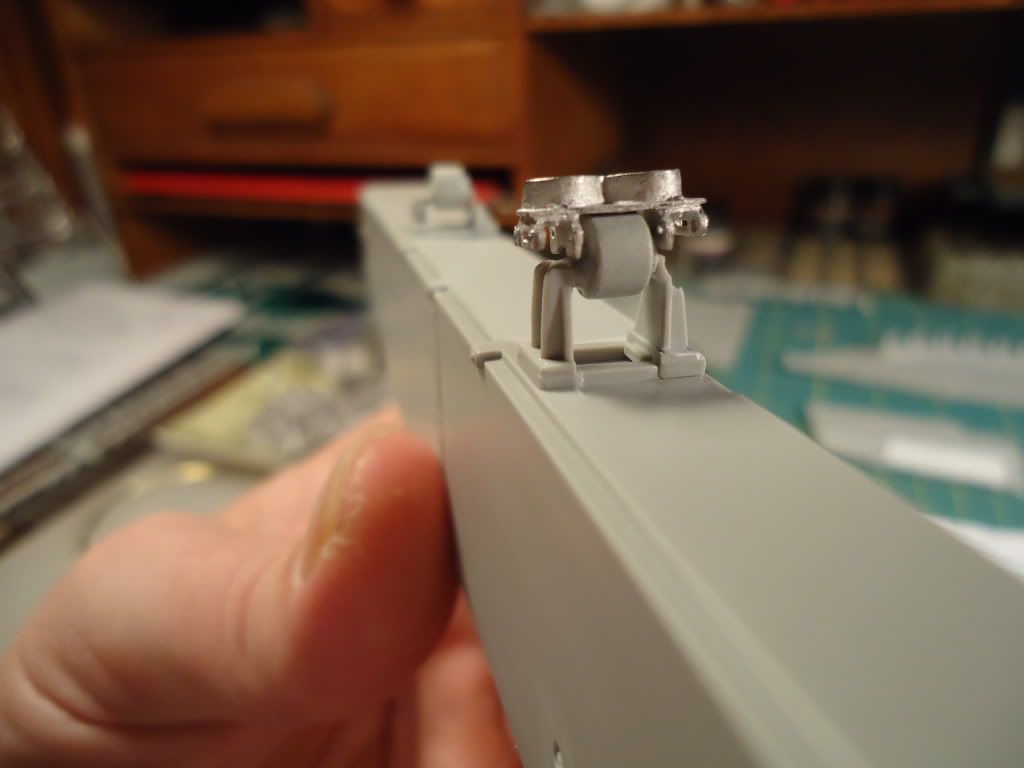
Bit more cleaning and this is now the new roller assembly.  Not the prettiest but the top section will be covered by the track.

For those of you that use Friuls on these, As said the assembly itself had to be thinned and top section taken out.  The wheel itself had to be trimmed also.  The part of the wheel needed cut off was the hub / axle section which would have been no problem to do if done before assembled.

Moving on, here have added the weld bead that joined the two pontoon armored plates.  This is in the middle of the pontoon.  Can also see the addition / modification on the fuel drain.

One side of the hull has been attached and started work on the interior details.  Has both some added and deleted details.  There will be a few more additions to go in here a little later on.

Finally the other half of the hull has been attached.  Interior details still need to be added which will be done today.

One thing to watch for here when putting on the pontoons is the idler wheel.  The holes for the idler do not line up properly making the idler sit crocked.  Had to dry fit the pontoon onto the side hull plate and drill the hole out (further down) in order to have them line up.  They are still not perfectly straight but could not go any lower with the hole without coming off of the idler mount.  Think the way it is now will work out fine.

There were small problems trying to get ll the hull pieces to line up correctly, care must be taken when putting the pieces together.  There were some very small gaps in the cargo bay which have already and easily filled with a little Squadron Putty.  I concentrated on lining up the top sections of the hull thinking they would be the more visible areas and for the most part the fit came out smooth.  The bottom section of the hull is where there are some gaps.  They are nothing bad and not even worth taking a picture of but there will be some filling and sanding to do on the bottom side.  One thing to watch for BEFORE gluing all the hull pieces together is to make sure the deck section is nice and straight.  I say this because the deck is two pieces, the bottom (outside actual bottom of LVT) and a top section (the deck seen in the cargo bay).  When these two pieces are together, there is a difference in the width of the two.  Had to sand the two flush with each other and keep dry fitting the hull sides on to ensure a nice straight fit.

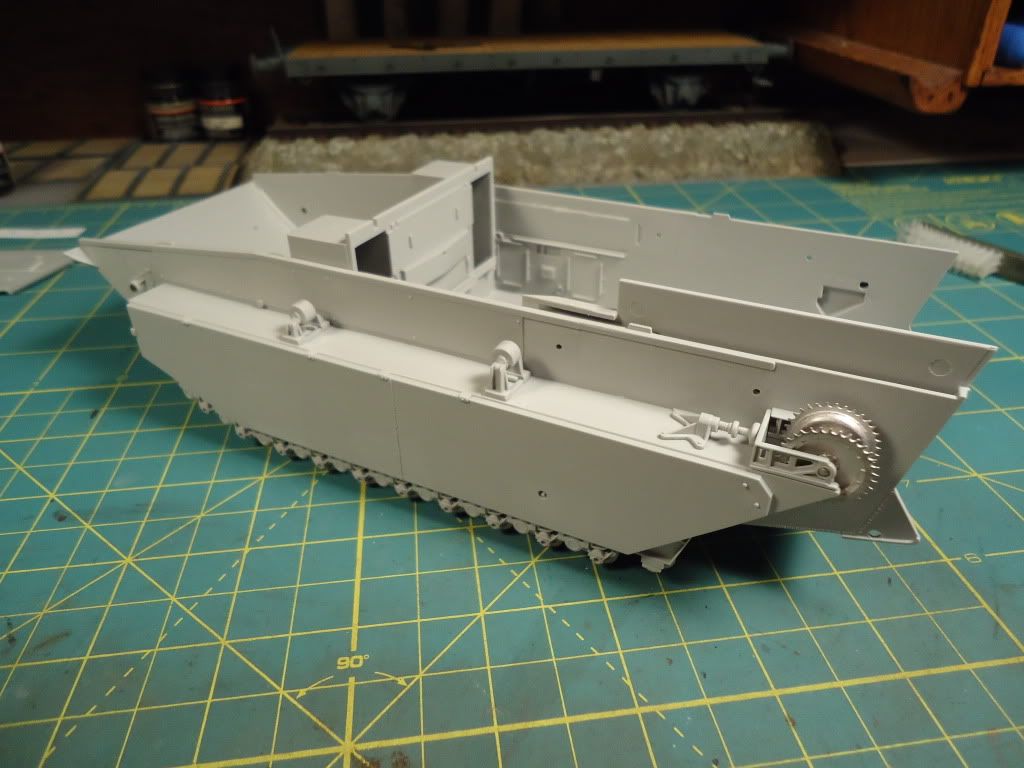
Took this last pic to try to show the size of this beast.  Have thrown in the fig for a little reference.  Still remember the top and track still need to be added once again giving it some more height.

Rob

  • Member since
    December 2009
Posted by ww2psycho on Sunday, January 8, 2012 8:18 AM

Amazing work on the jeep. Im priming the sherman right now. I probably wont get to painting the OD until next weekend.

  • Member since
    March 2006
  • From: Right Side of a Left State
Posted by Shellback on Saturday, January 7, 2012 8:15 PM

Eric , after the "jeepers" i'm building a "Shermie" . Yes

Bill , one hell of a complement my friend !!!Yes Beer

I got this much accomplished today .


  • Member since
    February 2003
  • From: Allentown, PA
Posted by BaBill212 on Saturday, January 7, 2012 12:50 PM

No worries Carl,,,,         

Enjoy the ride!


  • Member since
    March 2003
  • From: Rain USA, Vancouver WA
Posted by tigerman on Friday, January 6, 2012 7:37 PM

Shellback

Eric , how you doin ? Good to see you here . Thank you for your comment . Sorry i havent visited your Italian G.B. yet my friend . I will . Yes

Yeah it was kind of low-key. No problems, but I expect you to get into it when you finish up your Jeepers (as my wife calls her Liberty) Wink

   http://i7.photobucket.com/albums/y269/wing_nut_5o/PANZERJAGERGB.jpg

 Eric 

  • Member since
    March 2006
  • From: Right Side of a Left State
Posted by Shellback on Friday, January 6, 2012 6:49 PM

Bill  , dont know what to say right now in response .....................................

  • Member since
    February 2003
  • From: Allentown, PA
Posted by BaBill212 on Friday, January 6, 2012 3:41 PM

Carl,,     paving the way for me my friend....   beautiful job.       Maybe I will hold off on posting any pics of mine until you move on to your next piece within the GB (not sure I can live up to your work!)....     Just kidding, I will try to emulate your fantasic build.

Enjoy the ride!


  • Member since
    March 2006
  • From: Right Side of a Left State
Posted by Shellback on Friday, January 6, 2012 12:54 PM

Eric , how you doin ? Good to see you here . Thank you for your comment . Sorry i havent visited your Italian G.B. yet my friend . I will . Yes

  • Member since
    March 2003
  • From: Rain USA, Vancouver WA
Posted by tigerman on Friday, January 6, 2012 1:50 AM

Carl, lovely work on the Jeep.

   http://i7.photobucket.com/albums/y269/wing_nut_5o/PANZERJAGERGB.jpg

 Eric 

  • Member since
    March 2006
  • From: Right Side of a Left State
Posted by Shellback on Friday, January 6, 2012 1:08 AM

Andy and Ski thanks guys Yes

Andy ..... HA HA ! Minus one beer you owe me .......Beer........i dont think anyone else is keeping score so its my rules now ......................Wink

  • Member since
    January 2012
  • From: Camp Pendleton CA
Posted by usmcski on Thursday, January 5, 2012 10:48 PM

That jeep is looking SHARP, Carl!  Can't wait to see more!

Semper,

Ski

"For the veteran, every day is Memorial Day."

  • Member since
    April 2009
  • From: Carmel, IN
Posted by deafpanzer on Thursday, January 5, 2012 10:22 PM

Those seats look great.  Now I just want to spend the whole weekend sitting on those seats, drink beer and watch the movie 'Blob'.

Carl, funny pic. He sure looks like me! 

Andy

  • Member since
    March 2006
  • From: Right Side of a Left State
Posted by Shellback on Thursday, January 5, 2012 9:58 PM

Tonight ...............seats in .

  • Member since
    March 2006
  • From: Right Side of a Left State
Posted by Shellback on Thursday, January 5, 2012 7:26 PM

Ski , thanks for the answer . Was curiouse becausei havent looked at that kit .Yes

Bill , Sounds like a good plan and it should be fun .Yes

Hope That wasnt Andy under all ofthat acrylic paint residue ....................................Whistling

  • Member since
    February 2003
  • From: Allentown, PA
Posted by BaBill212 on Thursday, January 5, 2012 7:18 PM

Like I said,,       monsters      (again, in the best of ways...        nice pic!)

Carl,,,  no worries my friend. I would not have taken it out of context.....  no frets!          Thanks for the color reference(s) too.     I probably won't remove the "under-plating" from the chassis. I am just doing a little engine revamping because it looked like fun....  plus you gave me the map and vids to accomplish it.    If I get it to look half as good as yours, I will be thrilled.

Enjoy the ride!


JOIN OUR COMMUNITY!

Our community is FREE to join. To participate you must either login or register for an account.

SEARCH FORUMS
FREE NEWSLETTER
By signing up you may also receive reader surveys and occasional special offers. We do not sell, rent or trade our email lists. View our Privacy Policy.