SEARCH FINESCALE.COM

Enter keywords or a search phrase below:

Steel Cats (Sept. 2012-Aug. 2013)

322301 views
3330 replies
1 rating 2 rating 3 rating 4 rating 5 rating
  • Member since
    August 2009
  • From: MOAB, UTAH
Posted by JOE RIX on Saturday, September 29, 2012 4:33 PM

Ben -  Very nice looking progress there so far. Excellent work.

Ben's build and others I have seen has now led me to what is probably an armor newbie question. I see a number of Tigers assembled with the exhaust pipes and shrouds and then painted. So, how exactly does one then paint and weather the exhaust pipes and shroud interior?

SMJ - On the contrary, silly putty makes excellent hard lines. It can be pressed down, molded and then set aside for a bit to "melt" flush with model surface. I have used to create hard line camo patterns on my aircraft with very nice results.

 Joe 

"Not only do I not know what's going on, I wouldn't know what to do about it if I did". George Carlin

  • Member since
    November 2003
  • From: Nashville, TN area
Posted by bobbaily on Saturday, September 29, 2012 5:41 PM

Ben-Wow-great progress.  You'll have the Tiger ready for paint in no time.

Bob


  • Member since
    September 2009
  • From: Rugby, England
Posted by Hinksy on Saturday, September 29, 2012 6:28 PM

Tbh Bob I honestly didn't expect to make progress like this in the 6 hours I spent on her this aftermoon.

I wanted to get the Jack fitted and the 'C' clamps in place and all the other little bits but I didn't expect to make the commitment and get the whole deck on and the associated bits - it's a big step and if it doesn't work then it can be a nightmare. I can remember building my Initial Tiger I and having a nightmare getting that to drop together - I even did that the 'proper' way that the instructions ask you NOT to do but it was still difficult!

I want this build to last and am not determined to whizz through it. I plan on keeping this looking neat and tidy with the usual bit of light chipping / weathering. I'm not going to cover this one in muck and dust like I normally like to do.

I admit to cutting corners on the engine ventilation and ducting etc which I spent ages on on my initial Tiger I so I decided to assemble the plastic kit parts but I'm leaving the PE stuff off this time. It's great if you want an engine maintenance vignette /dio but otherwise, imo, it's not needed and saves on a hell of a lot of time.

The turret assembly looks like the real challenge now - an exciting one at that. I'll probably go for an RB replacement Barrel BUT I'd like to see what I can do with the DS tracks. I've got some Friuls for the links to go on the turret wall and to make a run of spare links to go on the front.

I'll get a bit more done tomorrow!

Ben Toast

On the Bench - Dragon Pz. IV Ausf. G (L.A.H.) Yes

Your image is loading...


  • Member since
    November 2009
  • From: SW Virginia
Posted by Gamera on Saturday, September 29, 2012 7:26 PM

Ben: She's coming along very nicely!

Joe: For the shrouds I went ahead and painted the interior of the shrouds and the exhaust pipes in my darkest pre-shading colour and assembled them. Then I'll go ahead and paint the whole thing letting a little of the lighter paint over-spray into areas where light would hit. I'll paint the weather the rusted areas on the pipes when I'm done.

"I dream in fire but work in clay." -Arthur Machen


  • Member since
    March 2006
  • From: Right Side of a Left State
Posted by Shellback on Saturday, September 29, 2012 8:27 PM

tigerman

Hi Carl. After seeing the previous RB Panther barrel, whom can blame you for getting one?

Wise to choose the Henschel version, I heard that the tracks for the Porsche version are much more complicated.

As for PE,I'm not sure, but I'd check Voyager (expensive), Lion Roar, Royal Models, and Eduard.

Eric , thanks for taking the time to give me your ideas .Toast I liked the rifling inside the barrel on the RB 128mm . Toast 

  • Member since
    March 2003
  • From: Rain USA, Vancouver WA
Posted by tigerman on Saturday, September 29, 2012 8:51 PM

I was hoping to get some work done, but got side-tracked. Perhaps some pictures tomorrow.

   http://i7.photobucket.com/albums/y269/wing_nut_5o/PANZERJAGERGB.jpg

 Eric 

  • Member since
    March 2006
  • From: Right Side of a Left State
Posted by Shellback on Saturday, September 29, 2012 11:51 PM

tigerman

I was hoping to get some work done, but got side-tracked. Perhaps some pictures tomorrow.

Napping ? Whistling

  • Member since
    March 2003
  • From: Rain USA, Vancouver WA
Posted by tigerman on Sunday, September 30, 2012 2:17 AM

Nah, just pure lazy. College football combined with some honey-do's.

   http://i7.photobucket.com/albums/y269/wing_nut_5o/PANZERJAGERGB.jpg

 Eric 

  • Member since
    March 2003
  • From: Rain USA, Vancouver WA
Posted by tigerman on Sunday, September 30, 2012 2:18 AM

Sadly, I only have the weekend to get any work done, so I blew 50% of that this week.

   http://i7.photobucket.com/albums/y269/wing_nut_5o/PANZERJAGERGB.jpg

 Eric 

  • Member since
    September 2009
  • From: Rugby, England
Posted by Hinksy on Sunday, September 30, 2012 8:57 AM

SADLY? I can only ever build during the weekend Eric so I wouldn't be too downbeat!

Tbh, I'm happy with my weekend arrangement as I think I'd burnout very quickly if I built every day? It really gives me an extra incentive to get through each week. Now I'm back living with the parents for a while we don't have room for a man-cave hence the kitchen table becomes my bench for the weekend. The main drawback is lugging all the tools up and downstairs and when it comes to painting and weathering it's a nightmare!

What I'd give for a nice, well lit small room with a good bench incorporating shelveing for all my paints and weathering products etc! I'd need a sink, too!

When I can eventually afford to move out I'll get one sorted but until then - it's the damn kitchen table! At least I have a proper spray-booth set up in the workshop outside which is something.

Ben :-)

On the Bench - Dragon Pz. IV Ausf. G (L.A.H.) Yes

Your image is loading...


  • Member since
    April 2006
  • From: ON, Canada
Posted by jgeratic on Sunday, September 30, 2012 10:03 AM

Likely just tracking cookies on that site I linked, but here are some photos from there:

btw, great work everyone.

regards,

Jack

  • Member since
    March 2003
  • From: Rain USA, Vancouver WA
Posted by tigerman on Sunday, September 30, 2012 1:00 PM

That last picture Jack, that shows the zimmerit and how thinly it's applied, is a great reference for do it yourself. so often I see thickly applied patterns with screwdrivers or razor saws.

   http://i7.photobucket.com/albums/y269/wing_nut_5o/PANZERJAGERGB.jpg

 Eric 

  • Member since
    September 2009
  • From: Rugby, England
Posted by Hinksy on Sunday, September 30, 2012 1:14 PM

Hi guys,

Cheers Jack - something on Avast didn't like that link. It can be fussy but superb photos, cheers!

Sunday update: following my marathon build session yesterday I wanted to get the hull assembly completed. When assembling Dragon kits I like to study a particular section and plan where to start and make an aim point where I can build to and then finish there. Basically this weekend I've been able to get the entire first few sections all done (minus the wheels, track guards and tools). The track guards will go on next weekend after I've chopped them into sections, the wheels will be painted separately during main painting and the tools will be painted separately to be fitted at a later stage, after painting of the tank and prior to weathering.

I've made the decision to go with the DS Tracks and an RB Barrel. I've ordered the RB Barrel on-line this afternoon. I'm sure I can get the tracks looking decent but I won't settle for 'okay' as this kit deserves the best. If I'm not happy I'll have to upgrade to some ATL-06 Late Friuls but that's a while off yet. I've also ordered some RB Brass 'U' Shackles to add that little bit of extra detail - only a couple of pound for 4 shackles.

Today I've fitted the coolant fan covers, added the PE Brass mesh for the engine deck covers, intalled the two round hatches up-front for driver and co-driver and fitted the seats in the Turret shell. I'm thinking about going to town on the turret and building up a really attractive main gun assembly, painting the interior in off white, showing the hatches open and definately having the escape hatch at the back of the turret posed open with a few Brass spent shell cases scattered on the rear deck and suitably blackened.

Perhaps I might even grow a pair and buy a decent Commander figure from Alpine like Andy Deafpanzer uses, paint him and have him posed in the turret?

So, here we are - next weekend the turret goes live!:

The Build Guide - The blue line shows where I'm up to so I'll be starting the turret assembly afresh next weekend Cool

Thanks for looking guys,

Update next week!

Ben Toast

Note: I have a box of new 38t (Hetzer) Friuls that I won't be using anytime soon. If anyone has a box of Friul Tiger I tracks they'd like to swap or know someone who would please, let me know. Iirc, Friul include a pair of white metal drive sprockets and mountings should you want to use them.

On the Bench - Dragon Pz. IV Ausf. G (L.A.H.) Yes

Your image is loading...


  • Member since
    April 2005
  • From: Piscataway, NJ!
Posted by wing_nut on Sunday, September 30, 2012 1:52 PM

Ben that is looking pretty darn sweet.  As far as Silly Putty goes, I have always had issues with the oily residue mentioned and it just flat out not sticking.  The best stuff to use in my opinion is poster tack.  Blue tac and UHU tac are 2 brands that come ot mind that I have used in the past and should be available on your side of the pond.

Tbolt I have used the Cav Zim before and is is the poo.  Love that stuff.

Speaking of zim... at the AMPS East show yesterday a vendor had laser cut paper zim. very thin and very fine texture zim pattern that looks like the last photo posted not too far up.  Gorgeous stuff.  They had a set for an early Panther G that is the vertical pattern.  I will try to get some close up pics pater and post them.  Their website is...

www.monroeperdu.com

Eric, now that I am done with the brass beast I need a bit more of a relaxed build so for the moment could you amend my entry to the 1/48 Tamiya early Panther G.

Lasty, can someone point me to early Panther G refs... hopefully with color profiles.  Would there have been early G's with vertical zim in a winter scheme?

Marc  

  • Member since
    March 2003
  • From: Rain USA, Vancouver WA
Posted by tigerman on Sunday, September 30, 2012 4:06 PM

Glad to have you aboard Marc, and kudos to that metal halftrack you built. Awesome work my friend.

From my refs, I'd say yes on the vertical ridged with diagonal cross hatches and horizontal cross hatches.

Here's some updates. I might respray in olive-grun, since my Jagpanther is a very late one with the muffler shrouds and heater unit on the upper deck.

The upper hull is dry-fitted at this time.

   http://i7.photobucket.com/albums/y269/wing_nut_5o/PANZERJAGERGB.jpg

 Eric 

  • Member since
    March 2006
  • From: Right Side of a Left State
Posted by Shellback on Sunday, September 30, 2012 4:14 PM

Marc , i'll look into the Panther G .

Eric , hey man it looks like you have been busy ! With the model , i mean .Yes

  • Member since
    March 2003
  • From: Rain USA, Vancouver WA
Posted by tigerman on Sunday, September 30, 2012 4:29 PM

Trying my friend, but I'm sure wasting the weekend on other things. I need to finish the barrel and see if it will pass the paint test. My Karaya tow cables are on their way from Poland. They should be a nice upgrade over the crappy styrene ones.

   http://i7.photobucket.com/albums/y269/wing_nut_5o/PANZERJAGERGB.jpg

 Eric 

  • Member since
    July 2012
Posted by Hasenpfeffer on Sunday, September 30, 2012 4:52 PM

Hey Bish - looking forward to seeing your Panther (G?). We Panther builders need some more company! Stick out tongue

Great work on all that zimmerit Mike. You may be the 1st to get some paint on. Unless of course Ben beats you to it.

Ben - You're on fire, man! Carting all that stuff up and down stairs every weekend sure hasn't slowed you down. I can't wait to see the completed turret.

And tigerman... this is exactly the excuse you need to put a tv in your man cave... watch the game while you build! Yes (Can't avoid the honey do's though - keep your cat out of the dog house...)

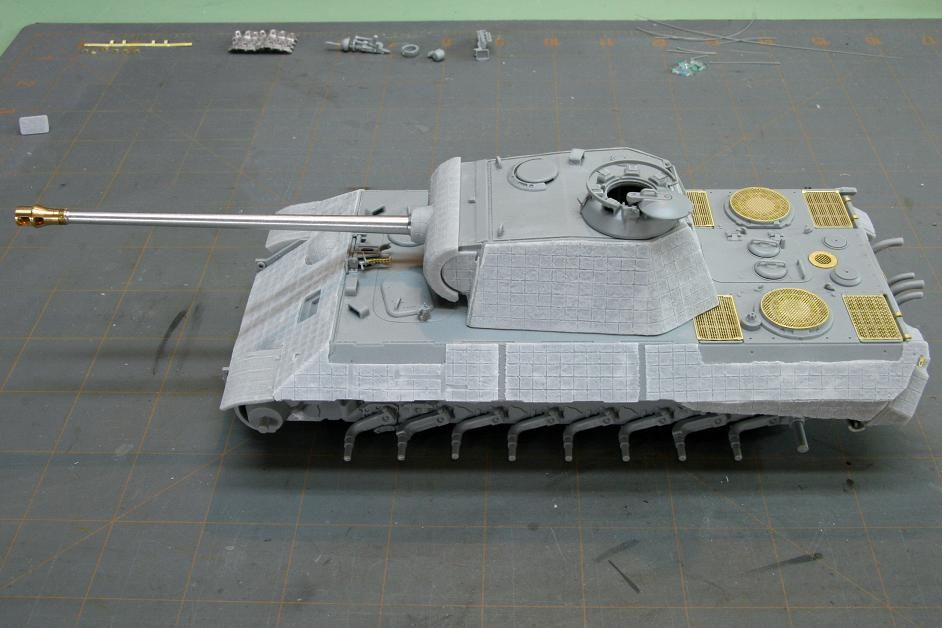
Over the weekend I spent what seems like an eternity doing a bunch of smaller things, so it doesn't look like a whole lot. I feel accomplished nonetheless. 1st off, I finished the rear/exhaust. I drilled out the exhaust pipes and put together the PE brackets for the exhaust/jack. I'm not the greatest at PE and the wrapping around the pipes didn't go as well as I would have liked. The "used" look it is, then...

Next up was finishing up the front end deck. Hatches, retainer mechanisms and main gun travel lock. I managed to get all of those chain bits lined up fairly well. I added a notch on the other side for some detail. I also added little release levers to the hatch retainers (hard to see here).

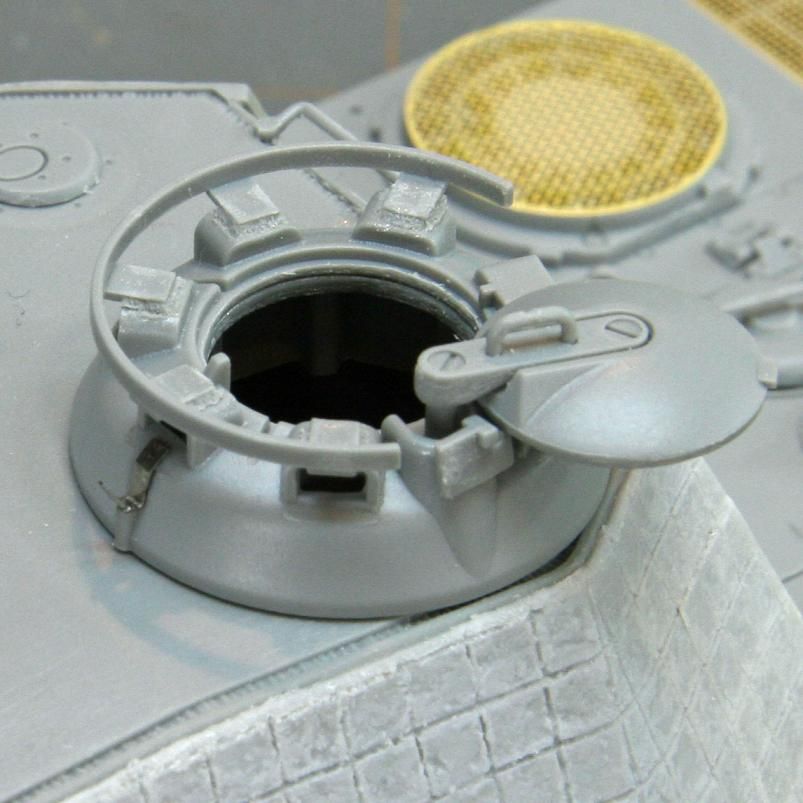
Today I spent a few hours trying to add detail to small areas. About an hour of that was an abortive attempt at bending some brass sheet (cut to the size I needed) into an angled peice that would become part of the antenna tube assembly. Guess I'll have to try to find some pre-fab'd stock. I added weld beads to the cupola ring attachment points (15 welds) with stretched sprue. They are way bigger than they should be for scale (see molded in welds on vision block bases for comparison), but I can't see anything smaller than that! This is the first model I've tried this on, and I think it came out pretty well. I practiced on a 20 year old scrap KT turret and the extra cupola that isn't used in this kit. I also didn't like the commander's direct sight so I made my own out of extra PE sprue. Not very detailed, but I like it better than the plastic kit part.

And I finished putting the zimmerit sheets on. There are peices for the side skirts too, but I think I'm probably gonna skip those. Still need to touch up all the corners, etc., with some putty.

And finally came the lamenting of Dragon designs while dry fitting all the big parts together. I never understand why they have you add pieces that have no positive locating feature 3 steps before you realize they are supposed to interact with some other parts. (Like the parts that attach under the tools boxes - supposed to meet up with the underside of the rear engine deck/hull - never know that without some serious ESP or prior knowledge.) The underside of the hull and chassis fit leave a lot to be desired given how it looks like it should go together.  Love the detail, but sometimes I'm just scratchin' my head going WTF!?!

  • Member since
    March 2003
  • From: Rain USA, Vancouver WA
Posted by tigerman on Sunday, September 30, 2012 5:36 PM

Hasenpfeffer, all I can say about you Panther is "meow, tastes great!"

   http://i7.photobucket.com/albums/y269/wing_nut_5o/PANZERJAGERGB.jpg

 Eric 

  • Member since
    March 2006
  • From: Right Side of a Left State
Posted by Shellback on Sunday, September 30, 2012 7:10 PM

tigerman

Trying my friend, but I'm sure wasting the weekend on other things. I need to finish the barrel and see if it will pass the paint test. My Karaya tow cables are on their way from Poland. They should be a nice upgrade over the crappy styrene ones.

Those cables will be nice to see Eric . Enjoy your time off  !

  • Member since
    March 2006
  • From: Right Side of a Left State
Posted by Shellback on Sunday, September 30, 2012 7:13 PM

Hasen that is Cat looking awful good ! I didnt go back to see where the barrel is from .........one of R. B.'s ?

  • Member since
    July 2012
Posted by Hasenpfeffer on Sunday, September 30, 2012 8:10 PM

Hey Carl, thanks, and yes, RB barrel. Pretty sweet for the price. A few challenges with replacing the kit barrel, but obviously can be overcome. Gratuitous barrel shot:

  • Member since
    July 2012
Posted by Hasenpfeffer on Sunday, September 30, 2012 8:15 PM

Thanks, Eric. Your JP is looking great too. Looks so clean with the paint on it. Makes me wanna get a Jagdpanther for my stash!

  • Member since
    May 2005
Posted by pyrman64 on Sunday, September 30, 2012 9:21 PM

Has & Eric... your cats are looking great!  

Unfortunately, I wasn't able to get time to work on mine.  Hopefully, I'll get some time in the mornings, after work, this week.

Greg H

"There is many a boy here today who looks on war as all glory, but, boys, it is all hell." Gen. Wm T. Sherman (11 April 1880, Columbus, Ohio)

  • Member since
    March 2003
  • From: Rain USA, Vancouver WA
Posted by tigerman on Sunday, September 30, 2012 11:13 PM

Hasenpfeffer

Thanks, Eric. Your JP is looking great too. Looks so clean with the paint on it. Makes me wanna get a Jagdpanther for my stash!

Just goes to show that Tamiya with an almost 20 year old kit can still be top-notch. I added Tamiya grills for it and have Dragon magic-tracks that I hope fit the sprockets.

   http://i7.photobucket.com/albums/y269/wing_nut_5o/PANZERJAGERGB.jpg

 Eric 

  • Member since
    March 2006
  • From: Right Side of a Left State
Posted by Shellback on Sunday, September 30, 2012 11:31 PM

Hasenpfeffer

Hey Carl, thanks, and yes, RB barrel. Pretty sweet for the price. A few challenges with replacing the kit barrel, but obviously can be overcome. Gratuitous barrel shot:

I like gratuitous Yes

  • Member since
    December 2002
  • From: Bury St Edmunds, Suffolk, England
Posted by Bish on Monday, October 1, 2012 3:08 AM

Hasenpfeffer

Hey Bish - looking forward to seeing your Panther (G?). We Panther builders need some more company! Stick out tongue


I am looking forward to it as well. Its been 2 years since i built any armour, i should be starting on it today, just the finishing touches to add to my current build. Though its not a G, it the Panther with Pz IV turret, and pretty rare vehicle from what i can gather.

I am a Norfolk man and i glory in being so


On the bench: Airfix 1/72nd Harrier GR.3/Fujimi 1/72nd Ju 87D-3

  • Member since
    April 2007
  • From: Schroon Lake, NY
Posted by SMJmodeler on Monday, October 1, 2012 10:07 AM

Guys:  She's ready for paint!!  

I decided to do the zim' by hand versus the PE stuff. It was definately a learning experience but I'm happy with results. I use a mix of sqaudron putty/ liquid glue and acetone (see last picture) I'll explain it in detail if anyone would like. I added a bunch of PE but opted to leave off the front & rear fenders and the exhaust shrouds. This baby will be pretty abused so I may even bend the side skirts some more. I'm still planning to make/add tow cables and accessorize her with a couple fuel drums propped up by wood blocks/ chocks based on a great reference photo in "Tigers in Action".

Anyway, here's how she looks as of last night:


  • Member since
    May 2005
Posted by pyrman64 on Monday, October 1, 2012 10:20 AM

ToastSMJ, your zimmerit looks great.   I too prefer to do it myself, after reading a "how to" by James Blackwell, on M-L. It involves using Tamiya putty and their p-e zimmerit tools.

Greg H

"There is many a boy here today who looks on war as all glory, but, boys, it is all hell." Gen. Wm T. Sherman (11 April 1880, Columbus, Ohio)

  • Member since
    March 2003
  • From: Rain USA, Vancouver WA
Posted by tigerman on Monday, October 1, 2012 10:55 AM

That's a very good effort on the zimmerit Steven. Much braver then I.

   http://i7.photobucket.com/albums/y269/wing_nut_5o/PANZERJAGERGB.jpg

 Eric 

JOIN OUR COMMUNITY!

Our community is FREE to join. To participate you must either login or register for an account.

SEARCH FORUMS
FREE NEWSLETTER
By signing up you may also receive reader surveys and occasional special offers. We do not sell, rent or trade our email lists. View our Privacy Policy.