SEARCH FINESCALE.COM

Enter keywords or a search phrase below:

Steel Cats (Sept. 2012-Aug. 2013)

322301 views
3330 replies
1 rating 2 rating 3 rating 4 rating 5 rating
  • Member since
    March 2006
  • From: Right Side of a Left State
Posted by Shellback on Saturday, October 13, 2012 9:57 PM

Ben looks good .

  • Member since
    April 2011
  • From: imperial beach, ca
Posted by malone duke on Sunday, October 14, 2012 12:38 AM

  • Member since
    April 2009
  • From: Carmel, IN
Posted by deafpanzer on Sunday, October 14, 2012 12:38 AM

Marc- A lot of weddings going on this time of year... I was in Philly for a wedding last weekend.  Hope you didn't have too much fun! Drinks

Ben- Tiger looking real good!  Looking forward to hear from you how your meeting went with the guys! 

Carl- You are one real sick man!  Surface on the KT looks GREAT!  I need to read your thread again to understand better how you made it work.  Listen to me... slow down! Stick out tongue

Guys- Things have been crazy at work... lost track how many hours I had to work.  Managed to find some bench time tonight.  The rear is finally complete as I have added the jack... I never enjoy dealing with clasps for the jack like my previous builds.  

The exhaust fans are complete too. 

Next I will work on the front hull... thanks for looking!

Andy

  • Member since
    April 2011
  • From: imperial beach, ca
Posted by malone duke on Sunday, October 14, 2012 12:42 AM

hey guys, got some paint on...  i thinks i done pretty good...  i cant seem to get text in with the pics sorry...  also this is the turret box i was speaking of. i cant tell if its modified or just a completely diffrent box... so any help...  also any suggestions on which kit i should get to build this version, since i'm not gonna pay 500 for a dragon. or is it possible to back date a late model. i know theres plenty of afv club kits out there. any one know why those guys havent jumped on an early version...

  • Member since
    April 2011
  • From: imperial beach, ca
Posted by malone duke on Sunday, October 14, 2012 12:44 AM

couldnt tell if this one came up.

  • Member since
    April 2009
  • From: Carmel, IN
Posted by deafpanzer on Sunday, October 14, 2012 12:51 AM

Malone- Looks like we posted at same time.  Great work on the camo!!!

Andy

  • Member since
    July 2012
Posted by Hasenpfeffer on Sunday, October 14, 2012 12:51 AM

Geez... so this is what happens when you don't post for 2 weeks, eh? 10+ pages to catch up on and all the progress to admire. We really have a zimmerit showcase going on. I think we are up to 5 different mediums for zimmerit. Molded, paper, putty, resin and PE, wow. So... where to start?

Mike/TB379 - Looking sweet. I am really looking forward to seeing the final camo scheme on that huge cat. I too have been starting to dabble in the scaling effect with my recent builds, so I'm watching with interest.

JOE RIX - Man that PE zimmerit looks sooo good. It's probably the most realistic looking of the lot. I agree with the others that your efforts are worth the results.

Eric - Man, now I've noticed that my kit doesn't have tow cables. After seeing yours I'm gonna have to buy some. (As if I haven't spent enough coin on this thing already. This must be a phenomenon of joining your 1st group build. Hmm) And good luck with starting the 2nd simultaneous build. Brave man.

SMJ - Paint job and battle damage look great. It'll be a nice and scruffy alley cat. Looking forward to the weathering.

Armor86 - Very nice weld seams and surface finish. Almost looks like a whitewash coat... I'll be interested to see how the paint looks over it.

Carl - What can I say. Masterful detailing. The turret is a thing of beauty. I am going to have to try some of these techniques on my future builds. It really does just add so much. It's those subtle nuances that when you notice them, are very appreciated. This is what I aspire to... realizing I have a very long way to go. Beer Hope you enjoyed that wedding! (A question for ya.. now that you've gone this far, are you going to add the casting numbers seen on the base of the gun or elsewhere?)

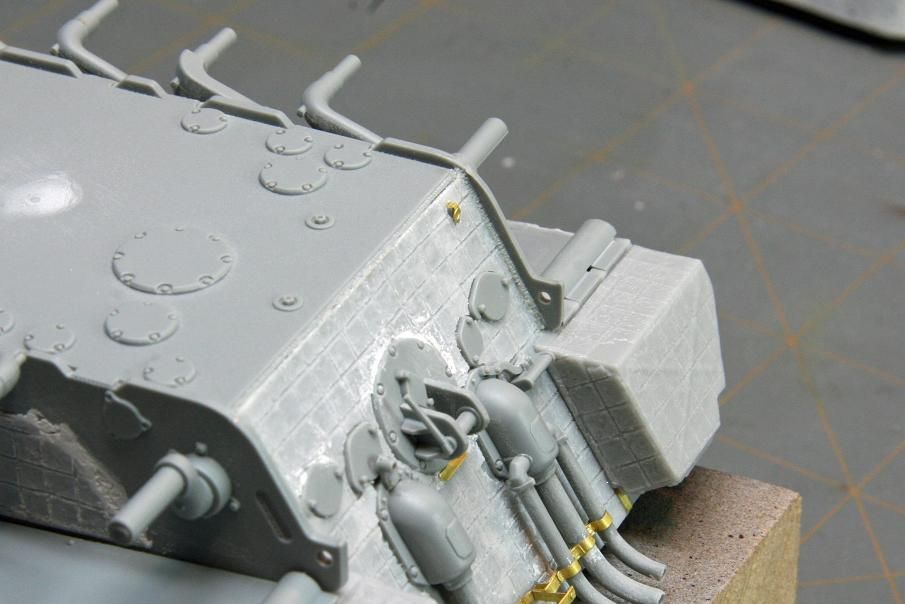
Ben - Boy you've made a heck of a lot of progress. I really like this kit. All those AM goodies.. love it. (It looks to me like MC1 is a PE zimmerit piece to cover the gap left by the joint of the upper/lower hull - to cover the smooth area there.)

wingnut/Marc - Thanks for the in depth lesson on paper zimmerit. After your trials and tribulations I don't know if I'm brave enough to try it... but it really looks good. Even better when you factor in that it's 1:48. The places where you had trouble and it got all mushy just look like chipping/battle damage. With that yellow base coat on, it just looks awesome. And I'm very much in awe of your paper spare link brackets on the rear hull. Those are pretty cool. Again, more amazing to me given the scale.

malone duke - You are a PE genius. Did you use any of the kit parts, sir? I would probably be pounding my head on my bench with that much PE. I'm pretty close with mine as it is. You've got some mad skillz, man.

Andy - Sweet work on your PE as well. Those are the "little" things that drive me nuts when I try them. I am always a little jealous when others do them so well. More practice! Do you solder? I'm coming to the realization that I need some magnification. Don't have that 20 year old eye sight any more.

Hope I didn't miss anyone!

Now for my update. I feel like I've been spending a lot of time building with not much to show for it. I still feel so far away from painting... So, trying to keep up with the group, I went from never doing a weld seam to having 27 on this thing. Examples of the rear/front hull. I used stretched sprue as before and liquid glue to soften. I made the texture by pressing the back of an older/dull exacto blade into it on a slight angle.

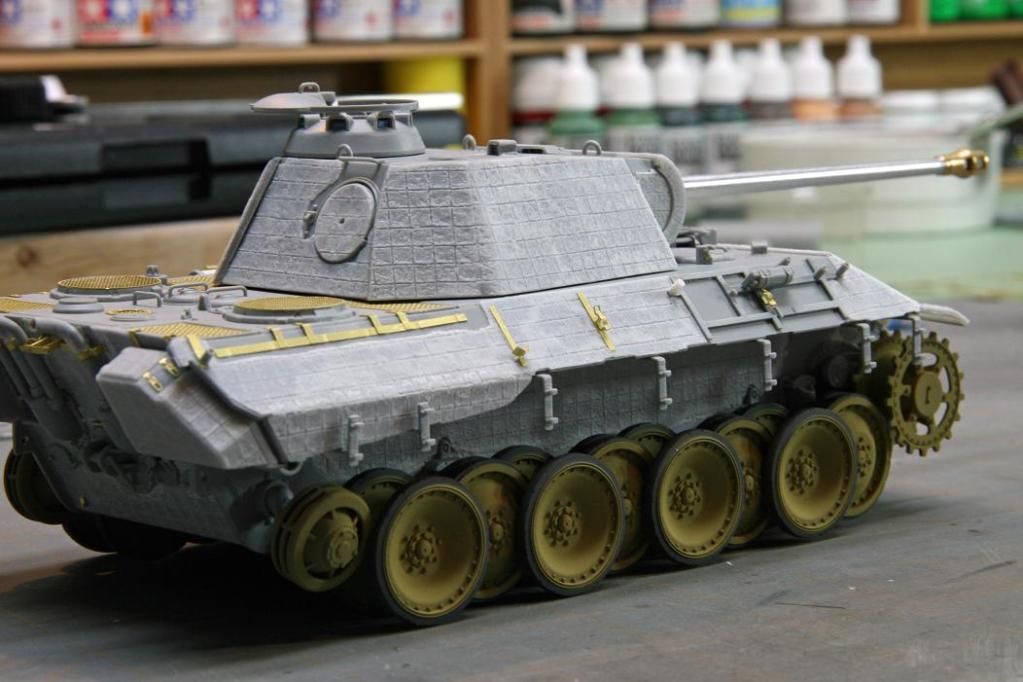
Here are some shots of where I'm at overall. I finished attaching the tool brackets. (I paint the pioneer tools separately and attach after camo is on.) I dry fit the wheels again just to see how it will look. This small PE stuff takes me forever, so I'm looking forward to getting to painting. Still have a bit of work on the spare link racks in the back, etc., but getting closer.

Any questions or comments are welcome. Thanks!

Dave


  • Member since
    April 2005
Posted by Thunderbolt379 on Sunday, October 14, 2012 1:02 AM

Dave -- awesome Panther, it is really looking good!

Malone Duke -- I love it when a kit reaches this stage and the colours go down, it all flushes together into a near-finished mosaic!

Andy -- stunning PE work!

Well, my royal kitty has its first suit of clothes, it took FOUR mixings to cover the beast! I'm almost afraid to start the second and third colours, it's been such a voyage getting to this point. The thin spots are done, the running gear is double-sided and the hull underside is done. Okay, maybe areas that are not directly seen should have been dark yellow, as they would have been issued in that shade, but this beast has green as the principle element of the scheme so it was just easier to make it an overall finish.

Here's the state of play:

The wheel hub/retainers were sprayed on the sprue as well. There are perhaps a couple of the tools that were oversprayed with camo, so I'll add those and touch up. Then begins the oddysey of the yellow and brown squiggly bits...

Cheers, M/TB379

http://worldinminiature.blogspot.com/

  • Member since
    March 2003
  • From: Rain USA, Vancouver WA
Posted by tigerman on Sunday, October 14, 2012 1:14 AM

Dave, that tile zimmerit is sweet. I'm a little disappointed that my panther G in the stash is a Late model. I wonder if it can be back-dated? I think it comes with the earlier mantlet.

Malone, nice to see the cat with it's coat on. Looking sharp.

Andy, I like those brass tow hooks.

   http://i7.photobucket.com/albums/y269/wing_nut_5o/PANZERJAGERGB.jpg

 Eric 

  • Member since
    May 2005
Posted by pyrman64 on Sunday, October 14, 2012 4:57 AM

Hinksy
I'm still keen on showing an MG34 on the Cupola Mount so I'm taking these with me tonight to see what the guys reckon:

Ben,  Your Tiger I's looking great!  Just an FYI - panzers were only issued 2 MG's, so you'll need to remove either the bow or co-ax MG, if you're planning on putting one on the cupola for AA defense.

hth

Greg H

"There is many a boy here today who looks on war as all glory, but, boys, it is all hell." Gen. Wm T. Sherman (11 April 1880, Columbus, Ohio)

  • Member since
    August 2009
  • From: MOAB, UTAH
Posted by JOE RIX on Sunday, October 14, 2012 7:30 AM

SMJmodeler

JOE RIX
Thank You SMJ for setting me straight on that. That's exactly what makes working in a GB a real worthwhile pleasure...

JOE RIX:  You're welcome...but I have to admitEmbarrassed, I didn't point out this oversight because I'm a Tiger expert (there are some true experts here on this forum that I lean on for help) but rather by a mistake I made when I glued the pieces behind the mantle before drilling the hole.  It was an easy fix but it made me well aware of the second hole.  Anyway, I told ya' I got your back on this buildBeer and I agree it does make these GB's a real pleasure. 

BTW:  Where do you fall in the lightSuper Angry versus heavyCoolYes weathering camps?...hmmm?...care to truly experience the power of the darkside.Angry?!

SMJ -

I believe I will be heaving towards the lighter side. figured enough to get the hang of it at least. You know I picked up Miguel Jimenez's "F.A.Q.s 1 AFV Painting Techniques", and that there is sensory overload. Just awesome stuff he manages to do, It certainly has given me some definite ideas but I'm not quite practiced enough yet to go all in. But do not fear, There Will Be Weathering!

This leads me to a query. I have watched and read a number tutorials on dot filtering AFVs and it dawned on me that I have yet to see this applied to a zimmeritt surface. Is there a reason for this? Does the zim texture limit the effectiveness? Or have I just missed something? Simply curious.

"Not only do I not know what's going on, I wouldn't know what to do about it if I did". George Carlin

  • Member since
    August 2009
  • From: MOAB, UTAH
Posted by JOE RIX on Sunday, October 14, 2012 8:02 AM

Greg H - Hello, now that is an important tidbit of info. I was completely unaware of. I was wondering why my Tamiya Mid Prod did not include a bow MG. Thanks for sharing that.

"Not only do I not know what's going on, I wouldn't know what to do about it if I did". George Carlin

  • Member since
    April 2005
  • From: Piscataway, NJ!
Posted by wing_nut on Sunday, October 14, 2012 9:27 AM

Hey.. real sharp work you guys.  Can't wait to get back, clear my pounding headIck!, and get moving forward.


The battle damage was intentional more or less to test how it would be done and the final look.  it was not a results of the surface getting too mushy.

Marc  

  • Member since
    March 2006
  • From: Right Side of a Left State
Posted by Shellback on Sunday, October 14, 2012 10:18 AM

Andy , looks like you P.E. 'd all over the rear of your Tiger ......................Whistling

Looking good dude !Yes

  • Member since
    July 2012
Posted by Hasenpfeffer on Sunday, October 14, 2012 10:23 AM

Marc - Ahh... that makes 2 mistakes on my part. My sincerest apologies. Embarrassed I had Carl going to the wedding too. Well, I'm glad the damage was intentional as my point was that it is very convincing. Skill points to you, sir. I need to work on my reading comprehension. Good luck with the hangover. Hope to see some more work soon.

  • Member since
    March 2006
  • From: Right Side of a Left State
Posted by Shellback on Sunday, October 14, 2012 10:26 AM

Dave , thanks Yes

I've been teasing Marc about the wedding but thankfully it was Marc attending the wedding ....................not me .Whistling

Your welds look very realistic ...more to scale than some of mine . I also noticed that when we start adding those weld beads there is almost no end to them . Zim and p.e. are looking really well also .Yes

  • Member since
    March 2006
  • From: Right Side of a Left State
Posted by Shellback on Sunday, October 14, 2012 10:28 AM

Dave , you covered the wedding while i was covering the wedding .....Hmm........Yes...........Coffee

  • Member since
    September 2009
  • From: Rugby, England
Posted by Hinksy on Sunday, October 14, 2012 10:54 AM

Hi guys,

First off regarding part MC1 - it has been 100% confirmed by wbill that it just sticks over the unzimmed area where the upper and lower hull parts meet. Also the only MG34 I have was an old badly moulded Cyber hobby one so I'm going to leave the MG mount in place but absent an MG.

I had a late night at the group meeting last night so decided to have a loooong lie-in! By the time I'd got up lunch was ready and when that was finished at 1pm I spent the remaining hour until 2pm when the work computer was due to arrive sorting out the remaining track guards.

As you know the main reason for my going last night was to attend to the track gauds. Dragon supplies the track guards in one single moulded length with a little panel line detail to show where the four parts that make up the guard butt-up against one another. These two lengths of Track Guard are just crying out for slicing into sections and fitting by section so they actually look like they are both made up of four sheet metal parts.

I thought I might need a decent razor saw which is the reason why I took them along last night to get the view of the lads and some guidance - plus Alan has a SUBSTANTIAL kit box. In the end we ended up slicing the panel lines with a fresh scalpel blade then shaving the edges very thin and then used pliers to gently add bends at the corners. 

I did the left side last night (under Alan's watchful gaze) and I did the right side this afternoon. The right side we said to leave looking intact and pretty unblemished but decided to take a chunk out of the middle of the left side as if it had taken a good dink. I might show some Zim damage around that area too - either way I'm VERY happy with the outcome.

My post from yesterday showed that the wheels had been cleaned up and were all firmly mounted on big matchsticks ready for priming and painting.

After that all I had left to do was sort these Track Guards and then sort the tiny PE padlock clasps for the turret bin. The guards are now done and I'll be hoping to get the PE sorted today and if it takes ages I'll finish them off next Saturday. I want to get one made and fitted and learn from that first one then hopefully rattle off the remainder in quick time!

Photos:

Left Side Fender:

Right Side:

I hope you like it so far guys - it makes a massive difference just doing little thing like this.

Hopefully my next update will be showing some assembled PE padlock clasps!

Cheers guys,

Ben Toast

On the Bench - Dragon Pz. IV Ausf. G (L.A.H.) Yes

Your image is loading...


  • Member since
    April 2006
  • From: ON, Canada
Posted by jgeratic on Sunday, October 14, 2012 11:12 AM

I believe I've found a resin version of that peculiar 503 turret bin, manufacture is  Modeling Artisan Mori.

It is listed as being in stock both with Covemodels in the UK and also HobbyLinkJapan, as well as the manufacture's own website.

regards,

Jack

  • Member since
    March 2003
  • From: Rain USA, Vancouver WA
Posted by tigerman on Sunday, October 14, 2012 12:14 PM

Mike T-Bolt, forgot you man. Looking forward to see what you do with the paint job. Cool

I've washed my parts on the Tiger and might begin construction tomorrow.

Update on my jagdpanther: Had a heck of a time gluing the mantlet in. It wouldn't go flush for some reason. Hmmm. So I glued and puttied as best as I could. I'm still cleaning the barrel. If all goes well, I'll try another coat of paint next week. I do believe it should have been primed in green, even though the end results shouldn't matter much per say.

   http://i7.photobucket.com/albums/y269/wing_nut_5o/PANZERJAGERGB.jpg

 Eric 

  • Member since
    March 2003
  • From: Rain USA, Vancouver WA
Posted by tigerman on Sunday, October 14, 2012 1:18 PM

I might just go ahead and use the DS tracks, unless someone might want to trade for my DS or doesn't want their magic tracks. Anyone have a set of Tiger magic tracks they don't want?

   http://i7.photobucket.com/albums/y269/wing_nut_5o/PANZERJAGERGB.jpg

 Eric 

  • Member since
    September 2005
  • From: beacon falls , Ct.
Posted by treadwell on Sunday, October 14, 2012 1:45 PM

Turret looks sweet ,Shell !Yes

nice texture !

tread Cool


  • Member since
    December 2002
  • From: Bury St Edmunds, Suffolk, England
Posted by Bish on Sunday, October 14, 2012 1:47 PM

Some great progress going on here. Some of you guys are really shifting. Mine has been a little more sedate. I am still tackeling the hull PE and haven't even started on the turret yet. But it will get there.

And why do websites insist on changing to make thginks better and end up makeing it worse. I have just come across the new PB and what a pain in the butt. 

I am a Norfolk man and i glory in being so


On the bench: Airfix 1/72nd Harrier GR.3/Fujimi 1/72nd Ju 87D-3

  • Member since
    April 2005
  • From: Piscataway, NJ!
Posted by wing_nut on Sunday, October 14, 2012 1:52 PM

Ben  Jack. Very nice.

Has... means never having to say you're sorry

time togo to airplane mode.  laterdudes

Marc  

  • Member since
    November 2009
  • From: SW Virginia
Posted by Gamera on Sunday, October 14, 2012 3:53 PM

Again instead of leaving anyone out I'm just going to say- great work guys!!!

Bish- Yes, I know what you mean, now I'm going to have to relearn how to work in PhotoBucket all over again...

Joe:: And yeah, I'm not sure if you can do a dot filter over zimmerit either, I though about maybe mixing some weak washes in different shades to apply over the main wash to slightly tint the zimmerit a little. Not sure if it would work very well or not.

Anyway here she is in camo, put the four decals on today. BTW: have been reading the discussion on panzer mustard yellow over on the armour forum and hope the Model Master Panzer Yellow is at least decently close.

"I dream in fire but work in clay." -Arthur Machen


  • Member since
    December 2002
  • From: Bury St Edmunds, Suffolk, England
Posted by Bish on Sunday, October 14, 2012 4:22 PM

Nice looking camo. When it comes to DY, i really don't think it matters to be 100% accurate. I recall reading something which said when a museum was restoring a 251, they stripped off thge paint and found something like 9 different shades of DY. It all depends of who supplied the paint at the time. And i thibnk the same would go for the other colours as well.

I am a Norfolk man and i glory in being so


On the bench: Airfix 1/72nd Harrier GR.3/Fujimi 1/72nd Ju 87D-3

  • Member since
    March 2006
  • From: Right Side of a Left State
Posted by Shellback on Sunday, October 14, 2012 4:48 PM

Tread , thanks for that !

Bish , looks good .

Gamera , striped camo looks good . Once you weather it the colors get all gets smudged up anyway .

  • Member since
    September 2009
  • From: Rugby, England
Posted by Hinksy on Sunday, October 14, 2012 5:08 PM

Hi guys,

Following on from my earlier post showing the track guards now they have been fitted I'm going to make a post showing the final build 'naked' as I'll be starting painting next week.

I seriously attempted the PE clasps but they were beyond me but I did my best - I had to leave off the padlocks as I was getting in a mess!

The PE Zim strip up-front is also in place - I've just realised I should have actually thought about lining up the Zim lines but hey ho!

Photos:

I tried my best but REALLY found these hard. They aren't the best and the padlocks were so small my eyes hurt but once painted up I think they'll look just fine Toast


This stuff is great for PE work with tiny objects. It's a CA based glue for sticking on false nails - just make sure you buy one with a brush and not a dropper bottle. It takes longer to set than usual CA allowing fine adjustment of PE parts:

Cheers guys,

Paint starts next weekend!

Ben Toast

On the Bench - Dragon Pz. IV Ausf. G (L.A.H.) Yes

Your image is loading...


  • Member since
    April 2006
  • From: ON, Canada
Posted by jgeratic on Sunday, October 14, 2012 5:30 PM

From what I understand, the dot filter method was created to "live'n up" a flat monotone surface - something you don't have when zimmerit is present, what with the light and shadows dancing across the surface.   Attempting that technique here would be similar to applying it to track surfaces, and I don't think anyone has tried that - yet.  Rain streaking, dust and maybe some rust streaks is plenty IMO.

regards,

Jack

  • Member since
    March 2006
  • From: Right Side of a Left State
Posted by Shellback on Sunday, October 14, 2012 6:35 PM

Ben , cool idea , i'll look for that .

I have finished texturing the hull and i painted it with a coat of panzer gray as a primer to see how she looks  When apply the camo over this the texturing will not be as obviouse . I'm leaving off most of the tools and cables so i will be going back and scratch build the brackets .

Yes

JOIN OUR COMMUNITY!

Our community is FREE to join. To participate you must either login or register for an account.

SEARCH FORUMS
FREE NEWSLETTER
By signing up you may also receive reader surveys and occasional special offers. We do not sell, rent or trade our email lists. View our Privacy Policy.