SEARCH FINESCALE.COM

Enter keywords or a search phrase below:

Steel Cats (Sept. 2012-Aug. 2013)

322302 views
3330 replies
1 rating 2 rating 3 rating 4 rating 5 rating
  • Member since
    December 2002
  • From: Bury St Edmunds, Suffolk, England
Posted by Bish on Sunday, January 20, 2013 3:14 AM

Marc, those figures look realy nice, will make a great addition. I have heard of Warrior but can't seem to find them, not sure if the company is still going.

I am a Norfolk man and i glory in being so


On the bench: Airfix 1/72nd Harrier GR.3/Fujimi 1/72nd Ju 87D-3

  • Member since
    December 2002
  • From: Bury St Edmunds, Suffolk, England
Posted by Bish on Sunday, January 20, 2013 3:16 AM

Eric, now thats a nice paint job. Like the look of that a lot.

I am a Norfolk man and i glory in being so


On the bench: Airfix 1/72nd Harrier GR.3/Fujimi 1/72nd Ju 87D-3

  • Member since
    August 2009
  • From: MOAB, UTAH
Posted by JOE RIX on Sunday, January 20, 2013 6:48 AM

tigerman

Thanks Joe. This project, thanks to work, is taking wayyyyyyy toooo looonnng to finish.

Eric - I can unfortunately relate. Although not job related I have certainly had other committments that demanded my attention. That's the way it goes sometimes and I just accept that. Heck, I haven't even got the hull assembled yet nor the wheels painted. As I stated earlier it will be doubtful that I finish by the deadline but, I am still going to plug along here and there. Yeah, I could probably knock it out if I slapped her together sans all the PE but this is the only armor I am going to build for a while and would really like to do it justice and apply a number of the painting and weathering techniques I have learned here. I have the WestFest Model contest coming up the last weekend of April so I have turned my attention to some other projects that I can finish up in order to have some entries. Regardless, I am continuing to work on with the Tiger and will keep posting pics of my progress and definitely following everyone elses.

"Not only do I not know what's going on, I wouldn't know what to do about it if I did". George Carlin

  • Member since
    March 2003
  • From: Western North Carolina
Posted by Tojo72 on Sunday, January 20, 2013 7:36 AM

I got my build done,It's an Early Tamiya Tiger I with a couple of Miniart figures.It has a metal barrel and screens from Aber.I painted with mostly Tamiya and MM,weathered with various AK and Mig products including the Chipping Fluid in place of hairspray.Great campaign Eric,and lots of great builds from all.

  • Member since
    December 2002
  • From: Bury St Edmunds, Suffolk, England
Posted by Bish on Sunday, January 20, 2013 8:52 AM

Tojo, thats really nice work. Love the paint work, great wear and tear on the white wash. All round great looking build. Yes

I am a Norfolk man and i glory in being so


On the bench: Airfix 1/72nd Harrier GR.3/Fujimi 1/72nd Ju 87D-3

  • Member since
    April 2011
  • From: imperial beach, ca
Posted by malone duke on Sunday, January 20, 2013 12:27 PM

Tiger man. That paint job is awesome man. Really nice work.

Tojo. All around good job dude. Another inspiring creation man. Now I really want to do a white wash soon.

 Thanks for all the comments guys. All that brass really is kinda ridiculous. Every time I start a session I get a bit of butterflies in the stomach.

 I'd like a suggestion though. I usually mount the tracks after paint. I'm thinking of doing it before this time. Anything I should worry about going this route. The tracks are of the d's type.

 This is the late panther g. 1/72. Someone asked earlier I saw.

  As far as optivisors go. You have to get one that's the most comfortable. And get one that you can change the lenses. Also only get one strong enough to suit your needs.

  • Member since
    March 2003
  • From: Rain USA, Vancouver WA
Posted by tigerman on Sunday, January 20, 2013 1:39 PM

Thanks Malone.

Anthony, you did a bang up job on the Tiger. Nice chipping and weathering. I really like that every winter scheme looks so different. I like the variations.

   http://i7.photobucket.com/albums/y269/wing_nut_5o/PANZERJAGERGB.jpg

 Eric 

  • Member since
    November 2003
  • From: Nashville, TN area
Posted by bobbaily on Sunday, January 20, 2013 6:37 PM

WOW!!!!  The quality of the work in this GB is second to none....I've been following but not commenting so now it's time to attempt to play catch-up:

Tojo-Very nice job on your Tiger-nice to see a Tamiya kit built-you've done a great job on the weathering.

Eric-your JagdPanther is coming along nicely-great camo scheme and the 'polished' steel wheels are a nice touch.

Jack-thanks for the figure painting tips & the weld bead tips also.  Your Tiger is coming along nicely and that is a very nice Hurricane that you built for the other GB.

Marc-Another job well done-the figures and base are a nice touch.  Looking forward to your KT build-I've got that kit in my stash.

RBaer-Still love the camo scheme on your KT-very impressive weathering job.

Malone-PE looks great-even more impressive that it's 1/72 scale....my eyes aren't that forgiving.

Andy-Wow-just a great build all around.  Impressive weathering & winter camo scheme.

Dave-your Panther continues to impress-the detail that you're adding is making it stand out.

Mike-you're off to a good start on your Panther G-I'm working on a Late Panther G and I agree-very nice kit.  Will be watching your build with special interest.

Armor86-your Tiger is continuing to impress-very nice PE work.

I hope I didn't overlook anyone...if so, I'm sorry.  Again, all the build have been impressive.

I'm hoping to spend a few hours tomorrow on my Panther....if all goes well, maybe even get it primed....will wait and see.

Bob


  • Member since
    April 2005
Posted by Thunderbolt379 on Monday, January 21, 2013 3:10 AM

Tojo -- absolutely fantastic, that's a result to be very proud of! I shall be getting those AK fluids, I don't think I'll bother going the hairspray route after all on my planned winter builds.

Teensy update as of today -- my new display case is assembled and installed and I spent the whole afternoon unpacking my models from their shipping boxes and getting them into the case. There are minor repairs to do in a number of places, and several need a careful cleaning.

The King Tiger is now inpacked and ready to be resumed, so I am confident of completing it inside the terms of this wonderful GB.

Cheers, Mike/TB379

PS: Will post a display case pic!

http://worldinminiature.blogspot.com/

  • Member since
    November 2009
  • From: SW Virginia
Posted by Gamera on Monday, January 21, 2013 7:49 AM

Ohhh, that looks spectacular Tojo- why didn't I do a WW scheme- they all look soooo good!!!

"I dream in fire but work in clay." -Arthur Machen


  • Member since
    April 2005
  • From: Piscataway, NJ!
Posted by wing_nut on Monday, January 21, 2013 8:41 AM

MD,  lookin' good there bud.

Jack, thanks   That's in fact what I did but the old hands just ain't as steady as they used to be.  I did tighten it up a bit and added the piping on the hat.

Eric,  REALLY  like that camo.

Anthony, The winter finsish makes it look so cold and yet it is smokin' hot.

Thanks to all for base and fig comments

Figgies are done so I am really, finally, absolutely calling this one done. Eric, sorry to ask you to update the finished picture list Embarrassed  when you'd rather be building I'm sure.

Marc  

  • Member since
    December 2002
  • From: Bury St Edmunds, Suffolk, England
Posted by Bish on Monday, January 21, 2013 9:03 AM

Marc, thats is very nice indeed, simple but nice. I am trying to come up with more dramtice dio ideas, when sometimes a nice simnply one like this is just whats needed.

I am a Norfolk man and i glory in being so


On the bench: Airfix 1/72nd Harrier GR.3/Fujimi 1/72nd Ju 87D-3

  • Member since
    November 2003
  • From: Nashville, TN area
Posted by bobbaily on Monday, January 21, 2013 10:18 AM

Marc-again, the base and figures only add to an outstanding build.

I'm fortunate to have today off so I've been working on the Panther-taking an NCIS break at the moment.  Hope to post some pics by the end of the day.

Bob


  • Member since
    November 2009
  • From: SW Virginia
Posted by Gamera on Monday, January 21, 2013 10:51 AM

Marc: SuperAwesomeStupendousCool!!!!

Just great job all around on everything!!!

"I dream in fire but work in clay." -Arthur Machen


  • Member since
    July 2012
Posted by Hasenpfeffer on Monday, January 21, 2013 12:01 PM

Ahh, it's catch up time. If only I had more of "that". LOL

Jack - Lots of great tips, especially on the figure painting. I enjoy those the most since it is an area that has to catch up to the rest of my skills. Practice, practice. Yes

Andy - Coming along just as I would expect! Very nice indeed. I'm kinda with Jack on the realism of the WW wear & tear. In my mind it was probably washed or worn off vs. chipping and flaking. But you can't argue the visual coolness. It just looks neat. Plus, it's not my Tiger. Wink

Malone - Very impressed with the amount of detail and the effort that goes along with that. I can't imagine the size of some of that PE. It adds a ton to a model that scale.

Eric - Sweet job on the camo. The rest is falling into place as well. I'm hoping the tracks work out for ya! Yes As it stands now, you've got a winner on your hands.

Tojo - Excellent, excellent work, my friend! Sehr gut! Yes Love those scrapes and scratches on the fenders. Very good weathering all the way around. Super job on the WW and very impressive figures to boot! What else is there to say? You should be proud. 

Mike - That's great news! you've gotta be excited to get back into it. All that packing/unpacking is just tedious stuff. Hopefully, you've been able to create a work space that is special and fits your needs. Looking forward to some updates and pics.

Marc - My PB. Star Great SBS for the cobble road.I suspect you could do something similar for walls, etc. I wanna expand my horizons in the near future with this kinda stuff. It ill be very useful when I take the leap. Thanks! Cool As for the dio, looks amazing. Top drawer job on the figures. Not to mention how fast you cranked those out. You definitely have a gear much higher than me. (I also noticed that this particular Panther driver is one of those idiots that you find yourself behind on the freeway - dragging his tow chain creating a wall of sparks and the possibility of a busted windshield. What a punk! LOL) Great little detail though. Love it. Yes 

Well, from my neck of the woods... I was able to get a little done yesterday. We lost power due to high winds, but I was able to divert some output from the generator my way for lighting on my workbench.. Stick out tongue

The pics might be a little darker than usual because of that, but not terribly so. Got a bit chilly down in the man cave too. Only single digit to low teen temps out there... Brr. Anyway, here we go:

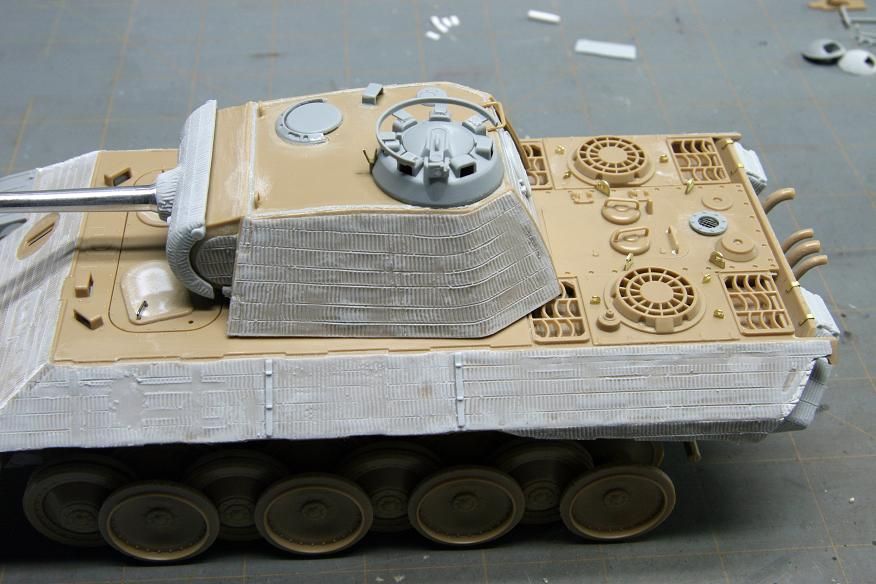
Most of the work yesterday was focused on the rear deck. I noticed that Panthers have an open area just behind the exhaust grates at the very rear of the deck. The Italeri kit is designed to be solid straight up to the rear plate, so I took saw in hand to rectify the situation.. Here, the left side has been notched out while the right is in its original state.

I also ground down and sanded away the lower turret ring that was on the upper hull. There is still on on the turret, but I will leave it as it looks close enough now. We'll see if I change my mind or not later.

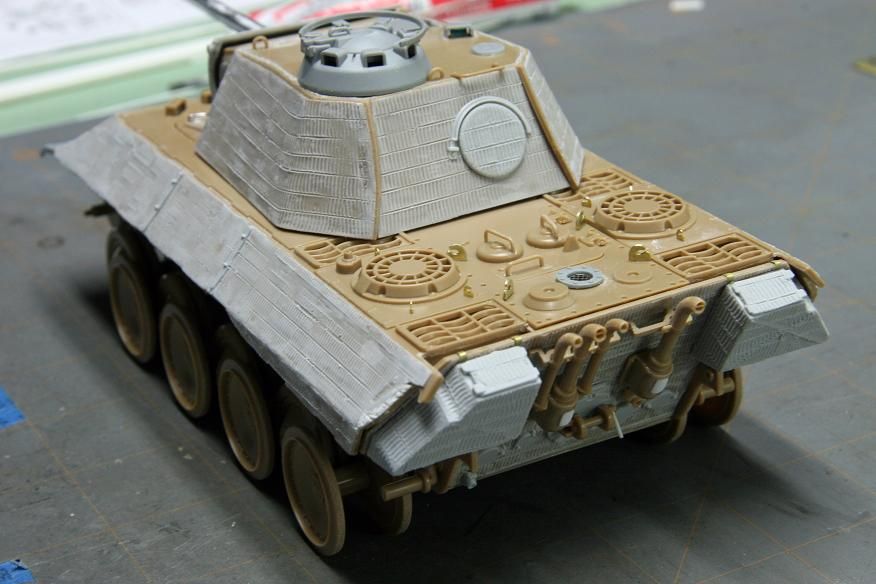
Here it is kinda "dry fit" together. (Thus the gap center rear) I added PE lifting hooks as well.

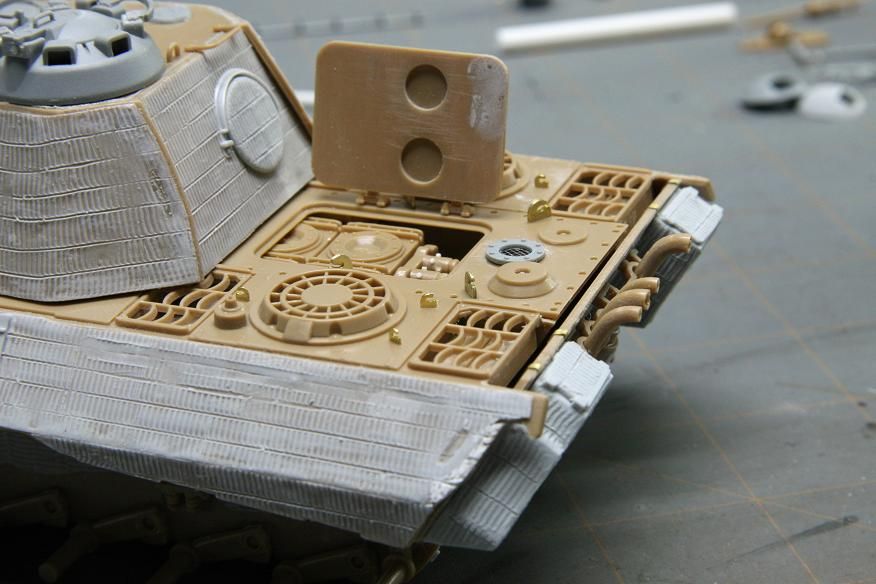
Added baffles in the exhaust tubes with stretched sprue. Almost screwed things up on the first attempt as the liquid glue really wants to pool in the tube. Gotta take extra care to not use too much. Added a handle to the tow pin. Not a big deal, but adds a little sumpfin' sumpfin'. Gosh, the exhaust brackets look huge here, don't they? 

The engine is a nice touch in this kit. Here you can see the HL230(H) - for Hasenpfeffer variant - as it's not very true to the real thing. But this is what I had done some 20+ years ago and I don't feel like tearing it all up. Wink I'll get pics that show it better next time.

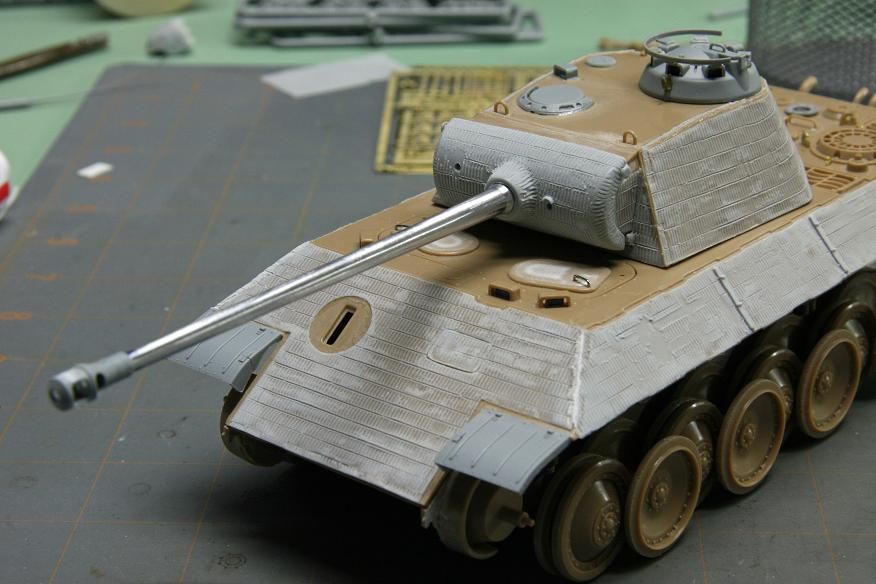
Main gun squared away with the attachment of the muzzle brake.

Up next is a beautiful wedding. The marriage of the lower/upper hull. Haha. Ick! 

  • Member since
    April 2006
  • From: ON, Canada
Posted by jgeratic on Monday, January 21, 2013 2:31 PM

Eric - camou shapes and colour look great.  Any plans for a new camera - the pixelation is causing a somewhat shimmering look to the photos.

Tojo72 - excellent finish, just a great job all around.  The worn out white wash looks quite natural.  Both figs are a nice added touch.

Marc - beautiful Panther scene, and you have rendered  the hell out of that drum barrel - looks very realistic (I wonder if a few small tufts from a cotton ball would convincingly display smoke?)  Final close up shot, noticed the figure holding his helmet has incomplete insignia on the arm patch, but can't tell in the other photos.  I'm certain there are decals available of different ranks.

Dave - super attention to detail on your current build, looking really good.

---------------------------------------------------

Before I get to my update of the Tiger I, some of you might remember a question being asked about the pair of holes located  just behind the front fenders.  I found another use was for the insertion of a jib to do maintenance work.

-------------------------------------------------------

This weekend I got in at least a good dozen hours at the work bench, and I've still haven't finished the hull details, let alone look at the tracks, and the wheels are still attached to the sprues.  Most of the photos describe the revisions done to make this Africa Tiger more accurate as put forth from this site:

http://tiger1.info/models/products/TAM32529

I was reluctant to grind the front  hull detail because it was made of metal, but the dremal tool did it's job.   I did add some Squadron putty to get the proper shape and filled in the old holes.  The web site also indicated a proper orientation of the starter adapter plate, but further research showed it had to be rotated into a vertical position once the muffler shields are added.   I also left the brackets from the S-mine launchers as a photo of the British captured Tiger still had them.

regards,

Jack

  • Member since
    November 2003
  • From: Nashville, TN area
Posted by bobbaily on Monday, January 21, 2013 4:56 PM

Dave-you are continuing to impress-very nice detail work

Jack-Your Tiger is continuing to come along nicely-also nice attention to detail-impressive that it's 1/48 also.

I was able to get motivated to work on the Panther G Late today-seems that I didn't get far when looking at the pics-lower hull was complete prior to today's efforts.  Launched three small parts, only one went into a 'black hole'...guess I'll have to try to scratch a small hook....

No where near the quality of work that you guys are doing-this one is out of the box...Dragon Smart Kit.

Bob


  • Member since
    July 2012
Posted by Hasenpfeffer on Monday, January 21, 2013 4:59 PM

Hey Jack, since you seem to be very interested in the achieving detail and correctness... I'm not sure if this applies to your Tiger or not but I remember seeing somewhere that the starter adapter is to be rotated so that the 2 bolts align vertically with the open hole in the center. Just something to look into... 

How is it working with the metal tub? I think Marc said he hated it on the 1/48 Panther he built. Coming along nicely though. Amazing how much time it takes to add detail and correct things isn't it?

  • Member since
    July 2012
Posted by Hasenpfeffer on Monday, January 21, 2013 5:02 PM

Bob - looks good to me... Yes The Smart Kits have quite a bit of detail OOB anyway. Don't go selling yourself short. Glad to hear only one part lost, frustrating to be sure, though... Looking forward to more.

  • Member since
    April 2005
Posted by Thunderbolt379 on Monday, January 21, 2013 5:55 PM

Marc -- you have me drooling with the realism of it, especially that barrel... The whole thing came out great!

Hasen -- thanks! I'm looking forward to easing back into things.

Jack -- fantastic work!

Cheers, Mike/TB379

http://worldinminiature.blogspot.com/

  • Member since
    August 2009
  • From: MOAB, UTAH
Posted by JOE RIX on Monday, January 21, 2013 6:08 PM

Marc - Excellent, excellent, excellent dio. I like the simplicity of your setting also.

Dave - Your certainly whipping that into shape very nicely. Me likey.

Jack - I have to marvel at your attention to detail and definitely the work you put in to represent it. Really a marvelous job.

Bob - I'll second that you need not down play the quality of work your doing. It certainly is impressive to me. 

"Not only do I not know what's going on, I wouldn't know what to do about it if I did". George Carlin

  • Member since
    April 2005
  • From: Piscataway, NJ!
Posted by wing_nut on Monday, January 21, 2013 6:56 PM

Hey guys... thanks so much for the very nice comments.

Dave, YO MY PB!!!!.  Nice work or your... hmmm... oh yeah... PANTHERStick out tongue

As far as speed.  My bench is in the family room next to the TV so I get bench time and family time at the same time.  So I get bench time 7 days a week... usually.

Jack, I was hoping you would notice that.  My only guide for painting was the box the figgies came in.  I could see the patch but not what was on it.  So any light you can shed on that will be appreciated.

Bob, good to se some progress. Feels nice to doesn't it?Wink

Marc  

  • Member since
    March 2003
  • From: Western North Carolina
Posted by Tojo72 on Monday, January 21, 2013 6:59 PM

That is a really great scene Marc


Bob,that Panther is shaping up

  • Member since
    March 2003
  • From: Rain USA, Vancouver WA
Posted by tigerman on Tuesday, January 22, 2013 2:06 AM

Sorry Jack, I'm such a terrible photographer. I tried editing them in Iphoto.

Great reference photo and nice progress.

Dave, you are huffing along on that panther. Never knew of that gap before on the rear deck.

Bob, glad to see you at work. Keep plugging away.

   http://i7.photobucket.com/albums/y269/wing_nut_5o/PANZERJAGERGB.jpg

 Eric 

  • Member since
    April 2006
  • From: ON, Canada
Posted by jgeratic on Tuesday, January 22, 2013 4:15 AM

Bob - good to see you've got some progress in on the Panther

------------------------------------------

Dave - Yes,  initially I had placed the starter adapter as shown in this diagram,

but as the glue was setting I realized there was no way even  PE muffler shields would sit straight with that piece in the way.  Photos show both positions in use, but is predominately as that above.  I decided to switch to full vertical position for less hassle once I attach the PE shields.

As for Tamiya's metal tub concept for the hull bottom, I'd say it was a step backward.  I think it was done just as a gimmick to get people interested in their 1/48 scale series.  Very minimal detail, and I had  to apply a great deal of pressure to the sides to eliminate the gap when the roof was fitted.

--------------------------------------

Marc - here's some info on that sleeve rank insignia:

It was introduced for wear on all garments without shoulder boards or straps, per HM 42, No. 742, dated August 1942.  It was worn only on the left sleeve 10cm below the sleeve seam.  It included the following garments - winter clothing, snow camouflage clothing, snow shirts, wind blouse, fatigue protection shirts of all types, tropical shirts, fatigue blouse, athletic suit, work jacket, and grey shirts of all types.

It was light green  (in varying shades) on a black base for ranks Unteroffizer to Oberst, and golden yellow on a dark green or black base for all general officers.  For brevity sake, I'll leave out size measurements and descriptions on construction materials.  Well maybe the width will help if you plan to paint the insignia on, 9-10cm wide.

Supposedly these are official issue from the war (selling for $345), the reverse side shows the oak leaves are embroidered.

There might be others out there, but Alliance Modelworks makes a huge decal set that includes these types of rank insignia in both their Heer and SS sets.  Also included is PE shoulder boards, medals and belt buckles.

regards,

Jack

  • Member since
    March 2003
  • From: Western North Carolina
Posted by Tojo72 on Tuesday, January 22, 2013 5:48 AM

I got my insignia from a Verlinden set,proves very helpful as I was never able to paint those things.

  • Member since
    April 2005
  • From: Piscataway, NJ!
Posted by wing_nut on Tuesday, January 22, 2013 6:49 AM

Great info Jack.  Thanks.  If I ever get into serious figures there is some great stuff on that site. Considering the size of that patch I think just the hint of some color will suffice... for me anywayWink

Marc  

  • Member since
    July 2012
Posted by Hasenpfeffer on Tuesday, January 22, 2013 8:35 AM

Hey Jack, totally understand. Do what ya got to do. In fact I think those are the diagrams I remember seeing. You may have even provided the link earlier and that's what I'm recalling.

Excellent stuff on the uniforms. You definitely have that covered and are a great resource. I have some things from Alliance Modelworks, stencils for panzer units and general markings. I also have a wheel mask set. All very, very good. Haven't seen their decals yet. I, like Bish, have a Verlinden set of decals that I've used in the past.

  • Member since
    May 2005
Posted by pyrman64 on Tuesday, January 22, 2013 8:53 AM

jgeratic1

Jack & et al...

The first two ranks are labelled incorrectly, they should be "Gefreiter" and "Obergefreiter."

I have a couple of Hudson & Allen camo sheets with these rank insignia.

Greg H

"There is many a boy here today who looks on war as all glory, but, boys, it is all hell." Gen. Wm T. Sherman (11 April 1880, Columbus, Ohio)

  • Member since
    April 2006
  • From: ON, Canada
Posted by jgeratic on Tuesday, January 22, 2013 1:53 PM

Greg - on my way to work, so don't have time to check further references for the ranks.  As I understand it, the new style of rank insignia was intended for nco's and officers. As it was, Gefreiter and Obergefreiter already had sleeve insignia, the single and double chevron respectively.  This too I will need to check if it was allowed on winter clothing, etc.  One thing I should mention is the SS officially adopted these new style ranks in February 1943.

regards,

Jack

JOIN OUR COMMUNITY!

Our community is FREE to join. To participate you must either login or register for an account.

SEARCH FORUMS
FREE NEWSLETTER
By signing up you may also receive reader surveys and occasional special offers. We do not sell, rent or trade our email lists. View our Privacy Policy.