SEARCH FINESCALE.COM

Enter keywords or a search phrase below:

Longest Day GB

265140 views
2863 replies
1 rating 2 rating 3 rating 4 rating 5 rating
  • Member since
    November 2010
  • From: Florida-West Central
Posted by Eagle90 on Saturday, June 7, 2014 8:24 PM

Stik...wow!  Great job on the office!  Awesome detail!

Thanks!  It does look more natural with them laying down more.  Diluted white glue....who'd a thunk that?  Embarrassed

Eagle90


  • Member since
    April 2006
  • From: Denver, Colorado
Posted by waynec on Saturday, June 7, 2014 9:07 PM

they are laying much better but it looks like the side edge of the tape didn't get painted. could be the light. sounds picky but sometimes little things stand out. on the bottom one it looks like the rear part is not flush on the fender. if it is snug against the side it could be strapped there. if there is a gap it looks like the strap isn't attached to the fender.

something i did not do with mine is simulate a buckle. i'm thinking a fine square drawin where the buckle should be would suffice.

i don't know if ww2 german camo nets had strips of canvas like american ones did. if so that would be where the fried green and brown herbs could be sprinkled on. not a lot just enough for some texture. i'm going to go back to my BEDFORD and do that in preparation for regionals.

just wait until i do an airplane. this whole conversion will be reversed. can't wait to see your next armor build.

Никто не Забыт    (No one is Forgotten)
Ничто не Забыто  (Nothing is Forgotten)


  • Member since
    July 2004
  • From: Sonora Desert
Posted by stikpusher on Saturday, June 7, 2014 11:21 PM

It's getting there...


F is for FIRE, That burns down the whole town!

U is for URANIUM... BOMBS!

N is for NO SURVIVORS...

       - Plankton

LSM


  • Member since
    October 2009
  • From: Oil City, PA
Posted by greentracker98 on Monday, June 9, 2014 12:48 PM

Hey everyone, I finally have the landing gear and undercarriage covers for my Jug Bubble top. So It should be finished soon.


A.K.A. Ken                Making Modeling Great Again

  • Member since
    December 2002
  • From: Bury St Edmunds, Suffolk, England
Posted by Bish on Monday, June 9, 2014 1:24 PM

Coming on nicely Ken.

I am a Norfolk man and i glory in being so


On the bench: Airfix 1/72nd Harrier GR.3/Fujimi 1/72nd Ju 87D-3

  • Member since
    September 2003
  • From: AandF in the Badger State
Posted by checkmateking02 on Monday, June 9, 2014 1:48 PM

Good progress, Ken.


  • Member since
    September 2003
  • From: AandF in the Badger State
Posted by checkmateking02 on Monday, June 9, 2014 10:07 PM

While I was preparing to close up the fuselage, I noticed that the troughs for the gun barrels were set too close together to accommodate said gun barrels.  So here's the result of a lot of filing and sanding.  By the placement of the little nubs where the barrels go, I think they should fit now.

After test-fitting, I'm not sure that the turret will even retract as far as it should into the fuselage.

Might be irrelevant anyway.  The bar inside the fuselage that is supposed to hold the stem on the suspension mechanism fell off a couple of days ago (and I thought I'd used more than enough superglue!!).  Of course the fuselage sides are glued together.  I tried to re-install it last night--to no avail.  So I'm going to have to just glue the ball turret to the bottom fuselage piece and let it be.

This was not serendipity.   Ick!


  • Member since
    September 2003
  • From: AandF in the Badger State
Posted by checkmateking02 on Monday, June 9, 2014 10:15 PM

Installed the cockpit seats

Tried to get a shot of the instrument panel, but it's too far back there to see very well:

and the (Norden?) bombsight

I thought it ought to be installed at right angles to the centerline of the fuselage, but the instructions show it parallel--so I followed the instructions.  Not sure if it's correct though.


  • Member since
    September 2003
  • From: AandF in the Badger State
Posted by checkmateking02 on Monday, June 9, 2014 10:24 PM

Painted up the four engines.  I dry-brushed them with some Model Master steel, some kind of brown, and a little silver.  Dry-brushed the center with some lighter gray, then gave them a wash of acrylic black.

Also painted the undersides of the horizontal stabilizer and one wing with WEM's Neutral Gray last light.  I only painted one wing, because I noticed that the NMF de-icer boot on the other wing got scuffed since I painted it.  Sooo--nothing to do but repaint that and wait for it to cure. 

Again, no serendipity there. 


  • Member since
    July 2004
  • From: Sonora Desert
Posted by stikpusher on Monday, June 9, 2014 10:32 PM

Well, at least my Marauder has some good company here!

Ken, your Jug is so close to the finish line!

CMK, I know exactly what you mean about the lack of serendipity on your Liberator. Not so much on my B-26, but on other projects. For every two steps forward, there is one step back on some builds.


F is for FIRE, That burns down the whole town!

U is for URANIUM... BOMBS!

N is for NO SURVIVORS...

       - Plankton

LSM


  • Member since
    October 2009
  • From: Oil City, PA
Posted by greentracker98 on Tuesday, June 10, 2014 12:16 AM

Thanks Everyone

I did some touch ups, painted inside the carriage covers, attached them to the landing gear, and installed the guns in the wings tonight. Sooo, It's getting there. I took a picture, but all you can see is the guns, barely that is.

Does everyone paint their guns? I painted them on the razorback jug, but I didn't on the P-38. I've been getting the brass guns from a company in Poland. and I like seeing the shiny brass.


A.K.A. Ken                Making Modeling Great Again

  • Member since
    December 2002
  • From: Bury St Edmunds, Suffolk, England
Posted by Bish on Tuesday, June 10, 2014 12:46 AM

Nice work CMK. In regards to the ball turret, I have not seen images of the real thing, but on the Hase kit they are holes rather than just troughs, so the turret can retract right in.

I am a Norfolk man and i glory in being so


On the bench: Airfix 1/72nd Harrier GR.3/Fujimi 1/72nd Ju 87D-3

  • Member since
    July 2004
  • From: Sonora Desert
Posted by stikpusher on Tuesday, June 10, 2014 1:06 AM

Ken, if it can be seen, or possibly be seen, I paint it. But if you have no plans for your build aside from your own viewing pleasure, why not leave them bare? It's your choice! I like leaving the little raised Revell/Monogram logos on the lower wing or tail surfaces of my kits... Gasp!!! And some of them place and or win at IPMS!!!! :-0 The horror!!!


F is for FIRE, That burns down the whole town!

U is for URANIUM... BOMBS!

N is for NO SURVIVORS...

       - Plankton

LSM


  • Member since
    November 2009
  • From: SW Virginia
Posted by Gamera on Tuesday, June 10, 2014 7:27 AM

Ken: Very nice work on the NM and the invasion stripes!

CMK02: Good looking work there too! I don't remember having many issues with my Liberator, but then again it was sorta a rush build.

"I dream in fire but work in clay." -Arthur Machen


  • Member since
    October 2009
  • From: Oil City, PA
Posted by greentracker98 on Tuesday, June 10, 2014 12:23 PM

Gamera

Ken: Very nice work on the NM and the invasion stripes!

CMK02: Good looking work there too! I don't remember having many issues with my Liberator, but then again it was sorta a rush build.

Gamera: Thank you.

I'm planing a diorama for the Jug and the P 38. I plan on taking it to display at a few shows and things.

Here is a pic of the installed guns

A.K.A. Ken                Making Modeling Great Again

  • Member since
    November 2009
  • From: SW Virginia
Posted by Gamera on Wednesday, June 11, 2014 7:40 AM

Ken: Lookin' good! Did you cement the guns in place yet? I normally put them on last thing if possible since if I put them on at this step of construction I'd have knocked off and lost each and every one of them by the finish!  

"I dream in fire but work in clay." -Arthur Machen


  • Member since
    October 2009
  • From: Oil City, PA
Posted by greentracker98 on Wednesday, June 11, 2014 3:53 PM

Gamera - SShhhhh Not so loud, LOL the guns are glued in. Thanks

A.K.A. Ken                Making Modeling Great Again

  • Member since
    September 2003
  • From: AandF in the Badger State
Posted by checkmateking02 on Wednesday, June 11, 2014 11:32 PM

CMK, I know exactly what you mean about the lack of serendipity on your Liberator. Not so much on my B-26, but on other projects. For every two steps forward, there is one step back on some builds.

Thanks, stik.  This seems to be one of those builds for me.

Nice work CMK. In regards to the ball turret, I have not seen images of the real thing, but on the Hase kit they are holes rather than just troughs, so the turret can retract right in.

Thanks, Bish, from pictures I've looked at, Hase's engineering seems to be the better of the two.  Wished Academy had done it that way.  When I painted the ball turret, I noticed some sanding scratches, so I have to work on that.  It's the "one step back."

CMK02: Good looking work there too! I don't remember having many issues with my Liberator, but then again it was sorta a rush build.

Thanks, Gamera.  It's probably the result of some ham-handedness on my part more than anything else.

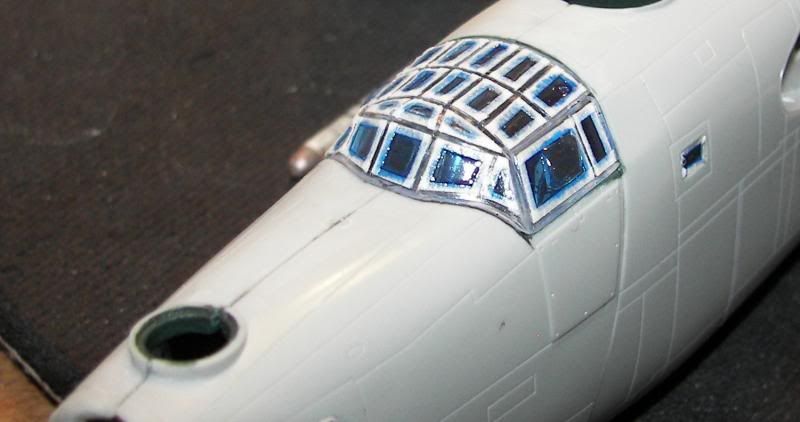
And back to some progress.  I installed the cockpit canopy.  I use white glue for this, but that also means a lot of checking and refilling, where the glue shrinks as it dries.  That leaves gaps that have to be filled in and everything smoothed out with a damp q-tip/cotton bud.  The process takes a couple of days to reach an acceptable point.

The canopy is in three pieces:  top and the two sides.  It didn't seem to fit together too well, but the glue will fill in some of it, then after painting I can try a thin wash to camouflage the imperfections--I hope.


  • Member since
    February 2010
  • From: New Jersey
Posted by 68GT on Thursday, June 12, 2014 5:39 AM

greentracker98

Wow, that's an offaly large wallet!

Jug looks great also!

On Ed's bench, ???


  • Member since
    November 2009
  • From: SW Virginia
Posted by Gamera on Thursday, June 12, 2014 9:05 AM

CMK02: Very nice! Seems almost a shame to peel the mask off and throw it away considering the time and effort spent on it. I used the Eduard pre-cut ones on mine, but I still had to trim and adjust them to get a good fit.

"I dream in fire but work in clay." -Arthur Machen


  • Member since
    December 2002
  • From: Bury St Edmunds, Suffolk, England
Posted by Bish on Thursday, June 12, 2014 11:52 AM

greentracker98

Gamera

Ken: Very nice work on the NM and the invasion stripes!

CMK02: Good looking work there too! I don't remember having many issues with my Liberator, but then again it was sorta a rush build.

Gamera: Thank you.

I'm planing a diorama for the Jug and the P 38. I plan on taking it to display at a few shows and things.

Here is a pic of the installed guns

Looking good Ken. And that wallet is rather bulky isn't it, theres some definite additions to the stash in there.

I am a Norfolk man and i glory in being so


On the bench: Airfix 1/72nd Harrier GR.3/Fujimi 1/72nd Ju 87D-3

  • Member since
    September 2003
  • From: AandF in the Badger State
Posted by checkmateking02 on Thursday, June 12, 2014 12:46 PM

Gamera

CMK02: Very nice! Seems almost a shame to peel the mask off and throw it away considering the time and effort spent on it. I used the Eduard pre-cut ones on mine, but I still had to trim and adjust them to get a good fit.

 
I suppose I could leave the mask on? Confused


  • Member since
    October 2009
  • From: Oil City, PA
Posted by greentracker98 on Thursday, June 12, 2014 1:59 PM

Bish

greentracker98

Gamera

Ken: Very nice work on the NM and the invasion stripes!

CMK02: Good looking work there too! I don't remember having many issues with my Liberator, but then again it was sorta a rush build.

Gamera: Thank you.

I'm planing a diorama for the Jug and the P 38. I plan on taking it to display at a few shows and things.

Here is a pic of the installed guns

Looking good Ken. And that wallet is rather bulky isn't it, theres some definite additions to the stash in there.

OH yea right!  (Heavy sarcasm) There isn't anything green in there

A.K.A. Ken                Making Modeling Great Again

  • Member since
    December 2002
  • From: Bury St Edmunds, Suffolk, England
Posted by Bish on Thursday, June 12, 2014 2:04 PM

greentracker98

Bish

greentracker98

Gamera

Ken: Very nice work on the NM and the invasion stripes!

CMK02: Good looking work there too! I don't remember having many issues with my Liberator, but then again it was sorta a rush build.

Gamera: Thank you.

I'm planing a diorama for the Jug and the P 38. I plan on taking it to display at a few shows and things.

Here is a pic of the installed guns

Looking good Ken. And that wallet is rather bulky isn't it, theres some definite additions to the stash in there.

OH yea right!  (Heavy sarcasm) There isn't anything green in there


MMM, plastic, even better. Wink

I am a Norfolk man and i glory in being so


On the bench: Airfix 1/72nd Harrier GR.3/Fujimi 1/72nd Ju 87D-3

  • Member since
    November 2009
  • From: SW Virginia
Posted by Gamera on Thursday, June 12, 2014 2:25 PM

checkmateking02

Gamera

CMK02: Very nice! Seems almost a shame to peel the mask off and throw it away considering the time and effort spent on it. I used the Eduard pre-cut ones on mine, but I still had to trim and adjust them to get a good fit.

 
I suppose I could leave the mask on? Confused

I was thinking you could carefully peel the mask off when done and then mount and frame it on the wall of your hobby room. I've seen worse modern 'art'... Wink

"I dream in fire but work in clay." -Arthur Machen


  • Member since
    October 2009
  • From: Oil City, PA
Posted by greentracker98 on Thursday, June 12, 2014 11:00 PM

A couple of "Almost Finished" Pics of the Jug Bubble Top. It's getting there

A.K.A. Ken                Making Modeling Great Again

  • Member since
    July 2004
  • From: Sonora Desert
Posted by stikpusher on Friday, June 13, 2014 1:14 AM

Ken, you are so close now! Nice!

Ok, today I finally had time to take and upload photos once I got my energy back.... so here we go. In the past few days I have been doing bits and pieces of detail painting and today I did my washes using teh Testors stuff. I bought their acrylic stuff and tried it today, but I am not overly impressed with it. It needs to be removed ASAP once applied while still damp or it stains the paint beneath it. Oh well, live and learn... and for some reason I got another wild idea to add the IP wiring to the back of the panel using some very fine wire and super glue... anyways here goes...
the front of the IP- I still need to decide if I am gonna use decals or drybrush the instruments themselves... decision and carrying that out tomorrow...

and the rear of the IP wired up. I still need to paint my work. It will be just slightly visible thru the nose glass so why not?

and now to the cockpit sidewalls after the wash. During the removal of the Testors Acrylic wash, some of the Vallejo acrylics that I had used on the detail work was removed as well. I am not overly impressed by those paints either. Tomorrow I will do paint touch up work to fix that stuff

And now for the cockpit work. Before I get any WTF/WTH feedback about the seat colors take a look at this photo of Flak Bait in the Smithsonian- the seat cushions really are a gawdawful yellow color...

so after getting the detail work and washes done on the flight deck and readio compartment I glued those portions to the bulkhead

and placed into the fuselage halves

thanks for looking...


F is for FIRE, That burns down the whole town!

U is for URANIUM... BOMBS!

N is for NO SURVIVORS...

       - Plankton

LSM


  • Member since
    November 2009
  • From: SW Virginia
Posted by Gamera on Friday, June 13, 2014 8:43 AM

Ken: Very nice- yeap almost there!

SP: Again nice work, the wired IP looks esp good. Not sure what happened with your Vallejo though. I love the stuff, it hand brushes like a dream. Did you thin it at all? I find often it is too thick, thinning it by about 10-30% helps it to go down evenly. I use a 50-50 water/Future mix with a drop or two of retarder I keep in a small squeeze bottle. I just squeeze out a little Vallejo, then add a drop of thinner, and mix it up with a toothpick.  

"I dream in fire but work in clay." -Arthur Machen


  • Member since
    September 2003
  • From: AandF in the Badger State
Posted by checkmateking02 on Friday, June 13, 2014 9:04 AM

Exceptional results, stik.  It looks really good.


  • Member since
    April 2006
  • From: ON, Canada
Posted by jgeratic on Friday, June 13, 2014 9:27 AM

Ken - great looking jug there.

I might be wrong, but the main port landing gear door seems to be facing backwards?

---------------------------------------

Stik - very impressive scratch building.  It's looking really  busy in there now.

regards,

Jack

JOIN OUR COMMUNITY!

Our community is FREE to join. To participate you must either login or register for an account.

SEARCH FORUMS
FREE NEWSLETTER
By signing up you may also receive reader surveys and occasional special offers. We do not sell, rent or trade our email lists. View our Privacy Policy.