SEARCH FINESCALE.COM

Enter keywords or a search phrase below:

Pearl Harbor '13 build thank you

25168 views
206 replies
1 rating 2 rating 3 rating 4 rating 5 rating
  • Member since
    September 2011
Posted by fightnjoe on Monday, July 22, 2013 10:36 AM

now for those following along.  ucoz is a bit quirky and when i tried to set up a test account i was less than impressed with what i had to do and the information needed.  

so....................

2nd attempt.

pearlharborsig.webs.com

still a bit of a long signup but less intrusive.  those things you dont wish to share you dont have to.

joe

Veterans,

Thank You For Your Sacrifices,

Never To Be Forgotten

Where you can find me:

Workbench on FaceBook  Google Plus  YouTube

  • Member since
    September 2011
Posted by fightnjoe on Thursday, July 25, 2013 3:27 PM

is everyone ready?????

we kick off tomorow.

looking forward to seeing everyones work.

joe

Veterans,

Thank You For Your Sacrifices,

Never To Be Forgotten

Where you can find me:

Workbench on FaceBook  Google Plus  YouTube

  • Member since
    April 2013
Posted by SchattenSpartan on Thursday, July 25, 2013 6:01 PM

My build schedule is filled out completely ATM, so I will join the fun later this year. I'm going to watch your progress untill I am able to start my projects for this GB though...

  • Member since
    September 2011
Posted by fightnjoe on Friday, July 26, 2013 9:38 PM

first of all the inspiration for the build.

picture just for discussion purposes.


this is the one and the only picture i have seen with armor in hawaii in 1941.


now the kit.


and so it begins.


joe

Veterans,

Thank You For Your Sacrifices,

Never To Be Forgotten

Where you can find me:

Workbench on FaceBook  Google Plus  YouTube

  • Member since
    December 2012
Posted by PeteG on Monday, July 29, 2013 4:13 PM

Well, I opened the kit and the aftermarket decals and gave it all a quick look over. The building will commence this week.

A little background. The kit comes from my late great next door neighbor, Bill. He was a very private man, but would go out of his way to help anybody in need. Lord knows he was over every time he saw me pick up a hammer. A Vietnam vet, Bill was a self employed carpenter who had the best workshop I ever saw. And the man was talented. I always knew Bill liked model railroads. I didn't know he liked scale models too. Although I had been in his house on numerous occasions over the years I never knew what was on the second floor and the in the attic. As I said he was very private. He had no real family left (at least no family that he would acknowledge) but a few close friends. Anyway, after his passing his executor (his best friend) showed me just what Bill had. Good lord, the man had a collection of both models and trains! I lovingly call him an organized hoarder. Because I knew and liked models, I offered to inventory the collection for the executor. He told me to take the kits I wanted as a thank you. I eventually took possession of the entire collection. Now when I build, I have Bill with me telling me everything I am doing wrong (and right).

So I am attaching some pics of the kit, the decals I purchased and some magazines, also inherited from Bill, that provide some nice reference.

I can't wait to get started

Pete

Pete Gottfried
Buffalo, NY 


  • Member since
    September 2011
Posted by fightnjoe on Monday, July 29, 2013 9:37 PM

that is going to be a good build for sure.


well work commenced for me.  

following the instructions i began with the bogies and the suspension.  in addition some parts went onto the lower hull.


now i did use school glue so i could take them apart and paint the black on the wheels.  the bogies are just dryfit into their spaces.

then as there is no real place that works on the tracks i began to put them together.  i went with the kit indies rather than the band tracks.


one side ready to go and will work on the other in the next few days.


there you have it where i am.

comments, critiques, and criticism are encouraged.


joe


Veterans,

Thank You For Your Sacrifices,

Never To Be Forgotten

Where you can find me:

Workbench on FaceBook  Google Plus  YouTube

  • Member since
    September 2011
Posted by fightnjoe on Saturday, August 3, 2013 8:39 PM

well progress is progress.  

some progress to report.

worked some on the interior.  added some white stuff.  added some green stuff.  fabricated a couple of things.  

so the update.  

i added some of the structures visible in the pictures that have been shown to me.  i also added some of the prominant riveting seen in the pictures.  the rivets are stretched sprue cut small and glued.  the white is assorted thickness of styrene sheet.

first the interior out of the lower hull.


and then dry fit in the lower hull to make sure things fit ok.


based on what i see i am pretty happy with this.  btw you will see the lower hull is now darker, yep i did some painting but not sure i like the way it is.  might redo it.  

comments, critiques, and criticisms are encouraged.


joe

Veterans,

Thank You For Your Sacrifices,

Never To Be Forgotten

Where you can find me:

Workbench on FaceBook  Google Plus  YouTube

  • Member since
    September 2003
  • From: AandF in the Badger State
Posted by checkmateking02 on Saturday, August 3, 2013 8:47 PM

My, that's good work, Joe--quite impressive.  

I've made a start on New Orleans; washed off the PE fret in lacquer thinner, per instructions, prior to forming and painting.  Nothing very picture-worthy, though.


  • Member since
    April 2013
Posted by SchattenSpartan on Saturday, August 3, 2013 8:53 PM

Very nice work! I love all that extra detail you put in there!

  • Member since
    September 2011
Posted by fightnjoe on Saturday, August 3, 2013 9:58 PM

many many thanks for the kind words.

being around you folks could give a guy a inflated ego.

joe

Veterans,

Thank You For Your Sacrifices,

Never To Be Forgotten

Where you can find me:

Workbench on FaceBook  Google Plus  YouTube

  • Member since
    September 2011
Posted by fightnjoe on Sunday, August 4, 2013 10:44 PM

well how about a second part of an update.


got to looking and had some bits to tidy up.

so went through and built a frame of sorts for the sidewalls and the nose.  also added just a few longer pieces to show the bolts in the tranny.  also added the seats and the driving yokes.


how she looks all together.


i also have a radio to add just a few bits to.


thinking that it is time to get some color on this.  


comments, critiques, and criticism are encouraged.


joe

Veterans,

Thank You For Your Sacrifices,

Never To Be Forgotten

Where you can find me:

Workbench on FaceBook  Google Plus  YouTube

  • Member since
    September 2003
  • From: AandF in the Badger State
Posted by checkmateking02 on Sunday, August 4, 2013 10:48 PM

No critiques--it simply looks great!

Since the insides are all, well, inside, are you going to brush paint the interior?


  • Member since
    September 2011
Posted by fightnjoe on Tuesday, August 6, 2013 7:50 AM

actually everything you see for the interior can be taken out of the hull and painted in subassembly forms.  

many thanks for the kind words.

joe

Veterans,

Thank You For Your Sacrifices,

Never To Be Forgotten

Where you can find me:

Workbench on FaceBook  Google Plus  YouTube

  • Member since
    December 2012
Posted by PeteG on Thursday, August 15, 2013 8:08 AM

An update and a question that I'm hoping someone in the build can answer. 

Assembly has gotten underway. I'm following the sequence laid out by the kit instructions and began with the bombs and the engine. All went together with little effort and after assembling and painting the bombs and rack I have stored it in a safe place, because the little props on the nose are just begging to be broken of. I'm surprised I didn't already do it. Bombs were airbrushed MM Olive Drab and rack was airbrushed with MM Steel. Next came the engine assembly, which was airbrushed with Floquil Silver. The heads/cylinders were brushed with a mix of Tamiya Metallic Gray and Semi-Gloss Black. They were then drybrushed with MM Steel to give some variation and depth. The prop has been given a coat of Floquil Old Silver. More weathering will be done as model progresses.

Now the question, form all I have been able to find, it appears the engine cover plate will match the cowling ring which is designated as "gold." Do you think I should just use MM Gold when the time comes? I've been researching and it's tough to find an exact answer. My Starfighter Decal color break shows Gold and the caption of the attached photo from P-26 Variants by Peter Bowers leads me to believe I should keep it gold. Any thoughts?

Here are some quick pics of my progress. Comments and criticisms are welcome. Have a good weekend.

Pete


Pete Gottfried
Buffalo, NY 


  • Member since
    September 2011
Posted by fightnjoe on Thursday, August 15, 2013 8:46 PM

pete looks like you are off to a good start.  as for the colorings, most of the information I have seen has the a/c in Hawaii as od/gray or nmf.  however I have seen pictures of aircraft on the ground with a scheme similar to the one you have in mind.  for me I would most likely go with either the testors or the mm version of the gold.  they should work fine.


as for me, I moved forward a little. 


update time.


first up.  painted the interior up.  still not glued in but close for sure.


and then mocked up with construction on the exterior almost finished.


so moving right along.  still have a couple of things that are not attached to the exterior but thinking they wont be attached until after paint.  also haven't gotten the mg's mounted.  going to paint them up and such before attaching them.


so again, comments, critiques, and criticism are encouraged.


joe


Veterans,

Thank You For Your Sacrifices,

Never To Be Forgotten

Where you can find me:

Workbench on FaceBook  Google Plus  YouTube

  • Member since
    September 2003
  • From: AandF in the Badger State
Posted by checkmateking02 on Friday, August 16, 2013 12:21 AM

Nice, Joe, very nice!


  • Member since
    December 2012
Posted by PeteG on Friday, August 16, 2013 5:44 AM

Joe-

Thanks for your help. Do you know anything about the cockpit? Hasegawa instructions call for neutral gray (except for the seat and foot controls) and I have seen a color picture with the cockpit in that color. However, I have also seen alot of B&W pics and the cockpit looks to be entirely in silver. Yesterday I sprayed the insides of the fuselage and the rest of the cockpit with gloss black and then a light coat of neutral gray (first time doing it this way) and it looks great. But now I'm wondering if I should just go over everything with either Floquil or Alclad. Oh and in my browsing, I found an Eduard photoetch early WWII seatbelt set that looks like it would be entirely appropriate for the kit. Nothing else to add, but this will dress her up a touch.

BTW, the flooring on your build looks excellent. How did you achieve the results. Very realistic.

Out of town all weekend. Sigh. No bench time. I'm really enjoying this build.

Pete

Pete Gottfried
Buffalo, NY 


  • Member since
    September 2011
Posted by fightnjoe on Friday, August 16, 2013 6:01 PM

thanks for the kind words.

for my peashooter i went with nmf.  if i remember i went with mm non buffing aluminum.  

now the flooring of the stuart was an oops that seems to have been a good deal.  i used a "sludge wash" that was to be a pin wash.  it spread quickly into all the recessed areas and so i said go with it.  i dabbed the wash to the floor and it soaked it up.  the result is what you see.  i believe i also did a bit of dabbing with a lighter color to give it variation.  in the end i dry brushed silver across it to give it highlights.  all in all it was just a matter of getting a decent result without really knowing why or even what i was doing.

joe

Veterans,

Thank You For Your Sacrifices,

Never To Be Forgotten

Where you can find me:

Workbench on FaceBook  Google Plus  YouTube

  • Member since
    September 2011
Posted by fightnjoe on Monday, September 2, 2013 7:38 PM

well after quite a dry spell i have some things to report.

first up was the painting.

i started out with flat black for shadows. i then sprayed od. trying to keep the panels in place. i then went with a od/flat white mix to gain some panel fading. i then went over the lines again with od/flat black.


up next was the rare decals that can be seen in the photo.


not happy with the pics. they dont do the color justice. i have also coated it with future. next up is a coat of future to prep for some weathering and such.

comments, critiques, and criticism are encouraged.

joe

Veterans,

Thank You For Your Sacrifices,

Never To Be Forgotten

Where you can find me:

Workbench on FaceBook  Google Plus  YouTube

  • Member since
    September 2003
  • From: AandF in the Badger State
Posted by checkmateking02 on Tuesday, September 3, 2013 5:08 PM

Coming along nicely, joe.  Good looking variegated paintwork!


  • Member since
    April 2013
Posted by SchattenSpartan on Tuesday, September 3, 2013 5:25 PM

Excellent work, Joe! I hope I can get to my Zero soon...

  • Member since
    September 2011
Posted by fightnjoe on Thursday, September 5, 2013 2:24 PM

many thanks for your kind words.

hopefully i can get more work on this soon.

joe

Veterans,

Thank You For Your Sacrifices,

Never To Be Forgotten

Where you can find me:

Workbench on FaceBook  Google Plus  YouTube

  • Member since
    September 2003
  • From: AandF in the Badger State
Posted by checkmateking02 on Thursday, September 5, 2013 11:38 PM

I've been working on a couple of other GB, trying to finish before the deadlines run out, but I've managed to do a little work on USS New Orleans.

I thought I'd start with the PE replacements.  That way, if anything fails, I'll know ahead of time, and I can still replace the bumbles with the kit parts.

Here's the PE sheet, from WEM.  Lot of stuff here, but much of it is for NO class cruisers later in the war, and won't be used.

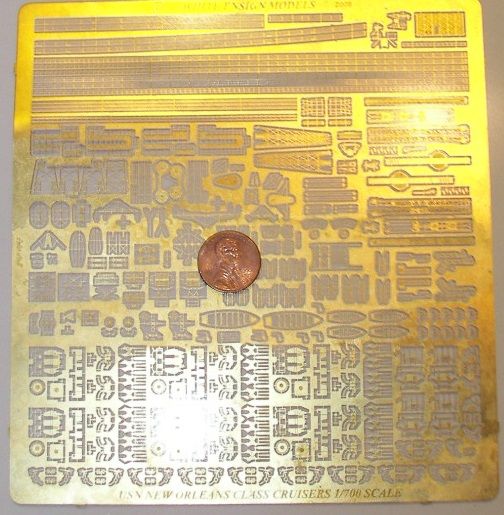
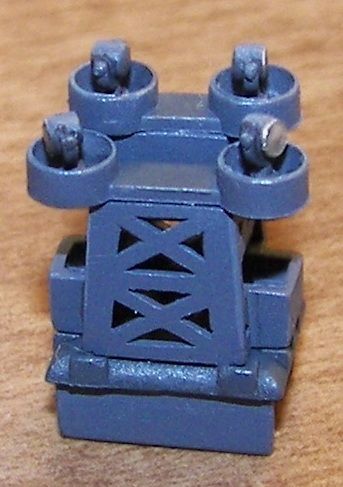
Above and to the left of the penny are the parts for the searchlight tower, which is where I started.

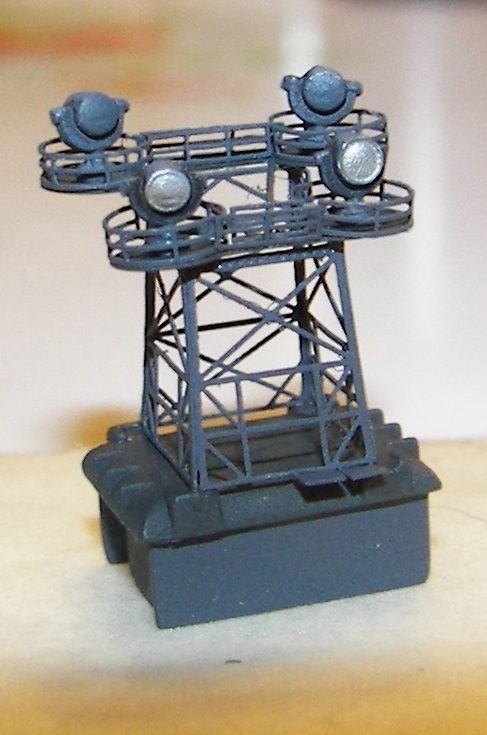
It took several attempts to get it done.  I tried superglue first, but the stuff sets up too quickly, and I didn't get the parts aligned properly, so I soaked the whole thing in fingernail polish remover till the superglue dissolved, then I reassembled the tower frame using white glue (plain old Elmers, thinned).  It turned out remarkably durable.

I formed the circular rails around the end of a drill bit, and tacked all the rails with white glue. 

Vertical surfaces are painted with Colourcoats 5-N Navy Blue, and I painted the horizontal surfaces with 20-B Deck Blue, also Colourcoats.  I overcoated everything with Floquil Flat.

I painted the searchlight lenses silver, then covered that with whiteglue after it cured.  Then I painted the body of the searchlight 5-N, and overcoated with Flat.  When that was dry, I poked a hole in the white glue "masks" on each light, soaked them in water till the white glue gave way.  That left the silver "lens" intact.  I put a drop of white glue over the "lens", and when dry, coated it with Future.  I put some lightened highlights on the searchlights, and ran a black acrylic wash over them to bring out details.

I think our cats don't like the NO boat.  Not only did one of them destroy the first kit I built, one of them dumped the water container overnight where I was soaking the searchlights.  I could only find three lights, so I scavenged the fourth from the remains of the previous built.

From now on, I've been locking the pieces away in snap-lid containers.

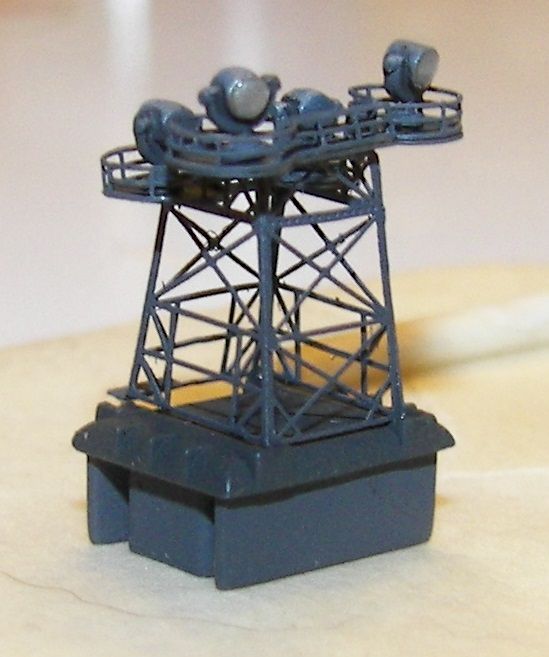
Anyway, here's the finished searchlight tower.


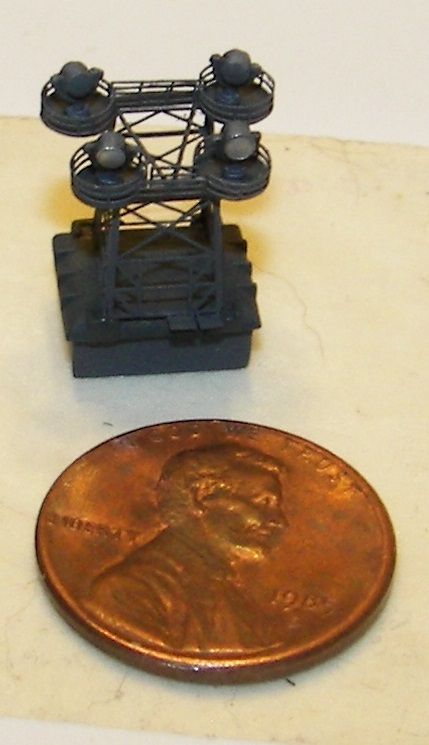
For comparison, below is a photo of the kit parts, from my previous, now-extinct NO boat. 

Presently, I'm working on the seaplane cranes.


  • Member since
    September 2011
Posted by fightnjoe on Friday, September 6, 2013 10:01 PM

off to a great start.  just to keep the animals away.  lost more than one build to them.

joe

Veterans,

Thank You For Your Sacrifices,

Never To Be Forgotten

Where you can find me:

Workbench on FaceBook  Google Plus  YouTube

  • Member since
    September 2011
Posted by fightnjoe on Friday, September 20, 2013 9:52 PM

well here i am yet again.  way too long between updates.

i spent a little time working on some subtle weathering.  in the pic the armor looks pretty pristine other than some streaking.  so with that in mind.

i used oils and several different shades.  would tell you what they were but to be honest i didnt pay much attention to the name just the shade.  not entirely displeased with it.  looks better in person.  only the second time i have tried to use oils for streaking and first time it came out looking somewhat like streaks.

comments, critiques, and criticism are encouraged.

joe

Veterans,

Thank You For Your Sacrifices,

Never To Be Forgotten

Where you can find me:

Workbench on FaceBook  Google Plus  YouTube

  • Member since
    September 2003
  • From: AandF in the Badger State
Posted by checkmateking02 on Saturday, September 21, 2013 5:10 PM

I think it looks good, Joe.  Can't suggest much about weathering since I'm not too adept at it and I don't do it much.

But maybe a little pin wash of some dark color would help add some depth around rivet and panels and such?  Again, take this for what it's worth, cuz I'm not real good at weathering.

I should have some progress pictures soon, too.  Been working on PE cranes and catapults for NO's aircraft.  Accomplished some painting today.


  • Member since
    September 2003
  • From: AandF in the Badger State
Posted by checkmateking02 on Saturday, September 21, 2013 5:15 PM

On another matter, Joe, would you be interested in a badge for this GB?  I was fooling around (probably when I should have been building!!) and came up with this:

It's pretty simple, but then, I'm not any better at computers than I am at weathering.


  • Member since
    September 2011
Posted by fightnjoe on Sunday, September 22, 2013 7:03 AM

i am thinking that badge fits very well.  many thanks for taking the time and the effort.  

joe

Veterans,

Thank You For Your Sacrifices,

Never To Be Forgotten

Where you can find me:

Workbench on FaceBook  Google Plus  YouTube

  • Member since
    September 2003
  • From: AandF in the Badger State
Posted by checkmateking02 on Sunday, September 22, 2013 1:36 PM

You're welcome!


  • Member since
    September 2003
  • From: AandF in the Badger State
Posted by checkmateking02 on Friday, September 27, 2013 5:38 PM

Another finished PE project for the NO boat, the sea plane cranes:

The vertical piece is from the kit.  The jib, wires and pulleys are PE from WEM

And a photo of the previous build crane, unmodified from the late, lamented build, visible in the lower left part of the picture. 


JOIN OUR COMMUNITY!

Our community is FREE to join. To participate you must either login or register for an account.

SEARCH FORUMS
FREE NEWSLETTER
By signing up you may also receive reader surveys and occasional special offers. We do not sell, rent or trade our email lists. View our Privacy Policy.