SEARCH FINESCALE.COM

Enter keywords or a search phrase below:

FineScale Modeler Heroes & Villains Group Build 2014

81030 views
849 replies
1 rating 2 rating 3 rating 4 rating 5 rating
  • Member since
    September 2012
Posted by GMorrison on Monday, March 3, 2014 11:44 PM

Fantastic job. Well done, sir!

 Modeling is an excuse to buy books.


  • Member since
    April 2003
Posted by shivinigh on Monday, March 3, 2014 5:57 PM

absolutely stunning piece of work there Jack. My applause and hats off to you.

Due to technical difficulty (I ran out of plastic strip and had to wait for the LHS to order some more) Spidey is a little behind schedule, But I have lots now and can finish the leg and hands.


  • Member since
    April 2006
  • From: ON, Canada
Posted by jgeratic on Monday, March 3, 2014 12:53 PM

Red Sonja is now done, all decked out and ready to smash some skulls - lol!

Tim and Aaron, thanks for hosting this.  A really different theme this one, and not sure I could even begin to guess what the next group build will be if it is going to top this one in terms of uniqueness.  Anyhow, on to the pics...

regards,

Jack

  • Member since
    November 2009
  • From: SW Virginia
Posted by Gamera on Monday, March 3, 2014 11:40 AM

Looks great Jack, just like it was made for the figure.

"I dream in fire but work in clay." -Arthur Machen


  • Member since
    April 2006
  • From: ON, Canada
Posted by jgeratic on Sunday, March 2, 2014 11:02 PM

Just gave Red an overall flat spray.   Tomorrow some  touch ups and then should be ready for the final photos.  

In the meantime, here is how I solved the belt and method for slinging the sword:

regards,

Jack

  • Member since
    December 2002
  • From: Bury St Edmunds, Suffolk, England
Posted by Bish on Friday, February 28, 2014 12:25 PM

Interesting idea, I would never of thought of that. I would never dream of trying it on vadar, especially now, but I will defiantly be watching to see how its done.

What you say about a point of reference makes sense. If the source omitting the light is not in the scene, it can be hard for people to understand what exactly is going on.

And you source of light for this one is the sun, now that should be interesting.

I am a Norfolk man and i glory in being so


On the bench: Airfix 1/72nd Harrier GR.3/Fujimi 1/72nd Ju 87D-3

Moderator
  • Member since
    September 2011
Posted by Tim Kidwell on Friday, February 28, 2014 12:00 PM

Bish
So if I understand it right, the grey will help you determine what areas would be in sun light and what in the shade and then paint accordingly. Have I got that right.

Right. Essentially it acts as a visual reference, helping me see where the light is coming from. Another method I use is to keep a small Maglite handy and hold it from the position I want the light to shine on a figure--usually directly overhead. The nice part about using the lighter primer is that it's a constant reminder.

I've painted a couple of figures using other lighting positions. However, as I discussed with Aaron yesterday, unless there is a point of reference on the figure (a lantern, lightsaber, glowing gem, etc.) it usually leaves the viewer wondering what the hell the painter was thinking. It doesn't help that I'm not very good at it yet.

By way of example for this last, consider a scene from The Empire Strikes Back. Remember Luke and Vader's duel in Cloud City's carbon-freezing chamber? It's a very dark scene, but when they ignite their lightsabers, that are lit up by either blue or red, but the farther away from the source of the light (the sword in this case) the effect lessens until you they are awash in shadow.

--

Timothy Kidwell
tkidwell@firecrown.com
Editor
Scale Model Brands
Firecrown Media


  • Member since
    December 2002
  • From: Bury St Edmunds, Suffolk, England
Posted by Bish on Friday, February 28, 2014 9:56 AM

Tim, nice to see some paint on this. Will be looking forward to seeing where you go from here.

So if I understand it right, the grey will help you determine what areas would be in sun light and what in the shade and then paint accordingly. Have I got that right.

I am a Norfolk man and i glory in being so


On the bench: Airfix 1/72nd Harrier GR.3/Fujimi 1/72nd Ju 87D-3

  • Member since
    November 2009
  • From: SW Virginia
Posted by Gamera on Friday, February 28, 2014 8:52 AM

Yeap, now that they're primed I'm looking forward to seeing the paint slapped on!

"I dream in fire but work in clay." -Arthur Machen


Moderator
  • Member since
    September 2011
Posted by Tim Kidwell on Thursday, February 27, 2014 10:00 PM

Hi Gary,

I'm glad you're coming along with the rest of us on this ride. It's been bumpier than I'd hoped, but rewarding all the same.

Thanks! Nothing primes your Squats and 23rd Light Dragoons like black. Oh yes, my basement is full of the materials to make miniatures wars ...

However, I'm not stopping with black on Conan. I'm going to come back through after I've cleaned up my work and spray light ghost gray from directly overhead. That'll give me a reference for the noon sun.

Thanks for commenting!

Tim

--

Timothy Kidwell
tkidwell@firecrown.com
Editor
Scale Model Brands
Firecrown Media


GAF
  • Member since
    June 2012
  • From: Anniston, AL
Posted by GAF on Thursday, February 27, 2014 8:13 PM

Tim,

Just following along, but your work on Conan looks great!  Must be an old Grognard using black as a base primer.  Wink

Gary

Moderator
  • Member since
    September 2011
Posted by Tim Kidwell on Thursday, February 27, 2014 2:39 PM

Thanks, Gamera. Textured paint? I'm curious to see how that turns out.

Here are a couple of pics of Conan, Belit, and me in the paint booth.

And the first coat of primer is down:

The modifications I made to Conan's fur kilt disappeared under the primer. YAY! Elbow and bicep modifications look pretty good. YAY! Belit's neck still needs a little attention, but isn't far off. YAY! All in all, I'm happy with today's progress. So, some extra filler, a little sanding, a touch-up coat of black primer, then gray primer shot from directly overhead.

--

Timothy Kidwell
tkidwell@firecrown.com
Editor
Scale Model Brands
Firecrown Media


  • Member since
    November 2009
  • From: SW Virginia
Posted by Gamera on Thursday, February 27, 2014 9:24 AM

Thanks guys, I was thinking about trying to post some better photos but I'm close enough to done now I think I'll just wait to post the finished ones. Looks like I'll overrun the initial deadline of the end of the month but I should have Picard at least finished this weekend (cross your fingers).

Tim: That looks fantastic esp for 20 mins of work! I just used some textured paint which I hope with a little paint will look sorta like the carpet on the 1701D's bridge and some sand for the Romulan.  

"I dream in fire but work in clay." -Arthur Machen


Moderator
  • Member since
    September 2011
Posted by Tim Kidwell on Thursday, February 27, 2014 9:04 AM

A quick update on Conan's base:

I drilled the holes for the treenails in the deck with a pin vise. I used toothpick tips for the treenails themselves and sanded them flush.

Went out to the craft store last night and picked up some black embroidery thread. It was the perfect size for caulking the deck and saved me from dying my own.

And here's the base with the caulk finished. I didn't have to use glue. However, after I stain the deck, I'll probably go back and tack down the ends, just to be safe. Not bad for 20 minutes of work this morning!

--

Timothy Kidwell
tkidwell@firecrown.com
Editor
Scale Model Brands
Firecrown Media


  • Member since
    April 2006
  • From: ON, Canada
Posted by jgeratic on Thursday, February 27, 2014 1:29 AM

Gamara - I like the same things about your figures as others have pointed out, but particularly Picard's skin tones.  The highlights that I'm seeing on his face an palm look really great.

Tim - can't wait to see some  paint bring your two figures to life, and how you will tackle the close proximity of the two subjects.

Aaron - thx, and hope the inspired scratch building results in a super build  for you.  

regards,

Jack

  • Member since
    March 2003
  • From: Towson MD
Posted by gregbale on Wednesday, February 26, 2014 2:41 PM

Gamera - Captain Picard is looking awesome, but the Romulan Commander is really striking (particularly in that "J'accuse!" pose). Great job on the tunic texture.

Tim - Great work on the tricky build for Conan and Belit. Can't wait to see it primed and painted up.

Aaron - Good to see work advancing on the Judge. Looking forward to your scratchbuilt additions!

Thanks to all for your comments on Superman. The brickwork was a nice relaxingly-tedious occupation while waiting for various bits to come together.

Greg

George Lewis:

"Every time you correct me on my grammar I love you a little fewer."
 
  • Member since
    November 2009
  • From: SW Virginia
Posted by Gamera on Wednesday, February 26, 2014 12:37 PM

Tim & Aaron: Those look great guys, really looking forward to seeing them all painted up.

And thanks, sorry about the horrible photos, funny something can look like a decent photo on the tiny little cell phone screen and then look awful blown up on a monitor!

The pattern on the Romulan tunic was thankfully molded on. Just painted the whole thing medium grey and then hit it with a sludge wash of black, wiped off the excess and looks pretty good to me.

Yeah, frelling, I'm a big fan of the show, funny you Tim are about the six or so FS fan I've encountered, everyone I know is a Trek fan but try to get them to watch something different!

"I dream in fire but work in clay." -Arthur Machen


Moderator
  • Member since
    April 2006
  • From: my keyboard dreaming of being at the workbench
Posted by Aaron Skinner on Wednesday, February 26, 2014 11:51 AM

After cleanup and another coat of primer, I actually made a start on painting Dredd. I have a base coat of darkish green on the boots, gloves, and knee and elbow pads. The FSM workshop has the look of a grisly MegaCity 1 butchershop now.

Great looking work showing up now as the deadline draws near.

Greg, Supes looks great and the base is terrific.

Jack, Sonja is awesome. You've inspired me to do more scratchbuilding on Dredd than I had intended.

Gamera, your Picard and Romulan look cool.

Shiv, I can't wait to see Spidey done.

Tim, yours ain't bad either.

Cheers, Aaron

Aaron Skinner

Editor

FineScale Modeler

Moderator
  • Member since
    September 2011
Posted by Tim Kidwell on Wednesday, February 26, 2014 11:30 AM

Almost ready for priming!

Filled the seam around Belit's neck this morning and finished up Conan's left arm last night.

I added a bead around the top of both of Belit's armlets using .010" styrene rod. I'll do the same for the bottoms after her arms are attached.

I have to let the last of the Green Stuff set today. So, I think I'll get in the spray booth tomorrow!

--

Timothy Kidwell
tkidwell@firecrown.com
Editor
Scale Model Brands
Firecrown Media


Moderator
  • Member since
    September 2011
Posted by Tim Kidwell on Wednesday, February 26, 2014 11:26 AM

Looking good, Gamera!

The skin tones are really coming along. Did you freehand the pattern on the Romulan's tunic or is that molded on?

Ha! Frelling. Nice to know there's another Farscape fan on the Forum other than Aaron and me. (Kid Kidwell, Goodwife Kidwell, and I are re-watching season three this week.)

--

Timothy Kidwell
tkidwell@firecrown.com
Editor
Scale Model Brands
Firecrown Media


  • Member since
    November 2009
  • From: SW Virginia
Posted by Gamera on Wednesday, February 26, 2014 8:16 AM

Greg: As Jack pointed out great work there on the wall too, Supes looks so good I didn't even notice all the work you put into the brickwork!

I'm not too far off now, all the major colours are laid in and I'm slowly painting details. Pretty happy but did go in and retouch the Captain's lips so it doesn't look like he's wearing lipstick... Indifferent

Looking at Jack's custom built scabbard started me thinking why the Romulan figure didn't come with a holster for her sidearm. Still I guess it doesn't matter since the blasted disruptor is still AWOL, no frelling clue where the thing vanished off to. There's a little sand on her boots there where I was trying to fit her to the groundwork on the base I'm doing. 

"I dream in fire but work in clay." -Arthur Machen


  • Member since
    April 2006
  • From: ON, Canada
Posted by jgeratic on Wednesday, February 26, 2014 1:52 AM

Bish, Greg & Gamera, again thx - yes, the sheath and dagger is all scratch built.  In hind site, I should of did this and the thigh armour as a sub-assembly, so the lead foil strip could actually wrap behind it,  but then it would of been covered in a number paint layers.

regards,

Jack

  • Member since
    April 2006
  • From: ON, Canada
Posted by jgeratic on Wednesday, February 26, 2014 1:41 AM

Greg, love what you did with this vintage kit.  I like the blue you choose, more apt for the man of steel.  That brick work also needs mentioning, just awesome stuff there.

regards,
Jack

  • Member since
    December 2002
  • From: Bury St Edmunds, Suffolk, England
Posted by Bish on Tuesday, February 25, 2014 4:08 PM

Jack, again, that is amazing. Did you really say that sheath was scratch built. And that hair looks perfect, so well blended with the rest. Can't wait to see this done.

Greg, that's really really nice. I agree about the face. And the added base sets it off nicely.

Great work guys.

I am a Norfolk man and i glory in being so


On the bench: Airfix 1/72nd Harrier GR.3/Fujimi 1/72nd Ju 87D-3

Moderator
  • Member since
    September 2011
Posted by Tim Kidwell on Tuesday, February 25, 2014 2:07 PM

Greg, Supes has been added to the Hall of Fame. Make sure to choose your ribbon (badge).

Heroic work! You've shown us that an old kit doesn't have to mean "unbuildable." I do like the in-flight pic.

--

Timothy Kidwell
tkidwell@firecrown.com
Editor
Scale Model Brands
Firecrown Media


  • Member since
    April 2003
Posted by shivinigh on Tuesday, February 25, 2014 1:59 PM

Thanks for the thumbs up Greg, here's hoping that I don't disappoint

.Superman turned out great, Lex Luthor better watch out cause the man of steel is here. Thumbs up for the great work.


  • Member since
    November 2009
  • From: SW Virginia
Posted by Gamera on Tuesday, February 25, 2014 12:00 PM

Wow, great work there Greg! The extra work you did on the face and head really add a lot to the figure!

"I dream in fire but work in clay." -Arthur Machen


  • Member since
    March 2003
  • From: Towson MD
Posted by gregbale on Tuesday, February 25, 2014 11:35 AM

Shiv - Beautiful work on the masonry! If I had a Spidey-sense, it would be tingling to see the final build. Keep up the good work!

Jack - Red just keeps looking better and better. Your work is truly masterful.

As promised, my finished Man Of Steel. First, sans-base (an in-flight shot, as it were):

With base added:

The obligatory close-up:

I found an old (unopened) bottle of Testors MM Acrylic Midship Blue in my paint drawer, which turned out to be exactly the shade I'd had in mind for Supe's costume. Reds and yellows were mainly Testors square-bottle enamels. Shading/highlighting (and weathering on the bricks) done mostly with artists' oils. Base is constructed straight OOB except for the addition of the nameplate printed from the web.

Build was great fun, learning and relearning some neat techniques. Thanks to all for useful advice and encouragement along the way.

Greg

George Lewis:

"Every time you correct me on my grammar I love you a little fewer."
 
  • Member since
    November 2009
  • From: SW Virginia
Posted by Gamera on Tuesday, February 25, 2014 7:36 AM

Jack, she looks great- you can't rush perfection!

"I dream in fire but work in clay." -Arthur Machen


  • Member since
    April 2006
  • From: ON, Canada
Posted by jgeratic on Monday, February 24, 2014 4:44 PM

Shiv - bold colour choice on the bricks, should work well when Spidey enters the scene.

--------------------------------------------

Red Sonja,  I too thought she would be done this weekend.  Little details here and there have slowed things down:
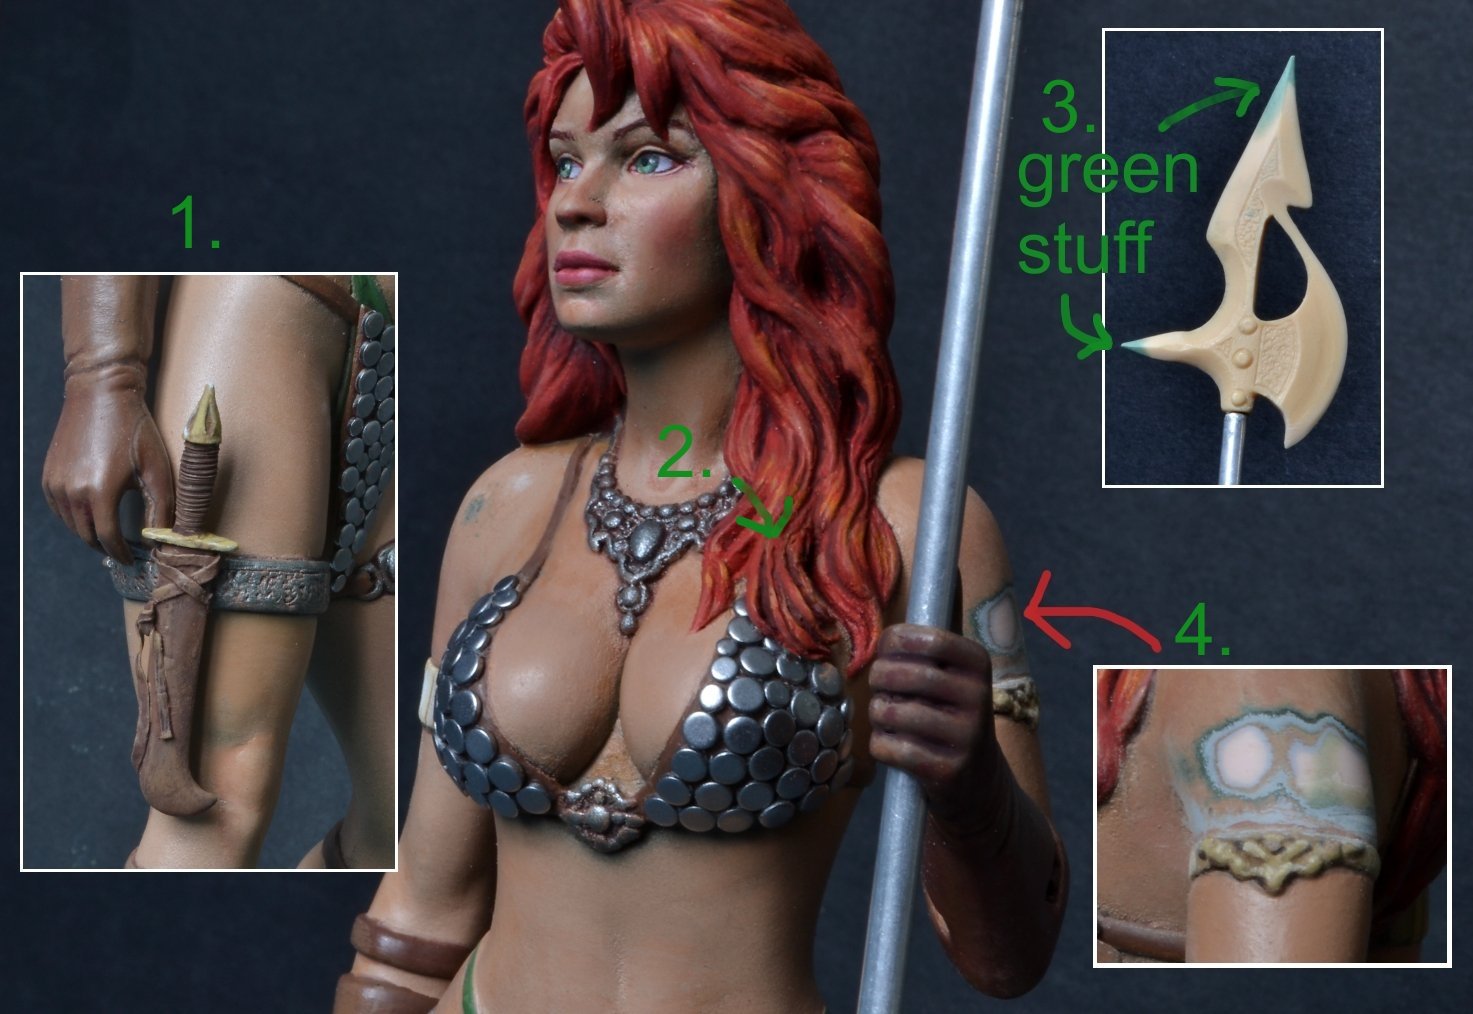
1.) - new dagger made to be more compact.  The original scratchbuilt sheath was retained, but it's length was shortened and made narrower.  Lead bindings were added to make it appear that it is strapped to her thigh armour.  

2.) - sculpted hair over the armoured discs, painted and complete.

3.) - green stuff applied to refine the sharp points on the staff weapon.

4.) - left arm attachment, still ended up with a slight gap.  Brushed on three layers of liquid surfacer, some sanding, followed by a coat of paint and more sanding.  

regards,

Jack

JOIN OUR COMMUNITY!

Our community is FREE to join. To participate you must either login or register for an account.

SEARCH FORUMS
FREE NEWSLETTER
By signing up you may also receive reader surveys and occasional special offers. We do not sell, rent or trade our email lists. View our Privacy Policy.