SEARCH FINESCALE.COM

Enter keywords or a search phrase below:

Ju 87 Stuka GB

173848 views
2599 replies
1 rating 2 rating 3 rating 4 rating 5 rating
  • Member since
    April 2005
Posted by Thunderbolt379 on Sunday, October 5, 2014 6:17 AM

Hi Bish, that's a big Ten-Four, Nightfighters kicks off at the end of this month, it's gonna be great!

I might try to get to the spinner cone tomorrow, and make a start on the canopy, then hopefully it'll be straightforward to the end.

Cheers, M/TB379

http://worldinminiature.blogspot.com/

  • Member since
    January 2013
  • From: Athens, Greece
Posted by Zvezda1980 on Sunday, October 5, 2014 6:20 AM

Mike, all the pics and references I have show yellow identification cowlings.

Perhaps there were some aircraft that did not have such colors, but I think our III/StG 77 planes were painted yellow from their jumping base in Bulgaria, since the start of operations. I will check further now that you mentioned it.

  • Member since
    December 2002
  • From: Bury St Edmunds, Suffolk, England
Posted by Bish on Sunday, October 5, 2014 6:32 AM

Mike, good news. I have it on my build list for next year, which is now officially full (again).

I believe those yellow markings were standard for Operation Marita, if you have seen the newer Revell Ju 88A-4, the box art features an aircraft with yellow cowlings and there are images of it on Me 110's and Do 17's.

I am a Norfolk man and i glory in being so


On the bench: Airfix 1/72nd Harrier GR.3/Fujimi 1/72nd Ju 87D-3

  • Member since
    September 2014
Posted by Teddz on Sunday, October 5, 2014 6:49 AM

I worked a bit on the Stuka yesterday... didn't get much done, just re-scribing and re-drilling the rivets anywhere they were sanded. Still have about 1/2 of the plane left to do, but once done and primed, it should look great.

  • Member since
    December 2002
  • From: Bury St Edmunds, Suffolk, England
Posted by Bish on Sunday, October 5, 2014 7:23 AM

Look forward to seeing some pics Teddz.

I am a Norfolk man and i glory in being so


On the bench: Airfix 1/72nd Harrier GR.3/Fujimi 1/72nd Ju 87D-3

  • Member since
    September 2014
Posted by Teddz on Sunday, October 5, 2014 8:36 AM

maybe later tonight... I have to finish up the billet aluminum housing for the SHIELD logo on my Bus build I started earlier. Taking a break from the lathe to make some coffee, check the milliput on the current builds and check emails. Then it's back to my dungeon until I'm done with the housing and have the logo components cut. Once I take it off the lathe, finding the center again is very difficult, so once the billet is on, it doesn't come off until the part is done. The lathe needs to be free tomorrow so I can make some parts for the CNC project.  

  • Member since
    December 2002
  • From: Bury St Edmunds, Suffolk, England
Posted by Bish on Sunday, October 5, 2014 9:01 AM

WOW, sounds like your keeping busy.

I am a Norfolk man and i glory in being so


On the bench: Airfix 1/72nd Harrier GR.3/Fujimi 1/72nd Ju 87D-3

  • Member since
    September 2005
  • From: Illinois: Hive of Scum and Villany
Posted by Sprue-ce Goose on Sunday, October 5, 2014 4:29 PM

Teddz

maybe later tonight... I have to finish up the billet aluminum housing for the SHIELD logo on my Bus build I started earlier. Taking a break from the lathe to make some coffee, check the milliput on the current builds and check emails. Then it's back to my dungeon until I'm done with the housing and have the logo components cut. Once I take it off the lathe, finding the center again is very difficult, so once the billet is on, it doesn't come off until the part is done. The lathe needs to be free tomorrow so I can make some parts for the CNC project.  

Please pardon the interruption, but that comment piqued my curiosity. What size lathe are you using? 
Tags: MD 65
  • Member since
    September 2014
Posted by Teddz on Sunday, October 5, 2014 5:01 PM

it's a JET series 1550 engine lathe with about a 5 1/2' travel and it's just under 8' long.

  • Member since
    September 2005
  • From: Illinois: Hive of Scum and Villany
Posted by Sprue-ce Goose on Sunday, October 5, 2014 5:28 PM

Teddz

it's a JET series 1550 engine lathe with about a 5 1/2' travel and it's just under 8' long.

Thank you !
I'd love to have room for something that size.
Tags: MD 65
  • Member since
    October 2008
  • From: Georgia
Posted by Rigidrider on Monday, October 6, 2014 11:09 AM

Mike (Thunderbolt) is that the "defenders five" I saw listed? If so great! Love night fighters...

When Life Hands You A Bucket Of Lemons...

Make Lemonade!

Then Sell It Back At $2 Bucks A Glass...

  • Member since
    December 2004
  • From: Houston, Texas
Posted by panzerpilot on Monday, October 6, 2014 1:10 PM

A night fighter GB? Interesting. I missed the last one a few years back. I just happen to have a 109 night fighter in the stash. Hmmm...

-Tom

  • Member since
    April 2005
Posted by Thunderbolt379 on Monday, October 6, 2014 6:13 PM

Yes it is, guys -- three weeks out from start at this time and a year to build, it's going to be great!

M/TB379

http://worldinminiature.blogspot.com/

  • Member since
    October 2008
  • From: Georgia
Posted by Rigidrider on Tuesday, October 7, 2014 10:25 AM

I think your right! Thanks...

Doug

When Life Hands You A Bucket Of Lemons...

Make Lemonade!

Then Sell It Back At $2 Bucks A Glass...

  • Member since
    April 2005
Posted by Thunderbolt379 on Wednesday, October 8, 2014 3:09 AM

A little progress to report, I was working and out yesterday and working earlier today, so only a little has happened. The payload is assembled and most locator holes are now masked with rubber solution, I've mounted the wing gun blisters and sprayed the spinner cone a mixed RLM 24 (well, a match for the blue on the fuselage codes at least). I've prepped the dive brakes for spraying off the bird, and am starting on the canopy. The decals that go on the inside may be a bit superfluous, as they are not RLM 02, and the Eduard mask set seems to have everything covered, albeit from the outside.

Does anyone have any experience with the decals for struts on the inside? I've read a few reviews and one reviewer called them very conspicuous unless "cut," but it was unclear if he was referring to the carrier film. Any thoughts?

Cheers, M/TB379

http://worldinminiature.blogspot.com/

  • Member since
    September 2014
Posted by Teddz on Thursday, October 9, 2014 1:14 PM

While I was working on finishing the logo for my SHIELD project, I got to thinking how I could incorporate some more of the T4 billet I have for the Junkers build... I took a good look at the logo and though that would look awesome on the base with raised logo and lettering (either polished or brushed, don't know yet) and a high gloss black enamel background. I'll probably do that after it's done and I'm making the base for it.

  • Member since
    December 2002
  • From: Bury St Edmunds, Suffolk, England
Posted by Bish on Thursday, October 9, 2014 2:00 PM

Sounds like an interesting idea, look forward to seeing that.

I am a Norfolk man and i glory in being so


On the bench: Airfix 1/72nd Harrier GR.3/Fujimi 1/72nd Ju 87D-3

  • Member since
    March 2010
  • From: MN
Posted by Nathan T on Thursday, October 9, 2014 11:26 PM

Man, time to get cracking here again! I've been making progress and have the cockpit sprayed and weathered up. Its now all tucked away in the fuselage. Here's the only shot before closing things up, pre seat belt installation:

The instrument panel came from the pe set provided in the kit. It has you sandwich dials from the decal sheet between two pe pieces. I thought it looked prett great, better than just dry brushing a plastic panel. The only thing is the decal dials were just printed a bit over scale, but it worked. Not quite as crisp as a acetate sheet you normally get in resin sets:

All buttoned up now:

I also got the cowling pieces glued together with minimal seams, and thinned the sides where you can see through the little scoops:

Dry fitting the cowling to the fuselage shows a great fit with no gaps, unlike the fidely Hasegawa cowlings. I can't say the same for the wings though. Started out with gaps like this at the root:

Got them to eventually look like this:

The leading and trailing edges were tougher. The trailing edge made me cut out the flaps and aileronns at the begining of the build:

Got some work to do on the bottom too:


  • Member since
    March 2010
  • From: MN
Posted by Nathan T on Thursday, October 9, 2014 11:37 PM

..more... The Oil cooler under the nose is fairly poor in the kit. Soft detail and it just doesn't fit the profile of the inside cowling like the real thing. There should be no gaps, so I used a strip of sprue around the cooler and it turned out like this:

You can still see a small gap on the bottom and sides, but its better. The back side is not like the real thing either, but it faces backwards so I'm trying not to worry about it:

Now on to filling gaps. This kit has its highs and lows. I bought it because I thought it would be alot better than the Hase kit. Turns out they are probably a wash either way. This Italeri kit does have a much better detailed cockpit, and does come with the nice little pe fret and some awesome and great preforming decals. But the fit of the wings all around is poor, and in tough places to try and repair. Who else is building Italeri Stukas, and what are your thoughts?


  • Member since
    December 2002
  • From: Bury St Edmunds, Suffolk, England
Posted by Bish on Friday, October 10, 2014 12:29 AM

Great work Nathan, some nasty gaps at those wing joins.

I am a Norfolk man and i glory in being so


On the bench: Airfix 1/72nd Harrier GR.3/Fujimi 1/72nd Ju 87D-3

  • Member since
    April 2005
Posted by Thunderbolt379 on Saturday, October 11, 2014 1:53 AM

I've not had much progress to show lately, it's the heavy season for marking in this semester -- but, I've got a few bits and pieces done. The mid fixed portion of the canopy took a little fiddling, the armoured headrest of the pilot seat needed to be filed/scraped down a little in size to allow the fixed canopy to mount snuggly over it, and of course the scraped areas needed to be repainted.Here's the state of canopy and masking:

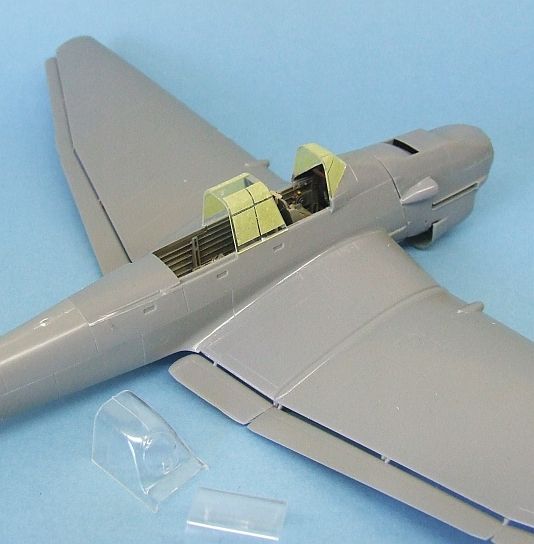
I'll press on, I'm thinking of masking the other two parts off the model, then securing them with whiteglue so I can slide them after painting. I have the MG to finish painting and install too.

I satin coated the blue spinner cone, so next up for that is to mask the blue portion. I have all locator holes and points now treated with rubber solution, so as soon as the canopy is done I can get her into the paintshop.

With regard to markings, I've done a lot of searching online and have found aircraft that seemed to be in the Crete campaign both with and without the yellow cowling. If they have the cowling in yellow, the rudder will be as well, it seems. I found a colour profile that seems to be an aircraft of the same unit, III/StG 77, but whether Stab or not I'm uncertain. Codes have been close, too. My gut tells me to trust Revell Germany, they got the markings for the desert snake spot-on, so why would they stumble on something as obvious as the yellow cowl and rudder for the Greece option? There's a practical aspect to the choice as well, if I'd been going to do a yellow cowling I'd have painted it before mounting to the bird...

I'm hoping to get to the canopy interior colour and the overall preshade in a couple of days (I'll be away tomorrow...)

Cheers, Mike/TB379

http://worldinminiature.blogspot.com/

  • Member since
    February 2010
  • From: New Jersey
Posted by 68GT on Saturday, October 11, 2014 10:19 AM

They all have 65 on their undersides as of this morning.

On Ed's bench, ???


  • Member since
    December 2002
  • From: Bury St Edmunds, Suffolk, England
Posted by Bish on Monday, October 13, 2014 3:49 PM

That's good news 68, now for the splinter.

Nice work there mike.

I would guess that those aircraft used in the Crete campaign without the yellow markings may have been replacements for losses during the Balkans campaign and there was no time to add them.

I am a Norfolk man and i glory in being so


On the bench: Airfix 1/72nd Harrier GR.3/Fujimi 1/72nd Ju 87D-3

  • Member since
    April 2005
Posted by Thunderbolt379 on Monday, October 13, 2014 5:14 PM

Interesting thought, I hadn't considered that... kay, that's the story I'll stick with!

Hoping to finish the canopy very soon, then start to hit her with paint.

M/TB379

http://worldinminiature.blogspot.com/

  • Member since
    March 2012
  • From: Corpus Christi, Tx
Posted by mustang1989 on Tuesday, October 14, 2014 8:29 AM

Nathan T:Good work so far. Man I see you are battling it out with the seam blues. I'm building a Revell F4U-4 Corsair right now and if it weren't a build for a good friend of mine I would have already thrown it in the trash.

Thunderbolt:Great work so far as always.

68GT:Your assembly line looks great. 4 at a time is something I would never consider. I'd need a work bench the size of my garage. lol


 Forum | Modelers Social Club Forum (proboards.com) 

  • Member since
    March 2010
  • From: MN
Posted by Nathan T on Tuesday, October 14, 2014 10:52 PM

Thanks Mustang. Seams weren't that bad actually. Got them all sanded and worked out. But the issue now is the landing light cut outs for both the top and bottom half of the wings don't line up any more cause I pushed the top half over a bit to close the gap at the root. So now I have to glue in the lens and fill around it, and then polish the lens out again....tedious...Thats why I hate landing lights in the leading edge! Guess I just need more practice at it. I'll have to take out a page from Thunderbolt's build!


  • Member since
    March 2012
  • From: Corpus Christi, Tx
Posted by mustang1989 on Wednesday, October 15, 2014 4:12 AM

Thunderbolt did an awesome job on his light for sure. I fabricated one myself on here and had about the same results. Just can't leave an empty hole in the leading edge of a wing. What were those model manufacturers thinking?


 Forum | Modelers Social Club Forum (proboards.com) 

  • Member since
    December 2004
  • From: Houston, Texas
Posted by panzerpilot on Wednesday, October 15, 2014 11:19 AM

Looking really nice, Nathan. Excellent job on that cockpit!

-Tom

  • Member since
    April 2005
Posted by Thunderbolt379 on Saturday, October 18, 2014 6:51 AM

Okay, tiny update, I finished masking the canopy. This is the most complex Eduard set I've ever worked with, and but for a couple of tidy-up strips of tape, the set fitted remarkably. The gun is masked with rubber solution and the sliding parts of the canopy are adhered with rubber solution, not very strongly, so I'll have the option of relocating them. I may have to secure them more strongly, I'm afraid the airbrush will blow them off!

Target for tomorrow -- final checkover, there's a tiny intake to add on the port side, possibly mask the mainwheels. Wash and air dry the model, then get the 02 onto the canopy and preshade the whole airframe.

M/TB379

http://worldinminiature.blogspot.com/

  • Member since
    March 2012
  • From: Corpus Christi, Tx
Posted by mustang1989 on Saturday, October 18, 2014 7:07 AM

Man I forgot how much masking off was involved in this canopy. Sheesh, it's as much as a Ju-88!!!!!!!!!!


 Forum | Modelers Social Club Forum (proboards.com) 

JOIN OUR COMMUNITY!

Our community is FREE to join. To participate you must either login or register for an account.

SEARCH FORUMS
FREE NEWSLETTER
By signing up you may also receive reader surveys and occasional special offers. We do not sell, rent or trade our email lists. View our Privacy Policy.