SEARCH FINESCALE.COM

Enter keywords or a search phrase below:

FineScale Modeler Orphaned Armor Group Build 2014

92122 views
1167 replies
1 rating 2 rating 3 rating 4 rating 5 rating
  • Member since
    December 2002
  • From: Bury St Edmunds, Suffolk, England
Posted by Bish on Tuesday, December 23, 2014 1:30 PM

Gamera

Thanks Bish.

Sorry the photos are a little fuzzy, she's Nationalist Chinese, a white sunburst on a light blue disk. They bought a small number of T-26s like this from the USSR before Stalin switched his support from Chaing Kai-Shek's Nationalists to Mao's Communists hence orphaned in this case.  

O yes, now I see it. I could not quite make it out on the kit. Very small insignia isn't it.

I am a Norfolk man and i glory in being so


On the bench: Airfix 1/72nd Harrier GR.3/Fujimi 1/72nd Ju 87D-3

  • Member since
    April 2006
  • From: ON, Canada
Posted by jgeratic on Tuesday, December 23, 2014 1:17 PM

Stick - cool work on the interiors, your personal experience on these vehicles is hands down your best reference material.

Gamera - looking very good, I like the effect of the lighter camou shade.  It's a small vehicle, but at least it has a proper caliber for it's main gun.

--------------------------------------

After touching up paint spray, some SIN ochre filter was applied to the vertical surfaces, though the flag colours were untouched. Then two coats of future were applied and a good 48 hours to cure.
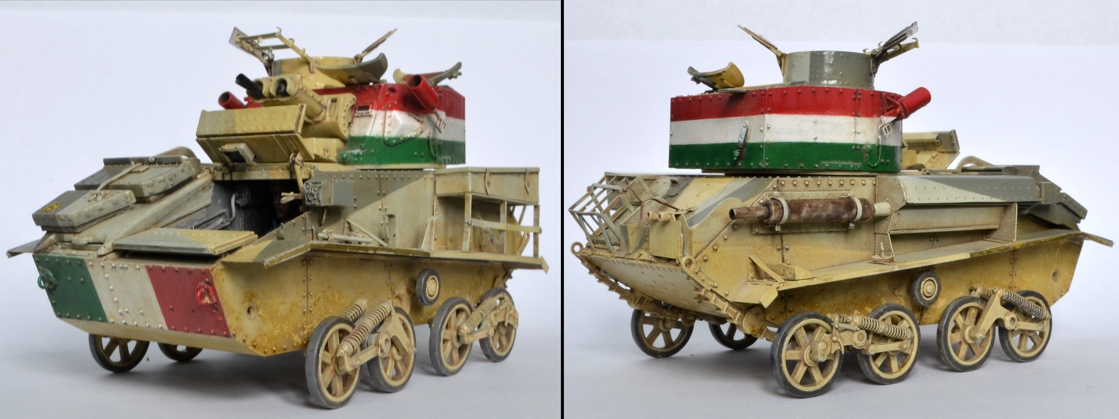
Florys sand wash was applied liberally all over, and once dry, was wiped off with a slighty damp section of a t-shirt wrapped around a fingertip.    On the hull sides where the wheels are, some dry sand pigment was dusted on, fixed in place with Tamiya thinner. 

For darker shadows, did some precise washes with Vallejo Umber shade wash (mixed with a little ultramarine blue from an  acrylic tube).  Same mix was applied on the muffler, to get some depth going - photo looks better than the actual for some reason, maybe because the sheen is not noticeable?

regards,

Jack

  • Member since
    November 2009
  • From: SW Virginia
Posted by Gamera on Tuesday, December 23, 2014 7:57 AM

Thanks SP. I've really been getting into the Sino-Japanese war here lately. Before the US started supplying them with lend-lease Shermans and Stuarts Chinese armour was crazy- British Vickers 6 ton tanks, German Panzer Is, these Soviet T-26s and well no standardization at all- just a pot-pouri of random stuff. And the uniforms, French, Dutch, British, German - all sorts of stuff mixed and matched.

And the most insane thing to me is the major trainer and equiper of the Chinese army was the Germans! At least until their Japanese allies asked them to stop arming and training the troops of the country they were invading!

"I dream in fire but work in clay." -Arthur Machen


  • Member since
    July 2004
  • From: Sonora Desert
Posted by stikpusher on Monday, December 22, 2014 6:09 PM

Thanks for the kind words so far guys!

Gamera, I really like that Chinese T-26! Something quite a bit off the beaten path! Aside from the Flying Tigers, the Sino-Japanese war of pre Pearl Harbor is very largely overlooked in the west. And technically speaking, the AVG, did not commence combat operations until after that date...


F is for FIRE, That burns down the whole town!

U is for URANIUM... BOMBS!

N is for NO SURVIVORS...

       - Plankton

LSM


  • Member since
    November 2009
  • From: SW Virginia
Posted by Gamera on Monday, December 22, 2014 1:49 PM

Thanks Bish.

Sorry the photos are a little fuzzy, she's Nationalist Chinese, a white sunburst on a light blue disk. They bought a small number of T-26s like this from the USSR before Stalin switched his support from Chaing Kai-Shek's Nationalists to Mao's Communists hence orphaned in this case.  

"I dream in fire but work in clay." -Arthur Machen


  • Member since
    December 2002
  • From: Bury St Edmunds, Suffolk, England
Posted by Bish on Monday, December 22, 2014 1:22 PM

Gamera, that's look really nice. What nationally is that again, is that little blue circle the national insignia.

I am a Norfolk man and i glory in being so


On the bench: Airfix 1/72nd Harrier GR.3/Fujimi 1/72nd Ju 87D-3

  • Member since
    November 2009
  • From: SW Virginia
Posted by Gamera on Monday, December 22, 2014 1:07 PM

Thanks RBaer!

Thankfully those goshawful individual link tracks I assembled months ago- with one arm I doubt I'd have gotten two or three together before flinging the whole thing at the wall...

"I dream in fire but work in clay." -Arthur Machen


  • Member since
    September 2006
  • From: Dripping Springs, TX, USA
Posted by RBaer on Monday, December 22, 2014 12:09 PM

Looking good, Carlos.

G, also looking good. Gotta be tough with one broken wing......

Apprentice rivet counter.

  • Member since
    November 2009
  • From: SW Virginia
Posted by Gamera on Monday, December 22, 2014 8:44 AM

Well, here is where I stand right now, thankfully I got most of the thing done before I left on vacation. I did add a few more washes recently, which isn't too bad with a bum arm. Hopefully I can push though with what little is left. Again thanks for the extension Tim & Aaron!

Sorry cell phone photos, a little blurry if you click on them to blow them up but should be ok at regular resolution here:


"I dream in fire but work in clay." -Arthur Machen


  • Member since
    July 2004
  • From: Sonora Desert
Posted by stikpusher on Saturday, December 20, 2014 4:22 PM

Oh I will be... a nice wash, some stowage, I even scrounged up some decals from my spares bin...


F is for FIRE, That burns down the whole town!

U is for URANIUM... BOMBS!

N is for NO SURVIVORS...

       - Plankton

LSM


  • Member since
    November 2009
  • From: SW Virginia
Posted by Gamera on Saturday, December 20, 2014 3:13 PM

Looks cool SP, maybe add a little dirt and you're in business!

"I dream in fire but work in clay." -Arthur Machen


  • Member since
    July 2004
  • From: Sonora Desert
Posted by stikpusher on Saturday, December 20, 2014 1:39 PM

Chuck that looks great! It is certainly not your run of the mill common half track! Great work on both your conversion and the finish!

Last night I finally got back to work on my 113 (nothing like a looming time deadline for motivation...) and I got some paint on interior parts to break up that monotonous white...

The OD paint was still drying when I took the photos so that is why it has a bit of a shine here. The wavy line is because the seat cushions are molded that way.


F is for FIRE, That burns down the whole town!

U is for URANIUM... BOMBS!

N is for NO SURVIVORS...

       - Plankton

LSM


  • Member since
    September 2006
  • From: Dripping Springs, TX, USA
Posted by RBaer on Friday, December 19, 2014 6:39 PM

Looks great, Chuck.

Big thumbs up here!

Apprentice rivet counter.

  • Member since
    January 2013
Posted by jibber on Friday, December 19, 2014 4:13 PM

Thats funny, great job

  • Member since
    October 2011
  • From: Lake Villa, Illinois
Posted by Chuck Davis on Friday, December 19, 2014 3:14 PM

Thanks, Jibber.  You're right - the dot filter wasn't hard, but it sure worried me.  The first green dot I dragged across the kit made it look like it moldy cheese!  I will definitely look to using this on other builds.

Chuck Davis

  • Member since
    January 2013
Posted by jibber on Friday, December 19, 2014 2:30 PM

Chuck you nailed it, the weathering is awesome and Braille really is a lot of fun. The wash worked fantastic and I think you'd agree that the dot filter wasn't that difficult. Congrats on a cool build.

  • Member since
    December 2002
  • From: Bury St Edmunds, Suffolk, England
Posted by Bish on Friday, December 19, 2014 1:23 PM

SchattenSpartan

That's one cute little bugger you got there, Chuck! I'm completely blown away by the piantwork and the weathering you managed to pull off on something that tiny!

BTW: did Bish really just advise someone to NOT build 1/72 models? Something seems very odd here... Hmm

Don't get your hopes up or worry I am ill. This rule only applies to armour. Unless of course that piece of armour is close to an aircraft. Wink

Confused yet. If not, please explain cause I am Big Smile

I am a Norfolk man and i glory in being so


On the bench: Airfix 1/72nd Harrier GR.3/Fujimi 1/72nd Ju 87D-3

  • Member since
    December 2002
  • From: Northern California
Posted by jeaton01 on Thursday, December 18, 2014 7:55 PM

Seeing is one thing, having a steady enough hand is quite another.  I'm impressed!

John

To see build logs for my models:  http://goldeneramodel.com/mymodels/mymodels.html


  • Member since
    October 2011
  • From: Lake Villa, Illinois
Posted by Chuck Davis on Thursday, December 18, 2014 5:16 PM

Thanks guys!  I routinely wear Optivisors for nearly everything but driving it seems, so 1/72 doesn't pose any additional eye issues.  Maybe us Braille scale folk should start trying to convince the big guys to broaden their horizons...or shrink them...or whatever...

Chuck Davis

  • Member since
    April 2013
Posted by SchattenSpartan on Thursday, December 18, 2014 2:31 PM

That's one cute little bugger you got there, Chuck! I'm completely blown away by the piantwork and the weathering you managed to pull off on something that tiny!

BTW: did Bish really just advise someone to NOT build 1/72 models? Something seems very odd here... Hmm

  • Member since
    December 2002
  • From: Bury St Edmunds, Suffolk, England
Posted by Bish on Thursday, December 18, 2014 2:07 PM

Chuck, that is one very nice little build. Nice weathering job and some awesome scratchbuilding.

But you should really try a larger scale, will be much easier on the eyes

I am a Norfolk man and i glory in being so


On the bench: Airfix 1/72nd Harrier GR.3/Fujimi 1/72nd Ju 87D-3

  • Member since
    November 2009
  • From: SW Virginia
Posted by Gamera on Thursday, December 18, 2014 1:54 PM

Looks fantastic Chuck! No idea how you do such a great job on colour modulation etc on something so small!

"I dream in fire but work in clay." -Arthur Machen


  • Member since
    April 2006
  • From: ON, Canada
Posted by jgeratic on Thursday, December 18, 2014 12:14 PM

Chuck - now that turned out really smart. Yes

I like the colour modulation,  works very well I think.

regards,

Jack

  • Member since
    November 2003
  • From: Nashville, TN area
Posted by bobbaily on Thursday, December 18, 2014 11:57 AM
Great build Chuck-super job of scratch building and weathering to boot. Please tell us that the paper clip in the pic is a Jumbo sized clip...even so, that's one small half track-making your build even more impressive.

Bob


  • Member since
    October 2011
  • From: Lake Villa, Illinois
Posted by Chuck Davis on Thursday, December 18, 2014 11:49 AM

Okay, folks…it’s done!  Phew!  There were days I wondered.  And the whole “rubber band track” thing…how did you armor guys put up with that for so many years.  Angry Yikes!

Anyway, thanks for a really cool group build.  All the work displayed, techniques shared, and minor jousting has been a blast.  This is my first piece f armor in years.  And the first time I've tried a dot filter (that was scary Surprise) I think you've all convinced me that armor is fun.  I think I’ll still stick with braille scale though. Geeked

Here she is (she?...he?...it?  what do you guys use?).  I included a shot with the paperclip for nostalgia, as that’s how I started out.  Looking forward to everyone else’s finish!

Chuck Davis

  • Member since
    September 2006
  • From: Dripping Springs, TX, USA
Posted by RBaer on Thursday, December 18, 2014 11:18 AM

Thanks, all!

John, I suppose I should read the instructions that came with the camera.... ;)  You're right, I would rather have the whole object in focus, not just a portion.

Garzohn, the color it Tamiya TS-46 in the rattle can. I like it for the earlier (pre-80's) sand, and I used it on a Merkava1 I did earlier this year, but for that I had to use a heave gray/green filter/wash to get it looking more like the later color.  I have pics somewhere, I'll see if I can't post one after lunch.

Apprentice rivet counter.

  • Member since
    January 2013
Posted by jibber on Thursday, December 18, 2014 8:32 AM

RB the Sherman look great and the casting on the turret really stands out. Nice finish with the figs and base, really works.

  • Member since
    March 2013
  • From: Puebla, Mexico
Posted by garzonh on Thursday, December 18, 2014 7:07 AM

Rbaer, very very nice and the figures make it look sooooo good.

The color paint looks very realistic, did you mentioned what paint you used?, I like that color for my Merkava which is sitting in line to be built.

The base brings it to life and yeah, Im also not very good at photograp but I have found the indoor natural light is better than direct sunlight unless it is cloudy and early hours or late hours of the day, it provides a nice warm lights.

Good to have you in the gallery.

Have a great holidays! 

  • Member since
    December 2002
  • From: Northern California
Posted by jeaton01 on Wednesday, December 17, 2014 10:13 PM

Nice work, RBaer.  I like the light in the photos, if I were to think of one thing that might make you like them better it would be to set the camera up for better depth of field.  Longer exposure at higher f-stop, (smaller aperture).  See how in the third photo the tracks are sharp but the figures have gone soft?  That is what a narrow depth of field will do, and sometimes it is just what you want, but maybe not in this case.

John

To see build logs for my models:  http://goldeneramodel.com/mymodels/mymodels.html


  • Member since
    November 2003
  • From: Nashville, TN area
Posted by bobbaily on Wednesday, December 17, 2014 11:50 AM

RBaer-very impressive job on the Sherman & figures....very nice indeed.

Bob


JOIN OUR COMMUNITY!

Our community is FREE to join. To participate you must either login or register for an account.

SEARCH FORUMS
FREE NEWSLETTER
By signing up you may also receive reader surveys and occasional special offers. We do not sell, rent or trade our email lists. View our Privacy Policy.