SEARCH FINESCALE.COM

Enter keywords or a search phrase below:

Monogram Mafia III

106860 views
1369 replies
1 rating 2 rating 3 rating 4 rating 5 rating
  • Member since
    July 2004
  • From: Sonora Desert
Posted by stikpusher on Saturday, August 23, 2014 10:49 AM

Dave, the Gemini capsule was very snug fitting, although not quite as cramped as the Mercury capsule. As far as protection from the conditions of space (really cant say environment, becuase there is actually a lack of environment up there) the hatches and sidewalls are actually a little more substantial than depicted in the kit. That just adds to the cramped interior. Especially when you figure that some missions had them taking along all the food and water needed for over a week by two men. Oh yeah, you have to wear that suit for that long as well. But yes very brave souls. As has been seen in other space flights, things can and do go wrong and men have perished as a result.


F is for FIRE, That burns down the whole town!

U is for URANIUM... BOMBS!

N is for NO SURVIVORS...

       - Plankton

LSM


  • Member since
    January 2011
  • From: Commonwealth of Virginia
Posted by Tal Afar Dave on Saturday, August 23, 2014 7:54 AM

Hey Stick, that Gemini capsule is looking pretty good......looking at the astronauts, makes me realize what cramped quarters they had and how little protection they actually had from the harsh conditions of outer space.....such brave souls!

Wow, Crazy, that Hind seems to be going together pretty fast....looks pretty deadly, even without its rotors!

Keep up the great work, gang!!

TAD

2022 New Year's Resolution:  Enter 1 group build and COMPLETE a build this year!!  Why Photobucket did you rob me of my one Group Build Badge???  Must be part of the strong anti-Monogram cartel!!!

 ]

  • Member since
    July 2004
  • From: Sonora Desert
Posted by stikpusher on Saturday, August 23, 2014 12:56 AM

MC, nice progress on your Hind!  I have seen that "Man in Space" kit. It looks pretty good to me. I hope to see yours built here in the not too distant future.

B_1 thank you for the kind words.


F is for FIRE, That burns down the whole town!

U is for URANIUM... BOMBS!

N is for NO SURVIVORS...

       - Plankton

LSM


  • Member since
    April 2014
Posted by B_one fixer on Friday, August 22, 2014 11:22 PM

The Gemini is looking good stick !

  • Member since
    July 2014
Posted by modelcrazy on Friday, August 22, 2014 11:20 PM
Stickpusher,

Your Gemini Looks great. I'm fascinated by the space program. I have the AMT Man in Space Rocket Collection I would like to start someday.

Anyway here is the progress on my Mi-24. It's going together well so far. Although I did have to do a considerable amount of filling behind the chin turret. Also I lost some raise panel line detail when I sanded the seams. The seams are so light though, it may not be noticeable once painted. I still may sand them off and cut in new panel lines.

Steve

Building a kit from your stash is like cutting a head off a Hydra, two more take it's place.


http://www.spamodeler.com/forum/

  • Member since
    July 2004
  • From: Sonora Desert
Posted by stikpusher on Friday, August 22, 2014 7:22 PM

Well here is the latest work on my Gemini Spacecraft project

Now where was I? I hit a speed bump due to trying some new weathering techniques and had to go back and fix those up. And I have been doing bits and pieces of detail painting over the past week. Today it was time to get it all assembled.

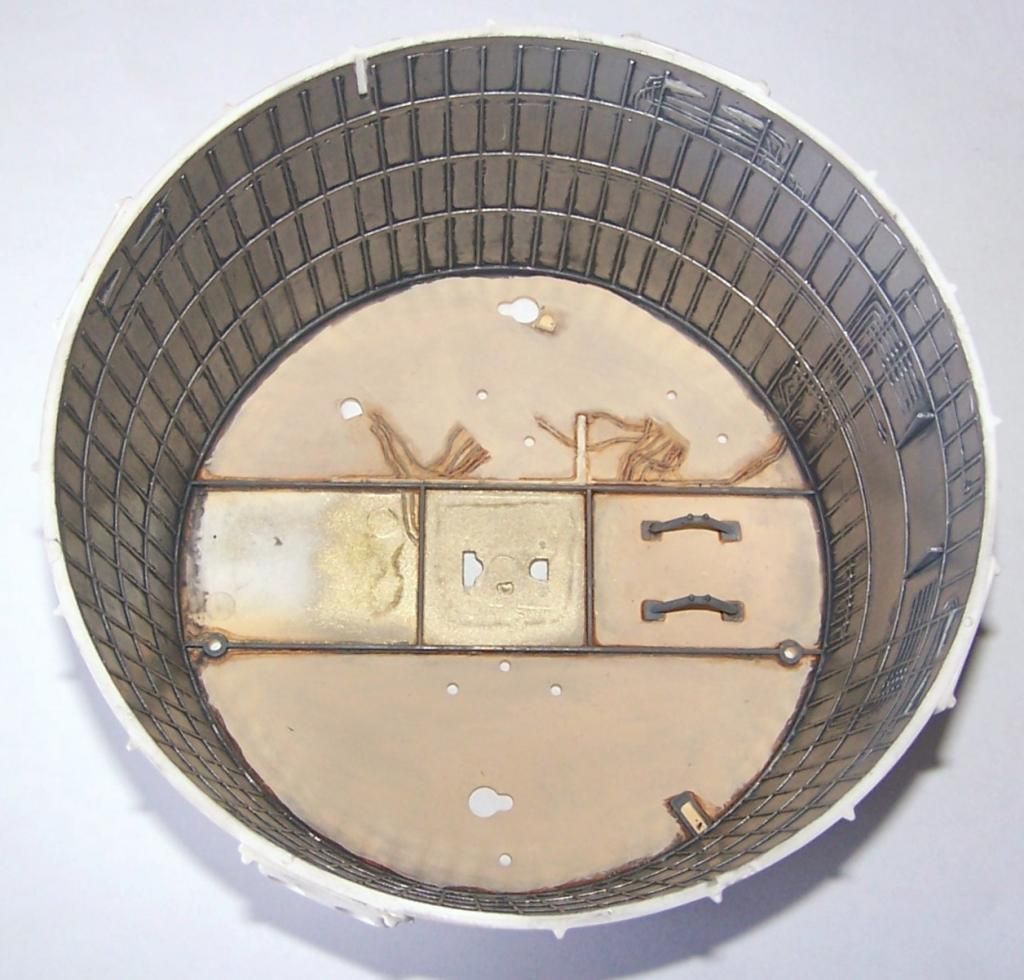
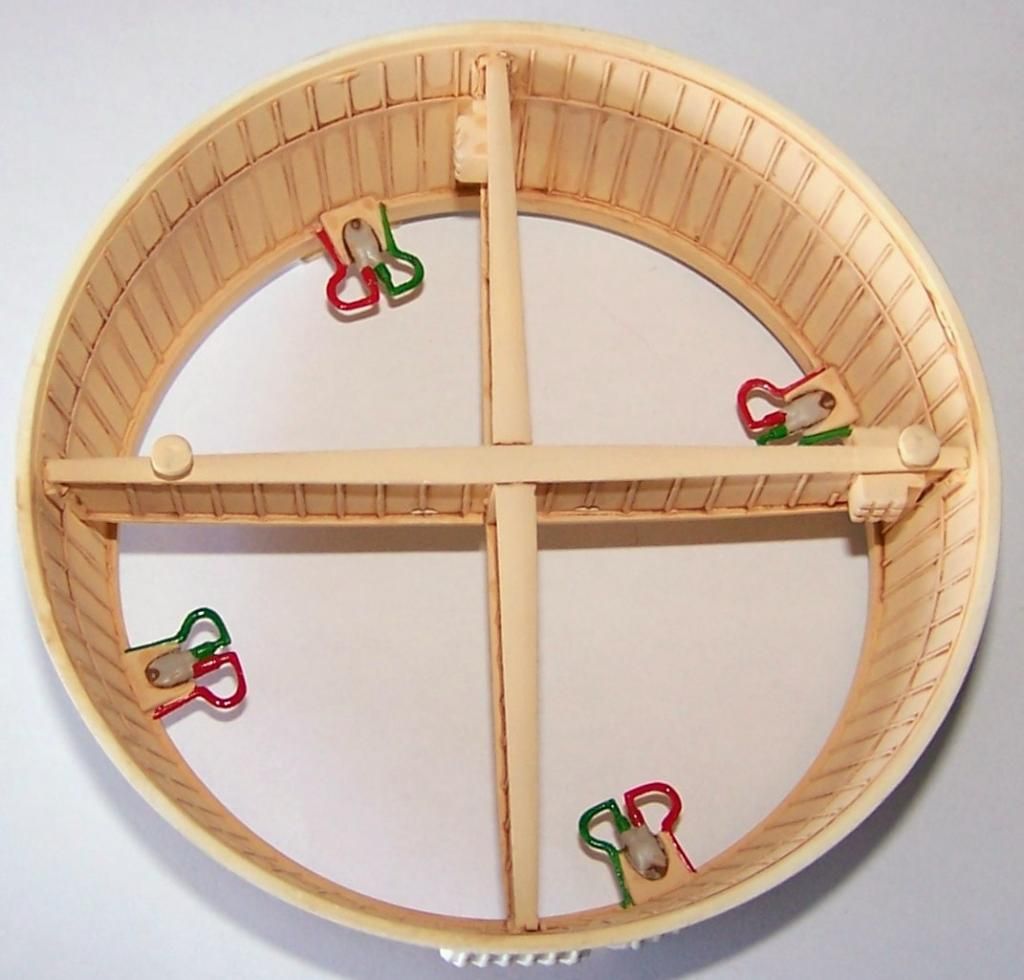
I used oil paints to apply a pin wash on the Equipment and Retrograde Sections. . It worked good enough on the Retrograde section, but did not react well with the Floquil paint on the sidewalls of the Equipment section, my first time using that medium. Next time I know to use a dissimilar layer in between. So I touched up the paint there and then used Promodeler Wash to take care of that section.

Equipment Section

Retrograde Section

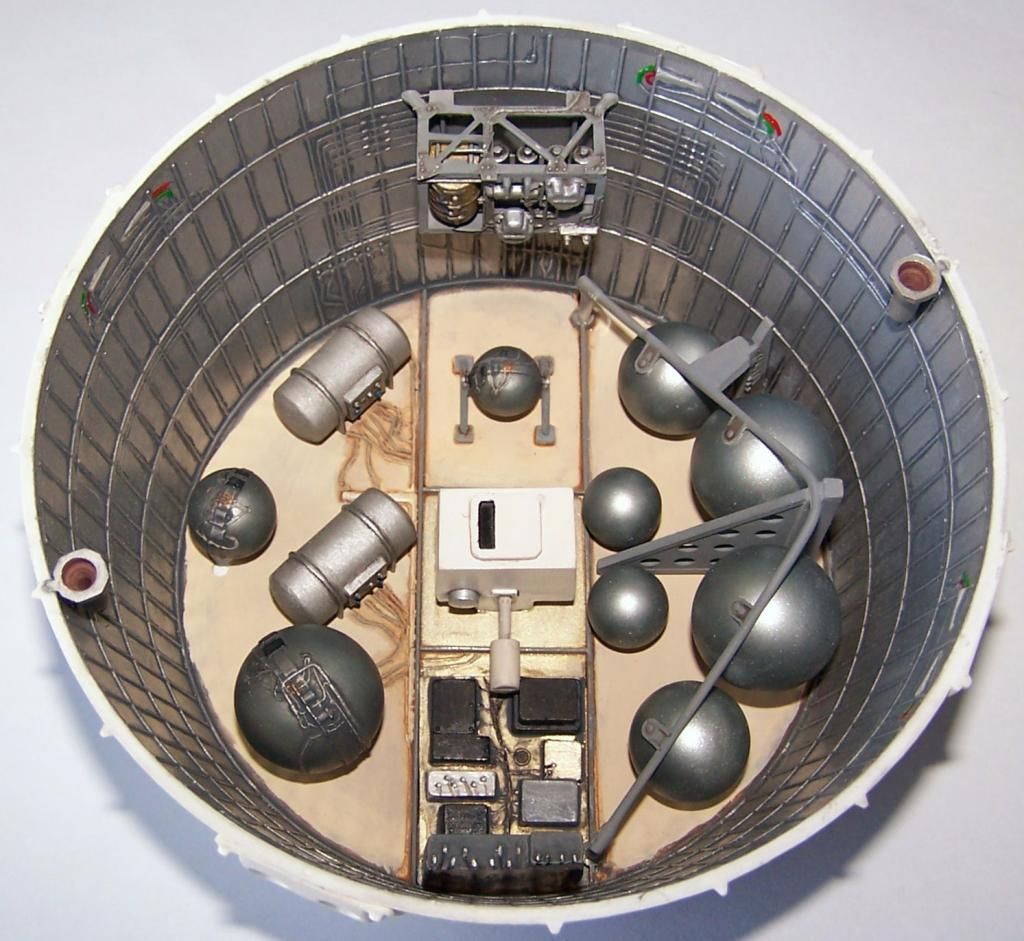
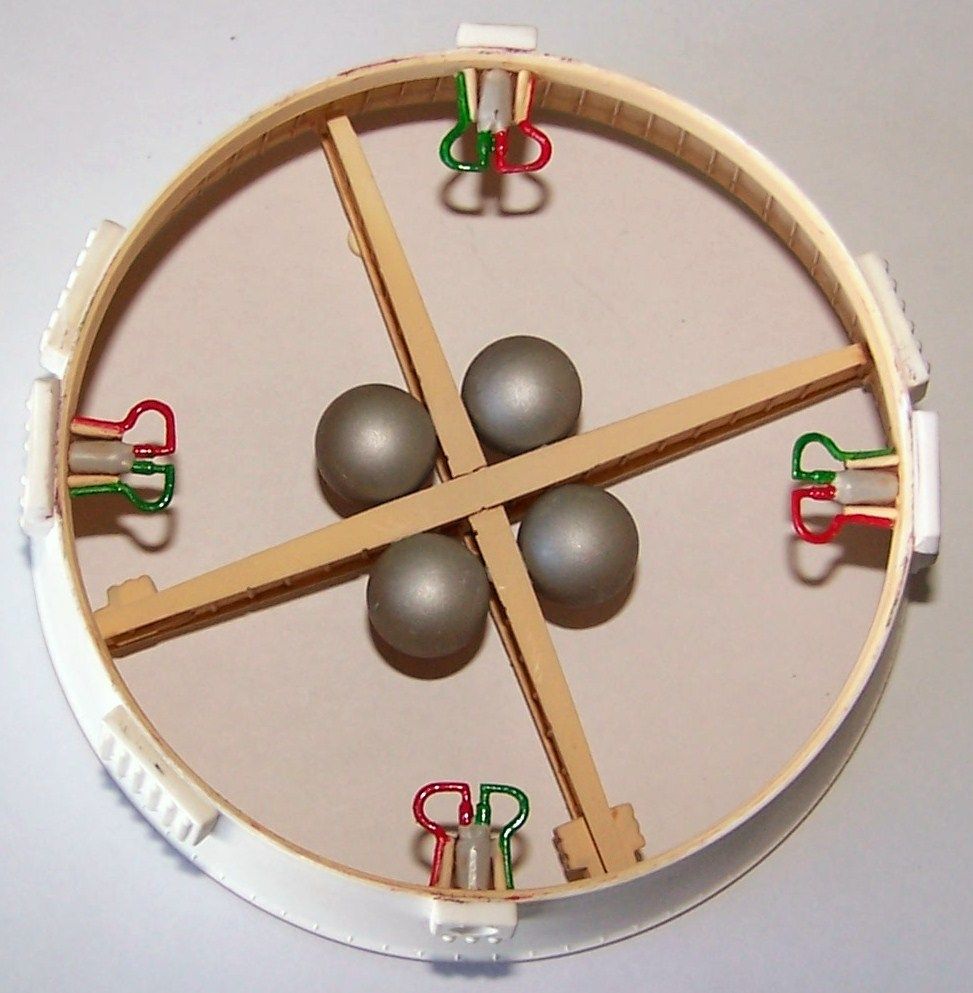
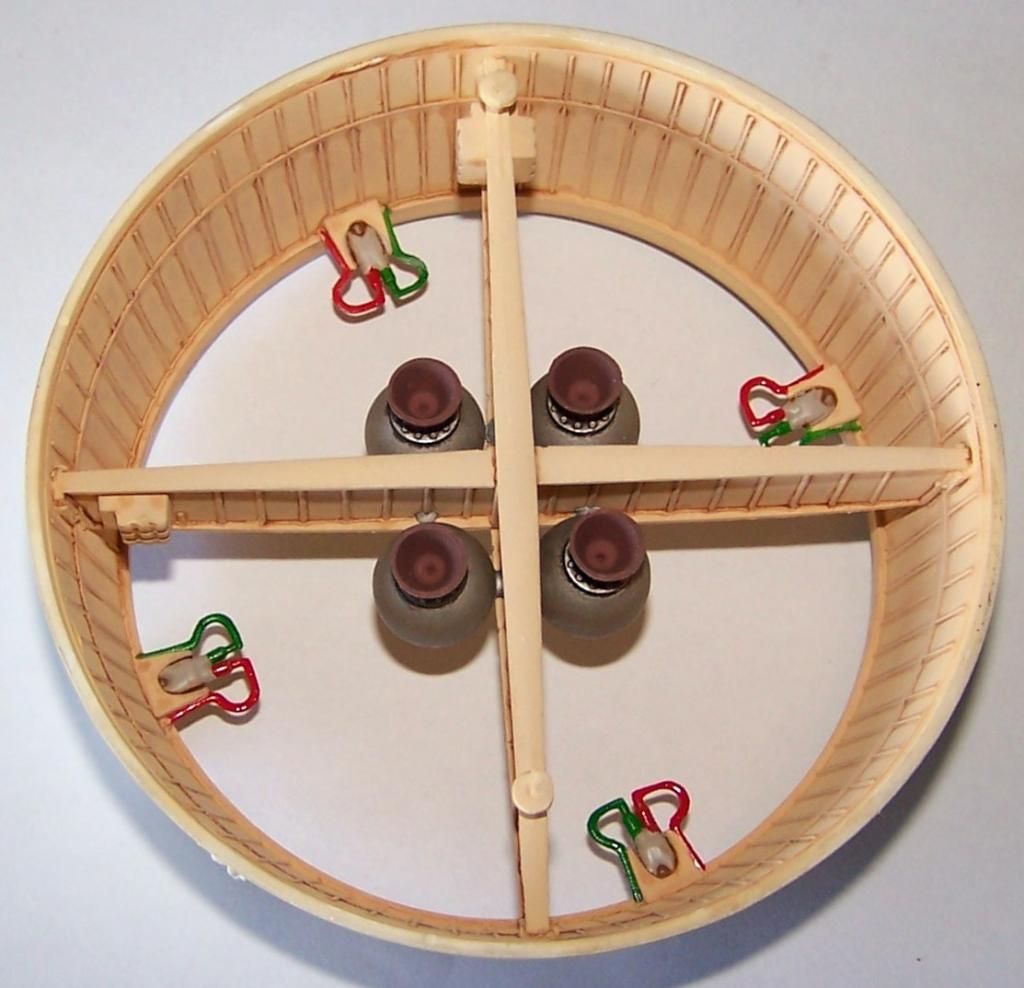
After getting that work fine tuned I added the equipment that goes in those sections

Equipment Section

Retrograde Section

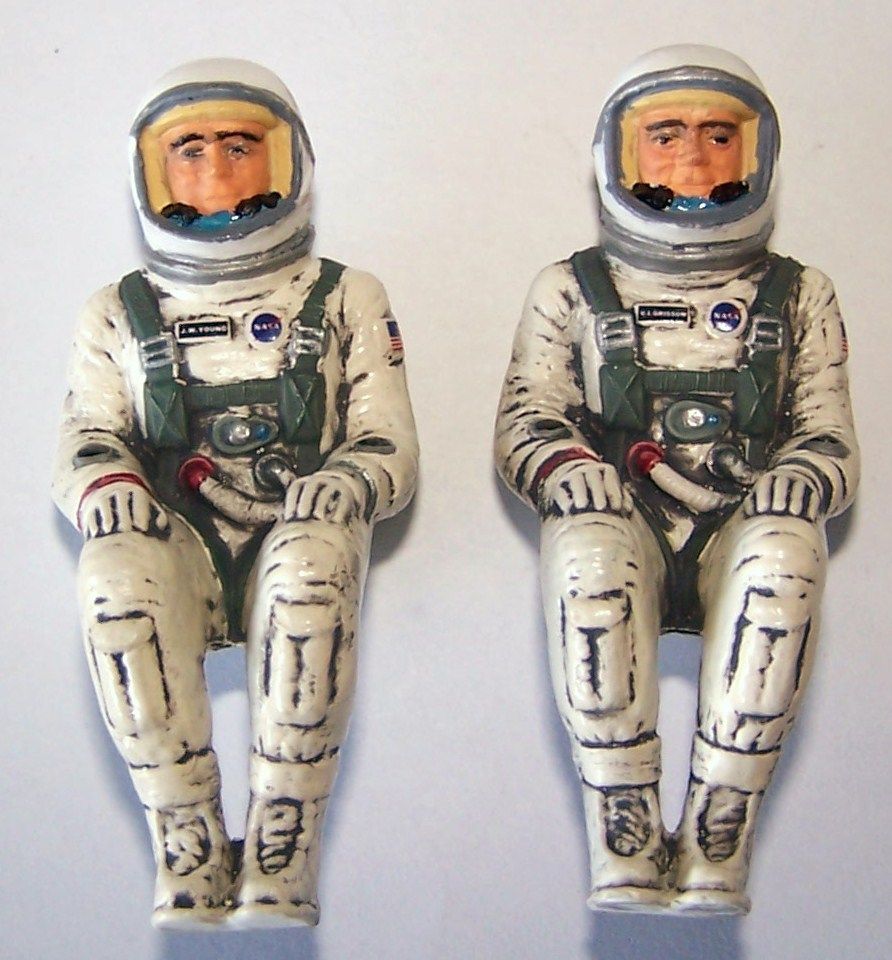
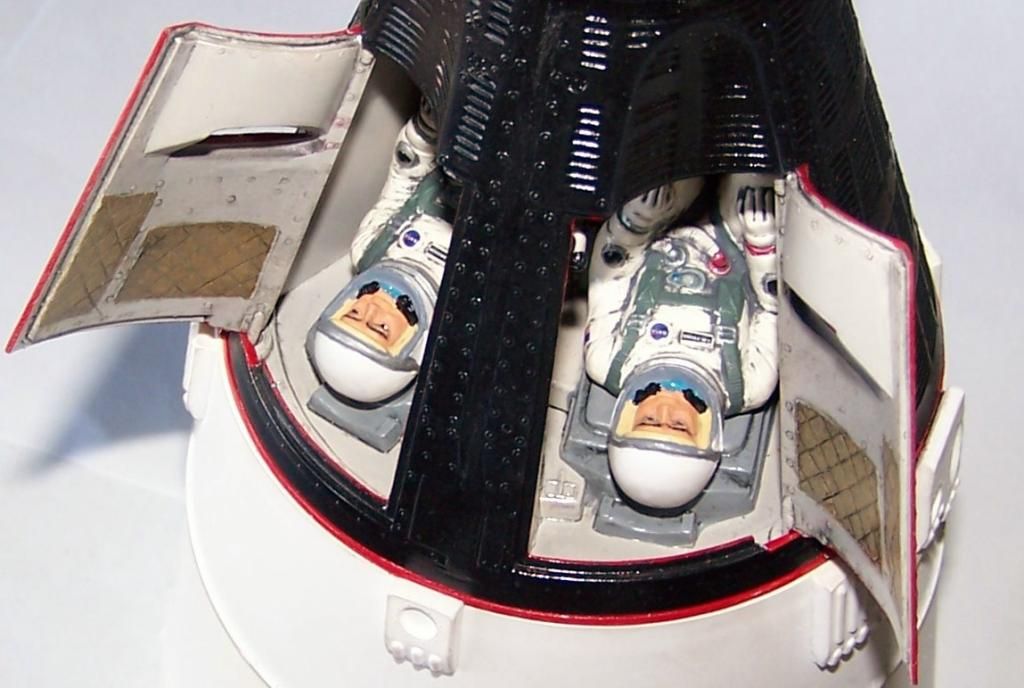
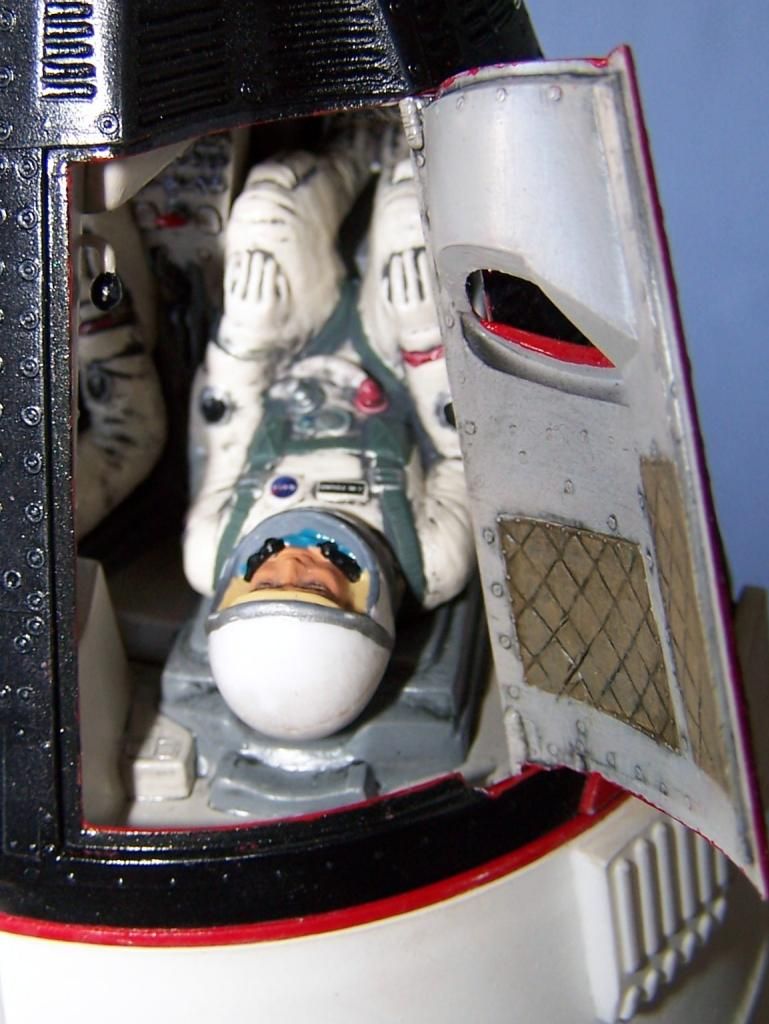
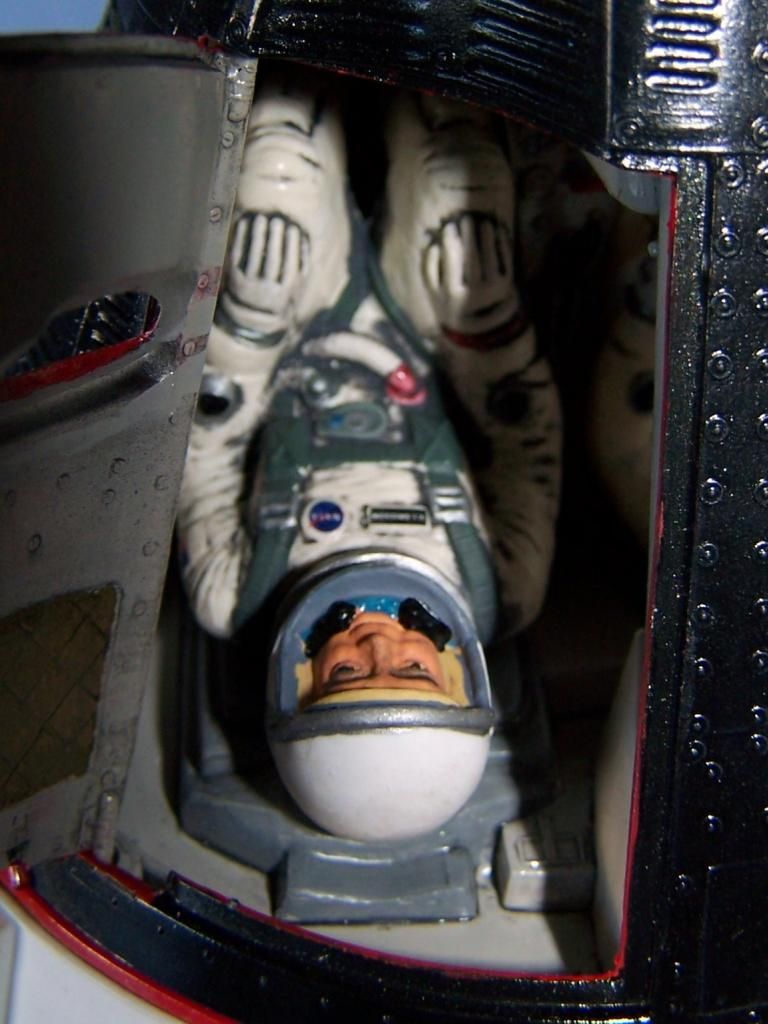
I also applied the Promodeler Wash to the Astronaut figures

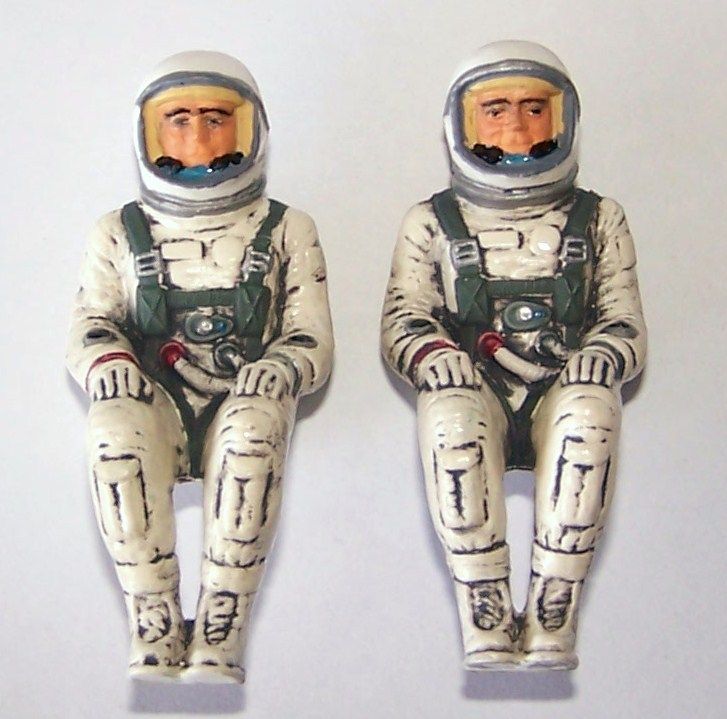
Then I applied their uniform decals- I still need to do a little more work on their faces and then add their helmet faceshields

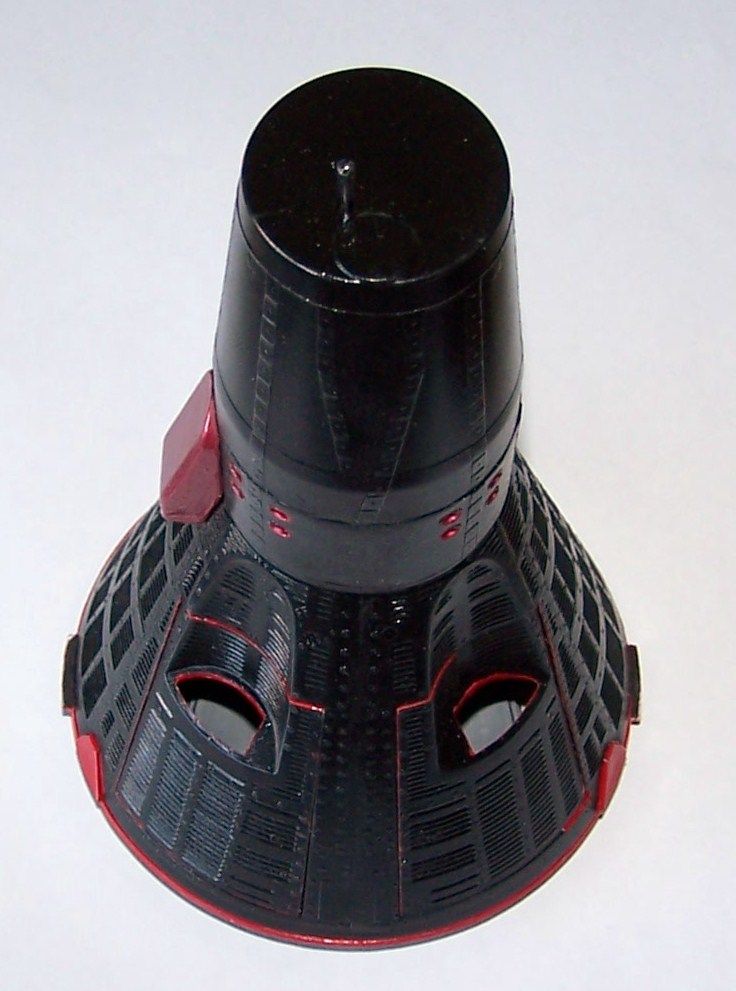
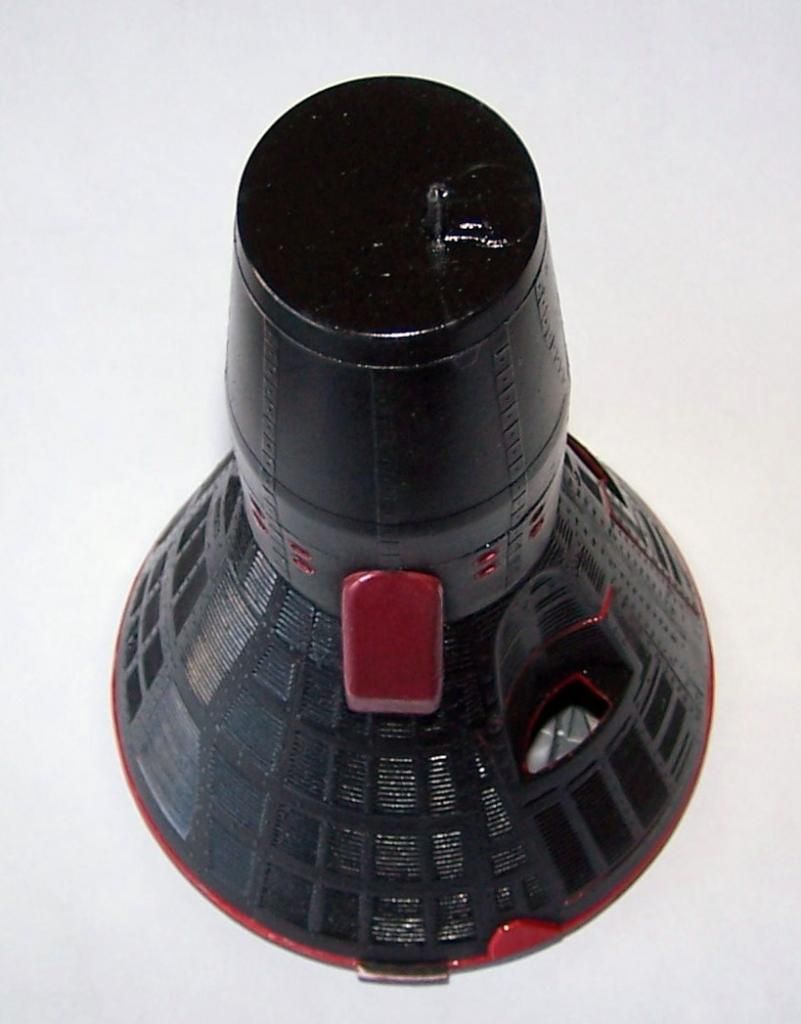
And I have been working on the red edging and mettalic red detail work for the capsule itself, all based off of photos of Gemini 3. Today I finally glued the capsule exterior to the heat shield so now all that needs to be added are the hatch windows. Which I will do after the decals are on and the final Flat coat on the exterior.

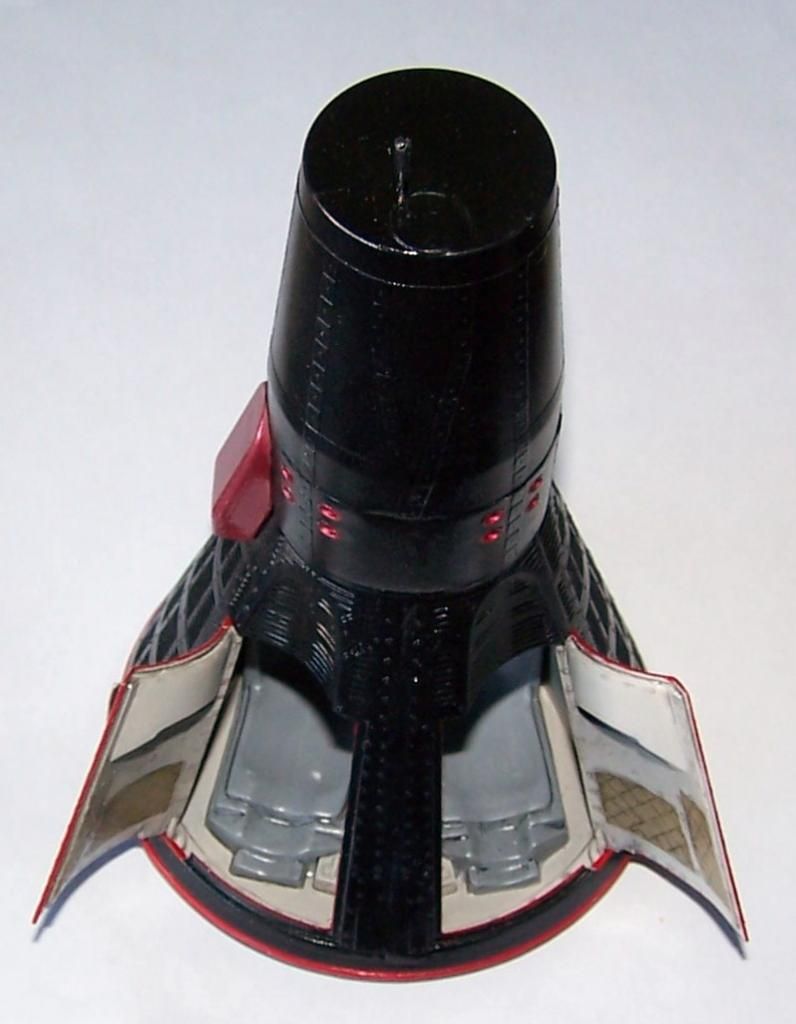
then a test fit of the Adapter Section to the Crew Section

and a test fitting of the Astronauts

Keep looking, more to come soon...


F is for FIRE, That burns down the whole town!

U is for URANIUM... BOMBS!

N is for NO SURVIVORS...

       - Plankton

LSM


  • Member since
    July 2004
  • From: Sonora Desert
Posted by stikpusher on Friday, August 22, 2014 3:38 PM

You're welcome Woody. I presume that those are both re issues of  the old Monogram 1/48 kits?


F is for FIRE, That burns down the whole town!

U is for URANIUM... BOMBS!

N is for NO SURVIVORS...

       - Plankton

LSM


  • Member since
    February 2003
  • From: USA
Posted by woody0369 on Friday, August 22, 2014 12:32 PM

Thanks stikpusher!

  • Member since
    November 2008
  • From: Central Florida
Posted by plasticjunkie on Friday, August 22, 2014 6:33 AM

Thanks guys! Mississippi, the old Monogram Phantom has IMO one heck of a very well detailed pit. That's a killer job on the IP's.

Stik..I agree about the light weathered look being more realistic but that bright polished tone just looks too good to mute down. Muted and all it still looks like real metal.

I started decaling and got spooked as the walk ways did not want to cooperate, bubbling up and wrinkling badly. Several applications of Solvaset did the job as I found out this morning. Sometimes you just have to let it sit overnight for the chemicals to do their magic. I have half the fuselage done so I will post some pictures once the entire Voodoo's markings are on.

 GIFMaker.org_jy_Ayj_O


Too many models to build, not enough time in a lifetime!!

  • Member since
    July 2004
  • From: Sonora Desert
Posted by stikpusher on Friday, August 22, 2014 1:02 AM

MV you are doing some very sweet work in the front office for your Phantom.

Woody, I will get you added to the roster.


F is for FIRE, That burns down the whole town!

U is for URANIUM... BOMBS!

N is for NO SURVIVORS...

       - Plankton

LSM


  • Member since
    February 2003
  • From: USA
Posted by woody0369 on Thursday, August 21, 2014 10:34 PM

And my second kit is the Black Widow P-61

  • Member since
    February 2003
  • From: USA
Posted by woody0369 on Thursday, August 21, 2014 10:13 PM

Sorry, I've got the old Revell P-40B. Can I? Can I? Pleeeeease?

  • Member since
    July 2014
Posted by modelcrazy on Thursday, August 21, 2014 10:12 PM

Mississippi,

That looks fantastic! I only wish I was 1/2 as good at cockpit detail.

Steve

Steve

Building a kit from your stash is like cutting a head off a Hydra, two more take it's place.


http://www.spamodeler.com/forum/

  • Member since
    February 2003
  • From: USA
Posted by woody0369 on Thursday, August 21, 2014 10:09 PM

Is it too late to join the group?

  • Member since
    November 2003
  • From: State of Mississippi. State motto: Virtute et armis (By valor and arms)
Posted by mississippivol on Thursday, August 21, 2014 9:25 PM

Great work, y'all! PJ, that NMF is outstanding! Here's a couple of shots of my Phantom cockpit; not so much from my expertise, but for the fact that Monogram does a killer job with cockpit detailing. If I had some extra time, I'd spruce her up more while guided by my Detail/Scale book, but you get a really good baseline to start.

  • Member since
    January 2011
  • From: Commonwealth of Virginia
Posted by Tal Afar Dave on Thursday, August 21, 2014 6:52 PM

PJ, that's one heck of a Voodoo you got goin' on there!!  Love the NMF on it. Matt, I've got that Corsair kit as well.  I built it as a kid and remember how fun the 'operating features' were at the time.  Looks like you did a great job buttoning up the landing gear and filling in the holes in the wings....(I'd forgotten about them!)  

Everyone's builds are looking great....I'm hoping to get off work early (or at least on time?!) in the near future to actually start building again.  It's good to see all of the inspirational building going on here!!!

Dave

2022 New Year's Resolution:  Enter 1 group build and COMPLETE a build this year!!  Why Photobucket did you rob me of my one Group Build Badge???  Must be part of the strong anti-Monogram cartel!!!

 ]

  • Member since
    July 2004
  • From: Sonora Desert
Posted by stikpusher on Thursday, August 21, 2014 6:32 PM

Modelcrazy, I am really looking forward to that Hind. That and the T-72 were the boogeyman to me once upon a time. The T-72 lost its' fear factor quite some years ago, but the Hind is still a fearsome beast to me.

MJ make sure that you do not mix up all those clear parts ;-) Your bent wing bird is coming along nicely! Almost ready to be cleared hot against those Chicom hordes now that she is armed up.

PJ, your Voodoo is looking simply stunning! I love the finish. But I gotta say that toned down is a bit more realistic to my eye. After all those things were sitting ramp alert exposed to the elements for much of their career. And while they were kept clean, I doubt that they were too shiny in service.

Mark, very wise to take that precaution with the decals, just in case.

I should have some update work on my Gemini to show in the next day or so...


F is for FIRE, That burns down the whole town!

U is for URANIUM... BOMBS!

N is for NO SURVIVORS...

       - Plankton

LSM


  • Member since
    November 2008
  • From: Central Florida
Posted by plasticjunkie on Thursday, August 21, 2014 11:42 AM

Yes Duke that liquid film works great at keeping the decal together. I have used that method several times. Waiting to see how you Bearcat comes out. That is a sweet looking plane.

 GIFMaker.org_jy_Ayj_O


Too many models to build, not enough time in a lifetime!!

  • Member since
    June 2003
  • From: Rowland Heights, California
Posted by Duke Maddog on Thursday, August 21, 2014 11:35 AM

Sweet job guys! I love all these great looking models! I also made a little progress on mine, but not much. I had just finished letting the gloss coat dry on my two aircraft and went to put the decals on. Given the age of these two kits I'm building, I took one look and decided to cover the decals with some Liquid Decal Film to make sure they didn't shatter on me. Left them to dry overnight. I'm gonna give it a shot after work today. Hopefully pics will be posted soon.

  • Member since
    June 2014
Posted by Matt-Joachim on Thursday, August 21, 2014 11:09 AM

WEAPONS ONLINE! F4U is LIVE!

  • Member since
    November 2008
  • From: Central Florida
Posted by plasticjunkie on Thursday, August 21, 2014 10:47 AM

Here's another update. Shot the Voodoo with Aqua Gloss as recommended for high shine Alclad when using decal setting solution. The Aqua Gloss killed some of the nice polished look. Next time I will try out their clear gloss lacquer base one instead. I took a 12,000 girt Micromesh pad and lightly polished the plane which produced a smoother surface and restored a little of the shine back. It actually looks pretty good and the Voodoo is ready for decals.


The interior green and red are on the wells.


The cans and heat/exhaust area were shot with several shades of dark Alclad and Tamiya clear blue was lightly sprayed to show heat discoloration on the metal.

Now for the decals and landing gear.

 GIFMaker.org_jy_Ayj_O


Too many models to build, not enough time in a lifetime!!

  • Member since
    June 2014
Posted by Matt-Joachim on Thursday, August 21, 2014 9:38 AM

Here is a pic of my KLEAR drying Dungeon  

I call it Purgatory! LOL They seem to be right about prisons being overcrowded now-days!

Too many kits going at once, as you see!

  • Member since
    June 2014
Posted by Matt-Joachim on Thursday, August 21, 2014 9:14 AM

echolmberg- Thank you very much. I had a little trouble with the wing fitment. Other than that it IS a great kit! All it needs now is the ordinance and final decaling!

O, and i forgot; I have the canopy and windscreen drying in my KLEAR dungeon LOL

  • Member since
    July 2014
Posted by modelcrazy on Wednesday, August 20, 2014 9:19 PM
Here is my Revell entry. I started on it tonight.  Steve

Steve

Building a kit from your stash is like cutting a head off a Hydra, two more take it's place.


http://www.spamodeler.com/forum/

  • Member since
    February 2003
  • From: Green Bay, WI USA
Posted by echolmberg on Wednesday, August 20, 2014 12:05 PM

Matt, I really like that Corsair!  I built that same one maybe 20 years ago.  Yes, I know what they say about the quality of it and how it compares to other manufacturers' versions and blah-blah-blah.  But I still have it hanging from my ceiling downstairs and I still love the look of the Monogram -4 kit.

I hope you enjoyed yours just as much!

Eric

  • Member since
    July 2004
  • From: Sonora Desert
Posted by stikpusher on Tuesday, August 19, 2014 10:46 PM

modelcrazy, your kit selections are added to the front page roster. Welcome aboard!


F is for FIRE, That burns down the whole town!

U is for URANIUM... BOMBS!

N is for NO SURVIVORS...

       - Plankton

LSM


  • Member since
    June 2003
  • From: Rowland Heights, California
Posted by Duke Maddog on Tuesday, August 19, 2014 10:04 AM

Thanks Carlos! I hope to have more done soon.

  • Member since
    July 2004
  • From: Sonora Desert
Posted by stikpusher on Tuesday, August 19, 2014 2:00 AM

Pyr, nice work on the interior so far. Nice work on the storage box. Mark, I like your two kits so far as well! That yellow tail came out really nice on the bipe. The Bearcat is looing really sharp too.


F is for FIRE, That burns down the whole town!

U is for URANIUM... BOMBS!

N is for NO SURVIVORS...

       - Plankton

LSM


  • Member since
    January 2011
  • From: Commonwealth of Virginia
Posted by Tal Afar Dave on Monday, August 18, 2014 7:11 PM

ygmodeler4

YES, that commercial had me in tears the first time I saw it

Yeah, me too!!!  Took me awhile to figure out that it was Rob Lowe!  Even funnier after that!!  LOL

2022 New Year's Resolution:  Enter 1 group build and COMPLETE a build this year!!  Why Photobucket did you rob me of my one Group Build Badge???  Must be part of the strong anti-Monogram cartel!!!

 ]

  • Member since
    June 2003
  • From: Rowland Heights, California
Posted by Duke Maddog on Monday, August 18, 2014 1:08 AM

Okay, here it is a few months down the line and I finally have some progress done and a camera to document it!

First off,  I shot some Tamiya Navy Blue from a spraycan on my F-8 Bearcat. This came out nice and smooth, now this bird is ready for decals:

Earlier in the week, I worked on my little F4-B4 biplane at Hobby Day. I got some paint on this and then added a few more detail parts. I had painted the tail surfaces and upper wing white to help the yellow go on better. Then I brushed on the yellow paint on the tail and it turned out great:


The top wing didn't work out though, so I wiped it off as much as I could to shoot some yellow on it later through the airbrush:


Later I'll apply the decals to this since it is easier to do when the upper wing is not on it. I might even get them on this tomorrow.

Anyway, that's all I have to show for now. It sure felt good to get back to the workbench again. Hopefully I'll be able to make more progress tomorrow. Meanwhile, thanks for looking in, comments are always welcome.

JOIN OUR COMMUNITY!

Our community is FREE to join. To participate you must either login or register for an account.

SEARCH FORUMS
FREE NEWSLETTER
By signing up you may also receive reader surveys and occasional special offers. We do not sell, rent or trade our email lists. View our Privacy Policy.