SEARCH FINESCALE.COM

Enter keywords or a search phrase below:

2015 Messerschmitt Bf 109 Group Build

181148 views
2798 replies
1 rating 2 rating 3 rating 4 rating 5 rating
  • Member since
    October 2008
  • From: Georgia
Posted by Rigidrider on Tuesday, January 20, 2015 4:14 PM

John (Falconmod) Man... That looks so small  in your hand! LOL... There is no way I could ever do one that small ever again. I did do a 72nd JU88 recently, but even in 72nd it was (to me) near 48th scale being it was such a big birdie. I really do admire and appreciate a nicely done 72nd.... but I cant do them any more! LOL...

When Life Hands You A Bucket Of Lemons...

Make Lemonade!

Then Sell It Back At $2 Bucks A Glass...

  • Member since
    December 2009
  • From: Laurel, MD
Posted by Tucohoward on Tuesday, January 20, 2015 6:32 PM

Main decals on. One of the "1's" came apart so had to use a Montex mask to do that. I will let you guess which side. The rest of the decals are Montex and Aeromaster. Tried one of the kit decals for a fuselage cross and it came apart so I immediately moved on.

Jay

The Mighty Mo says no.

  • Member since
    April 2005
Posted by Thunderbolt379 on Tuesday, January 20, 2015 7:27 PM

Absolutely superb work, Jay! It looks wonderful! (I must give these Montex masks a try!)

My own humble efforts over the last couple of days have been to get the canopy masked from scratch, here's the process started, fully outlined and filled in plus masking solution where needed:


The enlargements show a few spots where more fluid work is needed.

The decals I ordered arrived yesterday, here's the Print-Scale -D sheet and the Eduard -E stencils:

The idea was to compare the -D and -E stencils and it turns out they are virtually identical, quite close enough to get by, so while I'll work through the Print-Scale set in due course to develop a lineup of -Ds, I'll use the Eduard -E stencils in conjunction with the Aeromaster sheet I had originally intended to use but which came without stencils:

I just drilled out the wing guns, and the antenna post hole is drilled into the canopy. My next job is to repair the gunsight glass, then I can mount the canopy. It's a fraction narrow but doesn't fit too badly. From that point, masking the prop shaft and gear bays will put her into the paint shop.

Cheers,

M/TB379

http://worldinminiature.blogspot.com/

  • Member since
    May 2013
  • From: Indiana, USA
Posted by Greg on Tuesday, January 20, 2015 7:32 PM

Jay, that is just the coolest-looking camo scheme. You are really doing well with it and the decals surely dress it up.

Mike, nice, neat manual mask job. You are obviously a patient man.

  • Member since
    March 2012
  • From: Corpus Christi, Tx
Posted by mustang1989 on Tuesday, January 20, 2015 8:28 PM

John:There aint no way I'd ever do 72nd scale dude. I've gotta say I'm with Doug on that because 1.) My eyes just couldn't take it , hek they barely do now with 48th scale stuff! And 2.) I have alot of patience but 72nd scale would be pushing those boundaries. Great job so far on that build. I just don't know how you guys do it! 

Jay:Dang dude! Hammer down!!!!  That is a superbly applied color scheme and the decals just make it sing reeel purdy!! Nice Job bubba! 

Mike:That mask job looks great so far. Looks like you took your time with it.


 Forum | Modelers Social Club Forum (proboards.com) 

  • Member since
    April 2005
Posted by Thunderbolt379 on Tuesday, January 20, 2015 8:34 PM

Thanks Greg and Mustang! Greg, it's actually almost the opposite of patience, it would have taken weeks for an Eduard set to arrive and I didn't fancy the extra cost, so went for it with the available materials -- that said, I can only do a panel or two at a time, then concentrate on something else for a bit... Mustang, the commercial mask sets suggest liquid masking in the open areas but I've had some bad experiences with rubber incompletely covering, so now I try to block in all areas with tape as far as possible.

I'm looking forward to completing this one in the not too distant future, and in a few weeks the masks should be in for the E-4 and G-2 as well.

Cheers, M/TB379

http://worldinminiature.blogspot.com/

  • Member since
    January 2015
Posted by BrandonD on Tuesday, January 20, 2015 11:25 PM

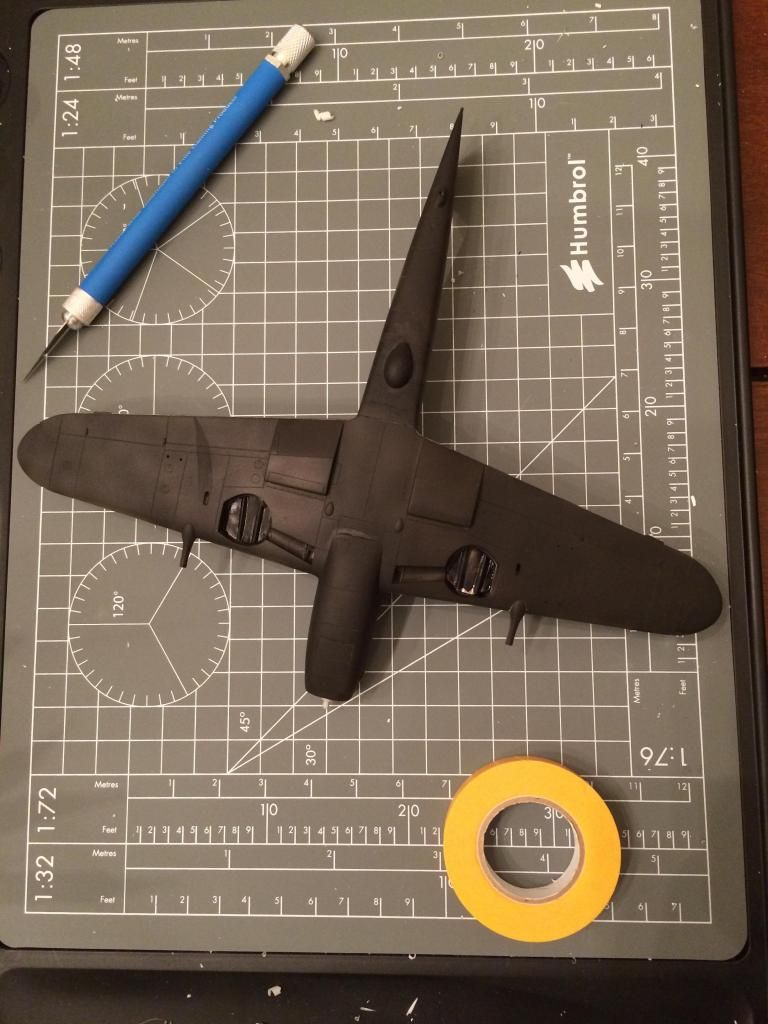
I've been working on my Buchon, and after much hemming and hawing, have decided to go with the natural metal finish instead of the blue overall. Mainly, I'm doing this to practice using AlcladII since that's what I intend to use on my P-51 and want to get a feel for it, but it's also a great opportunity to do a NMF 109 variant.

I went to prime with Humbrol acrylic grey primer, and it was a disaster. I thinned it with Tamiya thinner, and it didn't like that at all. Half of it sprayed fine, then the other half flowed like water. I washed it all off, then decided to forgo priming for the bottom, which will be light blue. I sprayed a black base, and I will be using the "black basing" method that DoogsATX recommends on his site.

Here it is as it sits - the streaks are because I wasn't patient enough to ensure the thing was fully dry before spraying it, but that won't affect the colors (which I won't paint until it actually is dry).

After this, it's on to the Alclad black base up top, then the NMF.

It's missing its rear wings at the moment, but I am not putting them on until after I finish painting the rudder, which is a black X on a white field. The kit has decals for this, but I prefer painting if at all possible, and masking/painting it with the rear wings on seems like a pain, so I will affix them before the NMF goes down.
-BD-

  • Member since
    April 2005
Posted by Thunderbolt379 on Wednesday, January 21, 2015 1:19 AM

Great work, Brandon, this Buchon seems to have been less of a headache than the one built on the forums several years ago. Looking forward to seeing it finished!

Here's my -D this evening. Next step is an overall wash, mask the locators for the pitot and mass balances, mask the gear bays and prop shaft/backplate, and she's ready for the paint shop.

M/TB379

http://worldinminiature.blogspot.com/

  • Member since
    September 2011
  • From: Milaca, Minnesota
Posted by falconmod on Wednesday, January 21, 2015 6:54 AM

Rigidrider and Mustang1989-  Thanks for the comments,  not really sure why I started gravitating to 1/72 but they seem to be kinda fun.  I also spend alot of time with optivisor on!

Here's what i got done last night.  now I just have some mottling to do to blend the fuselage colors in.

John

On the Bench: 1/72 Ki-67, 1/48 T-38

1/144 AC-130, 1/72 AV-8A Harrier

  • Member since
    March 2012
  • From: Corpus Christi, Tx
Posted by mustang1989 on Wednesday, January 21, 2015 7:13 AM

Brandon:That looks good so far. DoogsATX knows his stuff and used to frequent this forum a lot.

Mike:Man I can hardly wait to see paint on that thing. Yes

John:Getting to the meat and potatoes of the painting session now. Good stuff! (I spend a lot of time with the optivisor on myself and sometimes I don't think that's a good thing! lol)


 Forum | Modelers Social Club Forum (proboards.com) 

  • Member since
    September 2011
  • From: Milaca, Minnesota
Posted by falconmod on Wednesday, January 21, 2015 7:21 AM

Ya, my kids don't know who i am with out it on.   I forget it's on my head.  lol

On the Bench: 1/72 Ki-67, 1/48 T-38

1/144 AC-130, 1/72 AV-8A Harrier

  • Member since
    March 2012
  • From: Corpus Christi, Tx
Posted by mustang1989 on Wednesday, January 21, 2015 7:25 AM

Ha Haaa!! I know! I've come out of the hobby room wearing that stupid thing a time or two!!!! lol


 Forum | Modelers Social Club Forum (proboards.com) 

  • Member since
    February 2013
Posted by Chanter on Wednesday, January 21, 2015 8:16 AM

Doug - I'll be watching yours with great interest!  I love that camouflage scheme and had thought (briefly) about trying it, as I have the Montex set for a JG 54 F2.  I just have absolutely no idea how to even attempt it, so I look forward to watching how you do it and learning.

109

Jay - Man that is one very sweet looking bird; really really nice.  What a showpiece.

John - looks great so far!  I know what you mean about 1/72.  I did an Airfix Typhoon for the 1944 GB last year and loved it so much I bought another.  I'm going to have to try an Optivisor.  I use 2X reading glasses while looking through a magnifying lamp (also 2X I think).  It's awkward at best!

Greg(!) - nice to see you poking your head in; I was wondering where you were.  Looking forward to building alongside you again...virtually that is.  Smile

My mug finally arrived yesterday so I will officially get underway. Huzzah!

Allen

ButcherbirdBadgesmall_zps1d50c6bb1944 GB

  • Member since
    March 2012
  • From: Corpus Christi, Tx
Posted by mustang1989 on Wednesday, January 21, 2015 8:23 AM

Man those are some cool schemes Allen! Glad you got you mug in. Those are slick aint they?


 Forum | Modelers Social Club Forum (proboards.com) 

  • Member since
    February 2013
Posted by Chanter on Wednesday, January 21, 2015 8:33 AM

The mugs are slick for sure!  I ordered the morphing one.  It starts out completely black but once the hot java hits it, the mug turns white revealing Clemens' design...very cool.  Will post a before and after pic of it tonight.

Allen

ButcherbirdBadgesmall_zps1d50c6bb1944 GB

  • Member since
    December 2004
  • From: Houston, Texas
Posted by panzerpilot on Wednesday, January 21, 2015 3:38 PM
mustang1989

Ha Haaa!! I know! I've come out of the hobby room wearing that stupid thing a time or two!!!! lol

Me too! Respirator, optivisor and gloves! Especially when answering the door.

-Tom

  • Member since
    April 2005
Posted by Thunderbolt379 on Wednesday, January 21, 2015 4:16 PM

:-) I've wandered out of the mancave with the respirator and magnifying specs on a few times, and hair like a mad scientist too. It goes with my PhD!

I masked the gear bays and prop shaft of the -D last night, so it's going into colour today. I hope to make a start shortly.

Cheers, M/TB379

http://worldinminiature.blogspot.com/

  • Member since
    March 2012
  • From: Corpus Christi, Tx
Posted by mustang1989 on Wednesday, January 21, 2015 4:37 PM

panzerpilot
mustang1989

Ha Haaa!! I know! I've come out of the hobby room wearing that stupid thing a time or two!!!! lol

Me too! Respirator, optivisor and gloves! Especially when answering the door.

Now THAT'S funny right there!


 Forum | Modelers Social Club Forum (proboards.com) 

  • Member since
    December 2009
  • From: Laurel, MD
Posted by Tucohoward on Wednesday, January 21, 2015 5:58 PM

Flat coated it this morning before I went to work so I could do my oil wash tonight. I normally just use raw umber, but for the white srctions I lightened and grayed it little with some white and black in the mix. The pictures I have of this plane show it to be fairly clean so I really just wanted to bring out the panel lines and rivets a little. Somewhat dirtier underneath. With the aid of a hair drier it took about half an hour, even with oil paint.

Jay

The Mighty Mo says no.

  • Member since
    May 2013
  • From: Indiana, USA
Posted by Greg on Wednesday, January 21, 2015 6:40 PM

panzerpilot
...... Especially when answering the door.

That hit me as hilarious. Big Smile

  • Member since
    October 2008
  • From: Georgia
Posted by Rigidrider on Wednesday, January 21, 2015 6:57 PM

Jay... Shes beautiful... She will without a doubt "Shine"! Again, just beautiful...

When Life Hands You A Bucket Of Lemons...

Make Lemonade!

Then Sell It Back At $2 Bucks A Glass...

  • Member since
    December 2009
  • From: Laurel, MD
Posted by Tucohoward on Wednesday, January 21, 2015 7:19 PM

Thanks a lot, Doug. I am pretty happy with how it's going so far.

Jay

The Mighty Mo says no.

  • Member since
    April 2005
Posted by Thunderbolt379 on Wednesday, January 21, 2015 7:20 PM

Yes indeed, Jay, you've done a fierce job of work, and this model is a credit to your skills!

I've had a painting session this morning, I laid on the 02 over the canopy masking, then preshaded the underside in black, and finally laid on the 65. I also zapped the wheels with black, I figured I might as well use the kit wheels and change them out for the TDs when they arrive, it'll save having the almost-finished model standing around potentially for weeks.

Pics tonight, must shoot out to work for a bit!

M/TB379

http://worldinminiature.blogspot.com/

  • Member since
    June 2014
Posted by BrandonK on Wednesday, January 21, 2015 10:51 PM

Wow, that looks stunning. I shelved mine till I get all my PE in. Don't want to get started on something and have to go back. Better to wait. Again, great work my man.

On the bench:

A lot !! And I mean A LOT!!

2024 Kits on deck / in process / completed   

                         14 / 5 / 2  

                              Tongue Tied

  • Member since
    April 2005
Posted by Thunderbolt379 on Thursday, January 22, 2015 1:57 AM

Promised pics -- here's the preshade (Tamiya XF-1):

And the RLM 65 (MM Acryl):

Under this light there's not a lot of visible difference from the plastic, which is annoying. I laid on about three thin coats until the preshade was toned down to an acceptable level, it doesn't show up too well in this photo but it's there.

Next job is to mask the 65 and I'm hoping to get the 70 on tomorrow.

Cheers, M/TB379

http://worldinminiature.blogspot.com/

  • Member since
    January 2015
Posted by BrandonD on Thursday, January 22, 2015 3:22 AM

Jay - that looks sweet! Everyone's are looking real nice.

After realizing that the underside of the Buchon was azure and not hellblau, I got the paint today (Tamiya Sky Blue) and shot the base coat on this evening:

Then I mixed it 50/50 with Tamiya flat white and sprayed my shading coat.

Finally, I thinned the sky blue about 70 percent and shot it over the top of everything until it blended. This is my first time using this method, and I think I'll tone down the shade mix to a 60/40 base/white next time and see how that looks. The white speck in the photo is just a piece of plastic that dropped on it and didn't stick or anything since it was already dry. The lighting is a little harsh - it's more blended in real life.

Now to mask it up and shoot the base coat for my Alclad. Well, I need to do a little more body work up top and describe a few panel lines, so that will take a few days while I wait on my scribing tool to arrive.

Ugh, as I write this, I realize I forgot to shoot the landing gear skin and rocket mounts. Oops.

-BD-

  • Member since
    September 2011
  • From: Milaca, Minnesota
Posted by falconmod on Thursday, January 22, 2015 6:41 AM

Jay-  that is a beautiful job, makes me embarrassed to show mine!      

But here is mine anyway,  got the splinter done and the side mottling,  just a few small paint details and I can start decals!    still have the canopy and LG to paint.

John

On the Bench: 1/72 Ki-67, 1/48 T-38

1/144 AC-130, 1/72 AV-8A Harrier

  • Member since
    December 2009
  • From: Laurel, MD
Posted by Tucohoward on Thursday, January 22, 2015 7:02 AM

Looking good, guys.

Mike, That happens to me too with the preshade not showing up in the photos. Frustrating, but I can picture it in my head.

Brandon, I like that technique. Excellent result.

John, that looks great! Mottling in 1/72 has to be tough, but you did a really nice job overall.

Jay

The Mighty Mo says no.

  • Member since
    February 2013
Posted by Chanter on Thursday, January 22, 2015 11:35 AM

Getting ready to start, but first the essential tools...

The zazzle morphing mug. Yes

GB Mug 2

GB Mug 3

Almost there.

Mug 3

A hot mug-o-deliciousness, complete with Clemens' logo, ready to go.


Allen

ButcherbirdBadgesmall_zps1d50c6bb1944 GB

  • Member since
    April 2013
Posted by SchattenSpartan on Thursday, January 22, 2015 11:55 AM

You guys are pulling off some splendid work here!

Mike: Some great looking masking work you got going there! I usually just cheat and use Eduard masks. Wink Nice painting progress too!

Jay: This one's going to be a real msterpiece when it's done! I love the camo!

Doug: Looks like you're off to a fantastic start on that "roadmap" pattern! Some nice freehand camo work!

John: That little G-6 is coming along nicely as well! I lvoe the mottling you did on it. Nothing to be ashamed off at all!

Brandon: That's one nice blue color! I might have to try that shading technique, the results are speak for themselves for sure!

Allen: Ooh i like that color changing mug! I'm glad you like my design. Smile

Since we are on the subject of mug designs already, I have to apologize to you guys. I sent out the latest batch of designs to everyone who didn't get theirs earlier and screwed it up big time. I intended to send a group PM to all of you, but I just noticed I did something wrong and the only one who recieved it was Mike. I'm in Germany right now (just arrived), so I don't have access to my PC. I'll send them to you again as soon as I come back (Monday evening)

I might have a chance to visit the "German Museum" in Munich this weekend before returning home and they happen to have a Bf 109 on display. If I get there I'm going to take some pics of it Wink

JOIN OUR COMMUNITY!

Our community is FREE to join. To participate you must either login or register for an account.

SEARCH FORUMS
FREE NEWSLETTER
By signing up you may also receive reader surveys and occasional special offers. We do not sell, rent or trade our email lists. View our Privacy Policy.