SEARCH FINESCALE.COM

Enter keywords or a search phrase below:

Mustang Build

80558 views
1582 replies
1 rating 2 rating 3 rating 4 rating 5 rating
  • Member since
    April 2010
Posted by Theuns on Wednesday, September 30, 2015 10:48 AM

I started painting big cockpit parts, here black base with a MM Interior green over it all.


Theuns

  • Member since
    September 2011
Posted by fightnjoe on Wednesday, September 30, 2015 10:27 AM

You are both very kind.  Thank you.


Just remember anyone can do this, most would do it much better.


Joe

Veterans,

Thank You For Your Sacrifices,

Never To Be Forgotten

Where you can find me:

Workbench on FaceBook  Google Plus  YouTube

  • Member since
    September 2014
Posted by rooster513 on Wednesday, September 30, 2015 8:11 AM

Looking awesome Joe! Always like seeing your builds come together. Took a trip out to National Airforce Museum last weekend and they have a F-86 with the skin off and it lets you see all the inner workings of the plane. I saw it and instantly thought of youBig Smile Keep up the great work!

-Andy

  • Member since
    July 2014
Posted by modelcrazy on Tuesday, September 29, 2015 11:22 PM
I think you are doing fantastic Joe. A very ambitious build my man. You are going to submit it to the magazine if I remember correctly. It will make a great addition.
Well I broke down and ordered the 1/32 Tamiya 51D. I'm going to build that instead of the Hase kit. I really don't want to continue to scratch the open flaps right now, I don't have near the scratchbuilding skills Joe has.
 
Steve

Steve

Building a kit from your stash is like cutting a head off a Hydra, two more take it's place.


http://www.spamodeler.com/forum/

  • Member since
    September 2011
Posted by fightnjoe on Tuesday, September 29, 2015 9:33 PM

After about ten days of frustration, anger, cussing, and even some blood shed here is an update.  

Work continues on the radio equipment.  As it stands now much of the fabrication is done.  Cables were added by using a larger diameter wire and fitting it into the structures.  This was nearly the end of this build.  In the end it works and looks decent.  Again this is not to be a 100% accurate replica, just a relative imitation.  

...

I need to add a few more bits and bobs but for the most part I am near the point I can start to tackle the cockpit.  The seat frame is off a bit but I am not sure I can fix it.  I may go with this for this build and then do a better job on the next.

All comments, critiques, and criticism are encouraged.


Joe

Veterans,

Thank You For Your Sacrifices,

Never To Be Forgotten

Where you can find me:

Workbench on FaceBook  Google Plus  YouTube

  • Member since
    April 2010
Posted by Theuns on Sunday, September 27, 2015 11:18 AM
It is going surprizingly quick. I got the engine painted up aswell as the firewall basic assembly done. One expects a big kit with loads of detail to take alot longer but the engineering is so good it goes together (so far) very fast......hope it continues lke this. Theuns
  • Member since
    July 2014
Posted by modelcrazy on Sunday, September 27, 2015 10:29 AM

Sounds good Theuns, I think I'm going to trash my Has kit and get that Taimya kit instead. I still have the AM cockpit and PE which should work for it. I'm intrested to see how it goes together.

Steve

Building a kit from your stash is like cutting a head off a Hydra, two more take it's place.


http://www.spamodeler.com/forum/

  • Member since
    April 2010
Posted by Theuns on Sunday, September 27, 2015 3:56 AM
OK, so after putting it off and drooling over my Tam 1/32 Mustprang for 2 years now I am going to start it....I am happy that I have the basic Alclad skills to do it justice. Pix to follow soon. Theuns
  • Member since
    December 2013
Posted by CodyJ on Wednesday, September 23, 2015 1:47 AM

lzdaily@comcast.net

Well, I solved my problem with the oversized letters on my F-6B. After some searching, I found replacement letters at Kits-World. I ordered a sheet and set about removing the too-large letters. I had to do a bit of touch up to the paint, but the removal went pretty well overall. After a surprisingly short wait (Kits-World is in Great Britain), the decals arrived and I was back in business. This is the first time I’ve used Kits-World decals and they worked out pretty well. They snuggled down with no problems and didn’t really even need setting solution. Once the decals were on, I overcoated them with Future. When that was dry, I accented the panel lines with a burnt umber oil paint wash and then over sprayed the whole model with a light coat of Model Masters Afrika Khakibraun. Next up is a final coat of Model Masters Flat Clear.

Larry
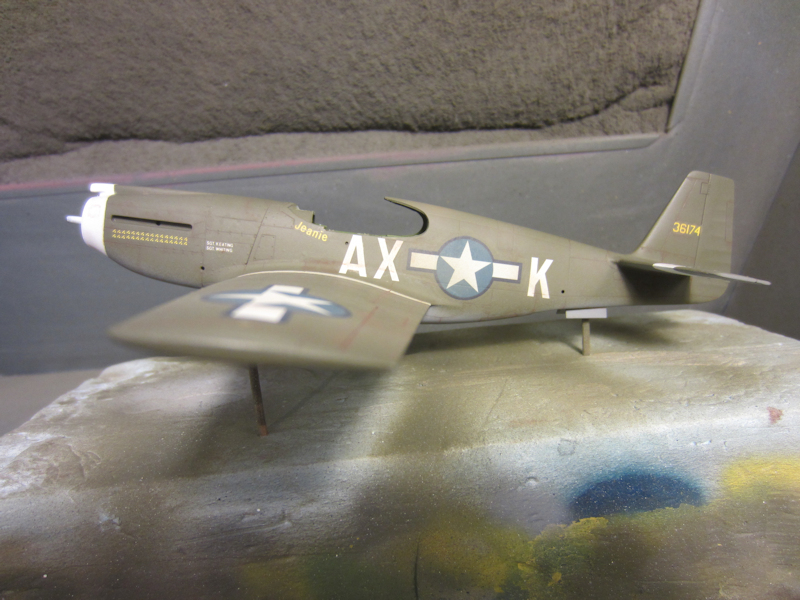


Excellent save!  Wouldnt have noticed you had a hitch if you hadn't mentioned it.  Looks Super!  Its always nice when you get something fixed and it looks better than if you left it.  Sometimes there are things I see that I want to fix on a model but am completely scared stiff that I will mess it up in the process.  Indifferent

  • Member since
    July 2013
Posted by lzdaily@comcast.net on Sunday, September 20, 2015 4:39 PM

Well, I solved my problem with the oversized letters on my F-6B. After some searching, I found replacement letters at Kits-World. I ordered a sheet and set about removing the too-large letters. I had to do a bit of touch up to the paint, but the removal went pretty well overall. After a surprisingly short wait (Kits-World is in Great Britain), the decals arrived and I was back in business. This is the first time I’ve used Kits-World decals and they worked out pretty well. They snuggled down with no problems and didn’t really even need setting solution. Once the decals were on, I overcoated them with Future. When that was dry, I accented the panel lines with a burnt umber oil paint wash and then over sprayed the whole model with a light coat of Model Masters Afrika Khakibraun. Next up is a final coat of Model Masters Flat Clear.

Larry

  • Member since
    January 2014
  • From: Nampa, Idaho
Posted by jelliott523 on Sunday, September 20, 2015 11:48 AM

Sorry, dont have any progress pics to post today; however, I just wanted to say, the kit I'm working on is going to be a definite "putty-bucket". I could not believe at how poor the fit was in this kit. Major seam lines that I couldnt get to line up at all, huge canyons at the wing root and the lower engine cowling was thin and mishaped. I did get a chance to try out my new tube of Perfect Plastic Putty, I love this stuff. It goes on easily, smoothes down with a moist finger and doesnt shrink.

On the Bench:  Lots of unfinished projects!  Smile

  • Member since
    September 2011
Posted by fightnjoe on Saturday, September 19, 2015 1:37 PM

Todays update will show the work on the radio equipment (SCR 522 A) as well as the work on the pilot seat.


First, here is the kit version of the radio equipment.


And now what I have done. This is not complete but I would say the radio equipment is about 70% complete.


I will be continuing to work on this over the next couple of days and then I will move on to the remaining bits aft the cockpit.


All comments, critiques, and criticism are encouraged.


Joe

Veterans,

Thank You For Your Sacrifices,

Never To Be Forgotten

Where you can find me:

Workbench on FaceBook  Google Plus  YouTube

  • Member since
    January 2014
  • From: Nampa, Idaho
Posted by jelliott523 on Wednesday, September 16, 2015 3:51 PM

I'm sure it is, its a pretty old mold and there is quite a bit of flash that I've had to trim off almost every piece. I think it will turn into a decent build in the end, probably a 4-footer, but it wont be too bad IMO.

On the Bench:  Lots of unfinished projects!  Smile

  • Member since
    July 2014
Posted by modelcrazy on Wednesday, September 16, 2015 1:14 PM

Hmmm, I wonder if that is the same mold as the Revellogram kit.

Steve

Building a kit from your stash is like cutting a head off a Hydra, two more take it's place.


http://www.spamodeler.com/forum/

  • Member since
    January 2014
  • From: Nampa, Idaho
Posted by jelliott523 on Wednesday, September 16, 2015 12:31 PM

Some quick pics of my P-51D 1/48 Monogram. Sorry for the dark photos. Got to finish up painting the detail and some weathering and then I'll button her up and get it ready for paint. Hopefully have some more progress in the next few days.

On the Bench:  Lots of unfinished projects!  Smile

  • Member since
    September 2011
Posted by fightnjoe on Wednesday, September 16, 2015 10:03 AM

modelcrazy
Outstanding work Joe. I really can't tell from the spoon picture, but from what I can see, I would agree with you. What are you going to do for the wings and stabilizer color? From what I understand they were typically painted with a silver lacquer and not a NM finish, but I certainly could be wrong.
Steve


I used Model Master Metalizer Aluminium Plate.  I did no polishing to the wings but it has a decent look to it.  You are definitely right, the wings were puttied, sanded, and then painted with an Aluminium Dope.


Joe

Veterans,

Thank You For Your Sacrifices,

Never To Be Forgotten

Where you can find me:

Workbench on FaceBook  Google Plus  YouTube

  • Member since
    July 2014
Posted by modelcrazy on Tuesday, September 15, 2015 10:03 PM
Outstanding work Joe. I really can't tell from the spoon picture, but from what I can see, I would agree with you. What are you going to do for the wings and stabilizer color? From what I understand they were typically painted with a silver lacquer and not a NM finish, but I certainly could be wrong.
Steve

Steve

Building a kit from your stash is like cutting a head off a Hydra, two more take it's place.


http://www.spamodeler.com/forum/

  • Member since
    September 2011
Posted by fightnjoe on Tuesday, September 15, 2015 9:37 PM

Here I am again.

Just a quick update on where the P-51D is at the moment.

I have begun on the interior.

I began by rough cutting the interior bulkheads for the area aft the cockpit.

...

From there I went to starting the detail work.  Beginning with the frame work for the SCR 522 A, I also fabricated the fuel tank which lies behind the cockpit.  

...

The wing is near complete.  The only thing left to do is the cables for the wing guns.

...

I also played just a bit with the color as I want it to appear.  In the picture below you will see three plastic spoons.  The one on the left is Testors Gloss Black, the one in the center is Rustoleum Gloss White, and the one on the right is Testors Gloss Gray.  They are all three sprayed with Alclad Airframe Aluminium.  After several days of consideration I will be going with the Gloss Gray as the undercoat.  It just looks better to me.

...


Next up is to work some on the radio equipment.

All comments, critiques, and comments are encouraged.


Joe

Veterans,

Thank You For Your Sacrifices,

Never To Be Forgotten

Where you can find me:

Workbench on FaceBook  Google Plus  YouTube

  • Member since
    July 2013
Posted by lzdaily@comcast.net on Sunday, September 13, 2015 11:49 AM

I have the decals on my F-6B, but I am NOT a happy camper. In the photo that I have of Jeanie, the 32 mission markings stretched from right behind the whote on the nose to the panel line in front of the crew names. The decal (which was on the sheet, bured in the markings for another aircraft) doesn’t come close to that. Then there are the letters. The photo clearly shows the “AX” right below the cockpit; the A is just aft of the flare gun port. The decal letters are over large and moving them that far forward would have put the bottom 1/3 of the “A” on the wing. Not sure what I’m going to do at this point. Opinions?

  • Member since
    July 2014
Posted by modelcrazy on Saturday, September 12, 2015 12:53 PM

IZ,

I don't think I do. I have Monogram's 51, but I'll look. 

Steve

Building a kit from your stash is like cutting a head off a Hydra, two more take it's place.


http://www.spamodeler.com/forum/

  • Member since
    July 2013
Posted by lzdaily@comcast.net on Saturday, September 12, 2015 12:33 PM

BrandonD, great job on the cockpit so far.

After a crazy week at work, I finally got back to my workbench. Jeanie has finally had a trip (several, actually) to the paint booth. I was following the painting diagram that came with the decals, which simply called for Olive Drab over Neutral Gray. Of course, right after I sprayed those colors, I finally obtained a photo of the plane that clearly showed a white nose and white ETO ID stripes on the wings. In the photo, Jeanie is also wearing 32 mission markings that look the same as the ones that AM included with Little Sir Echo. I have the Little Sir Echo decals that came with the kit, but there aren't 32 mission markings. Anyone have extras that they'd be willing to sell or trade for?

Larry


  • Member since
    July 2014
Posted by modelcrazy on Saturday, September 12, 2015 2:02 AM

BrandonD
This will be my first real stab at a natural metal finish, which is why I've put it off until now. But there's no time like the present, so...


I'm sure you will do fine. It will turn out outstanding like all your builds.

Steve

Building a kit from your stash is like cutting a head off a Hydra, two more take it's place.


http://www.spamodeler.com/forum/

  • Member since
    January 2015
Posted by BrandonD on Saturday, September 12, 2015 12:05 AM

Hi all,

I'm back into this group build now (finally) with my Tamiya 1/48 P-51 Mustang. This will be built and marked as Capt. John Meyer's Petie 2nd in 1944.

This will be my first real stab at a natural metal finish, which is why I've put it off until now. But there's no time like the present, so...

I got the Eduard cockpit detail set for $5, so I went ahead and added that in. The green is matched with Gunze paints, but I don't have those, so I painted around the details by brush with Model Master acrylic.

The Eduard set isn't earth-shattering, but it is an upgrade, and for $5, I think it was worth it.

At this point, I still need to do some touching up, some washes and get a flat clear on it to hide the shiny bits, but I should close the fuselage soon.

Not pictured is the guns I drilled out and replaced with Albion Alloys tubing. I'm not sure that did much more than if I had just drilled them out, but we will see.

-BD-

  • Member since
    July 2013
Posted by lzdaily@comcast.net on Thursday, September 10, 2015 5:35 AM

Thanks, Steve! Those help.

A friend sent me a scan of a photo of "Jeanie" from the book P-51 Mustang: A Photo Chronicle. It doesn't show the antenna so well, but it does show some other things. The plane had white stripes on the wings that weren't called out on the decal sheet. It also had a white nose and mission markings similar to the ones on "Little Sir Echo." Jeanie had 32 mission markings, though, a few more than Little Sir Echo. Anyone have a spare sheet from Little Sir Echo they'd be willing to sell or trade for?

Larry

  • Member since
    July 2014
Posted by modelcrazy on Wednesday, September 9, 2015 11:21 PM

IZ,

Try these.


I know their hard to see, but they help.
Steve

Steve

Building a kit from your stash is like cutting a head off a Hydra, two more take it's place.


http://www.spamodeler.com/forum/

  • Member since
    July 2013
Posted by lzdaily@comcast.net on Wednesday, September 9, 2015 5:58 PM

Hello, all.

I hope asking questions is OK. I'm working on an Accurate Miniatures F-6B. I plan to mark it as Jeanie, an aircraft assigned to the 107th Tac. Recon. Squad / 67th Recon. Group at LeMolay Airdrome, France in 1944. That aircraft - according to the decal sheet - had a Malcolm hood, which is one of the reasons I chose it. The problem is, I can't find any photos of Jeanie or any other Mustang with a Malcolm hood that clearly shows the whip antenna (the decal sheet drawing actually shows Jeanie with the standard antenna mast, which I guess is fine if you don't need a pilot to get in or out of the aircraft). Can anyone point me to a nice clear photo of a whip antenna installation so that I can model it correctly?

Thanks all,Larry

  • Member since
    January 2014
  • From: Nampa, Idaho
Posted by jelliott523 on Monday, September 7, 2015 10:57 AM

Yes, I'm still going to do the B model as well. I figured this would be a quick build and I wanted to contribute something.

Here's the boxart for the 1/32 B that I will be doing (only exception is that I will be doing her as the Boise Bee).

I had never seen this one either, I found it on EB a while back and got it for less than list price with free shipping. It was a sealed box. It's definitely old, the instructions sheets are pretty yellowed; however, the decal sheets look okay, I'll find out as soon as I try to use them if they are going to disintegrate.

The B-17 will be kept on the shelf awhile.  Way too many things ahead of it.

On the Bench:  Lots of unfinished projects!  Smile

  • Member since
    July 2014
Posted by modelcrazy on Monday, September 7, 2015 10:09 AM
I got you down Jeremy. Did you still want to build the 1/32 B model?
That’s a cool combo pack. I don’t believe I have ever seen that kit before.

Steve

Building a kit from your stash is like cutting a head off a Hydra, two more take it's place.


http://www.spamodeler.com/forum/

  • Member since
    January 2014
  • From: Nampa, Idaho
Posted by jelliott523 on Monday, September 7, 2015 9:57 AM

 Picked up this kit awhile back on the cheap. I'll be adding the P-51D that is included with this kit into this group build. I'll have some pictures up tonight of the progress I've made so far before I start assembly. It is going to be built straight OOB. So far its not too bad, quite a bit of flash, but its easily being cleaned up. Not too bad for a kit that's almost 30 years old.


On the Bench:  Lots of unfinished projects!  Smile

  • Member since
    June 2008
Posted by lewbud on Sunday, September 6, 2015 6:21 PM

I've started my 1/72 Tamiya bird.  Interior walls are painted, and photoetch is attached. Sorry for the crappy pics, I only have my cell phone camera at the moment.  Don't know whose markings she'll be in, right now smart money is on a post war scheme from the Dutch East Indies.

Buddy- Those who say there are no stupid questions have never worked in customer service.

JOIN OUR COMMUNITY!

Our community is FREE to join. To participate you must either login or register for an account.

SEARCH FORUMS
FREE NEWSLETTER
By signing up you may also receive reader surveys and occasional special offers. We do not sell, rent or trade our email lists. View our Privacy Policy.