SEARCH FINESCALE.COM

Enter keywords or a search phrase below:

Floats and Boats: Amphibious Aircraft Group Build

28980 views
865 replies
1 rating 2 rating 3 rating 4 rating 5 rating
  • Member since
    January 2016
  • From: A Galaxy Far, Far Away
Posted by Hunter on Wednesday, April 6, 2016 6:02 PM

Hello fella's,

Well I got the Albatross mess cleaned up and out of the way for now. I have got my second entry out and just finished cleaning and priming the spurs. I am going to let them cure over night before assembling it. I have deceided to set this build in a "Backcountry" setting diorama.

This is a MiniCraft 1/48th Cessna SkyHawk 172. This is going to ba a straight forward build. This will allow me time to work on my very first diorama. I have been lucky enough to gain alot of tips and information from Steve (Modelcrazy) on how to layout and construct a water base for my idea. Thank you very much Steve for all of your time, tips and suggestions. I really appreciate the time you took to provide me with all of that.

Here is the kit itself.....

As you can see....pretty easy and straight forward kit.


Hunter 


  • Member since
    March 2015
  • From: Streetsboro, Ohio
Posted by Toshi on Wednesday, April 6, 2016 6:43 PM

Bish

Toshi, great job on the Cat.

Hunter, ooooooooooooo, that not good. But your a better man than me. If that was me, my other half would not hear the last of it for months, or at least until she bought me at least one kit. Big Smile

But i am just evil that way. Wink


Thank you Bish.  That was one huge project.

On The Bench: Revell 1/48 B-25 Mitchell


Married to the most caring, loving, understanding, and beautiful wife in the world.  Mrs. Toshi


  • Member since
    March 2015
  • From: Streetsboro, Ohio
Posted by Toshi on Wednesday, April 6, 2016 6:46 PM

Hunter

Hello Toshi,

Thank you buddy. Your Catalina turned out great! I really like the paint job. You the man Toshi Big Smile


Thank you sir.  That was a lot of paint for one big bird!  LOL!

Toshi

On The Bench: Revell 1/48 B-25 Mitchell


Married to the most caring, loving, understanding, and beautiful wife in the world.  Mrs. Toshi


  • Member since
    July 2014
Posted by modelcrazy on Wednesday, April 6, 2016 7:05 PM

Hunter, 

At 1/72 that has got to be a wee little thing. Looks like a fun quick build and one that will allow you to concentrate on the water scene. 

Steve

Building a kit from your stash is like cutting a head off a Hydra, two more take it's place.


http://www.spamodeler.com/forum/

  • Member since
    June 2014
Posted by BrandonK on Wednesday, April 6, 2016 7:06 PM

Toshi, great finish. I LOVE IT !! Which pic do you want on the front page?

Hunter, I am looking forward to the new kit. It looks pretty cool.

BK

On the bench:

A lot !! And I mean A LOT!!

2024 Kits on deck / in process / completed   

                         14 / 5 / 2  

                              Tongue Tied

  • Member since
    December 2003
  • From: 37deg 40.13' N 95deg 29.10'W
Posted by scottrc on Wednesday, April 6, 2016 8:52 PM

Well GB friends, this project is about ready to make me go insane.  The clear front windscreen, which is a two part assembly, is about 1/8" TOO DAMN SMALL  overall and the wing won't fit. I spent all week triming, sanding, filing, filling, and sanding and the kit is now sorta resembling a Goose.  Now to figure out where to trim to get the wing assembly to fit without having to do a bunch of filling.  Oh, and as I type this, the glue is outgassing and fogging the clear wind screen.  I must have used too much.

Hunter, sorry for the Albatross, I had that happen a few times and my response has been that it just gives me an excuse to keep on building.  Hmmm, I am having evil thoughts of placing this Goose in a spot where it might meet a demise with a purse or crazy house cat.

Toshi, you are really making some beautiful aircraft. I am glad you are in this GB.  It was a pleasure building along side with you. 

Well, back onto the Goose.  Wish me luck, I'm about to cook it!

 Scott

  • Member since
    April 2006
  • From: ON, Canada
Posted by jgeratic on Wednesday, April 6, 2016 10:57 PM

Toshi, a fine job representing that big amphib.  Yes It certainly is huge, isn't it - only room I would have for display is hanging from a ceiling.

Hunter, that is unfortuneate about the accident, but these things happen.  Good on you for keeping cool about it.

Scott, hang in there bud.  It's crazy the stuff we sometimes put ourselves through.

-----------------------
Thank you BrandonK, Bish, and Hunter.

Since the floats required some putty work, I decided to go ahead and fix their shape.  They look like they needed a bit deeper curve at the forward bottom end when compared to this side profile line drawing:
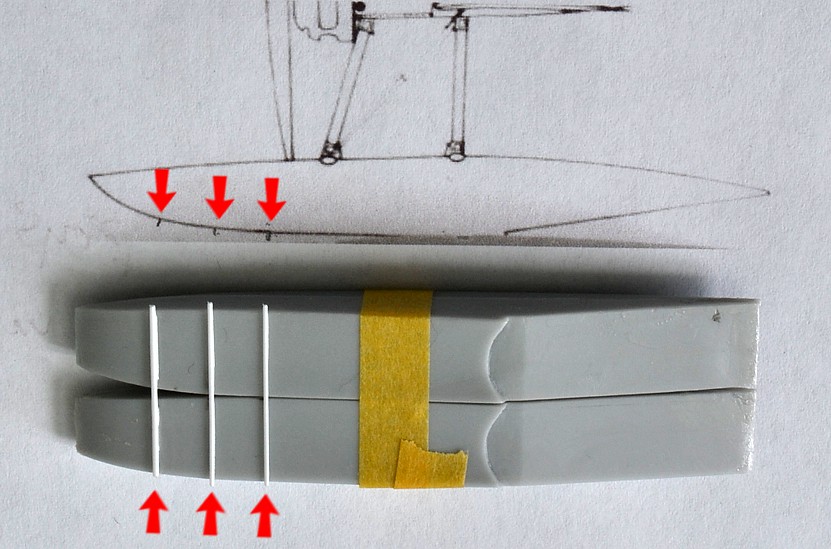
To ensure they receive equal treatment, the pair were taped together.  After careful study, three points were found as appropriate area for 'fattening up'.  The 0.5mm rods were glued straight across both, and once dry, separated with a sharp knife.
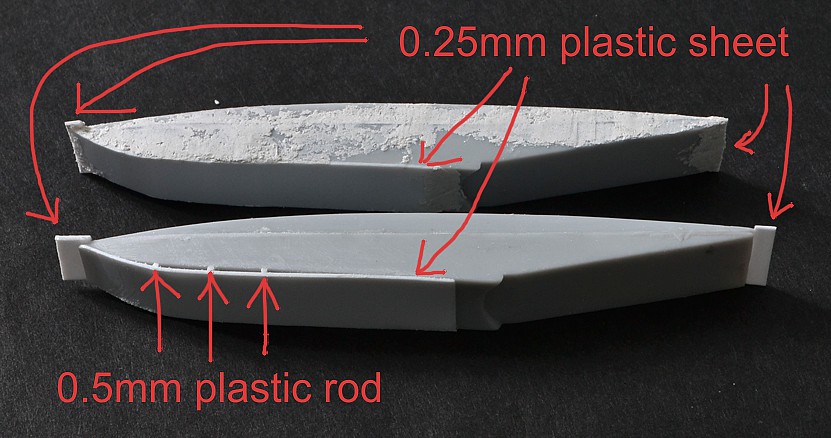
A narrow strip of sheet plastic (just slightly wider than the floats themselves), was glued in place.  I started from the rear and moved forwards, allowing some dry time at each new curved point.  The front and back ends also received some sheet plastic to fix the steps created from the uneven fit.  Followed up with some carving of excess plastic and a little sanding.  Then it was time to go nutz with the putty ....

regards,

Jack

  • Member since
    January 2016
  • From: A Galaxy Far, Far Away
Posted by Hunter on Thursday, April 7, 2016 8:17 AM

scottrc
Hunter, sorry for the Albatross, I had that happen a few times and my response has been that it just gives me an excuse to keep on building.  Hmmm, I am having evil thoughts of placing this Goose in a spot where it might meet a demise with a purse or crazy house cat.

Hey Scott - 

LMHO!!....I could be evil and milk it for everything it is worth(LOL). I couldn't do it though, the guilt would eat me alive. Great idea my friend. I'm sorry to hear that you have to fight this build the whole time. Good luck with it buddy.

Hunter 


  • Member since
    January 2016
  • From: A Galaxy Far, Far Away
Posted by Hunter on Thursday, April 7, 2016 8:21 AM

Jack - 

Sir you have some very serious scratch building skills...Thank you for posting such a greatly detailed and informative build. I have enjoyed watching you work.

Hunter 


  • Member since
    August 2015
  • From: the redlands Fl
Posted by crown r n7 on Thursday, April 7, 2016 8:55 AM

man you guy's eyes,working on 1/72 little float planes Geeked most impressive still working on pbm-5 cockpit hurts my eyes zinc yellow and interior green yuck. sorry to hear on the albatross shelf it for another time.


 Nick.

  • Member since
    June 2014
Posted by BrandonK on Thursday, April 7, 2016 9:34 AM

Wow Jack, those floats are nearly scratch built now. Man, I can't wait to see this assembled and in paint.

BK

On the bench:

A lot !! And I mean A LOT!!

2024 Kits on deck / in process / completed   

                         14 / 5 / 2  

                              Tongue Tied

  • Member since
    December 2003
  • From: 37deg 40.13' N 95deg 29.10'W
Posted by scottrc on Thursday, April 7, 2016 9:56 AM

Jack,  I got to put that kit on my bucket list.  It looks like you are having a lot of fun with it.  I know we are enjoying the build.

Scott

  • Member since
    August 2014
  • From: Willamette Valley, Oregon
Posted by goldhammer on Thursday, April 7, 2016 1:43 PM

modelcrazy

Hunter, 

At 1/72 that has got to be a wee little thing. Looks like a fun quick build and one that will allow you to concentrate on the water scene. 


I thought it was too, and another look at the box says 1/48.  Still almost too small for my hooks.  The biggest difference is more resin needed now..........


Will be fun to see as Hunter's skills are progressing rapidily.

  • Member since
    July 2014
Posted by modelcrazy on Thursday, April 7, 2016 2:14 PM

1/48 is a world of diffrence then.

Steve

Building a kit from your stash is like cutting a head off a Hydra, two more take it's place.


http://www.spamodeler.com/forum/

  • Member since
    March 2015
  • From: Streetsboro, Ohio
Posted by Toshi on Thursday, April 7, 2016 3:41 PM

BrandonK

Toshi, great finish. I LOVE IT !! Which pic do you want on the front page?

Hunter, I am looking forward to the new kit. It looks pretty cool.

BK


Anyone, I'll let you pick!

Toshi

On The Bench: Revell 1/48 B-25 Mitchell


Married to the most caring, loving, understanding, and beautiful wife in the world.  Mrs. Toshi


  • Member since
    January 2016
  • From: A Galaxy Far, Far Away
Posted by Hunter on Thursday, April 7, 2016 6:25 PM

goldhammer


modelcrazy

Hunter, 

At 1/72 that has got to be a wee little thing. Looks like a fun quick build and one that will allow you to concentrate on the water scene. 


I thought it was too, and another look at the box says 1/48.  Still almost too small for my hooks.  The biggest difference is more resin needed now..........


Will be fun to see as Hunter's skills are progressing rapidily.


Steve and GH - 

Just notice Steve's original post about the scale. Yeah it's a 1/48th scale Cessna. I do have a AirFix 1/72 scale kit that I am waiting to build. I agree with you Steve, 1/72 scale is very small. I just back from Hobby Lobby where I purchased the items needed to do the water dio. I am looking forward to that stage of my build.

Hunter 


  • Member since
    January 2016
  • From: A Galaxy Far, Far Away
Posted by Hunter on Thursday, April 7, 2016 6:30 PM

crown r n7

man you guy's eyes,working on 1/72 little float planes Geeked most impressive still working on pbm-5 cockpit hurts my eyes zinc yellow and interior green yuck. sorry to hear on the albatross shelf it for another time.


Thanks CRN7 - 

I plan on going back to it after I complete this plus 2 other GB's. I am going to try and fix it or if I can't I'll keep all the parts that weren't damaged and save them.

Hunter 


  • Member since
    January 2015
Posted by BrandonD on Friday, April 8, 2016 1:29 PM

Oh, man, I'm sorry to hear about that, Hunter. Sounds like a tough break on a model that was really shaping up nicely. That said, I agree with the others -- it's just a kit, and having a wife who thinks about you and cares enough to buy you something for your hobby to surprise you with is worth far more than all the plastic planes you can accumulate.

Looking forward to seeing more of the Cessna.

-BD-

  • Member since
    January 2016
  • From: A Galaxy Far, Far Away
Posted by Hunter on Saturday, April 9, 2016 9:50 AM

BrandonD - 

Yes friend, I am lucky to have such a wonderful wife. I never got upset or mad over it. Because as you stated it's just a plastic plane...that's all.

Hunter 


  • Member since
    August 2015
  • From: the redlands Fl
Posted by crown r n7 on Saturday, April 9, 2016 4:46 PM

up date on my PBM-5 cockpit not much detail but i can see why its going to get lost in the twilight zone


 Nick.

  • Member since
    June 2014
Posted by BrandonK on Saturday, April 9, 2016 4:52 PM

Those pics make the PBM look like it is similar in size the the B-17. Nice looking work thus far.

BK

On the bench:

A lot !! And I mean A LOT!!

2024 Kits on deck / in process / completed   

                         14 / 5 / 2  

                              Tongue Tied

  • Member since
    August 2015
  • From: the redlands Fl
Posted by crown r n7 on Saturday, April 9, 2016 5:44 PM

ok the seats are in a little black wash maybe the pilot and co pilot section


 Nick.

  • Member since
    January 2016
  • From: A Galaxy Far, Far Away
Posted by Hunter on Sunday, April 10, 2016 9:10 AM

CRN7 - 

Looking great sir, alot of nice detail on the pit. 

Hunter 


  • Member since
    December 2003
  • From: 37deg 40.13' N 95deg 29.10'W
Posted by scottrc on Sunday, April 10, 2016 10:07 AM

Hey Crown, coming along well on the PBY.  Well, time for my weekly update, here are some pics of what has transpired. First, the results of installing the wing and front windscreen. Man, that was a painful process.  I thought I had everything lined up and would not have to use much filler.  In the end, it just wasn't meant to be without scratchbuilding a whole new front part of the plane. 

  • Member since
    December 2003
  • From: 37deg 40.13' N 95deg 29.10'W
Posted by scottrc on Sunday, April 10, 2016 10:09 AM

Then the installation of the horizontal stabs.  I had to drill holes and then install pins.

  • Member since
    December 2003
  • From: 37deg 40.13' N 95deg 29.10'W
Posted by scottrc on Sunday, April 10, 2016 10:11 AM

Fill, sand, wash, check, and repeat.........

  • Member since
    December 2003
  • From: 37deg 40.13' N 95deg 29.10'W
Posted by scottrc on Sunday, April 10, 2016 10:15 AM

And here is where I am at this morning. I just filled the pinholes and gaps around the wake guard.  Then the plane gets another bath, mask everything up and its off to the paintshop for priming.  The plastic is so soft that even 900 grit sandpaper shows horrible scratches, so I'm using a filler primer, then wet sand, then plan to re-scribe the whole plane.

  • Member since
    June 2014
Posted by BrandonK on Sunday, April 10, 2016 11:31 AM

scottrc

And here is where I am at this morning. I just filled the pinholes and gaps around the wake guard.  Then the plane gets another bath, mask everything up and its off to the paintshop for priming.  The plastic is so soft that even 900 grit sandpaper shows horrible scratches, so I'm using a filler primer, then wet sand, then plan to re-scribe the whole plane.


Scottrc, its looks amazing. If you didn't tell me all about your issues I wouldn't have known; you've fixed them all that well. This is really gonna be a super nice build, no doubt. I often wet sand also, I just hate having to wash them up afterwards and get everything wet, but it's worth it in the end. And as far as a full rescribe, wowzers !! That's gonna take some time, but it will look stunning when complete. Keep the updates coming.

BK

On the bench:

A lot !! And I mean A LOT!!

2024 Kits on deck / in process / completed   

                         14 / 5 / 2  

                              Tongue Tied

  • Member since
    December 2003
  • From: 37deg 40.13' N 95deg 29.10'W
Posted by scottrc on Sunday, April 10, 2016 12:29 PM

Thanks Brandon.

Looking at all the curves on this plane, I am considering using tape for the panel lines.  I found some .010" wide graphic tape that will work.  For those who are not familiar with this process, you do one base coat of primer, then draft out where the panel lines will go, lay tape over the lines, then spray several coats of primer. Once dry, pull the tape and you now have recessed panel lines.  I've done it many times on 1/4 scale rc aircraft, but never on a 1/48 scale model, so it could be interesting.

  • Member since
    January 2016
  • From: A Galaxy Far, Far Away
Posted by Hunter on Sunday, April 10, 2016 12:42 PM

Scott - 

A job very well done friend. You did such a wonderful job over coming all the hurdles of this kit. I can't believe how well it looks. Awesome job!!

Hunter 


JOIN OUR COMMUNITY!

Our community is FREE to join. To participate you must either login or register for an account.

SEARCH FORUMS
FREE NEWSLETTER
By signing up you may also receive reader surveys and occasional special offers. We do not sell, rent or trade our email lists. View our Privacy Policy.