SEARCH FINESCALE.COM

Enter keywords or a search phrase below:

Floats and Boats: Amphibious Aircraft Group Build

28983 views
865 replies
1 rating 2 rating 3 rating 4 rating 5 rating
  • Member since
    December 2003
  • From: 37deg 40.13' N 95deg 29.10'W
Posted by scottrc on Saturday, March 19, 2016 11:26 AM

Well!!!!!!!!!!!!!!!!! This build has gotten interesting.  I thought this was a pretty straitforward kit, but it is not.  There are a number of problems to overcome.  First, the gating on the trees is extremenly thick and there are no alignment pins nor are the parts numbered.  Its going to be like a vacume form kit.

Major problem is the 1/8" high ejector marks that need to be sanded down.  Even a greater issue is one side of the fuselage is larger than the other side.  Thus, fit issues up the whazoo.

  • Member since
    January 2016
  • From: A Galaxy Far, Far Away
Posted by Hunter on Saturday, March 19, 2016 12:21 PM

scottrc

Well!!!!!!!!!!!!!!!!! This build has gotten interesting.  I thought this was a pretty straitforward kit, but it is not.  There are a number of problems to overcome.  First, the gating on the trees is extremenly thick and there are no alignment pins nor are the parts numbered.  Its going to be like a vacume form kit.

Major problem is the 1/8" high ejector marks that need to be sanded down.  Even a greater issue is one side of the fuselage is larger than the other side.  Thus, fit issues up the whazoo.


Scott - 

Sorry too hear that you are having a rough start of it. Which brand of kit is this? And have you had issues before with this brand in the past? With alittle patience and putty you'll have it looking great. 

Hunter 


  • Member since
    March 2015
  • From: Streetsboro, Ohio
Posted by Toshi on Saturday, March 19, 2016 12:37 PM

BrandonK

Toshi, it is amazing how you build at such warp speed and still produce such fine work.

BK


I just have lots of time on my hands.  LOL!  As far as producing fine work, I learn from you and other members of FSM forum.

Toshi

On The Bench: Revell 1/48 B-25 Mitchell


Married to the most caring, loving, understanding, and beautiful wife in the world.  Mrs. Toshi


  • Member since
    June 2014
Posted by BrandonK on Saturday, March 19, 2016 6:41 PM

Well Scott, it wouldn't be much fun if they all just fell together. Sometimes it's good to have a challange. I know you'll pull it off and I'm lovin' watching it.

BK

On the bench:

A lot !! And I mean A LOT!!

2024 Kits on deck / in process / completed   

                         14 / 5 / 2  

                              Tongue Tied

  • Member since
    November 2008
  • From: Central Florida
Posted by plasticjunkie on Saturday, March 19, 2016 8:11 PM

BK

I will be jumping in here pretty soon with my Jake. My bench time had been limited due to family duties But I will squeeze some time in here.

 GIFMaker.org_jy_Ayj_O


Too many models to build, not enough time in a lifetime!!

  • Member since
    December 2003
  • From: 37deg 40.13' N 95deg 29.10'W
Posted by scottrc on Saturday, March 19, 2016 8:34 PM

Hey Hunter, this is a JRF Goose by Czech Models.  Its a limited edition kit that is currently sold under Squadron.  I would say it would be for an experienced modeler. I never built a kit from this company before. 

Brandon, thanks for the confidence, this one is really forcing the old tricks to come out of the closet, and for as long as I have been from aircraft modeling theres a few cobwebs in the tricks box.  This kit is forcing me to think ahead, especially when installing the front windscreen.  Attaching the wing is also going to take a lot of time test fitting and sanding to get a good fit.

Here are pics of what the rest of the weekend will entail, a date with files, a nice sharp knife, and sanding sticks and sandpaper.  Its time to form, fit, sand, and fit some more, just like building an old vacuform kit.

  • Member since
    March 2015
  • From: Streetsboro, Ohio
Posted by Toshi on Sunday, March 20, 2016 12:12 AM

At this juncture on this overcast and cold Saturday afternoon I did some prepping on the PBY-5.  Nothing but sanding.  I did this as Mrs. Toshi and I had a date night.  The first place we went to on our date was grocery shopping LOL then to hobby lobby for some much needed paints.  She also got me a Revell Pro-Modeler Messerschmitt Me 410B-6/R-2.  This will be my first ever pro-modeler.  We then proceeded to Chilis for a wonderful dinner experience.  Off to Walmart to by Mrs. Toshi a Cosmetic case.  Final stop?  Steak & Shake for some old fashion milk shakes.  I'm a chocolate malt guy.  Mrs. Toshi is a heath shake girl.

Once home, I primed the Catalina with Tamiya Gray Lacquer Primer.  I gave it a first coat, then I took a 1200 grit sand paper and very carefully as well as lightly sanded the entire PBY-5 smooth.  Then I resprayed the Catalina once again for the evening.  I can not paint the base coat as I have no intermediate blue in my inventory.  So off to eBay I went and purchased the intermediste blue.  Until I recieve my intermediate blue, I'll work on either the pro-modeler Me 410B-6/R2 or the Kitty Hawk OV-10D Bronco.  I'll let Mrs. Toshi choose which one.  LOL!  

So for now, here is the current update for this Saturday.  Thank you my fellow forum members for your support.

Toshi


On The Bench: Revell 1/48 B-25 Mitchell


Married to the most caring, loving, understanding, and beautiful wife in the world.  Mrs. Toshi


  • Member since
    March 2015
  • From: Streetsboro, Ohio
Posted by Toshi on Sunday, March 20, 2016 12:15 AM

On The Bench: Revell 1/48 B-25 Mitchell


Married to the most caring, loving, understanding, and beautiful wife in the world.  Mrs. Toshi


  • Member since
    June 2014
Posted by BrandonK on Sunday, March 20, 2016 10:58 AM

Looking really good, Toshi. You are moving right along as usual. There is a lot of surface area there that needs some love, ie all that sanding. This is gonna be one fine looking bird. 

BK

On the bench:

A lot !! And I mean A LOT!!

2024 Kits on deck / in process / completed   

                         14 / 5 / 2  

                              Tongue Tied

  • Member since
    December 2003
  • From: 37deg 40.13' N 95deg 29.10'W
Posted by scottrc on Monday, March 21, 2016 7:43 AM

Looks good Toshi, I am looking forward to doing the same process on my old floatbird.

  • Member since
    August 2015
  • From: the redlands Fl
Posted by crown r n7 on Monday, March 21, 2016 9:30 AM

I gave up on mine the wheels dont line up you have to drill a hole in both plastic and resin engines  you know the little things I spent 6 months on a revell GTO who knows how long with this czech kit spent more on sanding sticks i guess


 Nick.

  • Member since
    March 2015
  • From: Streetsboro, Ohio
Posted by Toshi on Monday, March 21, 2016 10:39 AM

BrandonK

Looking really good, Toshi. You are moving right along as usual. There is a lot of surface area there that needs some love, ie all that sanding. This is gonna be one fine looking bird. 

BK


Thanks BrandonK!  I know, this build needs lots of love, it's like a second wife.  LOL!

Toshi

On The Bench: Revell 1/48 B-25 Mitchell


Married to the most caring, loving, understanding, and beautiful wife in the world.  Mrs. Toshi


  • Member since
    March 2015
  • From: Streetsboro, Ohio
Posted by Toshi on Monday, March 21, 2016 10:40 AM

scottrc

Looks good Toshi, I am looking forward to doing the same process on my old floatbird.


Thank yu scottrc!  

Toshi

On The Bench: Revell 1/48 B-25 Mitchell


Married to the most caring, loving, understanding, and beautiful wife in the world.  Mrs. Toshi


  • Member since
    March 2015
  • From: Streetsboro, Ohio
Posted by Toshi on Monday, March 21, 2016 10:49 AM

Here is my progress for Sunday.  I can't believe the length of the wing, it's approximately 25 inches.

Toshi

On The Bench: Revell 1/48 B-25 Mitchell


Married to the most caring, loving, understanding, and beautiful wife in the world.  Mrs. Toshi


  • Member since
    July 2014
Posted by modelcrazy on Monday, March 21, 2016 10:56 AM

Toshi,
Yes, the PBY had/has a HUGE wing. It's nice to see you on our GB. Sorry I didn’t welcome you earlier, I have been very busy in my new position (I'm doing part of my old position and all of my new) at work and have been wiped out in the evening. Things are smoothing out and my boss is hiring someone to take my old position, so things will back off soon.

Steve

Building a kit from your stash is like cutting a head off a Hydra, two more take it's place.


http://www.spamodeler.com/forum/

  • Member since
    January 2016
  • From: A Galaxy Far, Far Away
Posted by Hunter on Monday, March 21, 2016 12:49 PM

Toshi - 

Looking great sir! Always amazed on how well you do and the quailty and detail of your builds. Great Job Toshi! YesBig SmileYes

Hunter 


  • Member since
    January 2016
  • From: A Galaxy Far, Far Away
Posted by Hunter on Monday, March 21, 2016 12:51 PM

modelcrazy

Toshi,
Yes, the PBY had/has a HUGE wing. It's nice to see you on our GB. Sorry I didn’t welcome you earlier, I have been very busy in my new position (I'm doing part of my old position and all of my new) at work and have been wiped out in the evening. Things are smoothing out and my boss is hiring someone to take my old position, so things will back off soon.


Steve - 

Tell your boss to hurry up and hire someone! (lol) It's not the same with you not in here on a normal basis.

Hunter 


  • Member since
    July 2014
Posted by modelcrazy on Monday, March 21, 2016 1:37 PM

Hunter
Steve -  Tell your boss to hurry up and hire someone! (lol) It's not the same with you not in here on a normal basis.

LOL Thanks Hunter, I miss you guys too.

Steve

Building a kit from your stash is like cutting a head off a Hydra, two more take it's place.


http://www.spamodeler.com/forum/

  • Member since
    March 2015
  • From: Streetsboro, Ohio
Posted by Toshi on Monday, March 21, 2016 1:51 PM

To my fellow forum members,

Here is Monday's progress.  If you know about this how to putty section in the next paragraph, please disregard reading it.  I'm sure many forum members know about or utilize this already.  I read/saw this in a FSM article.

Take a piece of tape, get as close as you can to the gap or area to be putty, then do the same on the opposite side.  Putty the gap/area, when it's time to sand just sand the gap/area.  Once leveled and smooth, remove the tape, and you should have a perfect line.  What's great about this is that you just saved the panel lines as well as the rivets in that area.

My next step is to clean up the wing assembly and primer the wing.  

Toshi


On The Bench: Revell 1/48 B-25 Mitchell


Married to the most caring, loving, understanding, and beautiful wife in the world.  Mrs. Toshi


  • Member since
    March 2015
  • From: Streetsboro, Ohio
Posted by Toshi on Monday, March 21, 2016 1:55 PM

On The Bench: Revell 1/48 B-25 Mitchell


Married to the most caring, loving, understanding, and beautiful wife in the world.  Mrs. Toshi


  • Member since
    March 2015
  • From: Streetsboro, Ohio
Posted by Toshi on Monday, March 21, 2016 1:58 PM

modelcrazy

Toshi,
Yes, the PBY had/has a HUGE wing. It's nice to see you on our GB. Sorry I didn’t welcome you earlier, I have been very busy in my new position (I'm doing part of my old position and all of my new) at work and have been wiped out in the evening. Things are smoothing out and my boss is hiring someone to take my old position, so things will back off soon.


It's nice to be here.  Don't worry about the welcoming.  Just take care of yourself.  Congratulations on your new position.

Toshi

On The Bench: Revell 1/48 B-25 Mitchell


Married to the most caring, loving, understanding, and beautiful wife in the world.  Mrs. Toshi


  • Member since
    March 2015
  • From: Streetsboro, Ohio
Posted by Toshi on Monday, March 21, 2016 1:59 PM

Hunter

Toshi - 

Looking great sir! Always amazed on how well you do and the quailty and detail of your builds. Great Job Toshi! YesBig SmileYes


Thank you Hunter.

Toshi

On The Bench: Revell 1/48 B-25 Mitchell


Married to the most caring, loving, understanding, and beautiful wife in the world.  Mrs. Toshi


  • Member since
    June 2014
Posted by BrandonK on Monday, March 21, 2016 5:19 PM

I dont know what it is about the PBY, but it is a really cool looking plane, IMPO.

BK

On the bench:

A lot !! And I mean A LOT!!

2024 Kits on deck / in process / completed   

                         14 / 5 / 2  

                              Tongue Tied

  • Member since
    December 2003
  • From: 37deg 40.13' N 95deg 29.10'W
Posted by scottrc on Tuesday, March 22, 2016 1:00 PM

crown r n7

I gave up on mine the wheels dont line up you have to drill a hole in both plastic and resin engines  you know the little things I spent 6 months on a revell GTO who knows how long with this czech kit spent more on sanding sticks i guess


Hi Crown,

Its not just the engines, and your right, the wheel wells take a lot of sanding and test fitting to get them in correctly so the wheels line up. Every part that should have attachement pins and holes doens't.  I will be showing in a later installment how I will need to drill and pin the horizontal stabilizers and attach them before glueing the fueslage halves together.  I keep saying this is in every posting, that this kit is so much like building an old vacuform kit.  I was expecting a simple, quick build, WRONG!  And I can't leave it unfinished.

  • Member since
    August 2015
  • From: the redlands Fl
Posted by crown r n7 on Tuesday, March 22, 2016 2:27 PM

I dont know maybe Im grumpy with this kit but the decals are nice good luck with this one


 Nick.

  • Member since
    December 2003
  • From: 37deg 40.13' N 95deg 29.10'W
Posted by scottrc on Wednesday, March 23, 2016 7:51 AM

Thanks, I do like the decal set that comes with the kit, although I won't be using any of it.  I will be using CoralGraphics "Cutters Goose" set.  

Toshi, love the work your doing on you PBY, the painting of the engines has good contrast.  

  • Member since
    March 2015
  • From: Streetsboro, Ohio
Posted by Toshi on Wednesday, March 23, 2016 9:17 AM

scottrc

Thanks, I do like the decal set that comes with the kit, although I won't be using any of it.  I will be using CoralGraphics "Cutters Goose" set.  

Toshi, love the work your doing on you PBY, the painting of the engines has good contrast.  


Thank you sir.  

On The Bench: Revell 1/48 B-25 Mitchell


Married to the most caring, loving, understanding, and beautiful wife in the world.  Mrs. Toshi


  • Member since
    April 2006
  • From: ON, Canada
Posted by jgeratic on Wednesday, March 23, 2016 11:00 AM

Toshi, a really fine job on the interior, and the good work continues on the exterior.   Look forward to more on the catalina.

Hunter,  good work on the interior, solid work applying the paint.

Scott , yeah those kind of kits can be a bear to take on, but are that much more rewarding when completed.

---------------------------------------------------

Thanks Steve, BrandonK, Hunter, Scott,

One final bit of detail on the tail end before going forward. 

The PE was a one piece affair that wrapped around a vertical brass rod.  This gives a solid construction, but is not completely accurate.  So the green sections were removed, ending up with two sections.

Next came the stitching on the underside of the fuselage.  Current photos of the Hanriots don't show any sign of this detail.  At best there looks to be a length of fabric tape covering the area.
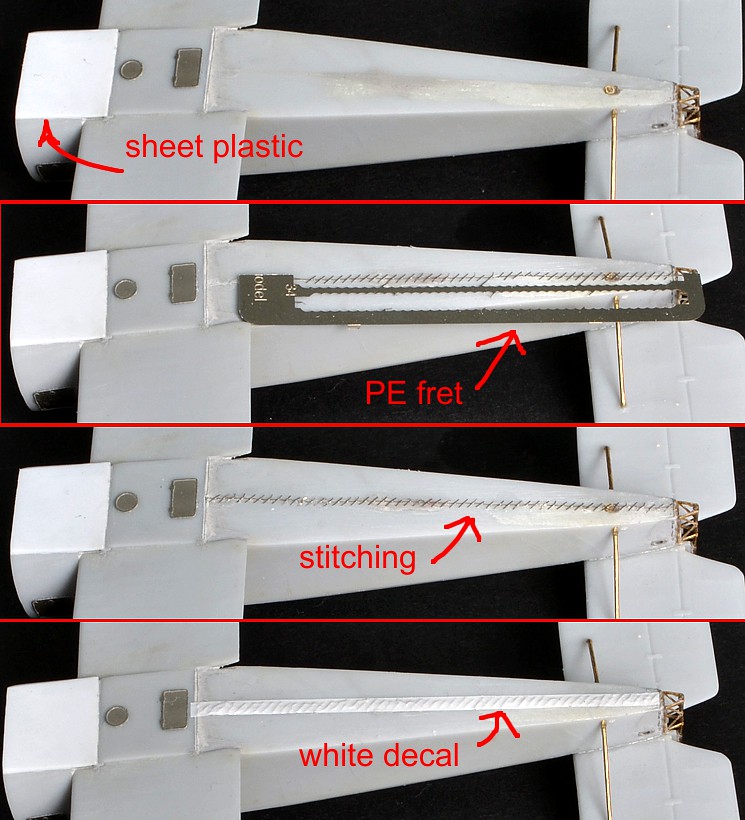
It took two tries to super glue the stitching in place.  On the 2nd attempt, it was easier to just leave this flimsy piece attached to one side of the fret, and once glued in place, some deft cuts to set it free.  A strip of white decal film was laid over top to represent the possible fabric covering. 

Up next were the cabane struts.  Picture from a Belgium Hanriot;

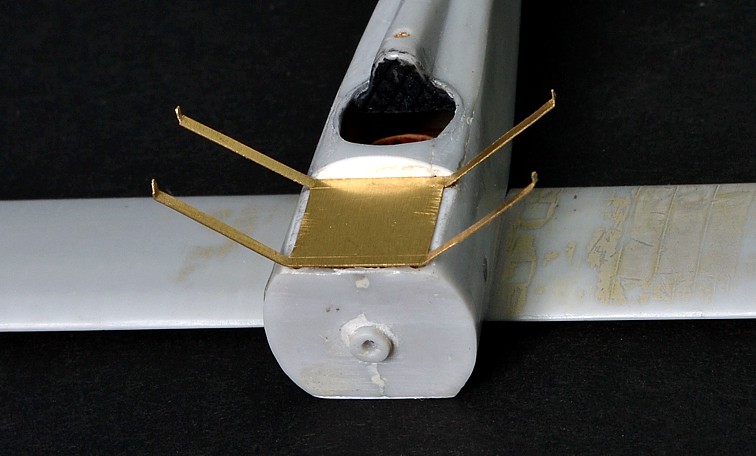
The kit provides these as individual lengths of plastic.  This leaves way too much guess work in arriving at a proper angle and fit.  A good week was spent figuring out how to approach this, but finally arrived at a solution.

It starts with a section of brass sheet 0.12mm thick, with dimensions        9mm x 31mm.  I relied on the PE scissor tool to cut, knife and ruler just didn't work.

Here is the first set test fit in place. 
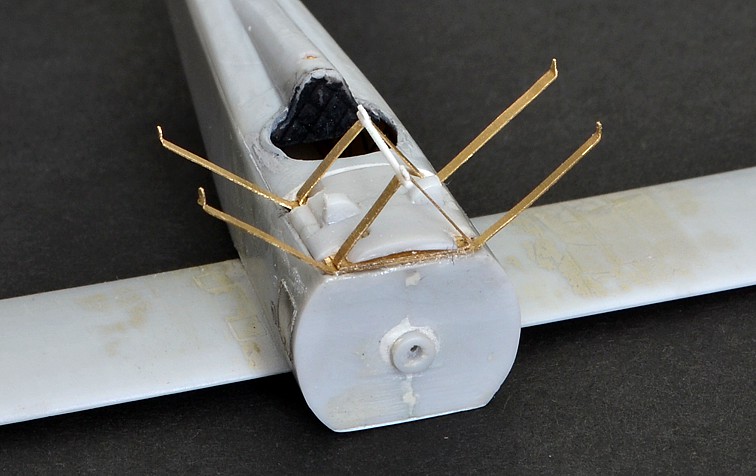
Now a second pair of cabane struts were constructed the same way, but these have the struts angled inward ...

The center section also had a 0.5mm plastic rod attached with a pair of tabs - these fit in between the two wings, which are actually separate on the real bird.

Another shot of the detail with decking in place...
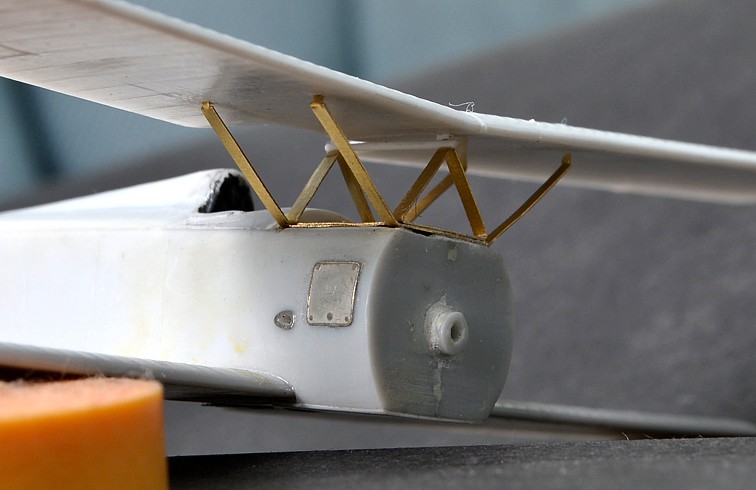
... and one final of top wing fit:
regards,

Jack


  • Member since
    August 2015
  • From: the redlands Fl
Posted by crown r n7 on Wednesday, March 23, 2016 11:24 AM

wow major frame work ! comming together nicely


 Nick.

  • Member since
    March 2015
  • From: Streetsboro, Ohio
Posted by Toshi on Wednesday, March 23, 2016 1:47 PM

jgeratic

Toshi, a really fine job on the interior, and the good work continues on the exterior.   Look forward to more on the catalina.

Hunter,  good work on the interior, solid work applying the paint.

Scott , yeah those kind of kits can be a bear to take on, but are that much more rewarding when completed.

---------------------------------------------------

Thanks Steve, BrandonK, Hunter, Scott,

One final bit of detail on the tail end before going forward. 

The PE was a one piece affair that wrapped around a vertical brass rod.  This gives a solid construction, but is not completely accurate.  So the green sections were removed, ending up with two sections.

Next came the stitching on the underside of the fuselage.  Current photos of the Hanriots don't show any sign of this detail.  At best there looks to be a length of fabric tape covering the area.

It took two tries to super glue the stitching in place.  On the 2nd attempt, it was easier to just leave this flimsy piece attached to one side of the fret, and once glued in place, some deft cuts to set it free.  A strip of white decal film was laid over top to represent the possible fabric covering. 

Up next were the cabane struts.  Picture from a Belgium Hanriot;

The kit provides these as individual lengths of plastic.  This leaves way too much guess work in arriving at a proper angle and fit.  A good week was spent figuring out how to approach this, but finally arrived at a solution.

It starts with a section of brass sheet 0.12mm thick, with dimensions        9mm x 31mm.  I relied on the PE scissor tool to cut, knife and ruler just didn't work.

Here is the first set test fit in place. 

Now a second pair of cabane struts were constructed the same way, but these have the struts angled inward ...

The center section also had a 0.5mm plastic rod attached with a pair of tabs - these fit in between the two wings, which are actually separate on the real bird.

Another shot of the detail with decking in place...

... and one final of top wing fit:

regards,

Jack


OMG!  That is some fantastic skills as well as your build sir!

Toshi

On The Bench: Revell 1/48 B-25 Mitchell


Married to the most caring, loving, understanding, and beautiful wife in the world.  Mrs. Toshi


JOIN OUR COMMUNITY!

Our community is FREE to join. To participate you must either login or register for an account.

SEARCH FORUMS
FREE NEWSLETTER
By signing up you may also receive reader surveys and occasional special offers. We do not sell, rent or trade our email lists. View our Privacy Policy.