SEARCH FINESCALE.COM

Enter keywords or a search phrase below:

75th Anniversary of 1942 (World at War)

39074 views
860 replies
1 rating 2 rating 3 rating 4 rating 5 rating
  • Member since
    February 2010
  • From: Berkeley CA/St. Paul MN
Posted by EBergerud on Saturday, November 25, 2017 4:55 AM


A little progress over the holidays. Put on the decals – one very small one was annihilated but as there seems not to have been one solid “party line” on how the aircraft on Cactus were given markings, we'll say that a tiny marking saying “US NAVY F4F4” is only on one side of the tail.


I'm looking at Doog's weathering he did on a splendid job of a 1/32 Tamiya Corsair, and he lightened the fabric control surfaces a little. I've looked at this before and am not really sure what to do. I did find a post by a USN guru and he said that the fabric surfaces on the two color planes would have been a little lighter. However, he said that the dope didn't really fade as much as it disintegrated – therefore ground crews would “redope” the control surfaces when needed. So I lightened the color just a bit (I may darken the blue gray) but I also gave both top and bottom a solid base coat and eliminating the tonal differences. The effect definitely points out that the fabric and metal look different and that's the point. I didn't change the gray color – just gave a more solid coat.


 control1 by Eric Bergerud, on Flickr


 control2 by Eric Bergerud, on Flickr


Eric


A model boat is much cheaper than a real one and won't sink with you in it.

  • Member since
    December 2002
  • From: Bury St Edmunds, Suffolk, England
Posted by Bish on Thursday, November 23, 2017 2:07 AM

Looking good Piers, can't wait to see that white wash.

I am a Norfolk man and i glory in being so


On the bench: Airfix 1/72nd Harrier GR.3/Fujimi 1/72nd Ju 87D-3

  • Member since
    December 2002
  • From: Bury St Edmunds, Suffolk, England
Posted by Bish on Thursday, November 23, 2017 2:06 AM

Really nicely done Eric.

I am a Norfolk man and i glory in being so


On the bench: Airfix 1/72nd Harrier GR.3/Fujimi 1/72nd Ju 87D-3

  • Member since
    September 2003
  • From: AandF in the Badger State
Posted by checkmateking02 on Wednesday, November 22, 2017 10:35 PM

That is a very nice finish, Piers.  Excellent work.


  • Member since
    September 2003
  • From: AandF in the Badger State
Posted by checkmateking02 on Wednesday, November 22, 2017 10:28 PM

Even unfinished, that is a very nice result, Eric.  It's very interesting and really attracts the eye very well.


  • Member since
    April 2014
  • From: Australia
Posted by lostagain on Wednesday, November 22, 2017 9:26 PM

Hi Eric,
Thought the Panzer dio finished well. But I can see what you mean about the snow though, I like your idea of doing windswept snow from the undamaged side. Had a look at the Precision krycell site and they show that happening in one of their videos.
So now the Wildcat is on its way too and starting well. I had a quick look at Doog’s site and his how tos intending to get a background on blackbasing, instead I ended up looking at his guides and discussions on model photography. Used a couple of his tips in the photo later on, think it lightened it up a bit.
I like how the blackbasing is coming along, the colour variation and faded look is great. But you say there is still more to come…
And the Tamiya 1/48 armour kits are great on detail. As well as this Marder, I built the JS-2 for the weekend build last year and both went together beautifully.
 
Dan,
The Stuka is racing together and nicely too. That canopy masking must have been great fun! Good to see the balsa rig out – wouldn’t be one of your builds without it – I found it indispensable for my vacform, thank you.
 
So with other stuff taking up my time, I have only added a few scratches, a bit of metallic paint and a bit of lead pencil for some metal edges. So now it is ready for sealing, then I will try my first hairspray/white overwash…
Piers

  • Member since
    February 2010
  • From: Berkeley CA/St. Paul MN
Posted by EBergerud on Wednesday, November 22, 2017 9:26 PM
I may have been a little lite on the base coat this time - but I'm going to see how it works. There will be both oils and pigments coming and drybrushing is actually a very good way to alter a base color slightly. Actually there is one definite advantage to black basing. "Painting small" is tricky and it is taking time to master it. You have to airbrush carefully and also get the viscosity/psi balance right. But once that's done, most people would be much more handy at the brush for any purpose. I could certainly see doing soft camo freehand. Modeling with a minimum amount of masking sounds neat to me. Eric


A model boat is much cheaper than a real one and won't sink with you in it.

  • Member since
    April 2005
  • From: Australia
Posted by taxtp on Wednesday, November 22, 2017 9:08 PM
Nice so far Eric. I like the way you support your models with appropriate comment and reference. I haven't tried the mottled undercoat, maybe my airbrushing technique is bad enough to not need it :) Cheers Tony

I'm just taking it one GB at a time.

  • Member since
    February 2010
  • From: Berkeley CA/St. Paul MN
Posted by EBergerud on Wednesday, November 22, 2017 4:51 PM

43 build....That'll be Tasca Sherman M4A1(Italy), Airfix C-47 (New Guinea), Tamiya Panther D (Kursk - this is one of Tamiya's super new tool kits out in late 2016) and I hope a DML T-34 (Kursk). But first I owe the RAF GB an Italeri Sunderland. I may get guilty after the Sunderland and build a ship - hopefully my sanity will prevent it.

More on the Cactus AF Wildcat. I mottled the lower surfaces - light sea gray - almost neutral in tone really. And then applied the base gray. Everything painted on this build is done with Golden High Flows.

 botmottl by Eric Bergerud, on Flickr

 Botbase by Eric Bergerud, on Flickr

Want to point out something neat about black basing. As Doog notes, very little paint is used. Check the very fine detail (not bad for a late 90s kit) that's very clear despite priming, mottling and base coat (excuse the photo - up close at night, and light gray turned a little brown):

 wingdet by Eric Bergerud, on Flickr

Here is the plane with it's early war two tone camo. A lot of line drawings show a very soft camo - the photos from Guadalcanal show a much harder version. I did go with Archer's rendition of the blue-gray. Most have more blue in them - his has more gray. I like the look. Note - this is far from done and we're looking for a very heavy fade.

 2tone by Eric Bergerud, on Flickr

Eric


A model boat is much cheaper than a real one and won't sink with you in it.

  • Member since
    July 2014
Posted by modelcrazy on Wednesday, November 22, 2017 8:11 AM

Yeah, I'm thinking the AMT 1/48 HS-129 or Dragon's 1/35 Flak 88.

Steve

Building a kit from your stash is like cutting a head off a Hydra, two more take it's place.


http://www.spamodeler.com/forum/

  • Member since
    December 2002
  • From: Bury St Edmunds, Suffolk, England
Posted by Bish on Wednesday, November 22, 2017 1:54 AM

Looking forwardto the next GB thread going up check, already decided what i am doing, in fact i know what i am doing for the next 3. Will be another armour build next year and planning on an early start this time.

I am a Norfolk man and i glory in being so


On the bench: Airfix 1/72nd Harrier GR.3/Fujimi 1/72nd Ju 87D-3

  • Member since
    September 2003
  • From: AandF in the Badger State
Posted by checkmateking02 on Tuesday, November 21, 2017 4:00 PM

modelcrazy

Ih Check,

I will not be finishing the Hurricane. Italari sent me the new wing parts tree alright but they were exactly the same that came in the kit. I suspect that the fuselage halves are the wrong version for the kit. Since the kit was free to start with and it too 14 weeks to get the parts from Italari, I won't be perusing another tree from them.

I'm glad I was able to complete the Zero.

I'm serching my stash for something for a 1943 GB. It will probably be 1/72 German or Russian armor.

Steve


Sorry to hear about this trouble, Steve.  Some kits just seem to be a problem from the get-go.  
 
Glad that you participated in the GB.  You're productions are always great!
 
Yeah, I'm planning on launching a '43 GB, as soon as we pick up the new computer.  Bought an Asus from Best Buy last Friday, but it's taking a while for them to download the old hard drive to the new unit.  And that's where the '43 GB badge was located when the old machine fell off the perch.


  • Member since
    September 2003
  • From: AandF in the Badger State
Posted by checkmateking02 on Tuesday, November 21, 2017 3:56 PM

Fascinating procedure, Eric.  Turned out very good-looking.


  • Member since
    July 2014
Posted by modelcrazy on Monday, November 20, 2017 10:35 PM

Yeah, I've sold a few built and un-built on eBay and a few went to a museum, the rest are on my shelves or boxes. I would like to donate most of them to the Vets home but they don't have room either, so I'm going small LOL.

Steve

Building a kit from your stash is like cutting a head off a Hydra, two more take it's place.


http://www.spamodeler.com/forum/

  • Member since
    February 2010
  • From: Berkeley CA/St. Paul MN
Posted by EBergerud on Monday, November 20, 2017 10:25 PM
With you on the room situation. I remember a few years back there was a fine modeler on our board that did nothing but Revell/Monogram kits. He was good and they looked great. After completion and photos he through them away - no place to put them. (I've got the Revell Ju-52 and it's very large. A lot of the 48s are hefty.) I just finished a dio here - after my next dio, the tank will go into some corner and the dio into the trash - I've only got room for two dios. I think this hobby is ideally requires a nice big midwest style basement. I know a gent who has 80 ship models in his - his basement is also bigger than my house. More than one kit I've got has gone into the eBay merry-go-round. I've got a Dragon Elephant - could sell that and try out the 1/48 Tamiya version. Eric


A model boat is much cheaper than a real one and won't sink with you in it.

  • Member since
    July 2014
Posted by modelcrazy on Monday, November 20, 2017 4:15 PM

Thanks Eric,

I still have the Hurri but my interest has defiantly waned on it because of the mis-fitting parts. I think I have the Airfix 1/72 hurri somewhere on my wishlist (out of about 100 kits) so, someday. My wife likes me to give her a wishlist for my birthday, Christmas and just cause presents so I print out pages and pages of dreams. I have switched to (with the exception of what’s in my stash) 1/72 for WW1 and WW2 fighters, 1/144 for WW2 bombers and modern AC and 1/72 for armor. I just don't have the room for anything else.

Steve

Building a kit from your stash is like cutting a head off a Hydra, two more take it's place.


http://www.spamodeler.com/forum/

  • Member since
    February 2010
  • From: Berkeley CA/St. Paul MN
Posted by EBergerud on Monday, November 20, 2017 3:48 PM

MC: I've never run into a model I couldn't finish but I've had a couple I shouldn't have finished and it's disappointing. ( I don't do several kits at once so I don't have any hangar queens. Not good at multi-tasking I guess.) Nothing like spending several hours and then finding out that something doesn't fit, or is broken or is warped. When I think of some of the old kits coming from Eastern Europe I ran into, it's a miracle I stayed in the hobby. There's always the new tool Airfix Hurricane I. I've bought several new tool Airfix kits but I still haven't made one. (I was thinking of taking the P-40 B/C and using other decals and have it serve as an RAF mount in the desert: "Killer" Caldwell flew a plane like it and I think was the leading P-40 ace of the war. I went with the Guadalcanal Wildcat because I wrote a book about the campaign and interviewed many of the pilots.) I heard the Italeri Hurricane was a good kit - Tamiya did a co-box of it. I hope that Italeri can make good models because I've got one on deck - the 1/72 Sunderland. The kit's real live new tool Italeri (not one of their reboxes - although they have reboxed some of the Accurate Miniature gems of the 90s). It's also complicated and whopping big for a 72. It will be a "project" and I've got my fingers crossed.

I think 72 is better for planes than armor but a well made kit is always a treat. (My first armor kit was a 1/72 Stug - the only Stug I've made. Looks pretty good really.) As always my stash is too large so I won't be doing it, but one could think of splitting the difference and picking up a 1/48 Tamiya tank. The part count is well down from the 1/35s, but the kits get high praise at Armorama. Good for dios for one thing. Tamiya is putting out 1/48 vehicles you'd find at an airstrip - trying to tempt us into aircraft dioramas. Tamiya makes all of the German tanks of importance in the East along with a KV1 and JS2 "Stalin" - but oddly no T-34. (All about $23). Hobby Boss does make a T-34 and a KV1 for $18. I bet a big tank - like a Tiger - would come off well in 1/48. Eric


A model boat is much cheaper than a real one and won't sink with you in it.

  • Member since
    July 2014
Posted by modelcrazy on Monday, November 20, 2017 11:42 AM

Ih Check,

I will not be finishing the Hurricane. Italari sent me the new wing parts tree alright but they were exactly the same that came in the kit. I suspect that the fuselage halves are the wrong version for the kit. Since the kit was free to start with and it too 14 weeks to get the parts from Italari, I won't be perusing another tree from them.

I'm glad I was able to complete the Zero.

I'm serching my stash for something for a 1943 GB. It will probably be 1/72 German or Russian armor.

Steve

Steve

Building a kit from your stash is like cutting a head off a Hydra, two more take it's place.


http://www.spamodeler.com/forum/

  • Member since
    September 2016
  • From: Albany, New York
Posted by ManCityFan on Monday, November 20, 2017 11:12 AM

Hey Eric, watching your build with intense interest.  A very interesting technique.  I am a fan of Golden products, so glad you are finding them useful.  The art store I go to praises them to no end, so I know they are quality products. 

Thanks for the explanation of your process.

Dwayne or Dman or just D.  All comments are welcome on my builds. 

  • Member since
    December 2002
  • From: Bury St Edmunds, Suffolk, England
Posted by Bish on Monday, November 20, 2017 6:15 AM

Nicework there Eric. I still can't get the hang of black baseing. It ends up either being so subtle youcan hardly see it or covered over completly. You seem to have nailed it.

I am a Norfolk man and i glory in being so


On the bench: Airfix 1/72nd Harrier GR.3/Fujimi 1/72nd Ju 87D-3

  • Member since
    February 2010
  • From: Berkeley CA/St. Paul MN
Posted by EBergerud on Monday, November 20, 2017 4:23 AM


More on the Guadalcanal bound Wildcat. As noted earlier, this is going to be another exercise in “black basing.” (If you haven't heard the term, check Ytube under Doog's Models and watch his first video – about 8 minutes, called Black Basing for an introduction. The idea is to dispense with preshading but also amplify tonal variations – just what we want on a plane that's bound for heavy weathering.) The first stage is to paint the primed plane (which is black) with tones of your base color – one of mine is lighter, another darker, the last the base coat – up very close and in very small quantity. The result looks like a bunch of squiggles. Doog does it better, but this is a fair representation of the stage called “Mottling”


 mottle by Eric Bergerud, on Flickr


After that's done you go over the assigned area (in my case the 2/3 of the area of the Wildcat that's light blue-gray) with a heavily diluted base color. You don't want to finish off the variations in tone – that would be like putting on a base coat over a preshaded model and hiding the preshade. (Sound familiar?) In my case, I'm very pleased with an irregular surface because of what's coming next. The first pic is overall, the second a detail.


 base by Eric Bergerud, on Flickr


 base1 by Eric Bergerud, on Flickr


This looks good to me for now – there's a lot more coming. (Next, of course, will be mottling and base coating the sea gray bottom surfaces – but we'll let that dry overnight first.)


No guarantees on this however. A couple months back I did a 1/48 Tamiya Beaufighter for the RAF GB – it was my first shot at black basing. Here's a detail, and the whole deal. I like it.


 PicFtDet by Eric Bergerud, on Flickr


 picrtabr! by Eric Bergerud, on Flickr


Golden High Flow continues to impress me mightily. Black basing is all about “painting small” - very heavily diluted paints, very low psi, mottling done at maybe an inch away from the kit: base is even more diluted but done with a little higher psi and from about three inches. Doog uses Gunze, Tamiya or the new Eastern European lacquer-acrylic that is very like the Japanese brands. Those solvent based paints do indeed excel at that kind of detail painting. Water based acrylics like Vallejo Model Air have real trouble here. You can do it, but the balance of viscosity and psi without getting tip dry is tough. High Flow blows through this kind of thing with zero trouble. It is extremely hard to get tip dry with High Flow – I'm sure there's retarder in there – the stuff is also pretty thin. And its also made by the planet's best producer of acrylic paints. Anyway, go to Blick and buy one bottle of High Flow neutral gray – a lovely color that will be useful anywhere – and try it. Because its agent is polymer you get a kind of film on the model – which is what real paint does. (I don't like solvents, but Tamiya is great paint. If there's one thing I don't like about it, it's that when you paint something properly it looks like the material has changed color. Water based acrylics looks like there's paint over the surface. Real machines, especially with matte surface, look like there's paint over the surface. In practice, by the time weathering is done, the difference (never great) is gone completely. This is terrific paint. For four bucks you can't lose. (Most airbrush companies sell it – along with my beloved Madea Iwata Com.Art.. Amazon sells it, but it's all mixed in with large size bottles, collections etc. Try Blick Arts – terrific site for tons of things at rock bottom prices. A 1 ounce bottle of Neutral Gray is about $4.00 – and nearly twice the volume of most modeling paints. Some of the mixing colors which have very complex pigments are more, but you don't need them unless you want to mix paints. There's about 45 colors – I have about 25. The titanium white and carbon black – two Golden standards – have tremendous opacity.) Golden has several videos on Ytube but it's all aimed at the art crowd. There's a lot to be learned but watching. I'm only now beginning to see how a lot of art techniques like glazing would work super for weathering.


Eric


A model boat is much cheaper than a real one and won't sink with you in it.

  • Member since
    September 2003
  • From: AandF in the Badger State
Posted by checkmateking02 on Saturday, November 18, 2017 12:03 PM

Fine looking progress, Eric.  Nice work.


  • Member since
    December 2002
  • From: Bury St Edmunds, Suffolk, England
Posted by Bish on Saturday, November 18, 2017 4:09 AM

Eric, you got that right. I've done plenty of 72nd Stuka's, but the size of my 32nd G really took me by surprise.

I am a Norfolk man and i glory in being so


On the bench: Airfix 1/72nd Harrier GR.3/Fujimi 1/72nd Ju 87D-3

  • Member since
    February 2010
  • From: Berkeley CA/St. Paul MN
Posted by EBergerud on Saturday, November 18, 2017 3:20 AM

OK: time to start with the Wildcat. It's the Tamiya 1/48 - new tool in the late 90s. In general a nice kit, but there was some filler. This will be another exercise in black basing (check one of Doog's crackerjack videos about the technique if its new). And I'll be using my trustly Golden High Flow which I like better every time I use them. But that does mean I have to make all of my own colors. Golden makes paints for artists and don't see a market for modelers. (Vallejo started as an art house: most of their business is still there. No accident that both companies use water based acrylics exclsively.) But I get a kick out of mixing paints. And Golden has several mixing colors - their patrons expect to mix. (No joke - try out something like Platho Blue (green shade) and it'd be hard to think of something to use it on. Through in some umber and maybe a little red and you're looking at a chromatic black. Finger painting for old people.)

This Wildcat will go to Guadalcanal, so I've made up some non specular blue-gray, light sea gray (the early war two color camo scheme) and interior green. Here I followed my very neat "USAAF Colors, Markings and Camoflauge" by Robert Archer and son. 400 plus large format pages from Schiffer - worth the $50. It has excellent samples but also a "blow by blow" account of how the USAAF handled paints. As we were on the same side and it made sense for the massive construction programs, the Navy actually cooperated, sometimes informerly, sometimes with full standards. (Might mention Archer spent the war as a high level aviation engineer in the UK: came to the US right after the war and spent twenty years with Lockheed. His clearance with Lockheed got him entrance into the USAAF archives in the 60s so the gent had access to a blizzard of color samples that were circulated by the hundred - sometimes thousands - to aviation companies across the country. This incudes the ANA (Army - Navy) regulations. Anyway, according to Archer the standard "interior green" used by both services didn't appear until late 42. Think of a color based on green chromate with a good dose of olive. (AK has a very good rendition.) However Archer insists early war "interior green" was based on yellow chromate and has is lighter and more of a green-gray with very little olive. It's similiar but a little lighter than RAF interior green. I've got a nice Squadron book on navy colors and they appear to agree.

I have a F4 "Walk Around" but there is only one F4F-4 still in existence (in Pensacola I think) so all of the museum planes are either F4F-3s or, more likely, FM-2s. (Digression Warning: I was lucky enough to attend a warbird "fly in" at Egan MN about 15 years back - used to be a Planes of Fame branch. Very cool - dozens of planes flew in. There was a Wildcat and Hellcat sitting next to each other. There are very few flying Wildcats, so its a treat to see one. Anyway, the Hellcat dwarfed it. They've got a family resemblence, but it's only on paper. The Hellcat, depending upon what you're measuring, matched and sometimes surpassed the P-47. Big, docile, whopping big engine - perfect plane for the junior birdmen flocking by the thousands to the USN by the end of 1943 - far better than the Corsair. Until Kamikazes showed the need for speed. The Wildcat is actually kind of petit. Look at pics - a tall pilot almost touches the canopy. Splendid plane in its own right. Certainly the equal to the Zero in an extended campaign. Tough as nails - Grumann Iron Works. Kinda ugly though.) Anyway in the Walk Around there are some color pics from wartime and the green interior primer matched this color to a T. Archer insists that "bronze green" was only used as glare protection on late war fighters - it's very dark. An article from IPMS about US interiors disagrees. It's a little hard to argue with Archer - he's got the documents in summary form for every months of the war. Needless to say, companies did not make exactly the same shade - so there's no single answer. And after weathering, there may be only obviously wrong answers.

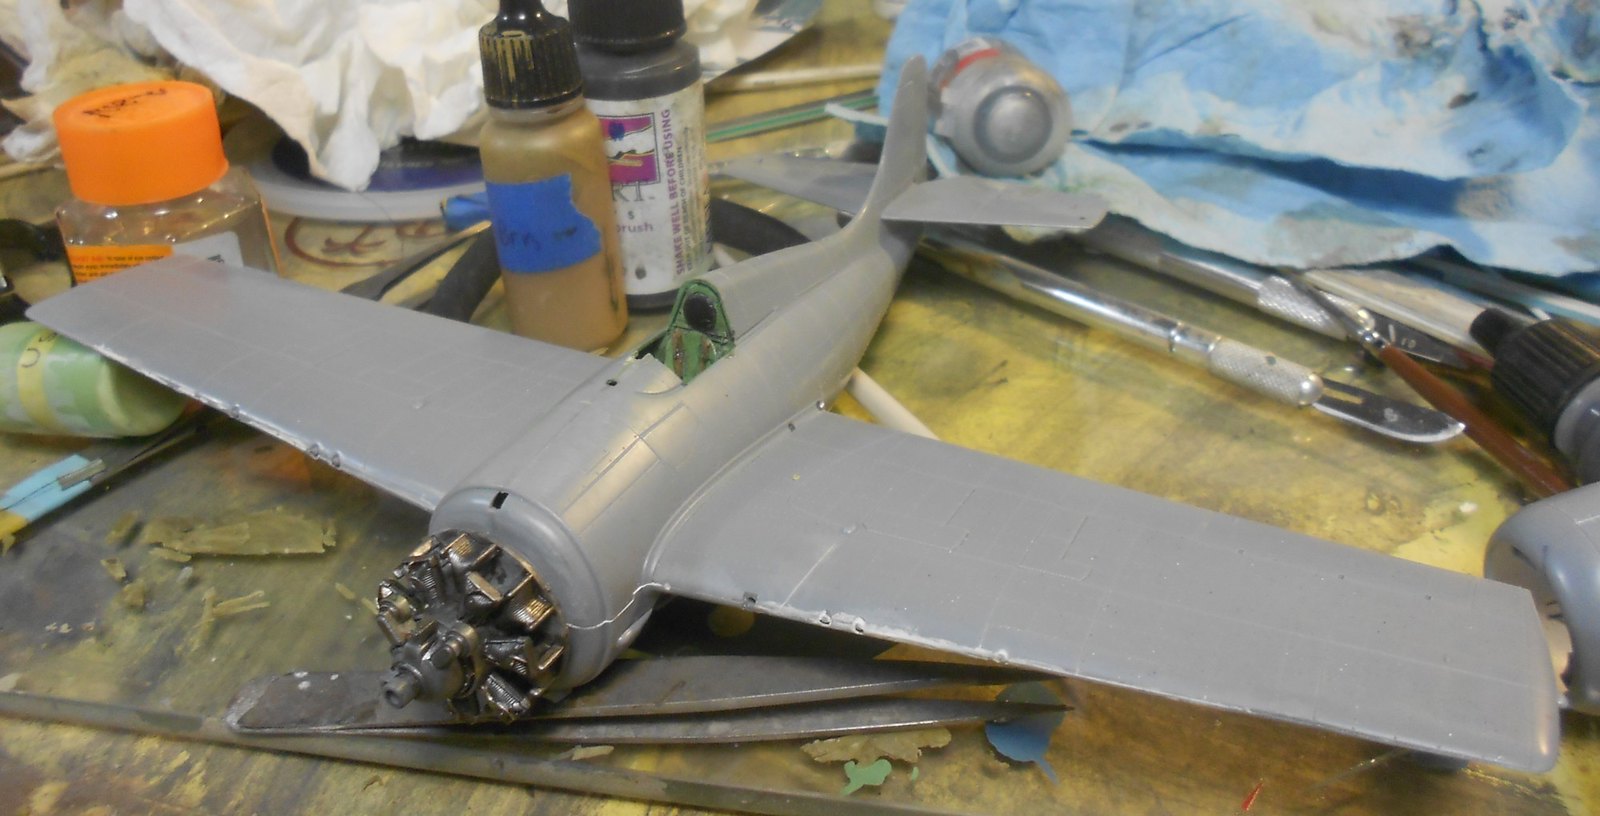
Enough: here's the interior green I cooked up. It's on the interior. I do not have the mind to be a great modeler - even if I had the hand-eye. I cannot get enthused about details added that only I can see. So I usually do a basic cockpit and spend time obsessing about base coat colors and base coat weathering. There were no seatbelts on the first pic. The second pic shows the kit near completion and highlights a pretty good engine - and nice seatbelts made out of Aves Apoxie Sculpt. I also didn't kill myself over the engine because you won't see that either. (Both parts were given a Com.Art transparent smoke wash - I really like that stuff because it highlights details and also looks grimy. Warplanes were dirty - maybe not often badly chipped (I can't find a super bad chipped Wildcat from Cactus - the Corsairs flying from the coral strip at Munda Point on New Georgia are very different), but always dirty. And US matte paints faded fast. According to the referenced IPMS article, cadmium was not used in paint pigments because it was needed for armor plate. Hence many US colors faded fast. (Uber modeler Doog claims the gloss blue planes didn't fade: my eyes say they did.)
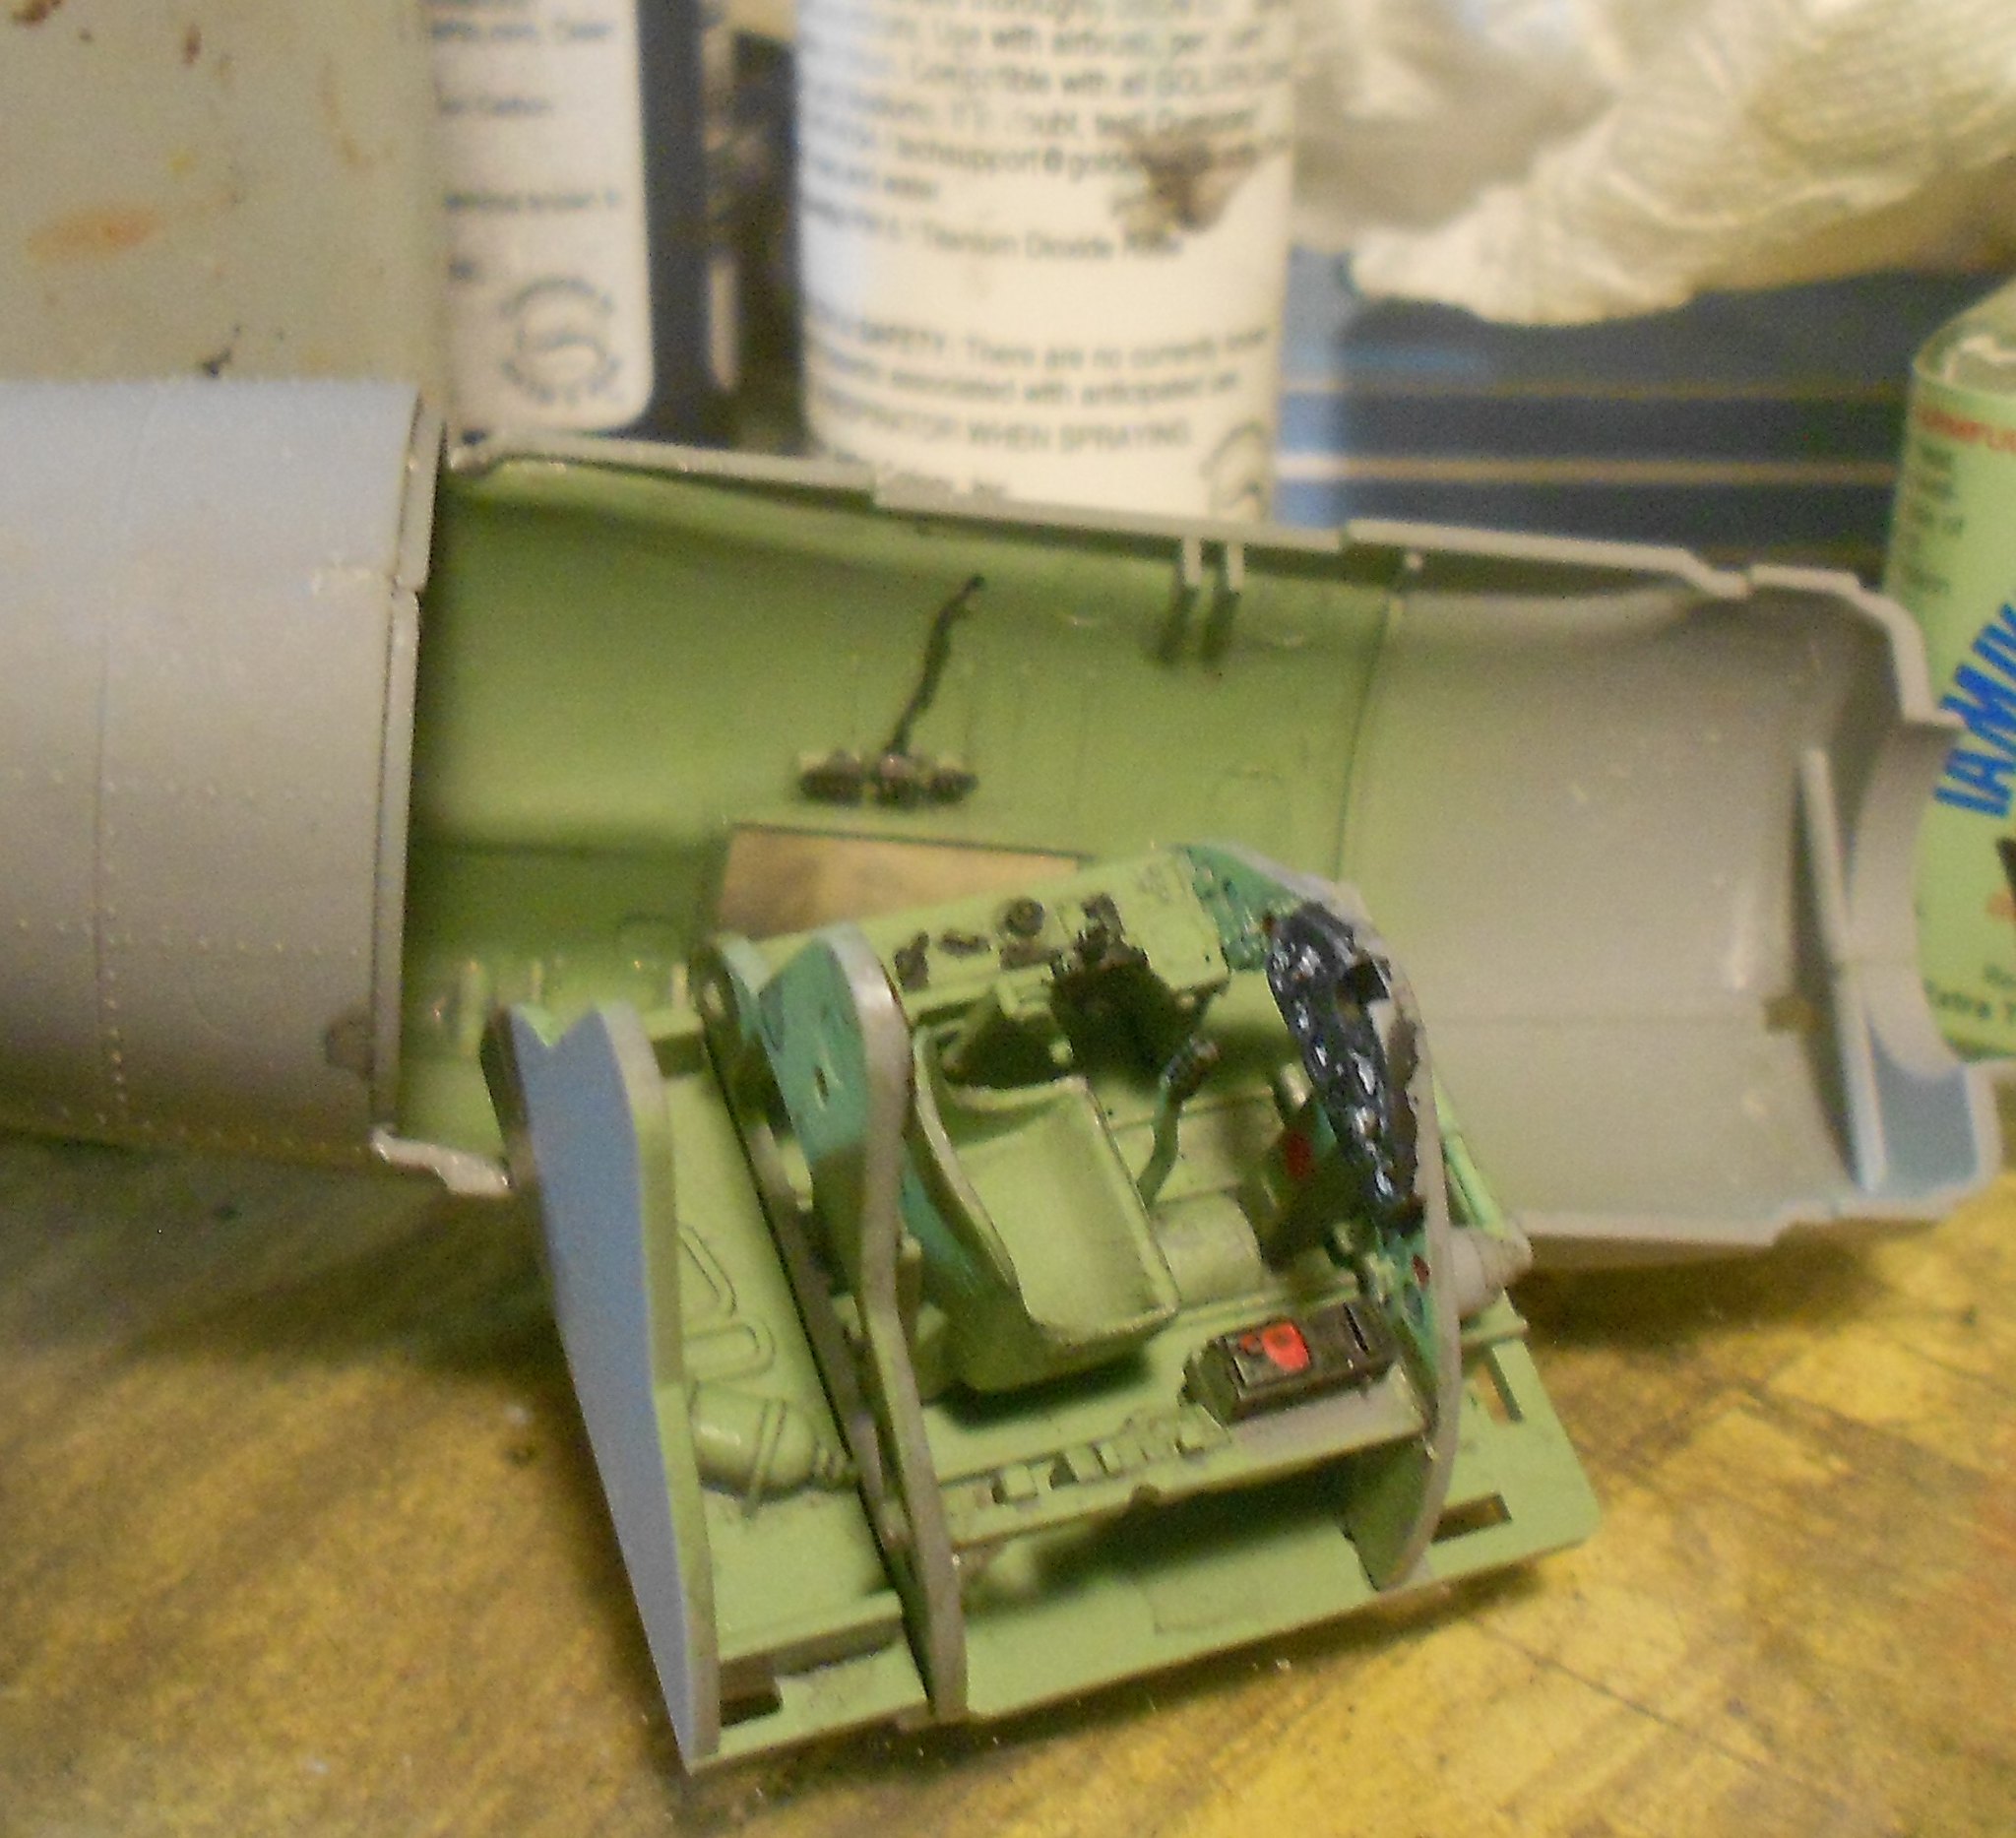
 interior by Eric Bergerud, on Flickr

 body by Eric Bergerud, on Flickr

And, as noted, I'm going to do some more black basing. Even though I'm now the owner of an Iwata Spray Gun (on Paul Budzik's order - works incredibly well for Stynelrez) I find it hard to beat Duplicolor's black sandable/fillable automotive lacquer primer. Bid bye bye to scratches, most seams etc. Unfortunately it's potent stuff and must be used outside, so no question of decanting it and spraying it on myself. The can has a fan cap, and you can lay down a very nice coat. I think it'll work. I got just a little too much on - no problem at all. A light sanding, maybe two minutes, with very light paper and the stuff turns almost gloss and all the details are there in perfect order. And no worry about anything coming off with masking.
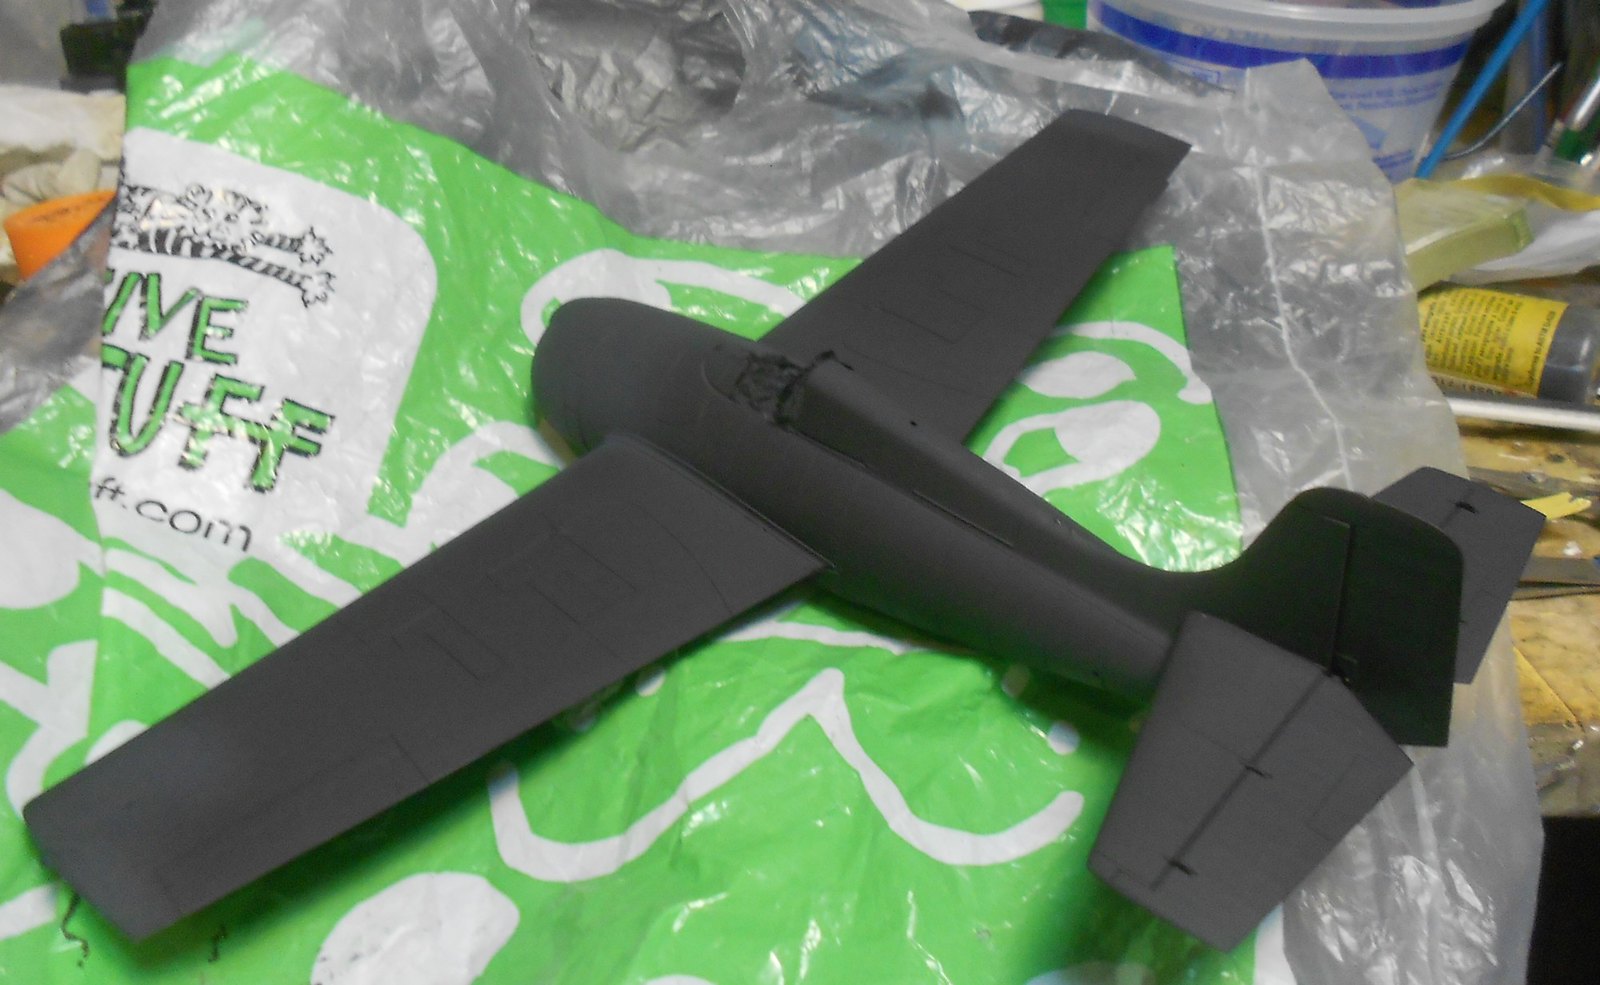
 primed by Eric Bergerud, on Flickr

Next up: mottling the black base.

Eric


A model boat is much cheaper than a real one and won't sink with you in it.

  • Member since
    February 2010
  • From: Berkeley CA/St. Paul MN
Posted by EBergerud on Saturday, November 18, 2017 2:34 AM
You're doing a 32 scale Stuka? I'd have to sell my car for space to stick it. I know some really fine modelers have shifted to 1/32 scale. I certainly see it biplanes (the Tamiya Storch is supposed to be a master kit - be nice in 32) but I still find a good 48 scale enough of a challenge. But the big thing is space. A good 1/32 would certainly make a neat "project" build (my projects take longer than 14 days to build) - all of those details on guns, engines, maybe stencils on the decals. Course you can always build a 1/32 B-17: that would keep you busy. In my world where I have to rotate kits so I can see a few, it won't happen. Do have projects though - the Dragon BF 110D; AM B-25, AMT A-20 and the Italeri Sunderland I've promised Bish. Supposedly Tamiya's new 109G has 180 parts - including magnets like their almost worshiped 1/32s. I did a lot of looking for a Stuka and decided that the Hasegawa kit didn't really look that hot. It's a good company, but they have their losers - it's not like Tamiya. (Hope their B26 is good - I just bought it). So I bought the new tool Italeri/Tamiya. And then sold that and have the new Airfix. It looks very good - and enough of a project at 1/48. We're not all brave.


A model boat is much cheaper than a real one and won't sink with you in it.

  • Member since
    September 2003
  • From: AandF in the Badger State
Posted by checkmateking02 on Thursday, November 16, 2017 11:36 AM

Classic Stuka, Dan.  Looking fine!  Lots of fun in your future with the canopy masking!


  • Member since
    September 2014
Posted by rooster513 on Thursday, November 16, 2017 8:40 AM

Heck of a masking job there Dan! That had to be a lot of fun;)

-Andy

  • Member since
    February 2006
  • From: Cincinnati Ohio
Posted by DantheMan85 on Wednesday, November 15, 2017 10:33 AM


Thanks Bish: Sorry to hear about the Hasegawa Stuka, I remember all the problems I had with Eduard Bf-110.


Thanks Checkmate.


About 14 days of assembly the Stuka is finished, I built a stand out of balsa wood and hot glue to hold the aircraft while airbrushing. Also free hand masked the canopy with Tamiya tape. Square shapes are much easier to mask then round ones. Picked up a new bottle of Pledge Future, my old one was not leaving a crystal clear shine anymore.

 18 by Daniel Smith, on Flickr

 16 by Daniel Smith, on Flickr

 15 by Daniel Smith, on Flickr

 14 by Daniel Smith, on Flickr

 13 by Daniel Smith, on Flickr

 11 by Daniel Smith, on Flickr

A soft cloth helps prevent marks on the clear plastic while masking.

 10 by Daniel Smith, on Flickr

Think I'll be using the (B)-R and (B)-L.


On my Work Bench: Tamiya Ford GT 1/24

Up Coming: ?


  • Member since
    September 2003
  • From: AandF in the Badger State
Posted by checkmateking02 on Monday, November 13, 2017 6:05 PM

Nice progress, Dan.  Looks like things are going well.


  • Member since
    December 2002
  • From: Bury St Edmunds, Suffolk, England
Posted by Bish on Saturday, November 11, 2017 1:59 PM

Dan, nice to hear that Stuka is going together nicley, i had major issues with my Hase kit. And i am at the point where i am going to put the issues with that Trup B to one side and just get one.

As for those bombs, if your useing that big one on the centre line, leave out the wing bombs. Is there a smaller option for the fuselage. That big 1000KG bomb would be right at the 87B's limit and was only able to be carried if the rear gunner was left behind.

As for colours, the big SC 1000 would be RLM 65 and the small SC 50's on the wings RLM 71.

I am a Norfolk man and i glory in being so


On the bench: Airfix 1/72nd Harrier GR.3/Fujimi 1/72nd Ju 87D-3

JOIN OUR COMMUNITY!

Our community is FREE to join. To participate you must either login or register for an account.

SEARCH FORUMS
FREE NEWSLETTER
By signing up you may also receive reader surveys and occasional special offers. We do not sell, rent or trade our email lists. View our Privacy Policy.