SEARCH FINESCALE.COM

Enter keywords or a search phrase below:

75th Anniversary of 1942 (World at War)

39072 views
860 replies
1 rating 2 rating 3 rating 4 rating 5 rating
  • Member since
    September 2003
  • From: AandF in the Badger State
Posted by checkmateking02 on Wednesday, July 5, 2017 4:11 PM

Still looks great, Steve!


  • Member since
    July 2014
Posted by modelcrazy on Thursday, July 6, 2017 7:49 AM

Well now this is a problem. I glued the fuse half’s together and assembled the wing. As everything was drying I dry fit the wing to take a look at what I was facing for a gap.

Now to my recollection, isn't the leading edge of the wing supposed to fit behind the engine cowl? I thought there must be a piece that fits under the cowl. No. Do I have the wing on backwards? No. Looking through the instructions there isn't a hint of why this is happening.

I will be contacting Italeri and inquiring the possible reason. Is this wing going to be used on a Mk.2 etc.?

Stop the assembly line until a resolution is found. Back to the stash to look for something else while my AB and current build are down.

Steve

Building a kit from your stash is like cutting a head off a Hydra, two more take it's place.


http://www.spamodeler.com/forum/

  • Member since
    September 2003
  • From: AandF in the Badger State
Posted by checkmateking02 on Thursday, July 6, 2017 3:26 PM

They made a big mistake there, Steve.  Saw this too over at RAF GB.  Hope it all comes together soon.


  • Member since
    September 2016
  • From: Albany, New York
Posted by ManCityFan on Thursday, July 6, 2017 4:53 PM

I'm interested in what Italeri has to say about this.  Not going to be a happy review if they can't address it.  That is way more than disappointing.

Dwayne or Dman or just D.  All comments are welcome on my builds. 

  • Member since
    September 2016
  • From: Albany, New York
Posted by ManCityFan on Thursday, July 6, 2017 9:17 PM

So, I checked the missing-lynx forums for any answers to the Panzer III M question Jack posted, and the responses placed them in battle in 1943.  I think it is a stretch for this to have been at Stalingrad.

Checked my stash and found this:

After a brief check on Russian tank markings, they appear to have been generic except in some rare cases.  The kit comes with generic markings.  This would definitely fit the time period, and would definitely have been involved in the battle of Stalingrad.  Looked the kit over, and it looks pretty straightforward.  I like how the box says "modelling skills helpful if under age 10".  Hope my skills measure up.  Big Smile

Check, if you would be so kind as to change my build to a T34/76 1942 production, I would appreciate it.  The kit has options for a winter version, but I don't think I am quite up to that level yet. 

I am looking forward to building this.  It will be my first Russian build.  Not my last though, as I have Tamiya kits for the KV I, KV II, and SU 85 in the stash.  I don't know as much about Russian armor as I do about German, so the research should be interesting.

Thanks,

D

Dwayne or Dman or just D.  All comments are welcome on my builds. 

  • Member since
    September 2003
  • From: AandF in the Badger State
Posted by checkmateking02 on Friday, July 7, 2017 9:24 AM

ManCityFan

So, I checked the missing-lynx forums for any answers to the Panzer III M question Jack posted, and the responses placed them in battle in 1943.  I think it is a stretch for this to have been at Stalingrad.

Checked my stash and found this:

After a brief check on Russian tank markings, they appear to have been generic except in some rare cases.  The kit comes with generic markings.  This would definitely fit the time period, and would definitely have been involved in the battle of Stalingrad.  Looked the kit over, and it looks pretty straightforward.  I like how the box says "modelling skills helpful if under age 10".  Hope my skills measure up.  Big Smile

Check, if you would be so kind as to change my build to a T34/76 1942 production, I would appreciate it.  The kit has options for a winter version, but I don't think I am quite up to that level yet. 

I am looking forward to building this.  It will be my first Russian build.  Not my last though, as I have Tamiya kits for the KV I, KV II, and SU 85 in the stash.  I don't know as much about Russian armor as I do about German, so the research should be interesting.

Thanks,

D


I'll update the build roster, D.  

What is the scale and manufacturer?  Your photo didn't come through; just this symbol you can see in the quote.

Don't know what's going on with these photo hosting sites lately.


  • Member since
    September 2016
  • From: Albany, New York
Posted by ManCityFan on Friday, July 7, 2017 9:33 AM

Sorry...this is the 1/35 Tamiya kit. 

This is frustrating.  I do the exact same process posting pics from my PC, and sometimes it works, and sometimes it doesn't.  I can see the pics, but others cannot.  I can see the pic in your reply...

I will try the annoying "mail myself the link" method, which seems to never fail.

Thanks,

D


Dwayne or Dman or just D.  All comments are welcome on my builds. 

  • Member since
    September 2003
  • From: AandF in the Badger State
Posted by checkmateking02 on Friday, July 7, 2017 9:57 AM

ManCityFan

Sorry...this is the 1/35 Tamiya kit. 

This is frustrating.  I do the exact same process posting pics from my PC, and sometimes it works, and sometimes it doesn't.  I can see the pics, but others cannot.  I can see the pic in your reply...

I will try the annoying "mail myself the link" method, which seems to never fail.

Thanks,

D


Thanks, D.  Build roster is updated with all the info.

And now, strangely, the photo you posted is visible!

Anyway, looking forward to watching your build.


  • Member since
    September 2016
  • From: Albany, New York
Posted by ManCityFan on Saturday, July 8, 2017 3:27 PM

Lookee at what I found when I was going through my literature stash:

D

Dwayne or Dman or just D.  All comments are welcome on my builds. 

  • Member since
    December 2002
  • From: Bury St Edmunds, Suffolk, England
Posted by Bish on Saturday, July 8, 2017 4:12 PM

Nice find Dwayne. Amazing what turns up in the deep dark corners.

Was going to do an update a couple of days ago but got delayed a bit. But have been able to get a lot done on this little kit in a week.

The kit does come with a rather nice fighting compartment, but i won't be fitting that. I have read one build which claims it not accurate as it has a marder interiour rather than the Pz II. But mainly, as it can't be seen and is not relevant to the dio, i won't waste the time and effort. If i was doing a turret lift scene, then with a little effort in correcting and adding extra detail, it would look really nice. I will be adding the turet interiour though.

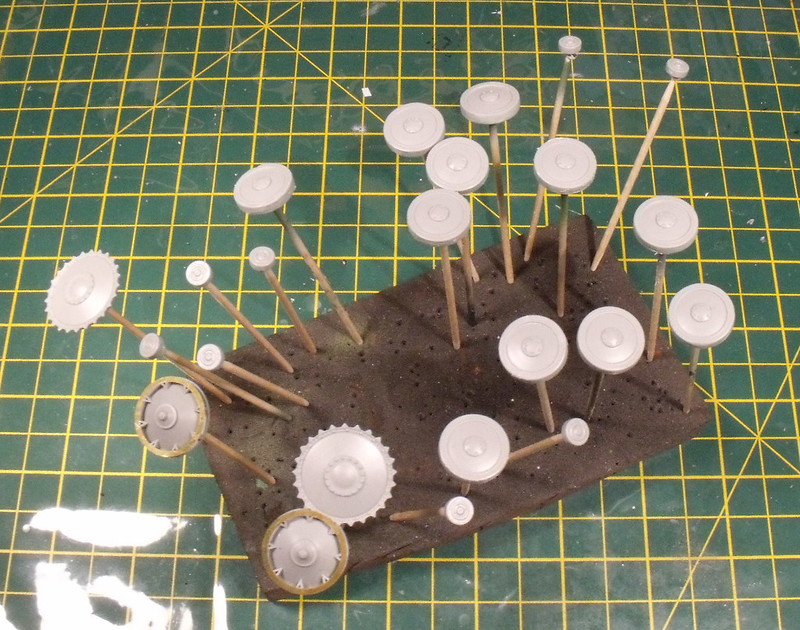
Started off by preppping the wheels. The road wheels and top rolers all has a seam running around them that needed sanding off, and while i was at it, i roughed up the wheels a bit with the file, taking a few small chunks out of the rubber.
The i got to work on the suspension. For those who may not be familiar with Dragon kits but may have heard about the high level of egineering and high parts count, here is an example of what to expect.

Each suspension unit is made of of 3 parts. The spring on top, axel arm on the bottom and a small squre piece on the end where the 2 join.
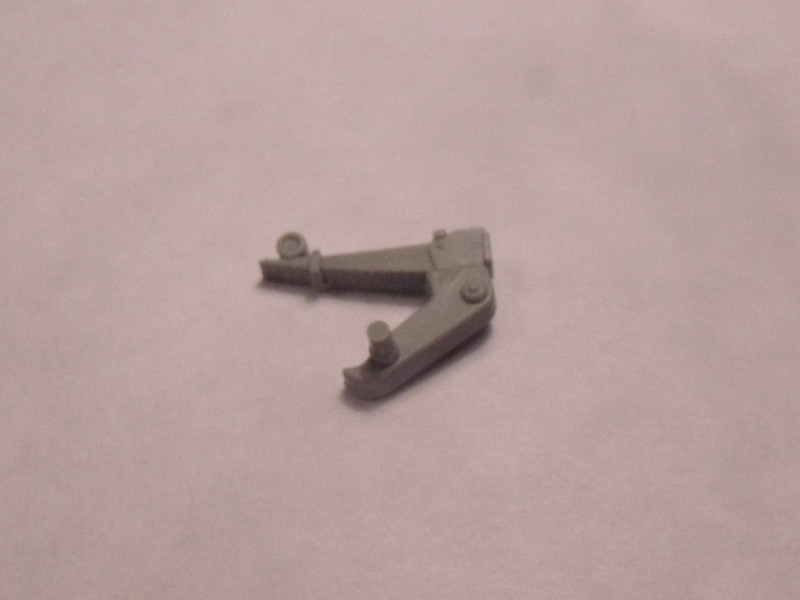
If that was a Tamiya kit, it would be a single piece.

Also, along the bottom of the lower hull, you have the bump stops, the object next to the holes. Each of these is a seperate piece.
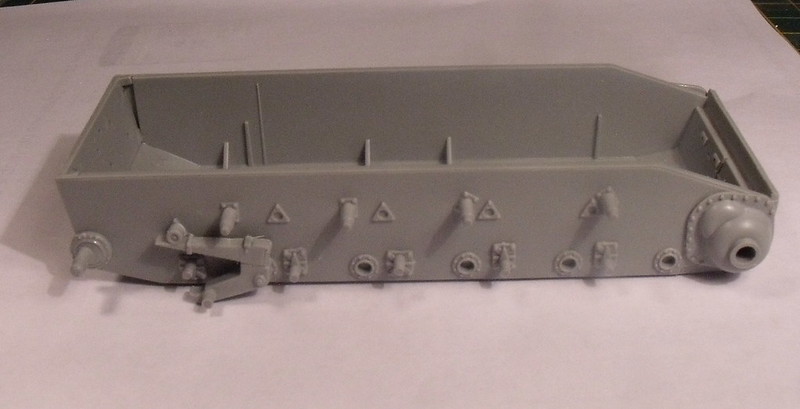
But unlike the Tiger and Panther kits, at least on this you get to see it.

Unfortunatly, this kit does not have a working suspension. So, because the area in the ruin the tank is going to sit has a small pile of rubble, i had to raise 3 of the stations slightly. So i took 3 of the leaf springs and warmed them up over a candle just enough to soften them to bend into the required shape.
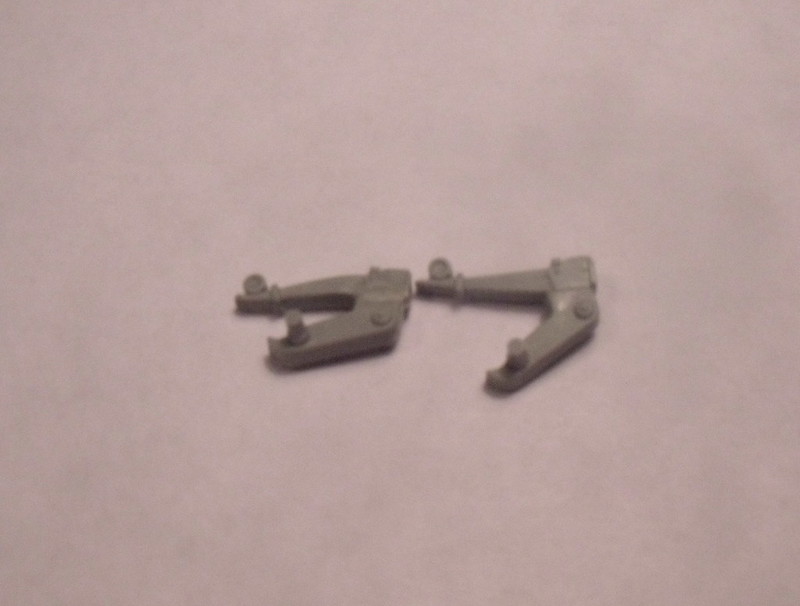
Then i was able to get the suspension finished. There no PE down here, so was a pretty quick job once i had made the adjustments.
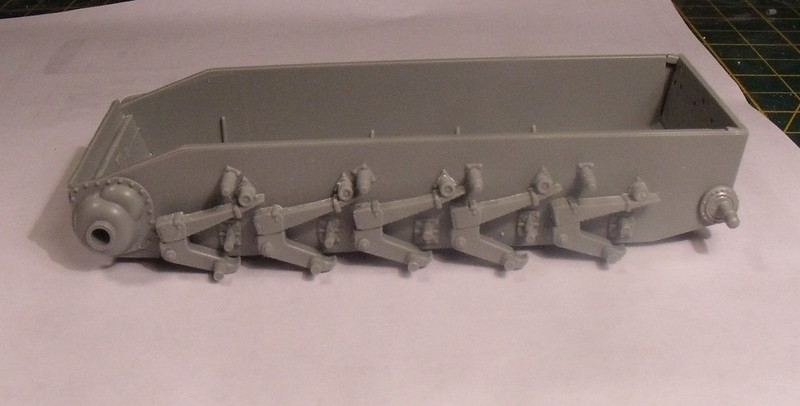
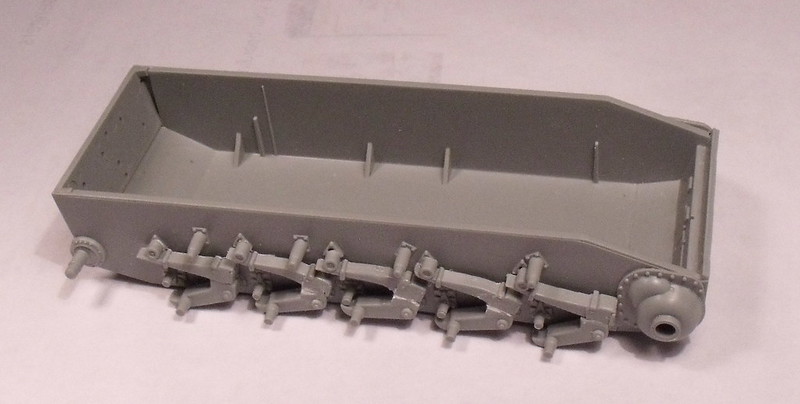
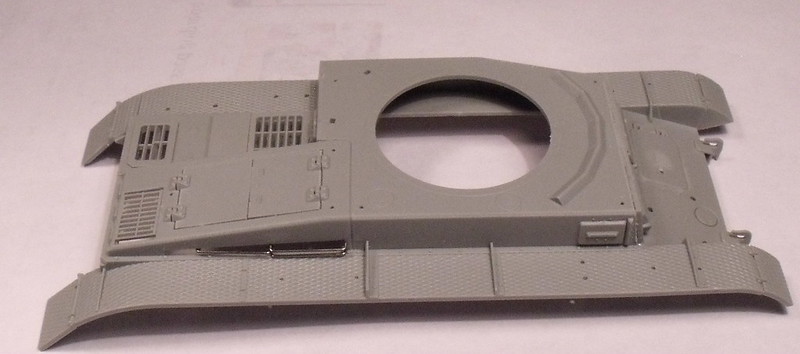
And then to the upper hull. I started off with the plastic parts that were not replaced by PE, mainly hatchs and vision port covers.
And then to the PE.
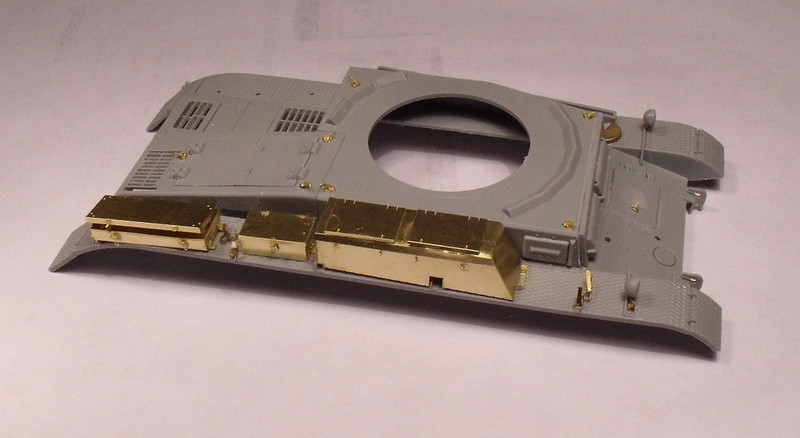
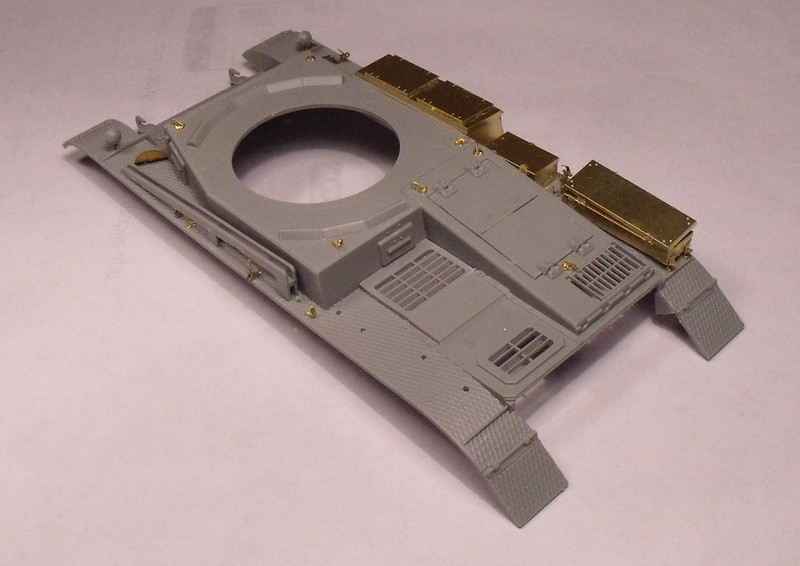
And thats it for now. Just got a few bits on the upper hull to add, plus the rear of the lower hull. Then i can start on the turret.

Thanks for looking, more soon.

I am a Norfolk man and i glory in being so


On the bench: Airfix 1/72nd Harrier GR.3/Fujimi 1/72nd Ju 87D-3

  • Member since
    July 2014
Posted by modelcrazy on Saturday, July 8, 2017 4:48 PM

Looks like a nice kit Bish. I wouldn't mind getting one for myself. 

Steve

Building a kit from your stash is like cutting a head off a Hydra, two more take it's place.


http://www.spamodeler.com/forum/

  • Member since
    December 2002
  • From: Bury St Edmunds, Suffolk, England
Posted by Bish on Saturday, July 8, 2017 4:56 PM

Ye, it is rather nice. And to be honest, its doesn't need the PE set. It comes with a small PE fret which includes tool clamps and that pretty much enough.

I am a Norfolk man and i glory in being so


On the bench: Airfix 1/72nd Harrier GR.3/Fujimi 1/72nd Ju 87D-3

  • Member since
    April 2006
  • From: ON, Canada
Posted by jgeratic on Sunday, July 9, 2017 10:48 AM

Bish, looking good and that PE really is nice.

Dwayne, great choice with the T-34, and maybe  you can still do a dual build depending on what you have planned for the rest of the year.  A late response over at the other forum gives good possibility that 6th Pz Div. had some IIIM's on hand as part of the relief effort during late Novemeber.

http://www.network54.com/Forum/47207/thread/1499264227/last-1499614326/View+Thread


regards,

Jack

  • Member since
    December 2002
  • From: Bury St Edmunds, Suffolk, England
Posted by Bish on Sunday, July 9, 2017 10:56 AM

Cheers Jack.

I am a Norfolk man and i glory in being so


On the bench: Airfix 1/72nd Harrier GR.3/Fujimi 1/72nd Ju 87D-3

  • Member since
    September 2003
  • From: AandF in the Badger State
Posted by checkmateking02 on Sunday, July 9, 2017 2:03 PM

I remember those "In Action" series from Squadron, D.  Might have some still kicking around, too--but I don't know where they are.

Nice start, Bish.  Until I looked closer, I thought all those road wheels on sticks was a field of mushrooms.  

Clever technique to adjust the suspension!


  • Member since
    December 2002
  • From: Bury St Edmunds, Suffolk, England
Posted by Bish on Sunday, July 9, 2017 2:07 PM

Thanks check. Now that you mention it, i can se what you mean about those road wheels.

It was the only thing i could think of to adjust them. It was either that or sand away the pile of rubble.

I am a Norfolk man and i glory in being so


On the bench: Airfix 1/72nd Harrier GR.3/Fujimi 1/72nd Ju 87D-3

  • Member since
    September 2016
  • From: Albany, New York
Posted by ManCityFan on Sunday, July 9, 2017 5:19 PM

jgeratic

Bish, looking good and that PE really is nice.

Dwayne, great choice with the T-34, and maybe  you can still do a dual build depending on what you have planned for the rest of the year.  A late response over at the other forum gives good possibility that 6th Pz Div. had some IIIM's on hand as part of the relief effort during late Novemeber.

http://www.network54.com/Forum/47207/thread/1499264227/last-1499614326/View+Thread


regards,

Jack


Hey Jack.  I am getting excited about the T-34.  Spent some time on missing-lynx, and got some great information.  Thanks again for introducing me to that site.  All of my "do I include this" questions were answered.  Really enjoyed doing the research.  The overall feeling at the site is that the 1942 kit is way more accurate than the 1943 kit, which I also own.

Now I have to do justice to the kit.  The kit calls for Tamiya OD green.  Not sure if that will work or if I should get the Vallejo Russian Green.  After washes and other weathering, it may not matter that much.

Working on a Zero right now, but will want a break soon, and will start the T-34.

Thanks again,

D

Dwayne or Dman or just D.  All comments are welcome on my builds. 

  • Member since
    December 2002
  • From: Bury St Edmunds, Suffolk, England
Posted by Bish on Monday, July 10, 2017 12:21 AM

D, the Tamiya kits of Russian tanks i have seen usually call out XF-61 for the Russian green and i think they would be a better option than OD, assuming you have it on hand.

I am a Norfolk man and i glory in being so


On the bench: Airfix 1/72nd Harrier GR.3/Fujimi 1/72nd Ju 87D-3

  • Member since
    July 2004
  • From: Sonora Desert
Posted by stikpusher on Monday, July 10, 2017 12:55 AM

I'd go with an olive green rather than an OD green on a T-34. Not too dark like XF-61.


F is for FIRE, That burns down the whole town!

U is for URANIUM... BOMBS!

N is for NO SURVIVORS...

       - Plankton

LSM


  • Member since
    September 2016
  • From: Albany, New York
Posted by ManCityFan on Monday, July 10, 2017 4:46 PM

stikpusher

I'd go with an olive green rather than an OD green on a T-34. Not too dark like XF-61.


In keeping with murphy's laws of model building...I have OD Green, NATO Green, JN Cockpit Green, JA Green, but no Dark Green or Olive Green.

Time to make a new list for a scalehobbyist.  If I have to pay shipping.....what else do I need (want)?  

Dwayne or Dman or just D.  All comments are welcome on my builds. 

  • Member since
    September 2003
  • From: AandF in the Badger State
Posted by checkmateking02 on Monday, July 10, 2017 4:59 PM

ManCityFan


stikpusher

I'd go with an olive green rather than an OD green on a T-34. Not too dark like XF-61.


In keeping with murphy's laws of model building...I have OD Green, NATO Green, JN Cockpit Green, JA Green, but no Dark Green or Olive Green.

Time to make a new list for a scalehobbyist.  If I have to pay shipping.....what else do I need (want)?  

 
There is always something!


  • Member since
    February 2006
  • From: Cincinnati Ohio
Posted by DantheMan85 on Tuesday, July 11, 2017 3:54 PM

Thanks Checkmateking.

Thanks Bish: Great start to your Panzer II.

Thanks Jgeratic.

Modelcrazy: Nice work on the cockpit and interior. Sorry to hear about that bad fitting wing section. Embarrassed

The other day airbrushed on X20 Clear, then let that set over night and applied the six decals. They went on nice and easy. After I seal them in I plan to give the tank a good dusting of XF57 Buff. Cool

 37 by Daniel Smith, on Flickr

On my Work Bench: Tamiya Ford GT 1/24

Up Coming: ?


  • Member since
    September 2016
  • From: Albany, New York
Posted by ManCityFan on Tuesday, July 11, 2017 4:07 PM

DantheMan85

Thanks Checkmateking.

Thanks Bish: Great start to your Panzer II.

Thanks Jgeratic.

Modelcrazy: Nice work on the cockpit and interior. Sorry to hear about that bad fitting wing section. Embarrassed

The other day airbrushed on X20 Clear, then let that set over night and applied the six decals. They went on nice and easy. After I seal them in I plan to give the tank a good dusting of XF57 Buff. Cool

 37 by Daniel Smith, on Flickr


That looks excellent.  Track sag is very well done.  Now dirty that beast up!  Big Smile

D

Dwayne or Dman or just D.  All comments are welcome on my builds. 

  • Member since
    September 2003
  • From: AandF in the Badger State
Posted by checkmateking02 on Tuesday, July 11, 2017 4:20 PM

Looks like it just rolled in from the desert, Dan.  Great work!


  • Member since
    December 2002
  • From: Bury St Edmunds, Suffolk, England
Posted by Bish on Tuesday, July 11, 2017 4:30 PM

Thanks Dan, and loking really good there.

I am just about reading to get this down to the spray booth and start painting. Finished off all the PE i was going to add and got the two halves of the hull together. I used some beading wire for the armoured cable for the lights.

I am leaving the exhaust off the rear and will paint that seperatly and add later.

I have left the turret is several sections. I'll paint the inside as wel as the gun and other fitings, then finish putting it together and doing the outside. I do like the Lion Marc barrel, very nicley detailed.

Once i start getting the paint on, i can start on the tracks. that will be fun.

I am a Norfolk man and i glory in being so


On the bench: Airfix 1/72nd Harrier GR.3/Fujimi 1/72nd Ju 87D-3

  • Member since
    September 2003
  • From: AandF in the Badger State
Posted by checkmateking02 on Tuesday, July 11, 2017 5:04 PM

Looking very fine, Bish.  Good work with the PE.

I suppose the tracks are all individual links?


  • Member since
    December 2002
  • From: Bury St Edmunds, Suffolk, England
Posted by Bish on Tuesday, July 11, 2017 11:53 PM

Thanks check, and yes they are, very small ones.

I am a Norfolk man and i glory in being so


On the bench: Airfix 1/72nd Harrier GR.3/Fujimi 1/72nd Ju 87D-3

  • Member since
    April 2014
  • From: Australia
Posted by lostagain on Friday, July 14, 2017 10:23 PM

Howdy Check, I would like to join up with this little offering:

In the meantime catching up with the great builds although Steve's Hurricane seems to be sticking out the bottom lip a bit!

Dwayne, got a classic kit out there! I (and sure many of us) have made it. In my case it was a few decades back and it has met a grisly end somewhere, somehow.

Bish, lots of detail in the PzkfwII, although it seems odd to me that Dragon would go to all that trouble with the suspension so it can't be posed.  The PE is coming together very well, what do you use to guide the folds?

Dan, the Pzkfw III is looking nice there.

Okay, this is building quickly so far:

Nice detail for a small kit.

  • Member since
    September 2003
  • From: AandF in the Badger State
Posted by checkmateking02 on Friday, July 14, 2017 10:46 PM

Hey yourself, lost!  Good to hear from you.

Unfortunately, the photo is coming through; just a big circle with a minus sign in it.

lostagain

Howdy Check, I would like to join up with this little offering:

In the meantime catching up with the great builds although Steve's Hurricane seems to be sticking out the bottom lip a bit!

Dwayne, got a classic kit out there! I (and sure many of us) have made it. In my case it was a few decades back and it has met a grisly end somewhere, somehow.

Bish, lots of detail in the PzkfwII, although it seems odd to me that Dragon would go to all that trouble with the suspension so it can't be posed.  The PE is coming together very well, what do you use to guide the folds?

Dan, the Pzkfw III is looking nice there.

Okay, this is building quickly so far:

Nice detail for a small kit.


  • Member since
    April 2014
  • From: Australia
Posted by lostagain on Friday, July 14, 2017 11:40 PM

Okay, I am suffering from Dwayne's issues with Google pics; I can see it but you can't. Even on the quote you posted back I can see the photos.

This is the Tamiya 1/48 Marder III. I will try Dwayne's 'post myself the link' solution when I am back from my hockey match...

JOIN OUR COMMUNITY!

Our community is FREE to join. To participate you must either login or register for an account.

SEARCH FORUMS
FREE NEWSLETTER
By signing up you may also receive reader surveys and occasional special offers. We do not sell, rent or trade our email lists. View our Privacy Policy.