SEARCH FINESCALE.COM

Enter keywords or a search phrase below:

Battle of Midway Group Build, 3 June, 2017 - 7 June, 2018

32816 views
777 replies
1 rating 2 rating 3 rating 4 rating 5 rating
  • Member since
    September 2003
  • From: AandF in the Badger State
Posted by checkmateking02 on Saturday, June 16, 2018 10:25 AM

Nice washes and weathering, Tony.  Very effective.  Without something like this, the Navy Blue gets a little boring.

Looking forward to seeing more progress on the Avenger, damouav.  Great plane.


  • Member since
    April 2005
  • From: Australia
Posted by taxtp on Sunday, June 24, 2018 8:06 PM

Thanks for your patience CMK. It took a bit longer because I decided to make a base for it, something I rarely do.

The base is an old picture frame, puttied and sanded like a model to remove that seams at the corners :) The carrier deck is the plastic one provided in Dragon's release of the Hasegawa Wildcat some years ago, cut down to size.

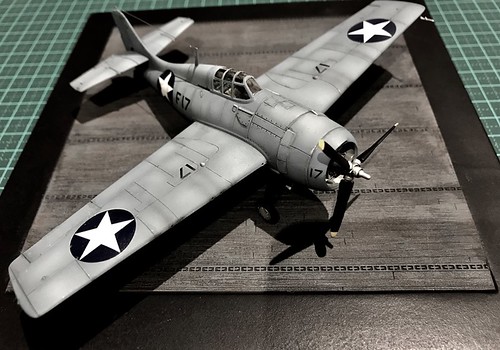
After some research, I opted for a faded/peeled 021 Flight Deck Blue over the pervious mahogony stain. One photo I found of the Hornet at Midway showed an absence of deck markings for part of the deck, so I replicated that.

Overall, I'm very happy with the model and the base this time.

Thanks for being such a patient host CMK, I really enjoy the effort you give us all for your GBs. Thank you !

Cheers

Tony

I'm just taking it one GB at a time.

  • Member since
    September 2003
  • From: AandF in the Badger State
Posted by checkmateking02 on Sunday, June 24, 2018 8:25 PM

Very sharp, Tony!  The paint work is equisite.  Looks very much at home on the deck.

Great photography, too; which one would you like for the finish-photo?

Thanks very much for being part of the GB.  It's always a pleasure to see the results of your artistry.


  • Member since
    April 2005
  • From: Australia
Posted by taxtp on Monday, June 25, 2018 2:04 AM

Thanks CMK. I think the 2nd one, but I'm ok with whichever one you choose.

Cheers

Tony

I'm just taking it one GB at a time.

  • Member since
    December 2002
  • From: Bury St Edmunds, Suffolk, England
Posted by Bish on Monday, June 25, 2018 6:20 AM

Tony, really nice finish. I like the final colour of that nice job on the deck as well.

I am a Norfolk man and i glory in being so


On the bench: Airfix 1/72nd Harrier GR.3/Fujimi 1/72nd Ju 87D-3

  • Member since
    September 2003
  • From: AandF in the Badger State
Posted by checkmateking02 on Monday, June 25, 2018 8:17 AM

Front page is updated with the finished photo of your Wildat, Tony.

Thanks again for taking part in the GB!  


  • Member since
    September 2016
  • From: Albany, New York
Posted by ManCityFan on Monday, June 25, 2018 1:32 PM

Tony, that is one good lookin' Wildcat.  Excellent job on that bird!

Dwayne or Dman or just D.  All comments are welcome on my builds. 

  • Member since
    April 2005
  • From: Australia
Posted by taxtp on Monday, June 25, 2018 7:20 PM

Thanks CMK and D.

Cheers

Tony

I'm just taking it one GB at a time.

  • Member since
    December 2002
  • From: Northern California
Posted by jeaton01 on Tuesday, July 10, 2018 10:19 PM

The B-26 has been getting a little attention here and there, just a little PE to show right now.  I've had too many other distractions, one of them getting an old timer R/C model finished along with it's build log.  Here's a picture of it and a link to the build log:

http://www.yolo.net/%7Ejeaton/gems/clippermk2/clippermk21.html


And the current progress on the B-26, it's getting converted to a B-26A with the Lone Star set.


John

To see build logs for my models:  http://goldeneramodel.com/mymodels/mymodels.html


  • Member since
    January 2017
Posted by damouav on Wednesday, July 11, 2018 6:31 AM

Great work Tony, CMK said it all in his comments.

Simply superb, truly superb.

Damian

In Progress
1/48 Tamiya P47-D Bubbletop
1/48 Hobby Boss TBF-1C Avenger (on hold)
Pending
1/48 Roden S.E.5a
1/48 Airfix Walrus
  • Member since
    December 2003
  • From: 37deg 40.13' N 95deg 29.10'W
Posted by scottrc on Wednesday, July 11, 2018 11:12 AM

 Those are some nice looking Wildcats that were finished.

John, I understand fully, my scale modeling has taken a back seat to pattern flying and flying my 1/4 scale cub.  But the summer temps are now into the tripple numbers so I'm sure I'll be spending time in the cool basement at the workbench. 


  • Member since
    September 2003
  • From: AandF in the Badger State
Posted by checkmateking02 on Wednesday, July 11, 2018 7:22 PM

Nice detail work, John.  It's looking good!

Pretty dramatic photo of your RC in flight!


  • Member since
    September 2003
  • From: AandF in the Badger State
Posted by checkmateking02 on Wednesday, July 11, 2018 7:23 PM

That's an attractive plane, Scott.  Did you build it?


  • Member since
    December 2003
  • From: 37deg 40.13' N 95deg 29.10'W
Posted by scottrc on Thursday, July 12, 2018 12:43 PM

No, I got it at an estate sale.  Its was built some 35 years ago and sat for about 25, so it needed some TLC to get it flying again.

  • Member since
    September 2003
  • From: AandF in the Badger State
Posted by checkmateking02 on Thursday, July 12, 2018 5:10 PM

Sure looks like you gave it the TLC it needed.  Beautiful plane.


  • Member since
    December 2002
  • From: Northern California
Posted by jeaton01 on Thursday, July 12, 2018 5:29 PM

Scott, here's my 1/6 scale Cub, built in 1987 and recovered once since then, always flown on electric power.  I built two back then, one electric and one glow originally with an OS 40 4 stroke but later an OS 25 FSR with a Davis Diesel head.  The plans were published in Scale R/C Modeler.

John

To see build logs for my models:  http://goldeneramodel.com/mymodels/mymodels.html


  • Member since
    September 2003
  • From: AandF in the Badger State
Posted by checkmateking02 on Thursday, July 12, 2018 9:47 PM

That is also a beautiful aircraft, John.  Nice work building it!


  • Member since
    December 2002
  • From: Northern California
Posted by jeaton01 on Monday, August 27, 2018 9:57 PM

So, in spite of my fervent hopes while I was off building P-40's no one snuck in and worked on this B-26.. Sigh.
 
Went back to the B-26 day before yesterday and actually feel like I have made some progress.  Feeling a little fun happening.  I spent some time on the tail gunner station modifications.  Having three or four really small arms and hands would help here.  I didn't want to wait until the fuselage was assembled to work on this as that would be sure to foul the interior with dust.   The fuselage was taped together, and the tailplane assembly was fitted up with the vacuform gunner's canopy and the resin lower tail cone.  I finally decided that the best method of getting a good result would be to use the kit's tail gunner canopy because it had a much better chance of having a good fit to the tailplane, but cut it where it could match with a thick frame on the vacuform canopy.  I left the cut a little long, and will do that final fit when the tailplane is permanently attached.  I was just holding parts in place with Tamiya tape during the test fitting.  The lower windows on the kit perspex don't seem to come close to matching up with the kit canopy, that might be due to differences in the tailplane from the kit parts which have long been amputated.  Some plastic card filling will have to fix that.  After that work I spent half a day rescribing the fuselage using the JLC saw.
 
Some photos:


John

To see build logs for my models:  http://goldeneramodel.com/mymodels/mymodels.html


  • Member since
    September 2003
  • From: AandF in the Badger State
Posted by checkmateking02 on Tuesday, August 28, 2018 2:39 PM

That's looks pretty challenging, John.  Going to be fascinating to see how your modifications go.  Keep it going!  Nice work!


  • Member since
    December 2002
  • From: Northern California
Posted by jeaton01 on Saturday, September 1, 2018 12:14 AM

Thanks, CMK.

The interior is complete now and the fuselage is ready to be joined.  The Eduard PE makes things a lot more interesting, although 75% of the PE is still unused.  Most of the rest goes in the back and I’m not doing that as none will be seen except the lower frame for the upper turret, which I did use.  I did my best to come up with the colors for the interior, using an overall medium dark green with light oversprays of OD.  Much of the interior was padded fabric for which no one seems to know the original color other than some type of OD or green.  The yellow life vests/seat cushions brighten things up some.  I have no idea what the padded area is on the bulkhead behind the copilot’s seat but I painted it khaki.  I think the yellow tank behind the pilot’s seat is a low pressure oxygen tank so I painted it yellow.  The fire extinguisher is aluminum with a light coat of copper and has a dark red brown nozzle.  The aft bulkhead is aluminum as they were uncoated according to all the information I could find.  The only reliable color source seems to be Flak Bait, and only its nose section until the Smithsonian assembles the airplane again.  The floor was covered in a dark rubber and the area above the cockpit sill is supposed to be flat black, what you see is my best guess at that.


John

To see build logs for my models:  http://goldeneramodel.com/mymodels/mymodels.html


  • Member since
    September 2003
  • From: AandF in the Badger State
Posted by checkmateking02 on Saturday, September 1, 2018 12:41 PM

I think this has turned out really well, John.  You've made a good choice of colors, and it's looking exceptional.  Very nice work!


  • Member since
    April 2005
  • From: Australia
Posted by taxtp on Sunday, September 9, 2018 10:20 PM
That does look really good John. Cheers Tony

I'm just taking it one GB at a time.

  • Member since
    December 2002
  • From: Northern California
Posted by jeaton01 on Saturday, September 22, 2018 12:59 AM

Work has continued on the B-26.  I have updated my web site and maybe it is best if those who are interested go there as there are 45 photos in the post so far.

Here's a link to the build log and then a picture of the work finished up today:

http://goldeneramodel.com/mymodels/b26/1b26/1b26.html

Number two wouldn't fire up, mixture problems I think.

John

To see build logs for my models:  http://goldeneramodel.com/mymodels/mymodels.html


  • Member since
    September 2003
  • From: AandF in the Badger State
Posted by checkmateking02 on Sunday, September 23, 2018 12:27 PM

That's a lot of work going in, John, and it looks like it's turning out very well.  Good job!


  • Member since
    December 2002
  • From: Northern California
Posted by jeaton01 on Wednesday, August 28, 2019 2:18 PM

Well, it's been a long haul but this one is finally in the display case.  Short wings, small tail, and early style tail gun set up.  Eventually I will have to build a stock Monogram kit, but not today!  Overall OD is 34086 from Model Master, as close to OD 41 as I can see, with fading using Faded Olive Drab and 34087, also MM.  Matte finish is Alclad II.  Oils used for weathering and a silver pencil, Tamiya Smoke for the exhaust.  The torpedo installation and decals are from Lone Star.  It is a B-26 used in the battle of Midway, and flew down the deck of Nagumo's flagship carrier, strafing it.  Here is a link to a narrative of the attack by the B-26's.  2 of 4 returned to Midway, but Susie Q was scrapped due to the damage incurred.


https://www.pacificwar.org.au/Midway/USArmy_at_Midway.html


John

To see build logs for my models:  http://goldeneramodel.com/mymodels/mymodels.html


  • Member since
    September 2003
  • From: AandF in the Badger State
Posted by checkmateking02 on Wednesday, August 28, 2019 3:42 PM

Great work, John.  Wonderful finish and paintwork; the subtle engine exhaust streaking on the wings is especially nicely done.

Do you have a preference for the finish-photo?  

Thanks for being part of this GB.  


  • Member since
    December 2002
  • From: Northern California
Posted by jeaton01 on Wednesday, August 28, 2019 6:59 PM

Thanks, and you can pick the one you like best.  And thanks for hosting the group build!

John

To see build logs for my models:  http://goldeneramodel.com/mymodels/mymodels.html


  • Member since
    September 2003
  • From: AandF in the Badger State
Posted by checkmateking02 on Thursday, August 29, 2019 1:44 PM

OK, John.  I'll pick one that shows up the torpedo fixture, since that's one of the notable features of this particular machine.

Again, thanks for your participation.  Always a pleasure to see your work.


JOIN OUR COMMUNITY!

Our community is FREE to join. To participate you must either login or register for an account.

SEARCH FORUMS
FREE NEWSLETTER
By signing up you may also receive reader surveys and occasional special offers. We do not sell, rent or trade our email lists. View our Privacy Policy.