SEARCH FINESCALE.COM

Enter keywords or a search phrase below:

RAF 100th Anniversay GB

85455 views
3404 replies
1 rating 2 rating 3 rating 4 rating 5 rating
  • Member since
    May 2013
  • From: Indiana, USA
Posted by Greg on Tuesday, March 13, 2018 10:54 AM

Joe, thanks for stopping in and taking a look at my model. I surely do appreciate it and your kind words.

  • Member since
    March 2012
  • From: Corpus Christi, Tx
Posted by mustang1989 on Monday, March 12, 2018 9:23 PM

Fantastic finish on that Tiffy Greg! Wow man! That sure is a beautiful aircraft.


 Forum | Modelers Social Club Forum (proboards.com) 

  • Member since
    May 2013
  • From: Indiana, USA
Posted by Greg on Monday, March 12, 2018 7:33 PM

Thanks Nick, your support is much appreciated.

Jack, yes, I think so too re the car door. Your earlier advice helped me tone the black bottom a bit and I was able to add some interest. No markings at all under there. No photos because of the finicky door parts hanging from the canopy!

  • Member since
    April 2006
  • From: ON, Canada
Posted by jgeratic on Monday, March 12, 2018 4:50 PM

Thanks all for the comments on the Camel interior work. 

Greg, the details should still be visible afterwards, but given the scale, eyesight is what deteremines what can be seen.

Andy, the green stuff putty is officially sold as Kneadatite.  It too is a two party expoxy putty and is available in tape form or tube - I think the former is more economical.  This stuff is tacky, but you can use water on both fingertips and tools to work around this.

For the cushion, I first made a pattern cut from a brass sheet and with masking tape on one side trimmed to exact fit - this all serves to get the shape and size of the putty.  Once dry, I peeled/popped the brass off, while tape remains stuck to the putty.

For the chair padding, I first rolled a very thin worm of putty and placed it on the framework, gingerly tamping down with a wet tool.  Let it set for about 10 minutes or more, then came back and shaped it more to conform to the curves and cutting off any excess.


regards,
Jack

  • Member since
    April 2006
  • From: ON, Canada
Posted by jgeratic on Monday, March 12, 2018 4:33 PM

Greg, excellent stuff.Yes
What's unique about the car door is it allows more show of the cockpit.  I like the markings too, not often you see red codes on a fighter, but I believe this is standard for night versions, which your subject aptly portrays.


regards,
Jack

  • Member since
    August 2015
  • From: the redlands Fl
Posted by crown r n7 on Monday, March 12, 2018 3:56 PM

Greg awesome build the camo came out fine I really like the open canopy! Nice job my friend 


 Nick.

  • Member since
    May 2013
  • From: Indiana, USA
Posted by Greg on Monday, March 12, 2018 3:51 PM

Andy, thanks for your positive comments. In the end, I think it might be that car door that I like best about this airplane/kit. Smile

Thanks, Bish. Always appreciate your thoughts and comments. And #3 is a fine choice for page 1.

  • Member since
    December 2002
  • From: Bury St Edmunds, Suffolk, England
Posted by Bish on Monday, March 12, 2018 3:25 PM

Greg, great loking build there, i like the finish and the camo came out really well. Deffo makes me want to do my car door Tiffy.

And i do try my best to reply to every one. If you guys take the time and effort to post your work, i should make some effort to respond. Its you guys that make a great GB.

Going to use your 3rd pic, shoulds off the scheme and the open door nicely.

I am a Norfolk man and i glory in being so


On the bench: Airfix 1/72nd Harrier GR.3/Fujimi 1/72nd Ju 87D-3

  • Member since
    September 2014
Posted by rooster513 on Monday, March 12, 2018 2:42 PM

Greg that Tiffy came out really nice! I like the weathering and that cockpit looks awesome...nice that you are able to see so much with the door open.

-Andy

  • Member since
    September 2014
Posted by rooster513 on Monday, March 12, 2018 2:41 PM

jgeratic

castel, that Walrus is coming along quite well I'd say, nice colours too.

----------------------

Update on the Camel ... well thought I'd be done with the scratchbuilding, but keep finding things to be improved upon.
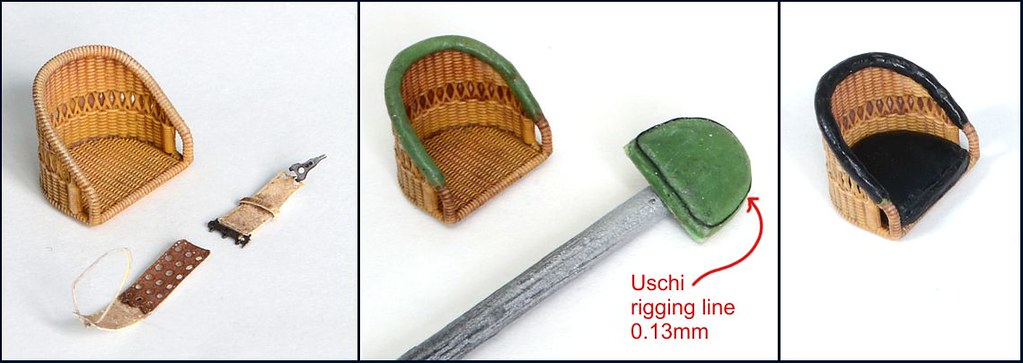
Belts are put together, but I did apply an umber wash to dirty them up a bit and help some of the detail stand out.  HGW provides two different styles of attachment points, either metal or a loop of fabric leather.  Think will go with the latter in hopes it makes it easier to attach to the airframe.

The resin whicker chair paints up nicely, but still needs a cushion, and usually the top frame also has some padding - so out came the green putty.  Also added some Uschi rigging line as the raised seam around the cushion.  Painted flat black afterwards, and oil from the ole forehead adds some sheen.
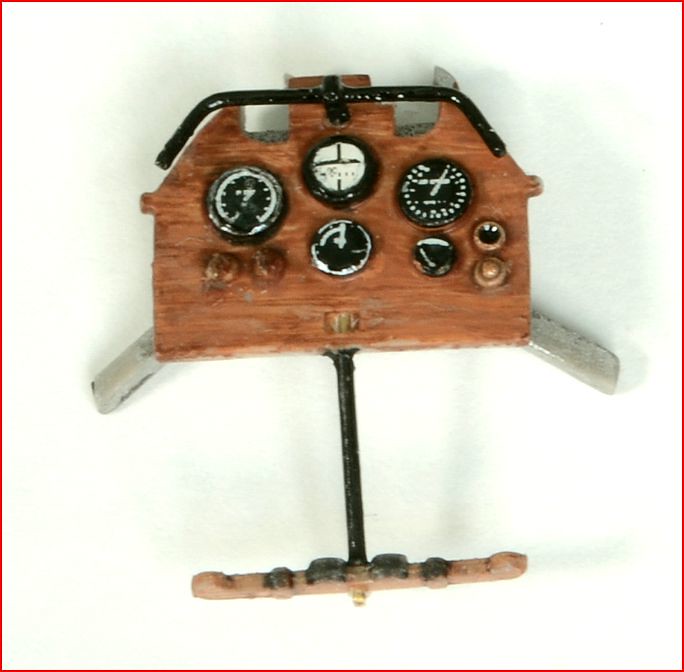
Ip done, but was surprised no PE on this (nor does Eduard make any separate IP for the 1/48 Camel - shocked!).  Dials are just decals, but they are oversized so had to fill in the bezels in order to accomodate the decals.  The black bars (verticle and the one on top that looks like a bicycle handle) were replaced with brass rod.

regards,

Jack


Jack that seat came out awesome! What's the putty that you are using? I tried using some two part epoxy putty to do something similar and it was a real pain. Was sticking to everything.

-Andy

  • Member since
    May 2013
  • From: Indiana, USA
Posted by Greg on Monday, March 12, 2018 2:00 PM

I've finished my 1/48th Eduard "Tiffy", which I believe is a repackage of Hasagawa sprues plus some added resin, PE, and mask from Eduard.

It was a fine kit with good fit. At the end, all of the last minute stuff assembled nicely.

As usual, clicking on an image should bring it up slightly larger...

This being my first RAF model, I'd like to thank several friends here who helped me out with various questions over the months. You know who you are. And speaking of months, hard to believe I started this one in May of last year. Yikes. But if it had to take forever, this is a nice bunch of people to take forever with. Smile

Bish, thank you for a great GB. I don't think you missed a single reply. This was a good one, my friend.

  • Member since
    August 2015
  • From: the redlands Fl
Posted by crown r n7 on Monday, March 12, 2018 12:58 PM

nice work there Jack like the grain 


 Nick.

  • Member since
    November 2009
  • From: SW Virginia
Posted by Gamera on Monday, March 12, 2018 11:34 AM

Hey wow guys, again I go away for the weekend and ya'll get all this done! 

Again to make sure I don't leave anyone out I'm just going to say 'Great work guys!!!

"I dream in fire but work in clay." -Arthur Machen


  • Member since
    May 2013
  • From: Indiana, USA
Posted by Greg on Sunday, March 11, 2018 7:01 PM

Jack, I sure hope that seat and IP can be seen at the end. Smashing work, really fun to look at. Love that wicker seat.

  • Member since
    December 2002
  • From: Bury St Edmunds, Suffolk, England
Posted by Bish on Sunday, March 11, 2018 5:48 PM

Jack, great job on that seta. I have seen a couple of those types of seats painted up and they look really nice when done right, the cushion and padding are a very nice touch. Very nice IP as well, really like the wood effect.

I am a Norfolk man and i glory in being so


On the bench: Airfix 1/72nd Harrier GR.3/Fujimi 1/72nd Ju 87D-3

  • Member since
    April 2006
  • From: ON, Canada
Posted by jgeratic on Sunday, March 11, 2018 5:44 PM

castel, that Walrus is coming along quite well I'd say, nice colours too.

----------------------

Update on the Camel ... well thought I'd be done with the scratchbuilding, but keep finding things to be improved upon.

Belts are put together, but I did apply an umber wash to dirty them up a bit and help some of the detail stand out.  HGW provides two different styles of attachment points, either metal or a loop of fabric leather.  Think will go with the latter in hopes it makes it easier to attach to the air frame.

The resin wicker chair paints up nicely, but still needs a cushion, and usually the top frame also has some padding - so out came the green putty.  Also added some Uschi rigging line as the raised seam around the cushion.  Painted flat black afterwards, and oil from the ole forehead adds some sheen.

Ip done, but was surprised no PE on this (nor does Eduard make any separate IP for the 1/48 Camel - shocked!).  Dials are just decals, but they are oversized so had to fill in the bezels in order to accommodate the decals.  The black bars (lower vertical and the one on top that looks like a bicycle handle) were replaced with brass rod.

regards,

Jack

  • Member since
    February 2010
  • From: Berkeley CA/St. Paul MN
Posted by EBergerud on Sunday, March 11, 2018 5:02 PM

Walrus is looking very good. We need more pics. When done let us know what you thought of the kit itself too.

The Sunderland needs some rigging and they recommend sprue. I've got rigging line with flex that I'll probably use. However one of the uber-gurus at ModelWarship is a Brit named Jim Baumann whose models are beyond good. He'll spend weeks rigging a ship with very fine sprue.

Baumann has some very nice instruction pics for making sprue. His technique is much easier than the standard one. You have to be a little careful, but the same is true heating the center of a piece of sprue and stretching it.

Here's how its done. Get a piece of sprue maybe 3" long - whatever is comfortable. Get a piece of cardboard or even a postcard and fix it to your desk. Light one end of the sprue and bring it down toward the card. It only needs to burn for a second - blow it out and stick it in the card immediately. Then pull back on the sprue. Once you get the hang of it, you can mass produce sprue of almost any thickness.

One advantage of sprue is that you can carefully heat it after it's on and it will tighten. The same is true with monofilament line. One or even two lb test would work well for rigging a plane.

Eric


A model boat is much cheaper than a real one and won't sink with you in it.

  • Member since
    May 2013
  • From: Indiana, USA
Posted by Greg on Sunday, March 11, 2018 11:43 AM

Justin, bad as my memory is, I recall quite vividly the early stages of your dam buster project, and some of the early "how will I do this" stuff.

It is nice to see it having all come together so well. You really did a knock-out job on it. YesYesYes

BTW, IMO those PE "moving" props looks fantastic in this application. I can almost feel the pulling-up forces.

Castel, you are a braver man than I tackling that bipe. It's looking really good and I think it's going to be a beaut.


  • Member since
    November 2008
  • From: Hatboro, PA
Posted by Justinryan215 on Sunday, March 11, 2018 10:04 AM

Bish

Chuffed to see this one done Justin, and really well done. Love how you have puled off the splash and with the bomb just lifting back up from the water. Great build and a really well done dio.

Going to use the second image if thats ok.

3000 and counting and still 3 weeks to go.


Not entirely sure what "chuffed" means, but I take it as a compliment!   Lol!

Thank you, Bish!  I wanted to get this one finished so I can put some focus on the bomberolling group build and get started on that Gotha....

Second image is fine to use, in fact I probably would have picked that one too!


Thank you all for the kind words!

Bish, I had fun on this one!


"...failure to do anything because someone else can do better makes us rather dull and lazy..."

Mortal as I am,I know that I am born for a day.  But when I follow at my pleasure the serried multitude of the stars in their circular course, my feet no longer touch the Earth...


  • Member since
    December 2002
  • From: Bury St Edmunds, Suffolk, England
Posted by Bish on Sunday, March 11, 2018 9:48 AM

castel, i like the scheme there, its coming along nicley. Those cross bars have come out well, i am sure you will do a grand job on the rigging.

I am a Norfolk man and i glory in being so


On the bench: Airfix 1/72nd Harrier GR.3/Fujimi 1/72nd Ju 87D-3

  • Member since
    December 2002
  • From: Bury St Edmunds, Suffolk, England
Posted by Bish on Sunday, March 11, 2018 9:44 AM

Chuffed to see this one done Justin, and really well done. Love how you have puled off the splash and with the bomb just lifting back up from the water. Great build and a really well done dio.

Going to use the second image if thats ok.

3000 and counting and still 3 weeks to go.

I am a Norfolk man and i glory in being so


On the bench: Airfix 1/72nd Harrier GR.3/Fujimi 1/72nd Ju 87D-3

  • Member since
    July 2008
  • From: Vancouver, the "wet coast"
Posted by castelnuovo on Sunday, March 11, 2018 12:38 AM

Some more work done on this. The big challenges will be to fit 6 vertical struts on wings along with four struts on the top of the engine into their respective holes all at the same time. Yay. The other one will be to stretch sprue and fix it somehow to form the wireing. The cross bars on the top right on the engine is my first atempt at stretching sprue, but because these are quite short pieces even with my trembling hands it wasn't too hard.


Justin, that dam buster looks super cool Yes

  • Member since
    April 2006
  • From: ON, Canada
Posted by jgeratic on Saturday, March 10, 2018 9:22 PM

Justin, very cool dio of an unique event.  The splash effects of the dropped 'package' is quite well done.  Yes

regards,

Jack

  • Member since
    November 2008
  • From: Hatboro, PA
Posted by Justinryan215 on Saturday, March 10, 2018 8:33 PM

bloody 'ell has this thread gotten away from me!  3000 posts?!  WOW! 


I have checked in, not nearly as frequently as I should have, apparently...

After taking some time off for the holidays, and building a pinewood derby car for entry into the adult class in our cub scout pack, I forced myself to put the finishing touches on the Dambusters build. 


Here she is, over the Moehne Dam in the Rohr Valley!


  Lancaster Bomber Dam busters build by Justin Ryan, on Flickr

 Lancaster Bomber Dam busters build by Justin Ryan, on Flickr

 Lancaster Bomber Dam busters build by Justin Ryan, on Flickr


"...failure to do anything because someone else can do better makes us rather dull and lazy..."

Mortal as I am,I know that I am born for a day.  But when I follow at my pleasure the serried multitude of the stars in their circular course, my feet no longer touch the Earth...


  • Member since
    May 2013
  • From: Indiana, USA
Posted by Greg on Saturday, March 10, 2018 10:51 AM

Jack, Bish, Nick....

Thank you all for commenting, I appreciate it.

That strip down the middle of the landing light lens is apparently supposed to be there. It is both molded into the plastic and also the Eduard masks come in two little pcs to fit it. It was finicky to mask and unmasked extremely cleanly which is why I mentioned it. I wasn't very clear! Nothing new about that.

Bish, I figure if anyone knows British camo, it's you so if you say it's ok then I'm pretty happy.

It's nice to have you fellows following along.

  • Member since
    April 2006
  • From: ON, Canada
Posted by jgeratic on Saturday, March 10, 2018 9:49 AM

Armor_Aficionado, very good work, and thank you for the heads up on the Hurricane's landing gear construction.  My only constructive crit would be that the hard edge camou looks more accurate than the freehand you have applied to the Spit - but in the end the dio should still end up being a treat.

regards,

Jack

  • Member since
    March 2017
Posted by Armor_Aficionado on Saturday, March 10, 2018 8:29 AM

Also, for anyone who intends on building this model, the Airfix 1/48 scale Hurricane Mk. I, I should point out an error in Airfix’s instructions.  There are two landing gear parts, D57 and D58, which are attached to the main landing gear struts and the forward bulkhead of the landing gear bay.  In the instructions (see illustration) it shows that each of these parts has to be threaded through a roughly triangular shaped hole in the wing structural member.  THIS IS INCORRECT - the part will absolutely NOT fit this way!  Instead, if you look at the wing structural member (and you can also see it in the illustration), just forward of that hole (toward the nose) is another, smaller, semicircular hole.  Thread the part through THIS hole instead; it’s a perfect fit!

https://pin.it/yier2sbfsifgpr


  • Member since
    March 2017
Posted by Armor_Aficionado on Saturday, March 10, 2018 8:15 AM

The Battle of Britain diorama is coming along nicely: ground crew figures are being assembled (that man on the Spitfire’s wing will be refueling it); the Hurricane upper side camo is finished; working on the landing gear for the Hurricane; and I got a nice effect for the underside of the fueslage’s amber identification light.  I drilled a hemispehrical depression in the center of the backside of the clear lens, then filled it with a couple of drops of something that approximated amber (mostly gloss yellow with a couple drops of dark earth and copper metallic).  It looks close enough to a clear lens with an amber lamp behind it.

https://pin.it/uqhqenoxzxe3bi

https://pin.it/utw36fp65r2mew

https://pin.it/x4hyxrq3howwlq

https://pin.it/m2hndrveuhkdpc


  • Member since
    August 2015
  • From: the redlands Fl
Posted by crown r n7 on Saturday, March 10, 2018 8:04 AM

Greg I agree the plane looks real good I would like to see the finished build.Yes


 Nick.

  • Member since
    December 2002
  • From: Bury St Edmunds, Suffolk, England
Posted by Bish on Saturday, March 10, 2018 3:00 AM

Greg, i like the look of that, really nice work. I think the camo has come out just right and despite the line down the front of the lense, that light loks really nice. I wouldn't not fix that seem either. Can't wait to see this finished.

I am a Norfolk man and i glory in being so


On the bench: Airfix 1/72nd Harrier GR.3/Fujimi 1/72nd Ju 87D-3

JOIN OUR COMMUNITY!

Our community is FREE to join. To participate you must either login or register for an account.

SEARCH FORUMS
FREE NEWSLETTER
By signing up you may also receive reader surveys and occasional special offers. We do not sell, rent or trade our email lists. View our Privacy Policy.