SEARCH FINESCALE.COM

Enter keywords or a search phrase below:

RAF 100th Anniversay GB

85456 views
3404 replies
1 rating 2 rating 3 rating 4 rating 5 rating
  • Member since
    November 2008
  • From: Central Florida
Posted by plasticjunkie on Monday, July 24, 2017 11:19 AM

Thanks guys.

 GIFMaker.org_jy_Ayj_O


Too many models to build, not enough time in a lifetime!!

  • Member since
    February 2010
  • From: Berkeley CA/St. Paul MN
Posted by EBergerud on Wednesday, July 26, 2017 3:14 PM


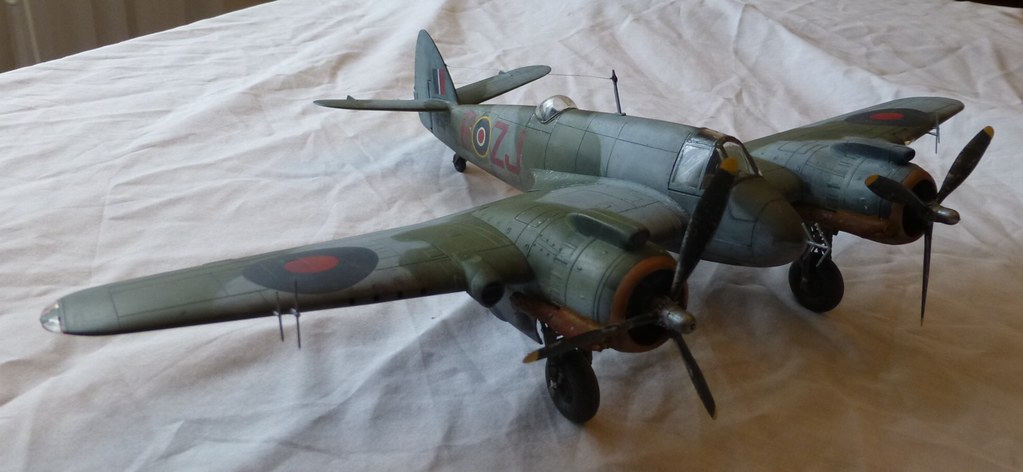
Okay, Beaufighter is a wrap. I'm within a couple of days of loading up our car and driving from St. Paul to Berkeley, so I didn't have time to do some things that I would have liked. I should have made a simple base for it. I also should have had some Tamiya colored clear for the lights. Next time.


The whole point of this kit was to try to get the look of a well worn plane in WWII service. That wasn't all of them of course (new planes came in regularly) but it didn't take much service for a plane to show wear and tear – all flew in what today's passenger would consider beastly conditions, and the maintenance given was usually well inspired but often under supplied. The percentage of frontline aircraft that in peace would have been either junked or sent home for complete overhaul was probably over half in any veteran squadron.


Beaufighter units did stick around. The plane was used from the beginning of the war to the end. (Beaufighters may have flown the last operational mission against wayward U-boats reluctant to surrender two weeks after German surrender.) It was in every theater. (It was the first modern combat plane built in Oz, and about 600 were made there.) It was a plane that accepted adaptation well. The Beaufighter was a variation on a very mediocre bomber the Bristol Beaufort. It's mutant background led to an odd look to the plane with it's short and stubby nose. The Beaufort was powered by the excellent Hercules radial – and when a larger version was available, the Mk. VI Beaufort appeared, easily recognizable by its pronounced dihedral on the tail. The plane I built flew for 96th Squadron out of Scotland and participated in night fighter operations in the North Sea. The Beaufighter never received the rave reviews of the Mosquito, but it was more rugged and proved well worth the schillings spent. 6,000 were built and served in active RAF and RAAF service until 1960. (Some served with the IDF in its early years.) Below are pics of an early mark (in Oz I think) and a Mk VI flying from the Western Desert. (Anyone interested in seeing a bang-up WWII aviation documentary should check out “Whispering Death”, a 70 minute show done on a low budget highlighting the Beaufighter in Australian service. Terrific combat film interwoven with interviews with Australian participants running from Air Group Commander William Garing – the longest lived of the RAAF's WWII bigwigs – to some ground crew. A few years back I wrote a book about the air war in the South/Southwest Pacific titled Fire in the Sky. Garing and a pilot named Bill Cassidy were terrific interviews.)


 photo3 by Eric Bergerud, on Flickr


 Photo4 by Eric Bergerud, on Flickr

  photo6 by Eric Bergerud, on Flickr


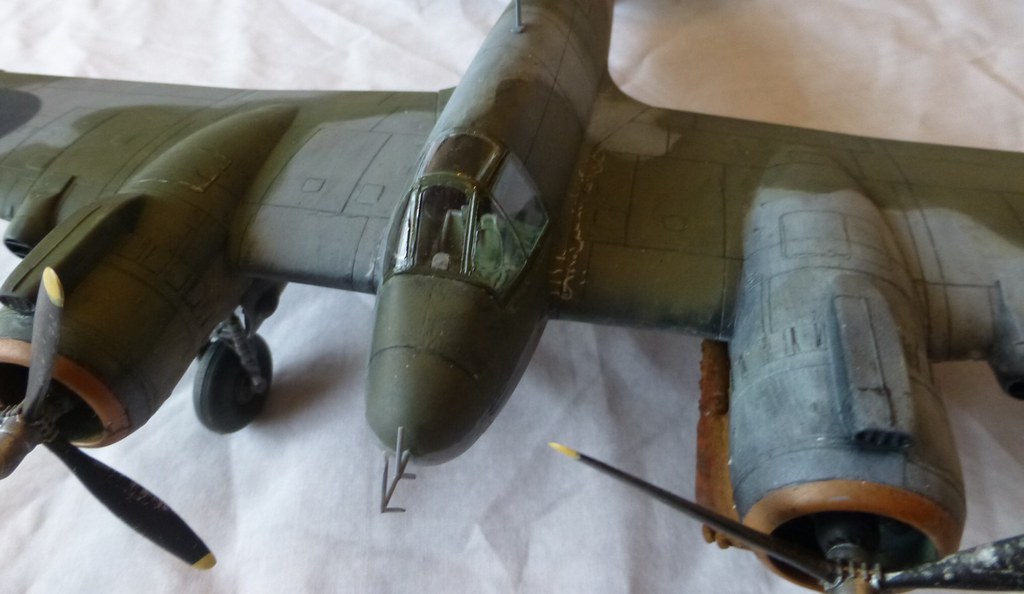
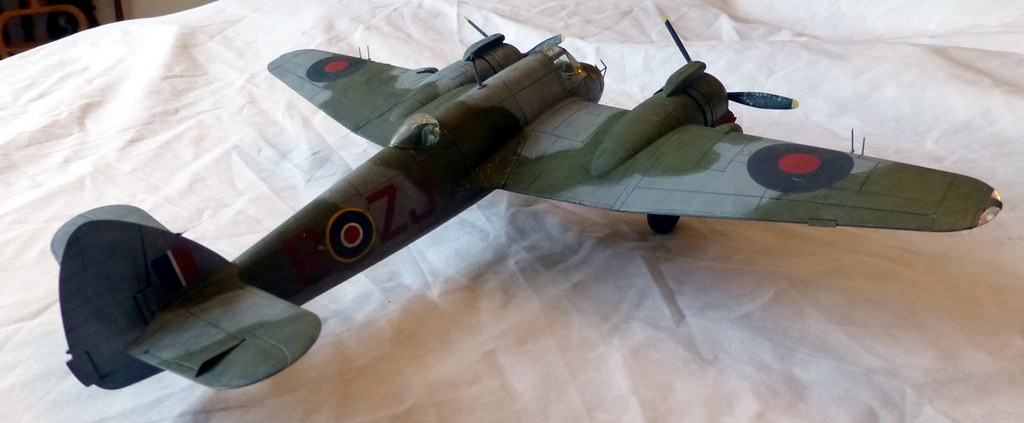
The major changes made to the kit since the last view included final assembly (especially clear parts); oil dot fading which I liked a lot and a good dose of pigments on the bottom. The exhaust is amplified which is definitely justified if you look at enough films and photos. WWII radials leaked oil, and two whopping big ones would leak a lot – because the exhausts run under the wings a very large exhaust stream from across the lower wing. As I understand it, the stains were more of a greenish brown than black. And as these planes normally operated out of pretty crude strips in today's standards, I gave the bottom a good dose of several colors of pigments. I enhanced the panel lines with Verithin pencils which work nicely – I wish I had done it in a shade of gray instead of black. Overall I'm pretty happy. I liked the black basing. The Golden High Flow Paints were a delight for airbrush use. I think the weathering was about right. Pics below:


 piclftab by Eric Bergerud, on Flickr


 Picftrt by Eric Bergerud, on Flickr


 Picftlt by Eric Bergerud, on Flickr


 PicFtDet by Eric Bergerud, on Flickr


 PicBot1 by Eric Bergerud, on Flickr


 picab! by Eric Bergerud, on Flickr


 PicRt1 by Eric Bergerud, on Flickr


 picrtabr! by Eric Bergerud, on Flickr


 pictpdet by Eric Bergerud, on Flickr


A model boat is much cheaper than a real one and won't sink with you in it.

  • Member since
    April 2006
  • From: ON, Canada
Posted by jgeratic on Wednesday, July 26, 2017 10:39 PM

Hi Eric, great job with the Beaufighter.  That black basing really does look smart, giving the impression of a well used aircraft.  Yes


regards,

Jack

  • Member since
    December 2002
  • From: Bury St Edmunds, Suffolk, England
Posted by Bish on Thursday, July 27, 2017 1:59 AM

Lovely build there Eric, really like the finish, you have pulled the look off perfectly.

Thanks for sharing that with us, i will update the roster later.

I am a Norfolk man and i glory in being so


On the bench: Airfix 1/72nd Harrier GR.3/Fujimi 1/72nd Ju 87D-3

  • Member since
    January 2017
Posted by damouav on Thursday, July 27, 2017 5:05 AM

Eric, Really great build you have achieved here, well done.

In Progress
1/48 Tamiya P47-D Bubbletop
1/48 Hobby Boss TBF-1C Avenger (on hold)
Pending
1/48 Roden S.E.5a
1/48 Airfix Walrus
  • Member since
    June 2014
Posted by BrandonK on Thursday, July 27, 2017 9:12 AM

Eric, great work on the Beaufighter. It looks very good. The camo looks much better on that bird than the overall black of the nightfighter. Well done.

BK

On the bench:

A lot !! And I mean A LOT!!

2024 Kits on deck / in process / completed   

                         14 / 5 / 2  

                              Tongue Tied

  • Member since
    November 2009
  • From: SW Virginia
Posted by Gamera on Thursday, July 27, 2017 9:16 AM

Great job there Eric, that is some impressive work! Yes

"I dream in fire but work in clay." -Arthur Machen


  • Member since
    December 2002
  • From: Bury St Edmunds, Suffolk, England
Posted by Bish on Thursday, July 27, 2017 1:07 PM

Eric, got your completed build on the front page. But for some reason i had not added you to the roster. Which kit was that again.

My bad, sorry about that.

I am a Norfolk man and i glory in being so


On the bench: Airfix 1/72nd Harrier GR.3/Fujimi 1/72nd Ju 87D-3

  • Member since
    February 2010
  • From: Berkeley CA/St. Paul MN
Posted by EBergerud on Thursday, July 27, 2017 1:19 PM
Bish That was a 1/48 Tamiya Bristol Beaufighter Mk VI. Eric


A model boat is much cheaper than a real one and won't sink with you in it.

  • Member since
    December 2002
  • From: Bury St Edmunds, Suffolk, England
Posted by Bish on Thursday, July 27, 2017 1:37 PM

Cheers Eric, i was sure it was 48th, but couldn't remember the make.

Thanks again.

I am a Norfolk man and i glory in being so


On the bench: Airfix 1/72nd Harrier GR.3/Fujimi 1/72nd Ju 87D-3

  • Member since
    February 2010
  • From: Berkeley CA/St. Paul MN
Posted by EBergerud on Thursday, July 27, 2017 2:03 PM
I left something out. Before putting on the clear parts and pigments I gave the kit a last coat of matt. It was Windsor Newton Artists Matt Varnish thinned with some Mr. Levelling Thinner - Tamiya Lacquer thinner would work also, but not stuff from the hardware store. I got this tip from a YTube video "Expert Model Craft" done by famous Brit aircraft modeler and big show judge Geoff Illsley last year. (A little old school but some very good tips indeed.) I'd guess it was thinned about 30% thinner going over a .35 nozzle at about 25 psi - it won't spray properly neat. Anyway the result was not only a fine matt-satin (I find that a very good hue) but it was very smooth - completely unlike Dullcoate which is dull okay but rough. As advertised it completely removed any blemishes from decals. Very good stuff. Supposedly USA only but the Brit go hold of some and Windsor Newton is based in the UK methinks. This is not to be mistaken with the acrylic matt varnish made by Windsor and many other companies from Golden to Vallejo. Look for the term "artist." As noted I didn't seal the pigments. I should experiment varnishing clear parts - in the real world they don't have that bright shine often found on model canopies. Nor is it the same as spray can stuff from art houses. I got some Golden spray varnish and it dries extremely slowly - pretty much for sealing paintings where speed is not needed. (Tamiya spray varnishes work perfectly well, but its not as smooth as this stuff. I rotate between Tamiya and Vallejo during weathering depending upon what kind of finish I want to protect: acrylic varnish for weathering with enamels or oils; Tamiya spray weathering with acrylic. Weathering stage also controls gloss, satin or matt.) Eric


A model boat is much cheaper than a real one and won't sink with you in it.

  • Member since
    November 2009
  • From: SW Virginia
Posted by Gamera on Friday, July 28, 2017 7:39 AM

Thanks Eric! Sounds interesting, I really should experiment with different stuff like this, I have a few brands that work that I stick to. I'm really in a rut with them. 

"I dream in fire but work in clay." -Arthur Machen


  • Member since
    March 2017
Posted by Armor_Aficionado on Saturday, July 29, 2017 6:13 AM

The Airfix 1/72 Spitfire is nearing completion, just a little touch-up paint, decal application, nd some light weathering still to be done:

https://www.pinterest.de/pin/55450639145977533/

https://www.pinterest.de/pin/55450639145977532/

  • Member since
    November 2009
  • From: SW Virginia
Posted by Gamera on Saturday, July 29, 2017 6:47 PM

She's lookin' good! I assume you just slapped the prop on for the photo?

"I dream in fire but work in clay." -Arthur Machen


  • Member since
    December 2002
  • From: Bury St Edmunds, Suffolk, England
Posted by Bish on Saturday, July 29, 2017 11:34 PM

Looking nice there AA.

I am a Norfolk man and i glory in being so


On the bench: Airfix 1/72nd Harrier GR.3/Fujimi 1/72nd Ju 87D-3

  • Member since
    October 2016
  • From: .O-H-I-O....
Posted by DasBeav on Sunday, July 30, 2017 7:04 PM

Great Job on the Beaufighter, Eric. After seeing yours I'm moving mine up in the "To Do" list.

AA Nice Camo job on the Spit....Looking forward to more pics.


 Sooner Born...Buckeye Bred.


  • Member since
    September 2014
Posted by rooster513 on Monday, July 31, 2017 7:01 AM

Was finally able to wrap this one up. This is my 2nd time building the newer Airfix Hurricane and like last time it went together pretty painlessly. Tried a couple things for the first time on this one, including painting the roundels and drilling out the exhaust. All paints were tamiya and I used EZ line for the rigging. Here are some finished pics...

I'm thinking the last one for the front page Bish. Thanks for hosting the massive and fun GB! You are a great host and I appreciate all the work that you put into this and your other GB's. Thanks again!


-Andy

  • Member since
    December 2002
  • From: Bury St Edmunds, Suffolk, England
Posted by Bish on Monday, July 31, 2017 7:08 AM

I do really like that Andy. You did a really nice job on those markings, i like the open gun bay and some nice chipping effects.

Thanks for sharing this with us and for giving us a fine addition for the front page. I will update that tonight.

I am a Norfolk man and i glory in being so


On the bench: Airfix 1/72nd Harrier GR.3/Fujimi 1/72nd Ju 87D-3

  • Member since
    November 2009
  • From: SW Virginia
Posted by Gamera on Monday, July 31, 2017 7:20 AM

Oh yeah, that's some nice work! Yes

"I dream in fire but work in clay." -Arthur Machen


  • Member since
    January 2017
Posted by damouav on Monday, July 31, 2017 9:08 AM

Very nice work Andy, well done.

In Progress
1/48 Tamiya P47-D Bubbletop
1/48 Hobby Boss TBF-1C Avenger (on hold)
Pending
1/48 Roden S.E.5a
1/48 Airfix Walrus
  • Member since
    June 2014
Posted by BrandonK on Monday, July 31, 2017 9:12 AM

Andy, that Hurricane is stunning. That is truly one amazing looking build. Well done, Sir.

BK

On the bench:

A lot !! And I mean A LOT!!

2024 Kits on deck / in process / completed   

                         14 / 5 / 2  

                              Tongue Tied

  • Member since
    April 2006
  • From: ON, Canada
Posted by jgeratic on Monday, July 31, 2017 10:06 AM

Hi Andy, splendid job on your Hurricane, and excellent results with those sprayed on roundels.  Yes

regards,

Jack

  • Member since
    September 2014
Posted by rooster513 on Monday, July 31, 2017 10:29 AM

Thanks guys I really appreciate the kind words! I'll be keeping an eye on this GB and hopefully will get something else built for it.

-Andy

  • Member since
    December 2002
  • From: Bury St Edmunds, Suffolk, England
Posted by Bish on Monday, July 31, 2017 12:24 PM

Front page updated. Andy, are you still planning on doing the hasegawa Spit i have you down for.

I am a Norfolk man and i glory in being so


On the bench: Airfix 1/72nd Harrier GR.3/Fujimi 1/72nd Ju 87D-3

  • Member since
    September 2014
Posted by rooster513 on Monday, July 31, 2017 12:33 PM

Bish

Front page updated. Andy, are you still planning on doing the hasegawa Spit i have you down for.


Bish, honestly I've picked that one up and put it down so many times already and just can't get into it. I'd scratch that one from the roster for now but I'll be keeping an eye out for something at one of the shows coming up in the next few months that I can build.

-Andy

  • Member since
    December 2002
  • From: Bury St Edmunds, Suffolk, England
Posted by Bish on Monday, July 31, 2017 12:48 PM

No worries Andy, if your not feeling it, can't be forced.

I am a Norfolk man and i glory in being so


On the bench: Airfix 1/72nd Harrier GR.3/Fujimi 1/72nd Ju 87D-3

  • Member since
    March 2017
Posted by Armor_Aficionado on Tuesday, August 1, 2017 3:51 PM

Decals are done on the 1/72 Spitfire.  Now just have to spray it with Dullcote, peel the mask off the canopy, and a little weathering and she'll be done.  Then it's time to start on the 1/48 Spit for my diorama! 

https://www.pinterest.de/pin/55450639145997709/

The markings are for the aircraft of Polish ace and 303 Squadron commander Jan Zumbach.

  • Member since
    November 2009
  • From: SW Virginia
Posted by Gamera on Wednesday, August 2, 2017 7:29 AM

She's lookin' good AA! 

Though I do notice the red in the fusilage roundel looks slightly out of register. Not sure there's much you can do about that though. Or maybe it's just the angle of the photo. 

"I dream in fire but work in clay." -Arthur Machen


  • Member since
    March 2017
Posted by Armor_Aficionado on Wednesday, August 2, 2017 8:07 AM
No, it's not the angle of the photo; unfortunately, the decals were printed out of register. If you look closely, you can tell the yellow outer ring of the roundel is also slightly off-register. Oh well, nothing to be done about that... :-(

  • Member since
    November 2009
  • From: SW Virginia
Posted by Gamera on Thursday, August 3, 2017 7:53 AM

If you can find another roundel in the same size you can just lay it over the one there. You can buy a sheet of just roundels, which is kinda a waste just to use two but you still have it in case you need it in the future. 

"I dream in fire but work in clay." -Arthur Machen


JOIN OUR COMMUNITY!

Our community is FREE to join. To participate you must either login or register for an account.

SEARCH FORUMS
FREE NEWSLETTER
By signing up you may also receive reader surveys and occasional special offers. We do not sell, rent or trade our email lists. View our Privacy Policy.