SEARCH FINESCALE.COM

Enter keywords or a search phrase below:

Pride of the Luftwaffe GB

42445 views
1268 replies
1 rating 2 rating 3 rating 4 rating 5 rating
  • Member since
    January 2015
Posted by BrandonD on Wednesday, November 1, 2017 11:40 AM

jgeratic

Thanks Bish, interesting.  Have you tried mixing with other brands, like Tamiya?

regards,

Jack


Mr. Paint is great stuff. And yes, you can absolutely mix with other brands, and can use Gunze/GSI Creos Mr. Levelling Thinner with it (so I assume also Tamiya Lacquer Thinner, though I have not done so).

Last night, actually, I was shading an A-36 with MRP Olive Drab and some Tamiya Desert Yellow, then darkening with MRP mixed with Tamiya RAF Dark Green and Black. Absolutely no issues.

Untitled

Untitled

-BD-

  • Member since
    April 2006
  • From: ON, Canada
Posted by jgeratic on Wednesday, November 1, 2017 11:34 AM

Thanks Bish, interesting.  Have you tried mixing with other brands, like Tamiya?

regards,

Jack

  • Member since
    December 2002
  • From: Bury St Edmunds, Suffolk, England
Posted by Bish on Wednesday, November 1, 2017 11:16 AM

jgeratic

What type of paint is MRP - acrylic, enamel, lacquer? 

regards,

Jack


Its an Acrylic lacquer.

I am a Norfolk man and i glory in being so


On the bench: Airfix 1/72nd Harrier GR.3/Fujimi 1/72nd Ju 87D-3

  • Member since
    April 2006
  • From: ON, Canada
Posted by jgeratic on Wednesday, November 1, 2017 11:13 AM

What type of paint is MRP - acrylic, enamel, lacquer? 

regards,

Jack

  • Member since
    December 2002
  • From: Bury St Edmunds, Suffolk, England
Posted by Bish on Wednesday, November 1, 2017 8:25 AM

jgeratic

Steve, your suggested top colours look spot on to me.   I'm thinking the box art of the fw 109D might be fictitious, or did the Luftwaffe revert back to early paint colours in 44-45?  Maybe paint shortages would explain it?

The white fuselage band indicates a JG3 aircraft:

regards,

Jack


I think Monogram have just gone for a generic look. If it was me, i would find a profile i liked and do that.

I am a Norfolk man and i glory in being so


On the bench: Airfix 1/72nd Harrier GR.3/Fujimi 1/72nd Ju 87D-3

  • Member since
    December 2002
  • From: Bury St Edmunds, Suffolk, England
Posted by Bish on Wednesday, November 1, 2017 8:21 AM

DiscoStu


Bish


I have just used MRP for the first time. Deffinetly does not need anything added, sprays lovely just as is. I got pretty good coverage with one coat, but gave it a second. One thing i have noti8ced and that its very much like Alclad in that it shows every mark and scratch. You need to make sure the surfice is well prepared before useing it.


Good to know!  I had to order from overseas so I bought a bunch of colors to justify the shipping.  They seemed to offer colors that are hard to get (Bronze Green, Dull Dark Green, etc.) Looking forward to trying them!


I have only found 2 places in the UK that has them and one of those (the cheaper one of course) doesn't have the complete range. I did a comparison with my current range, Xtracolour, checking all of the German aircraft and armour paints, and MRP has them all plus a few extra. I am going to do a couple more test builds, but i am thinking of switching over completly to that for all my German subjects at least.

I am a Norfolk man and i glory in being so


On the bench: Airfix 1/72nd Harrier GR.3/Fujimi 1/72nd Ju 87D-3

  • Member since
    January 2015
  • From: Tumwater, WA.
Posted by M. Brindos on Wednesday, November 1, 2017 8:13 AM

Indeed it is. I've had it in the stash for months. 

Its a lovely looking kit in the box and I've been thinking about building it since it arrived in the mail.

I haven't chosen a scheme yet, but both look cool. :)

I think I'll start it this weekend.

- Mike Brindos "Lost Boy"

  • Member since
    September 2014
Posted by rooster513 on Wednesday, November 1, 2017 7:53 AM

M. Brindos

Count me in. 

1/48 Airfix Me 109 E1/3

I should find enough time in a year to get this completed lol.


Great to have you in Mike! I assume that's one of the newer tooling airfix kits?

-Andy

  • Member since
    January 2015
  • From: Tumwater, WA.
Posted by M. Brindos on Tuesday, October 31, 2017 2:06 PM

Count me in. 

1/48 Airfix Me 109 E1/3

I should find enough time in a year to get this completed lol.

- Mike Brindos "Lost Boy"

  • Member since
    January 2006
  • From: Earth
Posted by DiscoStu on Tuesday, October 31, 2017 2:04 PM

Bish


I have just used MRP for the first time. Deffinetly does not need anything added, sprays lovely just as is. I got pretty good coverage with one coat, but gave it a second. One thing i have noti8ced and that its very much like Alclad in that it shows every mark and scratch. You need to make sure the surfice is well prepared before useing it.


Good to know!  I had to order from overseas so I bought a bunch of colors to justify the shipping.  They seemed to offer colors that are hard to get (Bronze Green, Dull Dark Green, etc.) Looking forward to trying them!

"Ahh the Luftwaffe. The Washington Generals of the History Channel" -Homer Simpson


  • Member since
    April 2006
  • From: ON, Canada
Posted by jgeratic on Tuesday, October 31, 2017 1:04 PM

Steve, your suggested top colours look spot on to me.   I'm thinking the box art of the fw 109D might be fictitious, or did the Luftwaffe revert back to early paint colours in 44-45?  Maybe paint shortages would explain it?

The white fuselage band indicates a JG3 aircraft:

regards,

Jack

  • Member since
    July 2014
Posted by modelcrazy on Tuesday, October 31, 2017 11:36 AM

Pinkbooger

Well I haven't been able to get much done on this. I am hoping to get an airbrush system in the near future to use on this. If I don't I will be brush painting it. My question is: What color should I use? I get my paints from Hobby Lobby. I am thinking of going with whats on the box or at least similar to it. Any ideas? Really not sure what colors to use!!
 

PB,

I would say RLM 70 Schwartzgrun which is a black grey/dark grey, RLM 71 Dunkelgrun which is a black green/dark green and RLM 65 which has a sky blue hue and will sometimes go up half the fuselage. The mottling looks to be the RLM 70. The interior is RLM 2 which is a med grey. The Luftwaffe would use several different colors but those should work for you.

You can Google images of these colors to get a good idea what they look like.

If I got this wrong someone correct me.

Steve

Building a kit from your stash is like cutting a head off a Hydra, two more take it's place.


http://www.spamodeler.com/forum/

  • Member since
    December 2002
  • From: Bury St Edmunds, Suffolk, England
Posted by Bish on Tuesday, October 31, 2017 10:35 AM

DiscoStu


B-1 CrewCheif


Thank you all for the comments on my paint work, yes the process takes a long time but its well worth it with the finishing effect. Plus the MRP paint makes it so much easier. If you havent tried MRP yet, get it, its worth it


I just discovered MRP while trying to find the right camoflage gray for an F-35, apparently they make the right color as well as a Have Glass finish.  I'm looking forward to trying it.  Any tips on how to spray it?  I typically use Tamiya Lacquer thinner and Tamiya and Mr. Color paints.  Not sure how to approach the MRP.


I have just used MRP for the first time. Deffinetly does not need anything added, sprays lovely just as is. I got pretty good coverage with one coat, but gave it a second. One thing i have noti8ced and that its very much like Alclad in that it shows every mark and scratch. You need to make sure the surfice is well prepared before useing it.

I am a Norfolk man and i glory in being so


On the bench: Airfix 1/72nd Harrier GR.3/Fujimi 1/72nd Ju 87D-3

  • Member since
    January 2006
  • From: Earth
Posted by DiscoStu on Tuesday, October 31, 2017 10:21 AM

B-1 CrewCheif


Thank you all for the comments on my paint work, yes the process takes a long time but its well worth it with the finishing effect. Plus the MRP paint makes it so much easier. If you havent tried MRP yet, get it, its worth it


I just discovered MRP while trying to find the right camoflage gray for an F-35, apparently they make the right color as well as a Have Glass finish.  I'm looking forward to trying it.  Any tips on how to spray it?  I typically use Tamiya Lacquer thinner and Tamiya and Mr. Color paints.  Not sure how to approach the MRP.

"Ahh the Luftwaffe. The Washington Generals of the History Channel" -Homer Simpson


  • Member since
    September 2017
Posted by Pinkbooger on Tuesday, October 31, 2017 8:50 AM

[quote user="Pinkbooger"]


Well I haven't been able to get much done on this. I am hoping to get an airbrush system in the near future to use on this. If I don't I will be brush painting it. My question is: What color should I use? I get my paints from Hobby Lobby. I am thinking of going with whats on the box or at least similar to it. Any ideas? Really not sure what colors to use!!

"You underestimate the power of the dark side"

-Darth Vader

  • Member since
    April 2015
Posted by Mopar Madness on Monday, October 30, 2017 9:08 PM

I really think it looks great!  Very nice application.  

Chad

God, Family, Models...

At the plate: 1/48 Airfix Bf109 & 1/35 Tamiya Famo

On deck: Who knows!

  • Member since
    May 2016
  • From: Rapid city SD
Posted by B-1 CrewCheif on Monday, October 30, 2017 8:25 PM

rooster513

Love the splinter camo B-1!


Thank you all for the comments on my paint work, yes the process takes a long time but its well worth it with the finishing effect. Plus the MRP paint makes it so much easier. If you havent tried MRP yet, get it, its worth it

Anyway, after giving it a lot of thought and doing a lot of research i painted the Mottling on the sides. I think i got it right. What do you guys think?

Next, decals


On the Bench: 1:32 Roden Stearman, 1:35 Orochi M3A3 Bradley, 1:6 Mandalorian figure

  • Member since
    September 2014
Posted by rooster513 on Monday, October 30, 2017 6:34 AM

Love the splinter camo B-1!

-Andy

  • Member since
    June 2014
Posted by BrandonK on Saturday, October 28, 2017 5:59 PM

B-1, you can see the basing in the close up shots and it looks great. Even though that technique takes more time I think it is well worth it. Excellent.


BrandonD, looking great thus far. Super work.

BK

On the bench:

A lot !! And I mean A LOT!!

2024 Kits on deck / in process / completed   

                         14 / 5 / 2  

                              Tongue Tied

  • Member since
    January 2016
  • From: A Galaxy Far, Far Away
Posted by Hunter on Friday, October 27, 2017 9:47 PM

B-1,

Great work on the paint,the pit and the engine... also the masking. It really looks sharp

BrandonD,

Beautiful job on the pit...she is coming along very nicely

Hunter 


  • Member since
    April 2015
Posted by Mopar Madness on Friday, October 27, 2017 8:59 PM

BrandonD

Speaking of mine, I got some work done on it. I finished the cockpit and got the main assembly done last night.

I'm going to keep the rudder off and just paint the markings rather than dealing with the decals, and I'm considering painting the side markings with masks made with my sweet new Thinnerline circle cutter. 
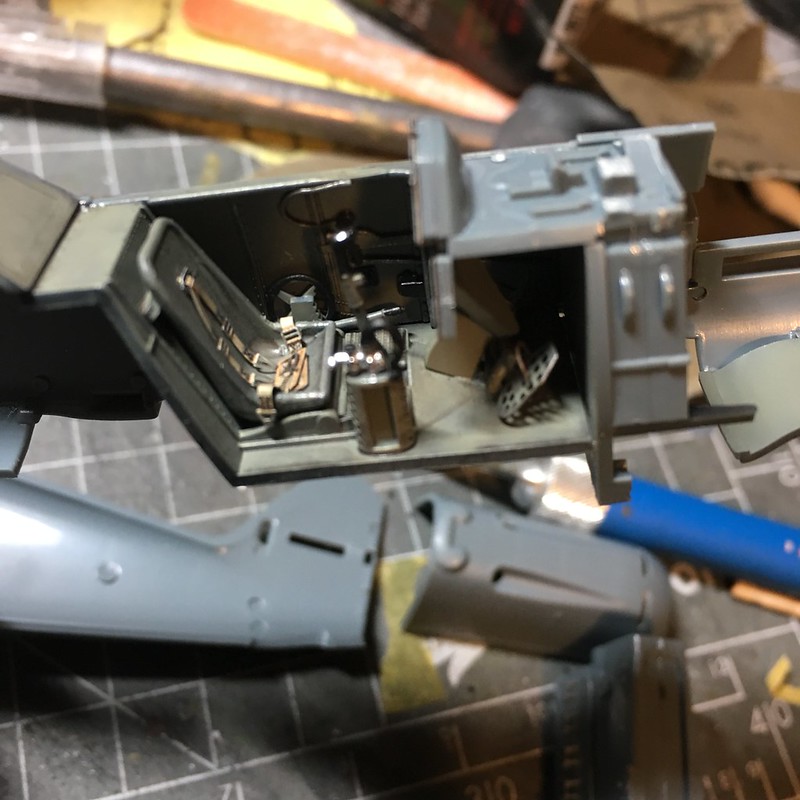
Untitled


UntitledThe only thing I need to do before adding the cowl is mount the engine. The engine mount is the one place this kit really falls down on. With it all buttoned up, there doesn't seem to be room to use the actual mounts, and that leaves it just sitting without positive locating points inside the nose, which is problematic, given that's how the prop and exhausts mount.

I've built one of these with the cowl off, and it was fine, and I managed to add the exhaust at the end of the build, so I'm hoping to do that here, too, so I don't have to mask them. I'll probably stick the prop on it and use that to line it up inside, then super glue it wherever it touches inside, because the last thing I want is to go to add the prop at the end of the build, push it onto the nose, and break the attachment points so I'm left without a prop shaft and a rattling engine.

-BD-


Nice progress on that 109.  The belts look great!

Chad

God, Family, Models...

At the plate: 1/48 Airfix Bf109 & 1/35 Tamiya Famo

On deck: Who knows!

  • Member since
    April 2015
Posted by Mopar Madness on Friday, October 27, 2017 8:57 PM

For real.  That splinter camo looks really nice!

Chad

God, Family, Models...

At the plate: 1/48 Airfix Bf109 & 1/35 Tamiya Famo

On deck: Who knows!

  • Member since
    April 2005
  • From: Australia
Posted by taxtp on Friday, October 27, 2017 8:17 PM

That splinter camo looks good B-1.

Cheers

Tony

I'm just taking it one GB at a time.

  • Member since
    May 2016
  • From: Rapid city SD
Posted by B-1 CrewCheif on Friday, October 27, 2017 5:33 PM

Im really surprised with how fast this kit is moving for me. Im now in the painting stage of the build and I have all the main colors painted. The Paint i used was MRP RLM 65, 02, and 71. I used the black basing technique and MRP is probably the best paint i have ever used for it. Next will be painting the mottling on the sides. I was trying to get some pictures showing the black bleeding through the Grey and the Grey bleeding through the Green but i dont know if my pictures show that too well.

On the Bench: 1:32 Roden Stearman, 1:35 Orochi M3A3 Bradley, 1:6 Mandalorian figure

  • Member since
    September 2014
Posted by rooster513 on Friday, October 27, 2017 7:17 AM

BD that cockpit is looking very nice!

-Andy

  • Member since
    May 2016
  • From: Rapid city SD
Posted by B-1 CrewCheif on Thursday, October 26, 2017 5:32 PM

BrandonK

B-1, that is definatly looking great. Even without the fuselage you can tell its a 109. I may have to pick one of these up since you like it so much.

BK


Yeah i definately recomend these kits especially for how cheap you can find them.

On the Bench: 1:32 Roden Stearman, 1:35 Orochi M3A3 Bradley, 1:6 Mandalorian figure

  • Member since
    January 2015
Posted by BrandonD on Thursday, October 26, 2017 4:02 PM

Speaking of mine, I got some work done on it. I finished the cockpit and got the main assembly done last night.

I'm going to keep the rudder off and just paint the markings rather than dealing with the decals, and I'm considering painting the side markings with masks made with my sweet new Thinnerline circle cutter. 
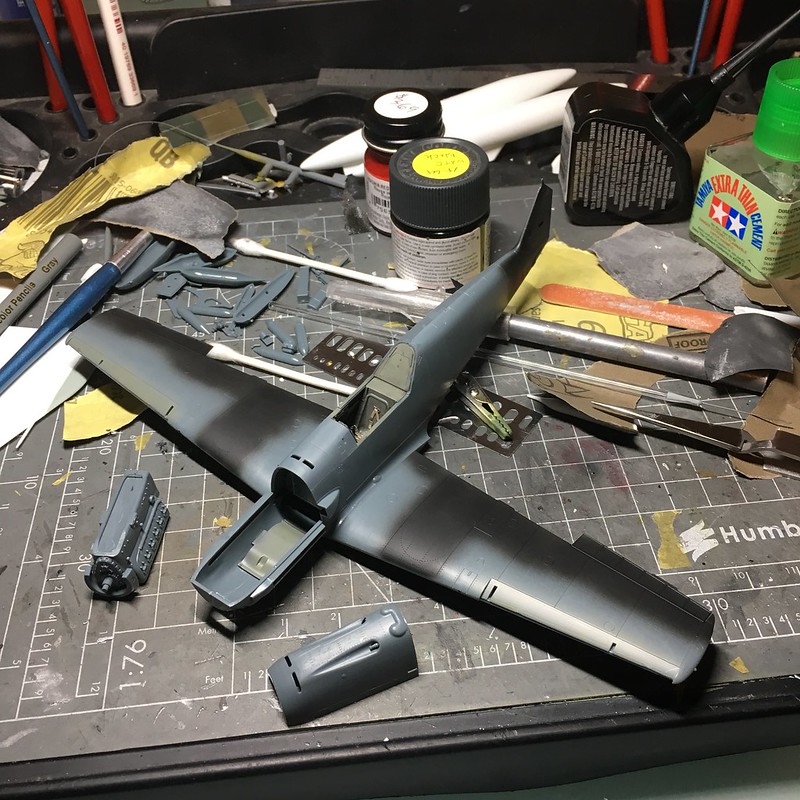
Untitled


UntitledThe only thing I need to do before adding the cowl is mount the engine. The engine mount is the one place this kit really falls down on. With it all buttoned up, there doesn't seem to be room to use the actual mounts, and that leaves it just sitting without positive locating points inside the nose, which is problematic, given that's how the prop and exhausts mount.

I've built one of these with the cowl off, and it was fine, and I managed to add the exhaust at the end of the build, so I'm hoping to do that here, too, so I don't have to mask them. I'll probably stick the prop on it and use that to line it up inside, then super glue it wherever it touches inside, because the last thing I want is to go to add the prop at the end of the build, push it onto the nose, and break the attachment points so I'm left without a prop shaft and a rattling engine.

-BD-


  • Member since
    January 2015
Posted by BrandonD on Thursday, October 26, 2017 3:57 PM

Blackdog:

I also found a few small images of your plane. Seems like if you're not happy with the result, you've got a display option...

And here's one of mine.

-BD-

  • Member since
    January 2015
Posted by BrandonD on Thursday, October 26, 2017 3:46 PM

blackdog62

brandon my kit has 2 versions 1 condor and 1 pre war. im going to go with the pre war just because i have never did a pre war with the red band on the tail. i will be useing all model master primer and paints im used to them and they work for me i also will be mixing the colors to scale with white with a little blue in it. im glad you threw up the RLM 02 color i forgot about that and probabley used RLM66. your pit looks great by the way.

i did a little research on the condor color and according to my schamatic book by kagero the condor 109s was deliverd in all natural metal. but my instructions in my airfix 109e-1 says a color close to RLM63. i have read in the past that they where all metal treated with a typ of acid wash that dulled the metal and protected it from the elaments ? 2017-10-19_04-44-40 by Jerry Richards, on Flickr 2017-10-19_04-50-19 by Jerry Richards, on Flickr


Thanks - I didn't realize they had used natural metal finishes in the Spanish Civil War. Looks like there was a mix of those and, most likely, RLM 63, a light gray over RLM 65 Hellblau.

This one clearly has two colors in addition to the black around the exhaust path.

And the shine on this one indicates bare metal.

And then there's this guy, which looks like a green (RLM 62 over RLM 65 I am guessing. The contrast between top and bottom of the fuselage is much starker than on the first pic above).

In any case, I'm going to go with the RLM 63 over RLM 65 scheme on mine, since that's what Eduard suggests for my markings, and I picked up a bottle of RLM 63 the other day.

Thanks for the answer - I had only seen them in RLM 63 before and didn't realize there was more variation.

-BD-

  • Member since
    June 2014
Posted by BrandonK on Thursday, October 26, 2017 9:06 AM

B-1, that is definatly looking great. Even without the fuselage you can tell its a 109. I may have to pick one of these up since you like it so much.

BK

On the bench:

A lot !! And I mean A LOT!!

2024 Kits on deck / in process / completed   

                         14 / 5 / 2  

                              Tongue Tied

JOIN OUR COMMUNITY!

Our community is FREE to join. To participate you must either login or register for an account.

SEARCH FORUMS
FREE NEWSLETTER
By signing up you may also receive reader surveys and occasional special offers. We do not sell, rent or trade our email lists. View our Privacy Policy.