SEARCH FINESCALE.COM

Enter keywords or a search phrase below:

Shelf of Doom GB II - 2018

18351 views
377 replies
1 rating 2 rating 3 rating 4 rating 5 rating
  • Member since
    August 2015
  • From: the redlands Fl
Posted by crown r n7 on Wednesday, May 16, 2018 5:58 PM

Jack I like the mix of blues and that interior is electric.

Bish thank you I’m trying some panel lighting. When I spray clear flat I hope to get that bleached lookbut I have another a6m5 in the works 


 Nick.

  • Member since
    April 2005
  • From: Australia
Posted by taxtp on Wednesday, May 16, 2018 9:22 PM

Jack the shade of blue you've chosen is stunning. THe engine wiring looks very good too.

Keavdog Nice clean work on the Kfir. I believe its not a great fitting kit so there's some good work in there.

Nick good progress on the Zeke. It's looking very good.

This is one of those models that I keep forgetting to photograph. Yeah I painted the instrument panel on this one.  I realised a while ago that I don't have any aircraft models on the shelf with solid olive drab on the upper surfaces. I also found with P-47s, that some had Olive Drab, some had RAF Dark Green. I want to display both side by side, so this is the first half of the pair. Here it is with it's base camo on. I'll expose the chipping and clear coat it for decalling and weathering next.

Cheers

Tony

I'm just taking it one GB at a time.

  • Member since
    May 2015
Posted by Griffin25 on Thursday, May 17, 2018 12:00 AM

Tony the slight color variation and panel lines look great. Did you accomplish that with preshading and a coat of the olive drab base color only? It looks like more was involved because it really pops. Looks really cool. 


Griffin

  • Member since
    March 2017
Posted by Armor_Aficionado on Thursday, May 17, 2018 12:23 AM

AAAARRGH!  Not once, anywhere in the instructions, did I see any warning ro put weight in the nose of this kit to prevent it from being a tail stander!  So of course, now that it‘s almost done, I get the unpleasant surprise.  So now to figure a way to get weight in the nose without wrecking the model...

https://pin.it/4ezoubaotoj5dp


  • Member since
    August 2015
  • From: the redlands Fl
Posted by crown r n7 on Thursday, May 17, 2018 9:37 AM

Tony wait untill you gloss clear coat it , the colors will deepen ! 


 Nick.

  • Member since
    March 2017
Posted by Armor_Aficionado on Thursday, May 17, 2018 2:10 PM

A-ha!  Success!  It‘s one of those rare occasions when an earlier error actually paid off, to help solve a more serious error later.  So when I was first starting to assemble the model, I forgot to put the jet exhaust tailpipe in before gluing the fuselage halves together. (See Part #9, first photo). To get it in there, I had to cut the front, sealed end of the pipe off and slide it in and glue it in place.  But that was to be my salvation later!  Now I had a way into the fuselage.  I used the smallest split-shot lead sinkers I could find, butveven then still had to split them into at least quarters, if not smaller.  Then I dropped a bunch of them down through the tailpipe until I had enough to weigh the nose down, and followed that by inserting a very thin liquid cement applicator tube through the pipe (Model Master liquid cement with the ultra-thin metal applicator tube) and pouring as much cement as needed to hold the lead in place.  She‘s looking good now!

https://pin.it/y6dxcbts632c7h

https://pin.it/snqfe2m6zmbyu2

https://pin.it/wpz3swlluengy5

https://pin.it/hm4pjheoilc7po


  • Member since
    April 2005
  • From: Australia
Posted by taxtp on Thursday, May 17, 2018 7:26 PM

Griffin25

Tony the slight color variation and panel lines look great. Did you accomplish that with preshading and a coat of the olive drab base color only? It looks like more was involved because it really pops. Looks really cool. 


Hi Griffin,

Thanks. My standard for upper surfaces is to preshade, then base colour, then lighten the base colour and thin it down, spray light coats into the middle of panels as best I can.

For lower surfaces, I just preshade and base coat, because it's shadow so I don't want as much contrast.

Cheers

Tony

I'm just taking it one GB at a time.

  • Member since
    April 2005
  • From: Australia
Posted by taxtp on Thursday, May 17, 2018 7:28 PM

crown r n7

Tony wait untill you gloss clear coat it , the colors will deepen ! 


Yup, they did as they always do :) I'll decal it this weekend and post some photos in its current 'dark' state.

The chipping worked OK, I won't do it every time but for selected builds I know I've got this technique in my pocket.

Cheers

Tony

I'm just taking it one GB at a time.

  • Member since
    April 2005
  • From: Australia
Posted by taxtp on Thursday, May 17, 2018 7:34 PM

Armor_Aficionado

AAAARRGH!  Not once, anywhere in the instructions, did I see any warning ro put weight in the nose of this kit to prevent it from being a tail stander!  So of course, now that it‘s almost done, I get the unpleasant surprise.  So now to figure a way to get weight in the nose without wrecking the model...

https://pin.it/4ezoubaotoj5dp


That's a shame Eric, it's a pretty little model. Are there any stores that you can add under the wings ? If you put weight in the front part of the store, it should be in front of the main undercarriage and may help to solve your problem. I did it on a Hawker Hunter once.

Cheers

Tony

I'm just taking it one GB at a time.

  • Member since
    March 2017
Posted by Armor_Aficionado on Friday, May 18, 2018 3:40 PM

Alright, calling this one DONE!  It wasn’t great:  the WORST decals I’ve ever seen, thanks to Revell of Germany; some major fit problems with the front canopy section, which resulted in a cracked canopy (although the rear canopy piece fit perfectly - weird!); and the aforementioned tail-standing issue, but for a kit I only piad, I think, a dollar for, I’m relatively pleased.  I really like the Hawk as a subject, so maybe I’ll try one again, just with a better quality kit.

https://pin.it/5tze5uzi5h26sg

https://pin.it/3ywnyiz5eri3fy


  • Member since
    April 2005
  • From: Australia
Posted by taxtp on Saturday, May 19, 2018 4:42 AM

Very nice Eric, it looks great, and a terrific save at the end too. I'm planning to do a 'project' on Hawks, which means 5 of them in 1/72 and a big one in 1/32. Yours has got me fired up to get going with it, the first one is in the Commonwealth GB.

Well done, and thanks for your contribution here. I'll put a photo on the front page tomorrow, I'm just on my way out the door now.

Cheers

Tony

I'm just taking it one GB at a time.

  • Member since
    May 2015
Posted by Griffin25 on Sunday, May 20, 2018 6:47 PM

Good job Eric.  How many have we saved from Doooooom? 5?


Griffin

  • Member since
    April 2003
  • From: USA
Posted by keavdog on Sunday, May 20, 2018 7:49 PM

Some progress on the KFIR... I really hate this model and it's one of those cursed kits where everything goes wrong.  The paint (duck egg underneath and tan on top) has been pebbling really bad.  Not sure if its a reaction to the tamiya primer, but I swear I've sprayed enamel over tamiya primers.  Anyhow... I'll continue the cammo this week and maybe get to decals.


Thanks,

John

  • Member since
    July 2014
Posted by modelcrazy on Sunday, May 20, 2018 9:05 PM

Hang in there John, You're almost there.

I pulled the Comet out and wanted to knock it out. I have so much on my plate now I don't know which way to turn. At this point all of them will end up on the shelf of doom LOL.

Onward! The tracks are in pieces but I'm sure I can manage.

Steve

Steve

Building a kit from your stash is like cutting a head off a Hydra, two more take it's place.


http://www.spamodeler.com/forum/

  • Member since
    April 2005
  • From: Australia
Posted by taxtp on Sunday, May 20, 2018 10:28 PM

I've updated page one with Eric's Hawk. Nice job again Eric !

Thats 6 models we've rescued from the Shelf of Doooooooooom !

Nice work on the Kfir and Comet respectively John and Steve.

I've also managed to get the decals onto my P-47, I'll have some photos soon.

Cheers

Tony

I'm just taking it one GB at a time.

  • Member since
    September 2011
  • From: Milaca, Minnesota
Posted by falconmod on Monday, May 21, 2018 8:09 AM

Finished this little guy this weekend!

John

On the Bench: 1/72 Ki-67, 1/48 T-38

1/144 AC-130, 1/72 AV-8A Harrier

  • Member since
    July 2014
Posted by modelcrazy on Monday, May 21, 2018 8:25 AM

John, that is so cute

Steve

Building a kit from your stash is like cutting a head off a Hydra, two more take it's place.


http://www.spamodeler.com/forum/

  • Member since
    May 2015
Posted by Griffin25 on Monday, May 21, 2018 10:07 AM

Awesome! 


Griffin

  • Member since
    April 2005
  • From: Australia
Posted by taxtp on Monday, May 21, 2018 11:39 PM

I think nifty is the right word. You are certainly kicking some goals with this GB John, thanks so much for clearing another model from the Shelf of Doooooooom !

That's seven models now that aren't spending an eternity on that shelf.

Here's the photo of my P-47 that I promised.
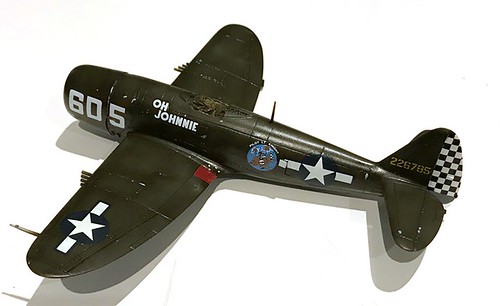
It's not too far away now.

Cheers

Tony

I'm just taking it one GB at a time.

  • Member since
    December 2002
  • From: Bury St Edmunds, Suffolk, England
Posted by Bish on Tuesday, May 22, 2018 2:06 AM

Nice job there John, i am going to have to get myself one of those eggplanes one of these days.

I am a Norfolk man and i glory in being so


On the bench: Airfix 1/72nd Harrier GR.3/Fujimi 1/72nd Ju 87D-3

  • Member since
    December 2002
  • From: Bury St Edmunds, Suffolk, England
Posted by Bish on Tuesday, May 22, 2018 2:12 AM

taxtp

I think nifty is the right word. You are certainly kicking some goals with this GB John, thanks so much for clearing another model from the Shelf of Doooooooom !

That's seven models now that aren't spending an eternity on that shelf.

Here's the photo of my P-47 that I promised.

It's not too far away now.

Cheers

Tony


That look relaly nice Tony, loike the markings.

I have been doing some work on my Tiger dio while trying to resist throwing my MiG for the Commonwealth GB into the bin. Hope to get some pics up at the weekend.

I am a Norfolk man and i glory in being so


On the bench: Airfix 1/72nd Harrier GR.3/Fujimi 1/72nd Ju 87D-3

  • Member since
    April 2005
  • From: Australia
Posted by taxtp on Tuesday, May 22, 2018 6:38 PM

Thanks Bish, I'd like to see how its coming along.

Cheers

Tony

I'm just taking it one GB at a time.

  • Member since
    May 2013
  • From: From the Mit, but live in Mason, O high ho
Posted by hogfanfs on Tuesday, May 22, 2018 7:33 PM

Wow! Gentleman, I step away for a few days, and I come back to some outstanding work!

AA, nice finish on the Alpha Jet! 

 Bruce


 On the bench:  1/48 Eduard MiG-21MF

                        1/35 Takom Merkava Mk.I


  • Member since
    August 2015
  • From: the redlands Fl
Posted by crown r n7 on Tuesday, May 22, 2018 7:34 PM

John how precious!

Tony sharply dressed thunderbolt.


 Nick.

  • Member since
    May 2013
  • From: From the Mit, but live in Mason, O high ho
Posted by hogfanfs on Tuesday, May 22, 2018 7:39 PM

Ok, a quick update on the Type 4. I finished the dot filter with Wilder oil paints. I'm really liking how these Wilder product work. Granted, I still need to get used to them. 

Here are a few pictures.

Next will be a pin wash, but I figured I would get the tools and exhaust installed. Then do some chipping and a few mild rust spots. More to come...

 Bruce


 On the bench:  1/48 Eduard MiG-21MF

                        1/35 Takom Merkava Mk.I


  • Member since
    April 2005
  • From: Australia
Posted by taxtp on Tuesday, May 22, 2018 9:33 PM

Looking good Bruce. I'm very interested in your weathering process.

Cheers

Tony

I'm just taking it one GB at a time.

  • Member since
    November 2008
  • From: Far Northern CA
Posted by mrmike on Tuesday, May 22, 2018 11:22 PM

Same here, the streaking looks great!

  • Member since
    August 2015
  • From: the redlands Fl
Posted by crown r n7 on Wednesday, May 23, 2018 6:11 AM

Bruce that wash is looking real good.

here are my latest pics with a pin wash with master touch oil paint.


 Nick.

  • Member since
    May 2015
Posted by Griffin25 on Wednesday, May 23, 2018 8:07 AM

Bruce and Nick both of your projects are looking great. Two different subjects with excellent painting and weathering teqniuqes. 


Griffin

  • Member since
    April 2003
  • From: USA
Posted by keavdog on Thursday, May 24, 2018 9:10 PM

Bruce - looking really nice!  Nick, sharp!

Aint she pretty all dressed up in sausages

Fresh out of the spray booth - let it set up a couple days and more sausages and then the green. 


Thanks,

John

JOIN OUR COMMUNITY!

Our community is FREE to join. To participate you must either login or register for an account.

SEARCH FORUMS
FREE NEWSLETTER
By signing up you may also receive reader surveys and occasional special offers. We do not sell, rent or trade our email lists. View our Privacy Policy.