SEARCH FINESCALE.COM

Enter keywords or a search phrase below:

Aircraft of the Commonwealth GB

44688 views
1113 replies
1 rating 2 rating 3 rating 4 rating 5 rating
  • Member since
    July 2008
  • From: Vancouver, the "wet coast"
Posted by castelnuovo on Thursday, November 15, 2018 1:56 PM

Bish

That looks nice castel, i take it your going to paint before fitting the wings.


It is already painted in sea gray, I guess it is not very visible under the flash of the camera. `

  • Member since
    February 2010
  • From: Berkeley CA/St. Paul MN
Posted by EBergerud on Thursday, November 15, 2018 11:32 PM
I just watched a video on YT from Andy's Hobby Headquarters. He owns a model shop and is a good modeler. He just assembled Tamiya's new tool 1/48 Spitfire I. (30 minute video, so it's quite complete.) It's a remarkable kit. Every time someone comes out with something good, Tamiya comes out with something incredible and puts the world back into place. I have the old 1/48 Tamiya Spit I (their kits around 2000 were are crackerjack) but it's tempting. Of course the new one has PE and probably double the part count - but it has some amazing features. I've got both the new Ki-61 and BF-109G - could do those first I suppose. Anyway, Xmas is getting close and the kit's supposed to be out in early December - you might want to check it out. Eric


A model boat is much cheaper than a real one and won't sink with you in it.

  • Member since
    December 2002
  • From: Bury St Edmunds, Suffolk, England
Posted by Bish on Friday, November 16, 2018 8:01 AM

castelnuovo


Bish

That looks nice castel, i take it your going to paint before fitting the wings.


It is already painted in sea gray, I guess it is not very visible under the flash of the camera. `


Yes, and the grey that Airfix use would make it hard to see as well.

I am a Norfolk man and i glory in being so


On the bench: Airfix 1/72nd Harrier GR.3/Fujimi 1/72nd Ju 87D-3

  • Member since
    November 2009
  • From: SW Virginia
Posted by Gamera on Friday, November 16, 2018 6:27 PM

CMK02, CN, Eric: Great work there guys!!!

"I dream in fire but work in clay." -Arthur Machen


  • Member since
    December 2002
  • From: Bury St Edmunds, Suffolk, England
Posted by Bish on Saturday, November 17, 2018 2:08 PM

Next on my list, representing the RAF, tamiya's 72nd Mossie B Mk IV.

I am replaceing the kit cockpit with a resin one from pavla. The resin replaces the whole front section of the fuselage, which are seperate pieces in the Tamiya kit allowing for the different versions they produce.

Along with resin parts to replace the interior.

I am also fitting a resin bomb bay, also from Pavla.

Even though i have an Eduard PE set with pre painted parts, i decided to only use the IP and paint the rest. The resin parts are a perfect fit, not somthing i am used to with resin cockpits. You can see a gap between the upper and lower sections, behind the pilots seat. This should be blocked off by the end of the bomb bay, and fortunatly the Pavla one does this. But if you don't use the bay, this will need blocking off, which the pavla pit instructions don't mention.

And then with the bomb bay fitted, the fuselage halves were put together. A bit of a tight fit, but nothing major.

Just a little bit of cleaning up of the seams to do before fitting wings and tail.


I am a Norfolk man and i glory in being so


On the bench: Airfix 1/72nd Harrier GR.3/Fujimi 1/72nd Ju 87D-3

  • Member since
    November 2009
  • From: SW Virginia
Posted by Gamera on Saturday, November 17, 2018 7:37 PM

Looks great Bish!!

The perfect fit on the resin cockpit does worry me, the gremlin that likes screwing up stuff like that is possibly trying to lure you into a trap where something else will go horrible later on... Devil

"I dream in fire but work in clay." -Arthur Machen


  • Member since
    December 2002
  • From: Bury St Edmunds, Suffolk, England
Posted by Bish on Sunday, November 18, 2018 5:36 AM

Thanks G, and yes, i will be watching for that. The bomb bomb bay doesn't fit perefctly, hopefully thats as bad as it gets.

I am a Norfolk man and i glory in being so


On the bench: Airfix 1/72nd Harrier GR.3/Fujimi 1/72nd Ju 87D-3

  • Member since
    September 2003
  • From: AandF in the Badger State
Posted by checkmateking02 on Sunday, November 18, 2018 12:59 PM

Thanks, Bish and Gamera!

Nice looking work on the Mosquito, Bish!

I did up the wheel wells; Airfix did a good job detailing this area.  

Paul Lucas (Camouflage and Markings No. 2, The Battle for Britain--RAF) shows a profile for this aircraft with Eau-de-Nil ("duck egg green") lower surfaces, so that is what I decided to go with.  I applied a dark green wash.  

Then I glued in the rudder pedal/control column part.


  • Member since
    December 2002
  • From: Bury St Edmunds, Suffolk, England
Posted by Bish on Sunday, November 18, 2018 3:11 PM

Thanks check, and thats coming on well.

I am a Norfolk man and i glory in being so


On the bench: Airfix 1/72nd Harrier GR.3/Fujimi 1/72nd Ju 87D-3

  • Member since
    April 2006
  • From: ON, Canada
Posted by jgeratic on Monday, November 19, 2018 2:53 PM

Got that Matchbox kit started:

The cockpit is the barest of bare minimum, just the floor and seat.  There is no IP nor control column, so good thing they provide a pilot to fill up the empty space.  Sitting underneath is a fret of Eduard's 1/72 scale stitching.  Will need to replace some of that detail after sanding the fuselage seams.

Have also acquired a resin engine.  Has more detail than the supplied plastic parts, but at the same time is not as crisp.   Looks like they need to clean up their molds or make some new ones as a lot of missing edges on the cylinder tops:

regards,

Jack

  • Member since
    December 2002
  • From: Bury St Edmunds, Suffolk, England
Posted by Bish on Monday, November 19, 2018 3:11 PM

Great start Jack, never come across that stitching before.

I am a Norfolk man and i glory in being so


On the bench: Airfix 1/72nd Harrier GR.3/Fujimi 1/72nd Ju 87D-3

  • Member since
    September 2003
  • From: AandF in the Badger State
Posted by checkmateking02 on Monday, November 19, 2018 6:14 PM

Thanks, Bish.

And, Jack, that's a plane I've never even heard of before!  Looking good.


  • Member since
    April 2006
  • From: ON, Canada
Posted by jgeratic on Monday, November 19, 2018 6:42 PM

Thank you Bish and Check.

Siskin IIIA was a British mid-war design, this particular version first flew in October 1925. The RAF retired them in 1932, but Canada kept flying them until 1939 when finally replaced with the Hurricane.  They received their nine aircraft in 1926 - one was of the earlier design, along with a pair of the two seated version.  The RCAF also had three of them often fly as an aerobatic display team:

My plan is to do aircraft number 20.

regards,

Jack


  • Member since
    July 2008
  • From: Vancouver, the "wet coast"
Posted by castelnuovo on Tuesday, November 20, 2018 11:25 PM

The wings are on althought it has been a bit of a productions. I liked the constructions of them. Unlike on other biplanes I have built where the wings are quite flimsy and each strut is on its own, these are very sturdy as the struts are rectangular and part of them is inside the wings. But the 4 struts in front of the cockpit were too high. So I trimmed and trimmed and trimmed some more untill there was a danger that the top wing of the ol' Swordfish will end up looking like Polikarpov I-153. So I somehow forced the wings down, bent them a little and superglued them.The axle of the propeller was too short, or maybe I didn't install the engine well so I made a new axle from stretched sprue and now it can spin.

Well, the whole contraption looks like this


  • Member since
    February 2010
  • From: Berkeley CA/St. Paul MN
Posted by EBergerud on Wednesday, November 21, 2018 3:35 AM

Biplane blues on the Swordfish? Looks like it's been fixed. Bipes are always neat and Swordfish have definite funk appeal and great history. (Did remind me that I've made a vow to do both the Tamiya 1/48 Swordfish and Storch - two models that some fine modelers I know consider beyond excellent.)

I've started weathering the Tomahawk. Maybe I should try to explain what I aim for when making a kit. Although only an ideal (as Mig Jimenez once said, you can't really make a small plastic thing look quite like a big metal thing) I try to make models look as realistic as possible. I've stared at a few zillion photos and it strikes me that it was a very rare operational tank or aircraft that would have been considered clean. A plane flying in the desert or the South Pacific is going to be pounded by the elements from hour one and they do show it. And there are no clean tanks - even if one has just been given a bath by the crew (seen pics of exactly that) about 20 minutes in column on most roads will cover the thing will dust. (I've always promised to do a "commission day" ship. Of course ship modelers are very reluctant to weather despite photo evidence, so it might not stand out. Could try an "out of the factory" aircraft. Be a challenge to do a super clean build.) I do concentrate on mottled/faded finish, dust and fluid stains. I don't see huge numbers of chips on most aircraft (some of the SOPAC planes on both sides flew off coral fields and they showed it - like landing on sandpaper: ditto with late war IJ planes). Just as I don't see a lot of rust on tanks in service.

Anyway, here we've got a Tomahawk flying for the RAF in the Desert - figure 1941/43. (P-40E was called the Kittyhawk and served well into 1943.) Check a couple of things from these photos. You can see the camo is very seriously weathered - I'd guess above all from dust. Also note - look closely here - that the camo is "hard" but it's not hard like rock. Indeed, and I've noticed this about RAF planes throughout the war, the camo lines are definitely a little feathered. Let's start with this Kittyhawk taking off - you'll see why these guys got dusty.

 RAF6 by Eric Bergerud, on Flickr

Below are a few WWII images of Desert AF Tomahawks and one Kittyhawk. The first one is Caldwell's, photographed when he landed after near calamity. The others just show the desert look. The crash-landed Tomahawk shows the camo pattern very well - unless the RAF was overwhelmed with spare fighters, you can bet that plane flew again.

 RAF1 by Eric Bergerud, on Flickr

 RAAF2 by Eric Bergerud, on Flickr

 RAF5 by Eric Bergerud, on Flickr

 RAF3 by Eric Bergerud, on Flickr

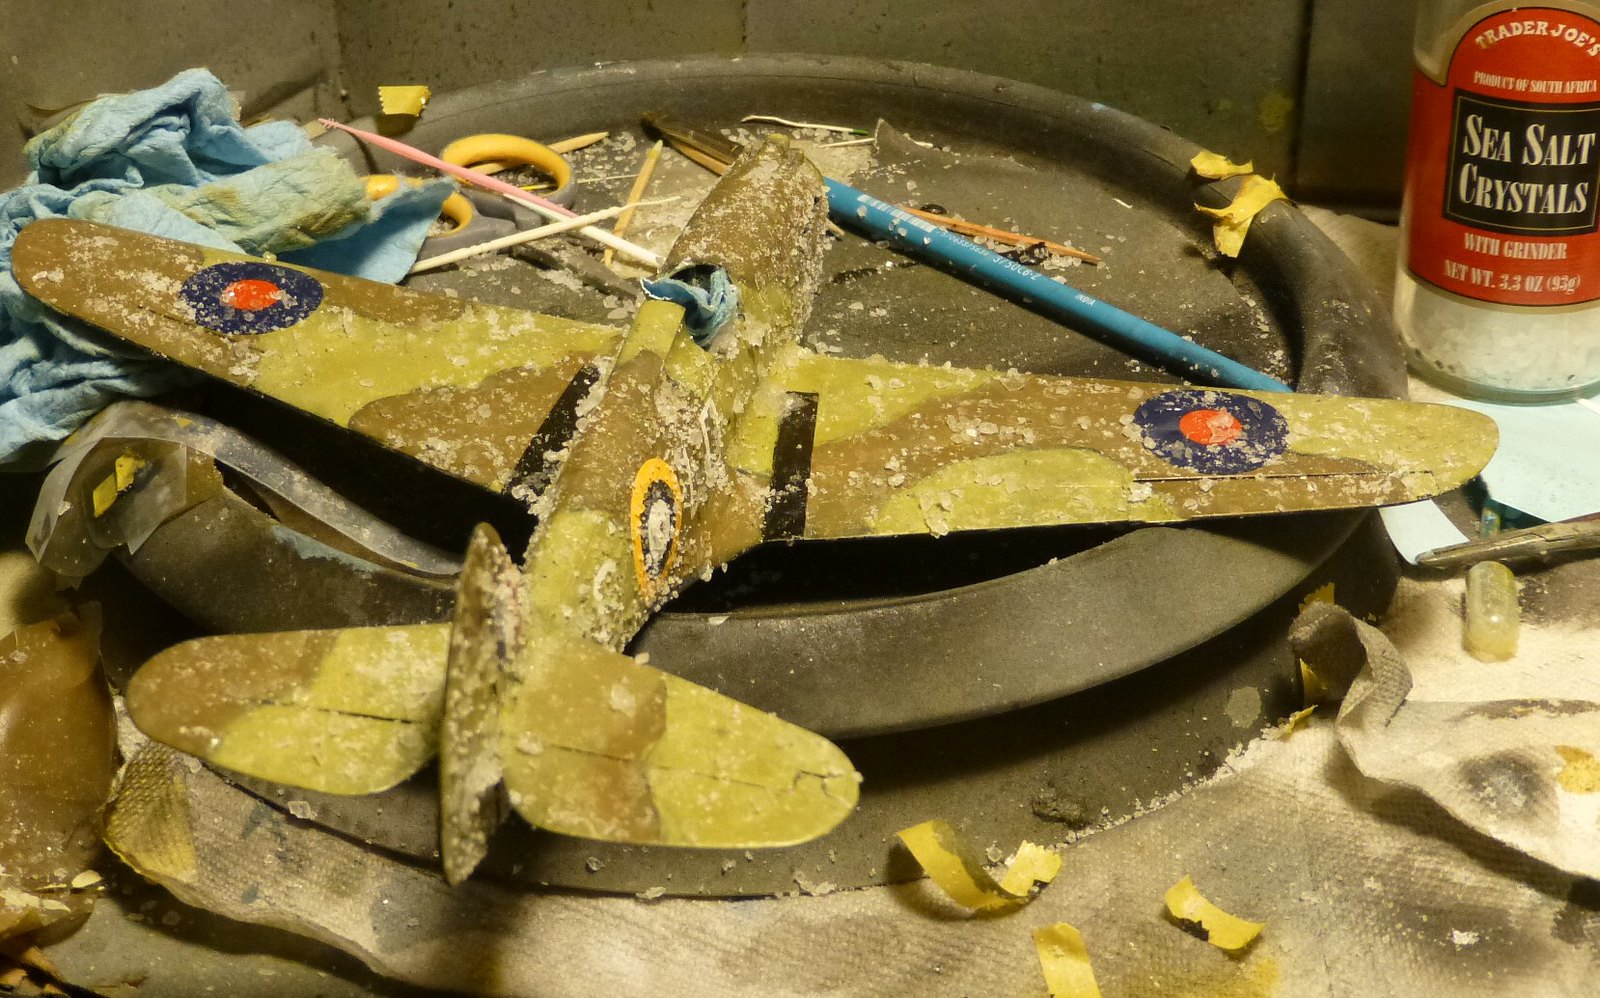
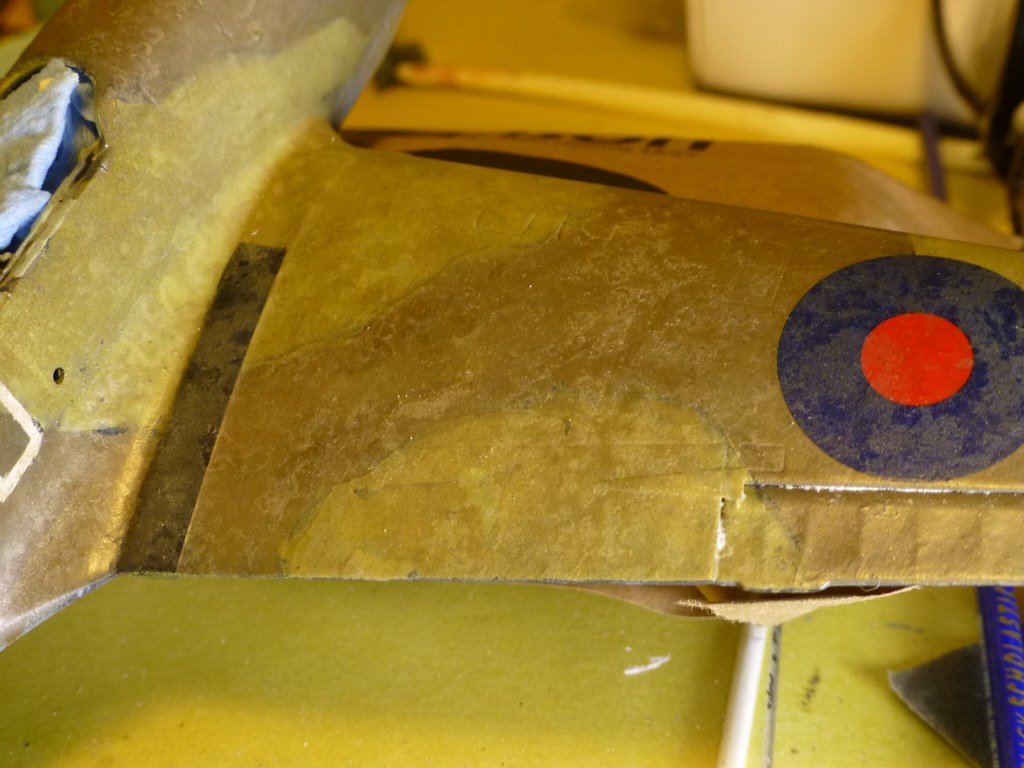
OK: we need some serious weathering. The black based finish is nicely mottled. I'm going to follow Doog's wonderful build of a heavily weathered SOPAC Corsair. So the first step is salt fading. The salt not only fades the surface, but it leaves it with very irregular markings which is exactly what I want. Technique is pretty simple. Wet the plane with warm soapy water and shake on a bunch of salt (I like sea salt) and let dry. Then shoot it with a very light coat of a tan-gray: as the salt turns dirty from white, that's enough. I did the process twice. Oils are up next. After the oils are applied and the kit finally given a matte varnish, the irregular finish will become less evident. That's okay, because I'm pretty sure I'm going to end with a light dusting of pigments which I don't usually use on planes. But I've never done a desert warplane before either. We'll see. First pic is salt on: second is on completion and third a detail of the effect. I do like this effect. But it's only one of many steps.
 salt by Eric Bergerud, on Flickr

 saltfus by Eric Bergerud, on Flickr
 saltdet by Eric Bergerud, on Flickr

Next up oils - lots of them. And then who knows. Wish me luck.

Eric


A model boat is much cheaper than a real one and won't sink with you in it.

  • Member since
    December 2002
  • From: Bury St Edmunds, Suffolk, England
Posted by Bish on Wednesday, November 21, 2018 4:04 AM

Looks good with the wing on castel, i do like the scheme.

I am a Norfolk man and i glory in being so


On the bench: Airfix 1/72nd Harrier GR.3/Fujimi 1/72nd Ju 87D-3

  • Member since
    December 2002
  • From: Bury St Edmunds, Suffolk, England
Posted by Bish on Wednesday, November 21, 2018 4:06 AM

Eric, great work there and thanks for the info on salt weathering. I want to try this on a black surface as have seen it done a few times, but was never sure how. Thank you.

I am a Norfolk man and i glory in being so


On the bench: Airfix 1/72nd Harrier GR.3/Fujimi 1/72nd Ju 87D-3

  • Member since
    July 2008
  • From: Vancouver, the "wet coast"
Posted by castelnuovo on Wednesday, November 21, 2018 2:55 PM

Thanks guys. I too would like to build Tamiya's Swordfish and Storch in 1:48 but at $70 or so plus shipping it is a quite an expensive affair. 

  • Member since
    February 2010
  • From: Berkeley CA/St. Paul MN
Posted by EBergerud on Wednesday, November 21, 2018 5:42 PM
And for the Swordfish, you'd want the $13 extra PE that has the rigging - it's supposed to work very well. I have, however, seen the Swordfish selling for considerably less than $70. But with a part count of 200+ and the capability of folding the wings, this would be a "project" build. I've paid more for kits regardless. Too bad that Tamiya didn't do it in 1/72: Swordfish is a big plane and it might have worked in that scale.


A model boat is much cheaper than a real one and won't sink with you in it.

  • Member since
    February 2010
  • From: Berkeley CA/St. Paul MN
Posted by EBergerud on Wednesday, November 21, 2018 6:13 PM
One more thing on salt. You don't have to use it for fading. I think it's a very good way to chip - no pics but I did it on the prop. Paint the part you want silver. Give it a sprinkling of salt (regular table salt might be better than sea salt) on the area that you want chipped, not as much as fading. Spray the desired color over the salt. After dry, wash off the part and you get a very nice chipping effect. They're small and really look like little chips. Superior I think to hairspray or it's equivalent - they're better for major chipping. If you want to see a much better explanation for salt and oils check Doog's wonderful Corsair: https://doogsmodels.com/2014/12/29/weathering-tamiyas-132-f4u-1-corsair-pt-1/ Eric


A model boat is much cheaper than a real one and won't sink with you in it.

  • Member since
    September 2003
  • From: AandF in the Badger State
Posted by checkmateking02 on Friday, November 23, 2018 10:45 AM

Some more progress on Airfix's 1/72 Hurricane:

closed up and finished the fuselage

and attached it to the wing; the rear fuselage is a separate piece

I'll get on with masking and painting it, along with the remaining smaller add-ons.

I'll be replacing the kit's wheels (which are four-spoke) with after-market (five-spoke) wheels.


  • Member since
    May 2015
Posted by Griffin25 on Friday, November 23, 2018 10:21 PM

Some great builds happening here. I have been lagging with the holidays and a touch of burn out. I've made a little progress on my Hunter. I used Eduards PE for the instruments, I know it's cheating a bit, they really look great though. You just need to shave off all the raised detail and install the PE. Slowly I go..... 


Griffin

  • Member since
    July 2014
Posted by modelcrazy on Saturday, November 24, 2018 12:08 AM

Good start Griffin and Check, I really am impressed with the new Airfix kits.

Bish I promiss I will be getting back on my Swordfish shortly. I've taken a long enough break, settled down in my new work routine, worked on some silly little quick builds and am recharged enough to tackel the stern business of more serious contest worthy builds like the Stringbag and Prince of Wales.

Steve

Building a kit from your stash is like cutting a head off a Hydra, two more take it's place.


http://www.spamodeler.com/forum/

  • Member since
    February 2010
  • From: Berkeley CA/St. Paul MN
Posted by EBergerud on Monday, November 26, 2018 3:15 AM

See people are taking it easy. I've done a little on the Airfix Tomahawk. I've been trying to further degrade the kit. This is evokes a Desert Air Force aircraft, and they looked the part:

 RAF3 by Eric Bergerud, on Flickr

After salt fading the kit, it was time for oil dot filters. It's a simple enough technique and I do like it. It fades - if you want - (and I did) and it evens out some of the harshness of the salt. On Doog's advice I tracked down a little tube of Windsor Newton "Transparent White" which is very good for fading - as name imples it's less opaque. I apply with a tooth pick. On the middlestone part of the camo I put on some buff, yellow and sepia. On the dark earth, I added two colors of brown and sepia along with the white. (I use Wilder Oils which dry fast and matte, but do need a second to soak out the oil. Also use some Gamblin "FastMatte" oils that are very thick, very little oil, dry fast and matte.) Underneath I used a Wilder light blue and platho blue from Blick. That made a very neat effect, but when you use a mixing color like platho anything, you use very little and do try not to get the stuff where it doesn't belong - like on your fingers. I had odd blue stains on the kit and my sweatshirt - fortunately, with oils you can get them off with white spirit. (I use Gamblin Gamsol, the absolutely lightest and least offensive spirit on the market. I keep AK white spirit handy in case I have to remove anything. Gamsol leaves almost zero visual impact - which it makes it good for cleaning a bit off if there's too much.) After the dots are on, I use a round brush to mix it around in the right area. Then follow with a flat brush and work it in. Both brushes are very lightly moistened with spirits - except for some removal. Here's a sample with the dots on one half the wing - note there's not much there:

 DFDet by Eric Bergerud, on Flickr

Here's the same wing after the oils have been blended in: you can see that the left side without the oil, looks different - the right slightly faded. 

 DFComp by Eric Bergerud, on Flickr

Here's the bottom - the color is more complex, which to be honest, I'm not really sure that I want. The mottled effect of the black basing remains quite evident, and that I do.

 DFBot by Eric Bergerud, on Flickr

OK: here's what the kit looked like before salt and oils:

 Fusebase by Eric Bergerud, on Flickr

And after salt and oils:

 DFFus by Eric Bergerud, on Flickr

There's still lots to do. Probably more oils for some smoke. Then panel washes, maybe some filters, panel lines with Com.Art and colored pencils and I think maybe some pigments. And the landing gear and canopy.

Eric


A model boat is much cheaper than a real one and won't sink with you in it.

  • Member since
    November 2009
  • From: SW Virginia
Posted by Gamera on Monday, November 26, 2018 10:53 AM

CMK02, Griffin, Eric: Those are all coming along great! Sorry, been on holiday/vacation and am back now and will be posting more. I hope when I get some this stuff I need to finish by the end of the year done I'll be back on the Corsair. I've gotten my hands on some blank decal sheet and am hoping to paint some darker blue roundels and lay them over the too light ones currently on the model. 

"I dream in fire but work in clay." -Arthur Machen


  • Member since
    September 2003
  • From: AandF in the Badger State
Posted by checkmateking02 on Monday, November 26, 2018 3:19 PM

Thanks, Steve and Gamera.  I appreciate your comments!

I figure painting the Hurricane will be taking up the rest of the week.


  • Member since
    July 2008
  • From: Vancouver, the "wet coast"
Posted by castelnuovo on Thursday, November 29, 2018 1:11 AM

Well, this is as far as I can take this one given my skills...

  • Member since
    December 2002
  • From: Bury St Edmunds, Suffolk, England
Posted by Bish on Thursday, November 29, 2018 2:21 AM

Sorry guys, i have neglected this for the last week, so better do some catching up.

Check, that has gone together really well, nice job on the wheels as well, i do like the CMK ones.

I am a Norfolk man and i glory in being so


On the bench: Airfix 1/72nd Harrier GR.3/Fujimi 1/72nd Ju 87D-3

  • Member since
    December 2002
  • From: Bury St Edmunds, Suffolk, England
Posted by Bish on Thursday, November 29, 2018 2:22 AM

Eric, great job on the weathering, she is coming out really well. I use dot filters all the time on armour but never on aircraft, i need to try it at some point.

I am a Norfolk man and i glory in being so


On the bench: Airfix 1/72nd Harrier GR.3/Fujimi 1/72nd Ju 87D-3

  • Member since
    December 2002
  • From: Bury St Edmunds, Suffolk, England
Posted by Bish on Thursday, November 29, 2018 2:24 AM

castel, that looks amazing. Love the finish, i do like that grey scheme. Thanks for taking part and i'll get the front page updated.

I am a Norfolk man and i glory in being so


On the bench: Airfix 1/72nd Harrier GR.3/Fujimi 1/72nd Ju 87D-3

JOIN OUR COMMUNITY!

Our community is FREE to join. To participate you must either login or register for an account.

SEARCH FORUMS
FREE NEWSLETTER
By signing up you may also receive reader surveys and occasional special offers. We do not sell, rent or trade our email lists. View our Privacy Policy.