SEARCH FINESCALE.COM

Enter keywords or a search phrase below:

Japanese Group Build X

43367 views
447 replies
1 rating 2 rating 3 rating 4 rating 5 rating
  • Member since
    February 2011
Posted by GreySnake on Monday, February 22, 2021 6:50 AM
Glad you like the interior Gamera. Really wish there were good photos of the inside of it.
 
I might have figured out some of the confusion over the Ho-Ni and its service record. I think some sources were putting the Ho-Ni I and Ho-Ni II together. At first glance they do look the same. However you can see here the Ho-Ni II has a shorter 105mm howitzer.
 
I haven’t started putting Japanese pages on the Ho-NI II through translation software yet. However from my little research it seems the Ho-Ni II was possibly used Burma. So I’m thinking that is where a lot of the confusion is coming from on some web pages. 
 
Right now I’m leaning towards the Ho-Ni I possibly being used in Manchuria (I’m becoming more doubtful), without question in the Philippines and in defense of the home islands. I’m leaning towards most of them be kept in the home islands since with a 75mm gun it could knock out a Sherman.
  • Member since
    February 2011
Posted by GreySnake on Monday, February 22, 2021 11:30 AM
Found another photo of the same Ho-Ni Philippines. At first I wasn’t sure it’s the same one the location is much different and the tracks have a lot of sag.
 
Comparing the two photos both have what appears to be the same damage to the left front fender, missing the right front fender (or most of it is gone), both are missing the pick-axe and shovel (if they even had them to begin with) both have a section of the engine deck cover slightly raised in the exact same position and both have shrapnel or bullet damage in the same spot on the exhaust cover.
Furthermore both appear to have the same exact same three tone camouflage and as far as I know Japanese crews camouflaged their own vehicles so it is very unlikely two different crews would paint the exact same camouflage on the armored shield at least.  I can only assume the second photo was taken sometime after U.S forces captured the Ho-NI and had moved it to a different location and perhaps something went wrong that would explain the track sag.
  • Member since
    November 2009
  • From: SW Virginia
Posted by Gamera on Tuesday, February 23, 2021 11:18 AM

Does look like the same AFV, weird about the track sag. Your explanation makes sense though.


Just so much stuff still unknown about Japanese AFVs. I remember the I-O ultra heavy 120 ton tank was believed to be a paper project until a bunch of blueprints, a track link, and test reports were found hidden in a shrine. Seems one was built, shipped to China in parts, reassembled, and tested. The army wasn't too impressed and with the navy sucking up all the resources of the empire the project was abandoned and after the war the Chinese hauled the thing away for scrap. 

Lots of weird stuff seemed to show up in shrines and temples. The Americans and Commonwealth mostly left religious and historical sites alone so the Japanese would hide odd stuff like priceless vintage samurai swords in them. 

"I dream in fire but work in clay." -Arthur Machen


  • Member since
    July 2014
Posted by modelcrazy on Thursday, February 25, 2021 9:20 AM

I worked a few night on the island. Now that everything is added I'll paint tonight then add crew on the bridge and lookout platforms.

Steve

Building a kit from your stash is like cutting a head off a Hydra, two more take it's place.


http://www.spamodeler.com/forum/

  • Member since
    November 2009
  • From: SW Virginia
Posted by Gamera on Thursday, February 25, 2021 11:24 AM

That looks awesome Steve! 


And please be careful- I know if I built that island I'd drop it for sure!!! 

"I dream in fire but work in clay." -Arthur Machen


  • Member since
    July 2014
Posted by modelcrazy on Friday, February 26, 2021 8:34 AM

Thanks Gam,

Here is the work I did on the island Yesterday. I put the bridge crew on the bridge and added some window clear for the bridge windows. You can't see the crew but it doesn't matter, you a see something. I also sprayed a clear gloss coat on the deck to prepare it for stain and touched up the stern deck stripes. Tonight I'll add the deck stripes. I don't think I'll spray them and use the supplied the decals instead. We'll see how they look.

Steve

Building a kit from your stash is like cutting a head off a Hydra, two more take it's place.


http://www.spamodeler.com/forum/

  • Member since
    November 2009
  • From: SW Virginia
Posted by Gamera on Friday, February 26, 2021 11:33 AM

She's coming along great Steve! 

Are the fabric splinter guards (or whatever you call them) kit parts? 

"I dream in fire but work in clay." -Arthur Machen


  • Member since
    July 2014
Posted by modelcrazy on Friday, February 26, 2021 12:46 PM

They are futon mattresses and they are pewter parts form the super detail set. Late war the Japanese stoped using the mattresses as splinter shields because they didn't work as well as they thought. Plus the crew didn't have to give up there beds Confused

The pewter parts make the ones I made look huge. I may have to think about how to remedy that.

Steve

Building a kit from your stash is like cutting a head off a Hydra, two more take it's place.


http://www.spamodeler.com/forum/

  • Member since
    April 2015
Posted by Mopar Madness on Friday, February 26, 2021 1:59 PM

She's got a crew!

Chad

God, Family, Models...

At the plate: 1/48 Airfix Bf109 & 1/35 Tamiya Famo

On deck: Who knows!

  • Member since
    July 2014
Posted by modelcrazy on Friday, February 26, 2021 3:10 PM

I have plenty to choose from. A few hundred as a mater of fact. When I spring one from the tweezers I just say "Oh well there's plenty where that came from".

Steve

Building a kit from your stash is like cutting a head off a Hydra, two more take it's place.


http://www.spamodeler.com/forum/

  • Member since
    July 2019
Posted by Hoss WA on Friday, February 26, 2021 9:25 PM

I'd like to jump in -- This is both my first GB and my first Japanese build. I'll submit updates both here and in the aircraft section. 

I've really been looking forward to building the Tamiya A6M5 1/48 kit and just started it. It's wonderful so far. 

I've chosen 320-85 from the 652 FG on the carrier Junyo during the Marianas Turkey Shoot in June 1944. 

The planes in the photo actually look in pretty good shape, so I won't be going hog wild on the paint chipping and weathering. 

I'm using mostly Tamiya paints and learning much about Zeros along the way. Just finished the office. Fuselage and engine are next. 

  • Member since
    December 2007
  • From: Beavercreek, Ohio
Posted by Wrinkledm on Saturday, February 27, 2021 5:31 PM


Ok, in 2019 I started a twin pack of 1/72 Hasegawa AH-1S helicopters. I finished the first one in 2019 for the GB and the second languished until today.   So it's now done.  Pushing on with my 2021 group build. I'm sure it will be completed by the end of the year. :)


Tags: 1/72 , Hasegawa , AH-1S , anime , JGSDF

  • Member since
    November 2009
  • From: SW Virginia
Posted by Gamera on Sunday, February 28, 2021 11:28 PM

Hoss: Just put you down. Sorry I didn't get to you earlier, I've found if I get on the computer over the weekend I'll end up goofing around on it all day so I just stay off it. Welcome aboard! We're pretty loose on the rules here, just post photos as you go along and keep it light and fun.

WrinkedM: Just got you down. Pretty friggin' cool looking paint scheme. Was that something the JSDF actually used or just something Hasegawa did for fun?

"I dream in fire but work in clay." -Arthur Machen


  • Member since
    July 2014
Posted by modelcrazy on Monday, March 1, 2021 10:55 AM

Good start Hoss. Yeah, there's a lot of confusion about the chipping and paint quality of Japanese planes.

For a short synopsis, at the beginning of the war, most manufactures, most notably Mitsubishi, used a good quality primer and a good quality semigloss paints. Notice I said most, not all. Nakajima, while they may have used primer at the start of the war, it was of a poor quality, so you'll see many Kate's with chipping paint from early war on. Later war most manufactures stopped using primer all together because of material shortages and naval blockades, except Mitsubishi, so you will see chipping as a major issue, especially on army aircraft, not so much navy. Mitsubishi used a red primer for their Bettys (and possibly other bombers), so if you did see them chip, you would probably see red underneath.

Very late was Zeros, probably around the Type 52s, like you have there, Mitsubishi, at least what I have read and researched, stopped using primer as well and then started seeing the chipping issues as time went by. By that time however, most of the IJN carries were sunk and there really wasn't a need to fill the decks with the Model Zero. Most of the older versions were used as the dreaded Kamikaze.

It pains me to hear that people (not anyone on the forums that I know of) believe that the Japanese took poor care of their Aircraft. That is most utterly a false assumption. The Japanese took great care of their machines and made the most with what they had.

One thing that I find fascinating. Once the US started testing aircraft like the Ki-84 Hayate (Frank) and the N1K Shiden (George) with our high-octane avgas and a tune up, those planes out preformed even the Mustang. Say thank you our silent service fleet that keep a strangle hold on the merchant shipping.

Enough of my usual soapbox that I’m sure Gam gets tired of

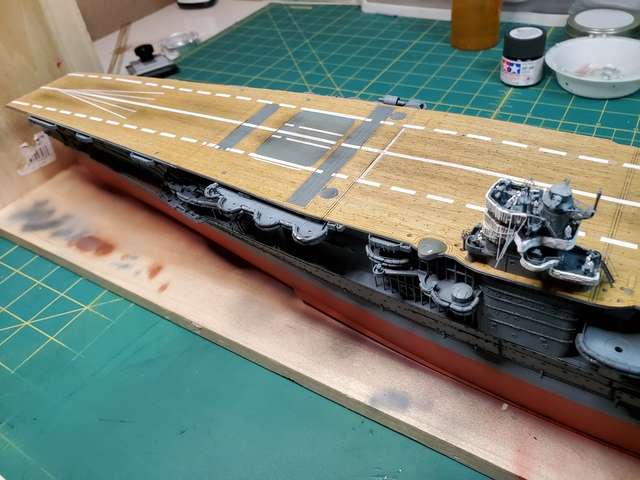
Speaking of sunk carriers, on to the Akagi.

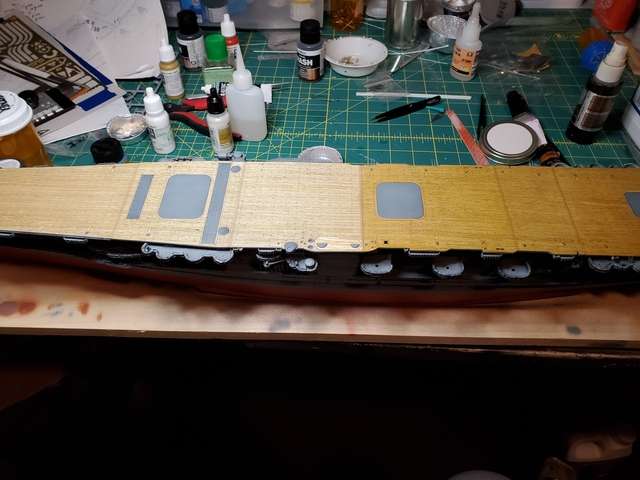
I sprayed a gloss coat on the wood deck and stained. Here it is half stained.

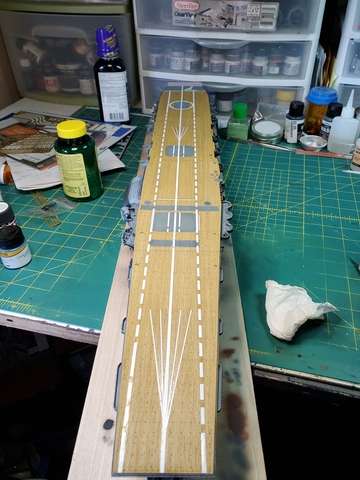
I then added three coats of the gloss coat and added the decals. That was an ordeal as decals don’t like to adhere to wood, imagine that. Confused

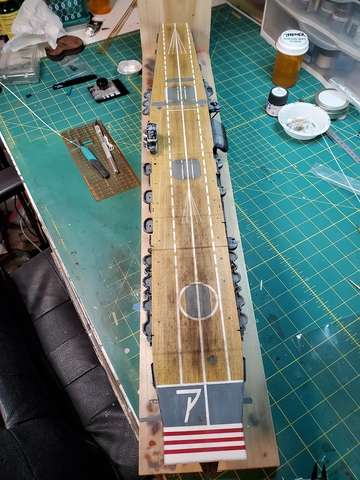
Once that all “dried” I then sprayed a few more clear coats. The katakana letter ã‚¢ “A” on the stern came apart, thank you Hase for your wonderful decals. So, I masked and spray the letter. After a few hours messing with that I was able to add the weathering I.E. oil spills, fuel leaks, tire marks and other sundry offences that happen to a wood carrier deck, using pastels and oils where I’m right at the point where I feel I’ve gone far enough. Not too much but not too little. Most of the stern will be covered with 27 or was it 28  aircraft and one hundred plus crew so the deck will be more of a background than the center point.

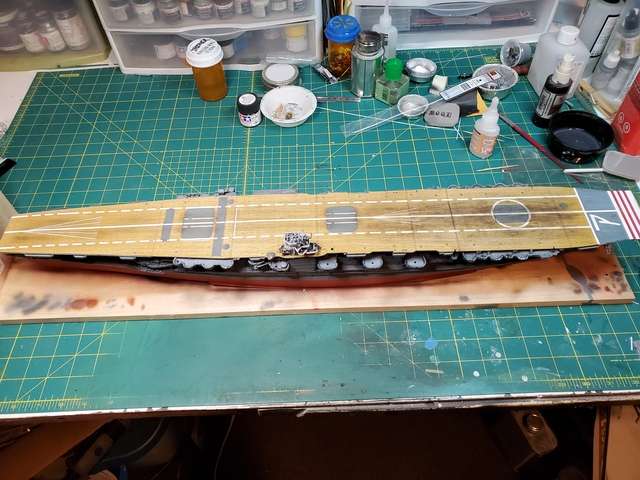
Oh yeah, the island it glued down now.

Next I need to finish the mast, a few ladders that I bought that were too long for what I had in my ladder stock, mast rigging, AA guns, deck safety netting, catch wires, aircraft catch system, side small boats, lowered antennas, landing light system.... You know, all those small nagging annoying items at add tons of interest to a build.

Steve

Building a kit from your stash is like cutting a head off a Hydra, two more take it's place.


http://www.spamodeler.com/forum/

  • Member since
    December 2007
  • From: Beavercreek, Ohio
Posted by Wrinkledm on Monday, March 1, 2021 7:00 PM

Real Birds Gamera.  At teh very least in 2011, 12 & 13 they decorated up for their anniversary celebration. I still have an Aoshima kit of the 2013 (OH-1) to build but that wonn't be too soon.  If you want some photos of the actual bird: google ( kisarazu helicopter )

https://www.scalemates.com/kits/hasegawa-02043-ah-1s-cobra-chopper-2011-2012-kisarazu-special--209623


Tags: Hasegawa , AH-1S , kisarazu

  • Member since
    November 2009
  • From: SW Virginia
Posted by Gamera on Tuesday, March 2, 2021 11:54 AM

Steve: WOW!!! I'd have no idea how to weather a wooden deck but WOW OH WOW that looks sooooooooooo good!!! Heart

WrinkedM: Oh thats so cool! Gosh I'm so tempted now to add one to my stash- but I don't need to buy anything else!!! 

"I dream in fire but work in clay." -Arthur Machen


  • Member since
    April 2020
  • From: Central CT
Posted by xenon55 on Thursday, March 4, 2021 7:42 PM

Cliff,

Can I join with this? I've had it at least twenty years. I've been waiting three months for the paint to come from Germany, which just got delivered today. Not sure when I'll start it though. I have a few kits I want to finish first.

Jay

  • Member since
    November 2009
  • From: SW Virginia
Posted by Gamera on Friday, March 5, 2021 10:17 AM

Xenon: Sure! Just put you down. Glad to see something a little different, I've always wanted to see someone enter a car model!

"I dream in fire but work in clay." -Arthur Machen


  • Member since
    November 2008
  • From: Central Florida
Posted by plasticjunkie on Friday, March 5, 2021 4:14 PM

Steve since you were discussing red primer on Japanese aircraft, so happens I took pictures of a crashed Zeke on display at the Imperial War Museum when we visited a couple of years ago. The green paint is gone but you can still see the red primer on many areas, a testament to its superior bonding quality.


 GIFMaker.org_jy_Ayj_O


Too many models to build, not enough time in a lifetime!!

  • Member since
    July 2019
Posted by Hoss WA on Monday, March 8, 2021 9:13 PM

Thanks @Gamera for the warm welcome to the group build and thanks @modelcrazy for the background on Japanese paint nuances. Lots to learn.

Progress continues. The main build is now complete along with the main painting. No issues to speak of with the build. Perfect fit and minimal cleanup. I can see why people love this kit. 

Mr. Finishing Surfacer was applied as the primer. Tamiya AS-2 (IJN Light gray) for the underside and AS-21 (IJN Dark Green 2) for the topside were applied after decanting from the rattle cans. Plenty of fading and shading was also applied. The topside photo below shows the fading and shading before blending with a thin coat of the base color. 


The Aotake metallic blue-green was painted with Tamiya paints per the call outs and really pops.


A couple of coats of Tamiya X-22 and MCLT and it's ready for decals. 


  • Member since
    July 2014
Posted by modelcrazy on Tuesday, March 9, 2021 8:46 AM

Some new pics for ya boys.

I worked on the hull weathering as stated but I was just not happy with the hammock splinter shields I made from Milliput for the gun platforms and such. They were out of scale and just didn't look good and took away from the overall picture IMO....so I removed them. After replacing the railings around the 12.7mm platforms and sanding where I had attached the other shields I was done for the night. I have a few more places to replace/install the railing and then on to the rope splinter shelds for said guns. First I need to repair the paint where the hammocks were located


Steve

Building a kit from your stash is like cutting a head off a Hydra, two more take it's place.


http://www.spamodeler.com/forum/

  • Member since
    November 2009
  • From: SW Virginia
Posted by Gamera on Tuesday, March 9, 2021 4:33 PM

Hoss: Beautiful job there! Love how she's coming out. 

Steve: Again, WOW!!! 

"I dream in fire but work in clay." -Arthur Machen


  • Member since
    February 2005
  • From: Nashotah, WI
Posted by Glamdring on Tuesday, March 9, 2021 8:37 PM

Now that another GB is winding down, I felt confident enough to break the seal on the M115.  Nothing like the feeling of that.

There unfortunately isn't any decals to indicate it is a Japanese Ground Defense Force piece, only the color differentiates it from the US guns id OD green.  


Maybe I will take some artistic liberty and add my own barrel markings if I can find some fitting Japanese decals.

Robert 

"I can't get ahead no matter how hard I try, I'm gettin' really good at barely gettin' by"

  • Member since
    November 2009
  • From: SW Virginia
Posted by Gamera on Thursday, March 11, 2021 8:54 AM

Robert: That's cool, interested in seeing how things go. 

"I dream in fire but work in clay." -Arthur Machen


  • Member since
    July 2019
Posted by Hoss WA on Sunday, March 14, 2021 8:48 PM

My rendition of A6M5 Zero 320-85/3 from the carrier Junyo during the Battle of the Philippine Sea in June 1944 is now complete. 

Since the last update, decals were applied followed by another gloss coat, a Flory wash of dark dirt, a couple coats of Dullcote and final weathering and assembly. 

All in all, I'm happy with the result. This machine has a real menacing look -- what a beast. Enjoy the photos and thanks for looking. 


GAF
  • Member since
    June 2012
  • From: Anniston, AL
Posted by GAF on Sunday, March 14, 2021 9:22 PM

Hoss,

That is an excellent rendition of the A6M5.  I built the Hasegawa version last year for Japanese GB IX.  I wonder if the Tamiya version is easier to assemble than the Hasegawa?

Gary

  • Member since
    November 2009
  • From: SW Virginia
Posted by Gamera on Sunday, March 14, 2021 9:48 PM

Hoss: That's an absolutly beautiful model!!! Great job, love the pre-shading!!! 

I'd swear the top photos were the real thing! 

Just got you posted. Heart


Gary: The Hasegawa kit is excellent but the Tamiya one is even better. If the Hasegawa kit is a Corvette the Tamiya one is a Lamborghini... 

"I dream in fire but work in clay." -Arthur Machen


  • Member since
    February 2011
Posted by GreySnake on Monday, March 15, 2021 7:12 AM
Outstanding work Steve.
 
 
Hoss the Zero looks great you did really well with the shading.
 
 
Jay nice to see a car kit added to the build.
 
 
Glamdring, interested to see how the M115 turns out.
 
 
Wrinkledm looking forward to see the AH-1S finished, that’s an interesting paint scheme.
  • Member since
    July 2014
Posted by modelcrazy on Monday, March 15, 2021 8:21 AM

Looks great Hoss, just enough chipping. Looks like the real thing on the deck.

Steve

Building a kit from your stash is like cutting a head off a Hydra, two more take it's place.


http://www.spamodeler.com/forum/

  • Member since
    July 2014
Posted by modelcrazy on Tuesday, March 16, 2021 9:00 AM
A few more days, a few more things added, a few more things to repair.
My fat hands just can't seem to keep their meat hooks from bending or breaking off a piece of something painstakingly added. Oh well, two steps forward, one step back.
I completed the hull weathering and was starting on the futon shields that I made, and they just looked out of scale and took away from the build IMO. So, ...I took them off......one step back. After reinstalling new railing where the shields were (I like the non-Hasegawa stuff better anyway) and re-spraying and weathering the hull, I sprayed some dull coat to the entire ship...part of a step forward. I took the build to a friend’s house to see it in person, but I saw the silvering on the wind direction strips decal attached to the bow. With everything else looking like it is, that just stuck out like a sore thumb. Once I brought it back home, I took 24 hours considering my options. The best, and one I went with, was to scribe along each strip and using wet sandpaper, 1000 grit, I was able to remove the offending additional carrier paper.... continuation of the step back. New problem, now I have a triangular section that's clean and almost perfect  . After re-applying a gloss coat, I wet sanded again, this time trying to match the areas that were weathered. Once completed I then went back over the area with an oil wash. It turned out pretty well I think and assuming that you never knew what had happened, almost unnoticeable and looks like I meant it.... the rest of the first step forward.
The above paragraph represents around 7 lost days  but the good news, it takes care of issues that surely would have counted against me. Tonight, I need to go back over that area with some dull coat.
Now on to the second step forward. I completed the rope shields using the laser paper cut-outs from Korea (remember those) which again, took a few days to get right, installed the Type 10 120mm twin AA guns and the flags/pennants to the mast lanyards. As close to the picture taken before the second wave as I could. I couldn't find a white/blue/white/blue/white pennant, so I went with a red/white/red/white/red. It's probably telling them to attack their own carries for all I know.
I'm also in the process of installing the boats to the davits and of course that's proving to be a small pain as well.

Steve

Building a kit from your stash is like cutting a head off a Hydra, two more take it's place.


http://www.spamodeler.com/forum/

JOIN OUR COMMUNITY!

Our community is FREE to join. To participate you must either login or register for an account.

SEARCH FORUMS
FREE NEWSLETTER
By signing up you may also receive reader surveys and occasional special offers. We do not sell, rent or trade our email lists. View our Privacy Policy.