SEARCH FINESCALE.COM

Enter keywords or a search phrase below:

Falklands War 40th Anniversary GB

34202 views
327 replies
1 rating 2 rating 3 rating 4 rating 5 rating
  • Member since
    July 2014
Posted by modelcrazy on Monday, August 23, 2021 9:28 AM

When I bought my Arma Hobby Hurricane, I purchased the overtrees as well. After building the expert kit I thought I had enough (no clear tree) for a second kit. I wrote them and explained that I needed to purchase the clear sprues and another PE set while I was at it. They said just put in a claim and they'll be on there way. I told them the clear sprue and PE set wasn't missing in the first place and this was just for the overtree purchase but they said no problem just write out the defect sheet anyway. They were very quick to respond, very wonderful customer service. Because of that, I pre-ordered their F4F-4 and will be buying more in the future. If they didn't want to respond or told me too bad or if I couldn't at least purcahse another clear tree..that would have been the last Arma Hobby kit I ever bought.

Exceptional company.

Steve

Building a kit from your stash is like cutting a head off a Hydra, two more take it's place.


http://www.spamodeler.com/forum/

  • Member since
    February 2005
  • From: Nashotah, WI
Posted by Glamdring on Monday, August 23, 2021 7:30 PM

Bish

Ye, i am surprised by that, would have though White Ensign would have decals like that.


They had at one point, but it seems to be OOP since the late 90s.  I suspect that with my luck, someone will release one before the year is out!

Robert 

"I can't get ahead no matter how hard I try, I'm gettin' really good at barely gettin' by"

  • Member since
    December 2002
  • From: Bury St Edmunds, Suffolk, England
Posted by Bish on Tuesday, August 24, 2021 2:45 AM

Glamdring


Bish

Ye, i am surprised by that, would have though White Ensign would have decals like that.


They had at one point, but it seems to be OOP since the late 90s.  I suspect that with my luck, someone will release one before the year is out!


I saw those on scalemates. And ye, that tend to be the way it works.

I am a Norfolk man and i glory in being so


On the bench: Airfix 1/72nd Harrier GR.3/Fujimi 1/72nd Ju 87D-3

  • Member since
    February 2005
  • From: Nashotah, WI
Posted by Glamdring on Tuesday, August 24, 2021 7:26 PM

Bish - What products did you use on your base for the grass?  I am building a farm tractor kit for a friend and think the look of your base would suit it well.

Robert 

"I can't get ahead no matter how hard I try, I'm gettin' really good at barely gettin' by"

  • Member since
    December 2002
  • From: Bury St Edmunds, Suffolk, England
Posted by Bish on Wednesday, August 25, 2021 3:54 AM

Its mainly woodland scenice static grass. I usually do a mix of colours depending on the season. Then on these larger scale bases i also add Greenline grass tufts, again a mix of colours and lengths. Sometimes i only add a few, but on this one i added quite a lot because it suited the Falklands terrains. On my Warrior i was a bit more spareing with the tufts, but still added quite a few as again it fitted the terrain. You can see the individual tufts here with the stactic grass in between.

I have the large tubs of the Woodland scenices grass as i use it a lot, but they used to do it in smaller packs, but they are not on their site from what i can see. As for the tufts, there are other companies that do those. Many seem to come stuck onto a sheet, i think MiG do those. I have a large selection of scenice materails i can just pick and choose for each build.

I am a Norfolk man and i glory in being so


On the bench: Airfix 1/72nd Harrier GR.3/Fujimi 1/72nd Ju 87D-3

  • Member since
    May 2011
  • From: Honolulu, Hawaii
Posted by Real G on Wednesday, August 25, 2021 1:49 PM

Bish,

A friend of mine now makes those grass tufts using a static grass applicator.  His tufts look exactly like the commercial stuff.  Perhaps I'll get him to do a tutorial and I will post it.  I need to learn to make these, as I want to get into terrain bases.

Now that we are back from the Vegas Nats, I'll get on the Pucara.

“Ya ya ya, unicorn papoi!”

  • Member since
    December 2002
  • From: Bury St Edmunds, Suffolk, England
Posted by Bish on Wednesday, August 25, 2021 1:51 PM

I have one of those fly swatters converted to a grass applicator, but i am guessing thats not the type your friend user's. I'd like to see that tutorial.

I am a Norfolk man and i glory in being so


On the bench: Airfix 1/72nd Harrier GR.3/Fujimi 1/72nd Ju 87D-3

  • Member since
    May 2011
  • From: Honolulu, Hawaii
Posted by Real G on Wednesday, August 25, 2021 2:39 PM

Bish,

I'm not sure if he is using a home-made unit or commercial one.  I'll ask him when I see him this weekend.

“Ya ya ya, unicorn papoi!”

  • Member since
    September 2011
  • From: Milaca, Minnesota
Posted by falconmod on Monday, August 30, 2021 6:51 AM

I'm calling this one done!  I still need to add a little wearthing, oil streaks and such.  but here it is.

John

On the Bench: 1/72 Ki-67, 1/48 T-38

1/144 AC-130, 1/72 AV-8A Harrier

  • Member since
    December 2002
  • From: Bury St Edmunds, Suffolk, England
Posted by Bish on Monday, August 30, 2021 9:21 AM

Thats nice John, i've always liked the A-4. Thanks for taking part.

I am a Norfolk man and i glory in being so


On the bench: Airfix 1/72nd Harrier GR.3/Fujimi 1/72nd Ju 87D-3

  • Member since
    February 2005
  • From: Nashotah, WI
Posted by Glamdring on Tuesday, September 7, 2021 6:39 PM

Nice Skyhawk, John!

Robert 

"I can't get ahead no matter how hard I try, I'm gettin' really good at barely gettin' by"

  • Member since
    February 2005
  • From: Nashotah, WI
Posted by Glamdring on Thursday, September 9, 2021 6:58 PM

My decals finally arrived from the Orient, so I can go full steam ahead with the Hercules.  Not sure if I announced that decision, but I made the appropriate deck cuts for the Argentinian destroyer.

Base coats are down, and some subassemblies are coming together:

Not much left, I am onto the PE affixing, which is very nerve wracking with all the deck rails. 

Robert 

"I can't get ahead no matter how hard I try, I'm gettin' really good at barely gettin' by"

  • Member since
    December 2002
  • From: Northern California
Posted by jeaton01 on Friday, September 10, 2021 12:28 AM

Well done on the A-4, John, looks great.

John

To see build logs for my models:  http://goldeneramodel.com/mymodels/mymodels.html


  • Member since
    December 2002
  • From: Bury St Edmunds, Suffolk, England
Posted by Bish on Friday, September 10, 2021 1:06 PM

Looking god Robert, good news about the decals.

I am a Norfolk man and i glory in being so


On the bench: Airfix 1/72nd Harrier GR.3/Fujimi 1/72nd Ju 87D-3

  • Member since
    February 2005
  • From: Nashotah, WI
Posted by Glamdring on Monday, September 13, 2021 4:14 PM

Let me start off by saying I don't know how anyone can work in this scale with PE and find it relaxing or enjoyable!  I look forward to cleansing my palate with 1/35 armor after this ship.  Just wanted to get that off my chest.  Stick out tongue

Most PE has been affixed, no thanks to Dragon's poorly marked instructions.  They referenced several fret numbers than did not have the same number of parts there.  Ex. it says add 4 lengths of rail labeled PE3 when only 2 are on the fret.  I am dreading having to paint it, but we will see how strong Gator's Grip glue us.

However, because this is a cursed project that is fighting me every step of the way, I found my radar unit and radar shack have now disappeared.  No idea at all where it has gone, I have looked high and low and it is just gone. I'll have to use the plastic board and mock up an approximation of a radar shack.  Such a shame, I really liked that subassembly.  To say nothing of the time I spent folding it....

Robert 

"I can't get ahead no matter how hard I try, I'm gettin' really good at barely gettin' by"

  • Member since
    December 2002
  • From: Bury St Edmunds, Suffolk, England
Posted by Bish on Tuesday, September 14, 2021 6:23 AM

I know the feeling Robert, i used PE on my 600 HMS Belfast. Your doing a good job with it, shame about loseing those parts after you had got them together.

I am a Norfolk man and i glory in being so


On the bench: Airfix 1/72nd Harrier GR.3/Fujimi 1/72nd Ju 87D-3

  • Member since
    June 2014
Posted by BrandonK on Friday, September 17, 2021 10:51 AM

fotofrank

Thanks, Bish. Well, here's the finished product. 801 Squadron Harrier, HMS Invincible, Falklands, 1982. The kit is typical Airfix of the 80s, raised panel lines and details. The parts fit was OK. The clear parts OK. The decals were OK. I know these airplanes didn't carry the checkerboard tail into combat but the overall extra dark sea gray needed something to break up the camouflage color. These airplanes were painted aboard ship on the way to the South Atlantic which must have been no fun. The kit decals worked well with Micro Sol but they are a little out of register. The paint and decals are sealed with Alclad Klear Kote Light Sheen. Obviously there are better kits of the Harrier available today but I'm fine with this build. It looks good on the shelf and I like that it is posed in flight. Jets just look nice posed in flight.

Hasegawa had an Argentine A-4 Skyhawk kit about the same time as this Airfix kit. I'd like to find one for this group build.


Man, you knocked this one out quick, and it looks amazing. Well done.

BK

On the bench:

A lot !! And I mean A LOT!!

2024 Kits on deck / in process / completed   

                         14 / 5 / 2  

                              Tongue Tied

  • Member since
    June 2014
Posted by BrandonK on Friday, September 17, 2021 10:54 AM

Bish

Got the Scimitar completed last night. Final weathering consisted of adding some mud useing the same celluclay mix i used on the base. Once this was dry i used some AL wet effects to give it all a wet look. I kept it all low down, the terrain on the Falklands is mostly peat so it doesn't get very dusty. With that done i added some stowage and got the turret fitted. I was going to add a 35th fabric flag but it looked a but large, even though it was the right scale so i have ordered some 48th and 72nd ones and hopefully can add one of those to an antenna.

I am really pleased with this. Nice kit and lovely AM from SMM. Deffinetly going to get some more from them.

Next up i will be doing the Victor, but i have a couple of other GB's to build for first.


Wow, that is very very nice. Also another quick one. Superb work all around.

BK

On the bench:

A lot !! And I mean A LOT!!

2024 Kits on deck / in process / completed   

                         14 / 5 / 2  

                              Tongue Tied

  • Member since
    June 2014
Posted by BrandonK on Friday, September 17, 2021 10:57 AM

modelcrazy

Here's an update on the Mirage.

I attached the decals and decided to take a diffrent tack regarding the weathering. I smeared black oil over the plane and wiped it off. It didn't turn out too bad I think.

On the left side of the picture is the side I already did. There's a nice diffrence.

This is a pic just after applying the black oil to the left side of the plane.

The finished results.

The bottom after the treatment. This wasn't as drastic as the top so I when back over the bottom with targeted oils like is my typical way (no pic of that)

Well this is bloody embarrassing. After installing the weapons, wheels and doors I can't find the nose gear! Since it was one of the first steps I constructed it and placed it in a contained for safe keeping.....and I lost the container.

I spent and hour looking for it

I'll keep looking and I'll see how Modelsvit's customer service is in obtaining a replacement.

But, for now here's the almost completed build. If all else fails I guess I could modify it to wheels up. 

Looks like I forgot to remove the mask on the front windscreen.

Once I get the nose gear, or modify it to wheels up, I'll put up completed pics.


Looks really good, Steve. In the end, I like the look of the plane on its stand and in motion over sitting on its gear. The end result is amazing. Well done.

BK

On the bench:

A lot !! And I mean A LOT!!

2024 Kits on deck / in process / completed   

                         14 / 5 / 2  

                              Tongue Tied

  • Member since
    June 2014
Posted by BrandonK on Friday, September 17, 2021 11:00 AM

falconmod

I'm calling this one done!  I still need to add a little wearthing, oil streaks and such.  but here it is.

John


Holy cow, John. That looks awesome. Great work on that one.

BK

On the bench:

A lot !! And I mean A LOT!!

2024 Kits on deck / in process / completed   

                         14 / 5 / 2  

                              Tongue Tied

  • Member since
    June 2014
Posted by BrandonK on Friday, September 17, 2021 11:03 AM

Glamdring

Let me start off by saying I don't know how anyone can work in this scale with PE and find it relaxing or enjoyable!  I look forward to cleansing my palate with 1/35 armor after this ship.  Just wanted to get that off my chest.  Stick out tongue

Most PE has been affixed, no thanks to Dragon's poorly marked instructions.  They referenced several fret numbers than did not have the same number of parts there.  Ex. it says add 4 lengths of rail labeled PE3 when only 2 are on the fret.  I am dreading having to paint it, but we will see how strong Gator's Grip glue us.

However, because this is a cursed project that is fighting me every step of the way, I found my radar unit and radar shack have now disappeared.  No idea at all where it has gone, I have looked high and low and it is just gone. I'll have to use the plastic board and mock up an approximation of a radar shack.  Such a shame, I really liked that subassembly.  To say nothing of the time I spent folding it....


Brother, I feel your pain. I did a 1/700 ship with a ton of PE and it looks great, but it was not fun in the least to apply. I am not going to say I'll never do another, but it is not something I want to do again. I'll stick with 1/350 or larger. Your work looks great by the way.

BK

On the bench:

A lot !! And I mean A LOT!!

2024 Kits on deck / in process / completed   

                         14 / 5 / 2  

                              Tongue Tied

  • Member since
    June 2014
Posted by BrandonK on Friday, September 17, 2021 11:06 AM

BIsh, put me down for a 1/48 Tamiya Sea Harrier. I have plenty of time to get it done and will start on it in a few weeks. Now that I have my new sprue cave fully up and running I am 100% back at the bench and flying through kits. With everything in one place and well organized and spread out, I can work so much faster and smoother than ever before. After 9 months off the bench I can't get enough of building now.

BK

On the bench:

A lot !! And I mean A LOT!!

2024 Kits on deck / in process / completed   

                         14 / 5 / 2  

                              Tongue Tied

  • Member since
    December 2002
  • From: Bury St Edmunds, Suffolk, England
Posted by Bish on Friday, September 17, 2021 1:08 PM

Thanks BK. The Scimitar wasn't a complicated kit, not an awful lot to it, and the lack of decals and easy weathering made it nice and quick.

I'll get the Shar on the list, look forward to it. Made a start on the victor a couple of nights ago, hope to have some pics in a few days.

I am a Norfolk man and i glory in being so


On the bench: Airfix 1/72nd Harrier GR.3/Fujimi 1/72nd Ju 87D-3

  • Member since
    July 2014
Posted by modelcrazy on Friday, September 17, 2021 3:46 PM

Thanks BK, but the Mirage was completed in flight mode.

Steve

Building a kit from your stash is like cutting a head off a Hydra, two more take it's place.


http://www.spamodeler.com/forum/

  • Member since
    June 2014
Posted by BrandonK on Sunday, September 19, 2021 12:25 PM

modelcrazy

Thanks BK, but the Mirage was completed in flight mode.


Ya, I saw that. It looks awesome in flight. Really cool display.

Bk

On the bench:

A lot !! And I mean A LOT!!

2024 Kits on deck / in process / completed   

                         14 / 5 / 2  

                              Tongue Tied

  • Member since
    February 2005
  • From: Nashotah, WI
Posted by Glamdring on Thursday, September 23, 2021 8:26 PM

Decals are on, with some artistic license involved, given the square peg/round hole situation I found myself in.  

All that is left is a couple bit pieces I left off until the hull was together, a clear coat, and printing a 1/700 scale Argentinian flag for the stern flagpole.

Robert 

"I can't get ahead no matter how hard I try, I'm gettin' really good at barely gettin' by"

  • Member since
    December 2002
  • From: Bury St Edmunds, Suffolk, England
Posted by Bish on Friday, September 24, 2021 6:22 AM

Very nice Robert, she has come out well. Look forward to the final pics.

I am a Norfolk man and i glory in being so


On the bench: Airfix 1/72nd Harrier GR.3/Fujimi 1/72nd Ju 87D-3

  • Member since
    December 2002
  • From: Bury St Edmunds, Suffolk, England
Posted by Bish on Sunday, September 26, 2021 2:50 PM

Made a start on the victor, there is a lot of kit in this box, and even without the bomber parts, its not going to be a quicky build. I am adding Eduard PE plus resin wheels and a few other AM parts. I am still awaiting the re-release of a couple of pieces of ground equipment from AIM, but if need be i wil add those later if they are not released before this is done.

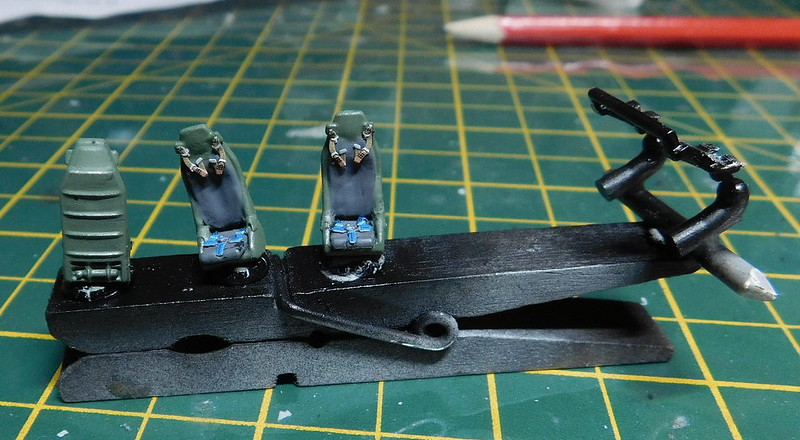
Starting out with the interior, from what i could find online i made a few changes to what Airfix recomends. Also, i noticed bthat the eduard interior set does not simply replace some of the consoles but it completly changes some. From what i could find the PE looked correct and so i checked the instructions for the previous bomber release which i found on scalemates. Airfix have not changed anything on the inside from their bomber boxing, and it does make sense that the 2 would be different. Once i worked all that out, i got going, the 2 front seats were painted, weathered and then the PE was added. The instructions said to paint the cushions yellow but this didn't seem right, the photo's seem to show grey, so thats what i went with.

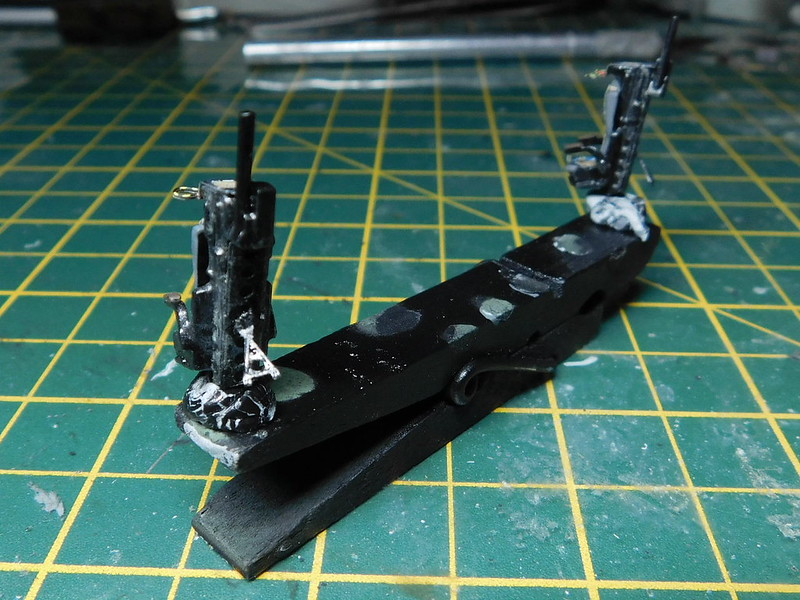
And the rear seats along with the rudder pedals.
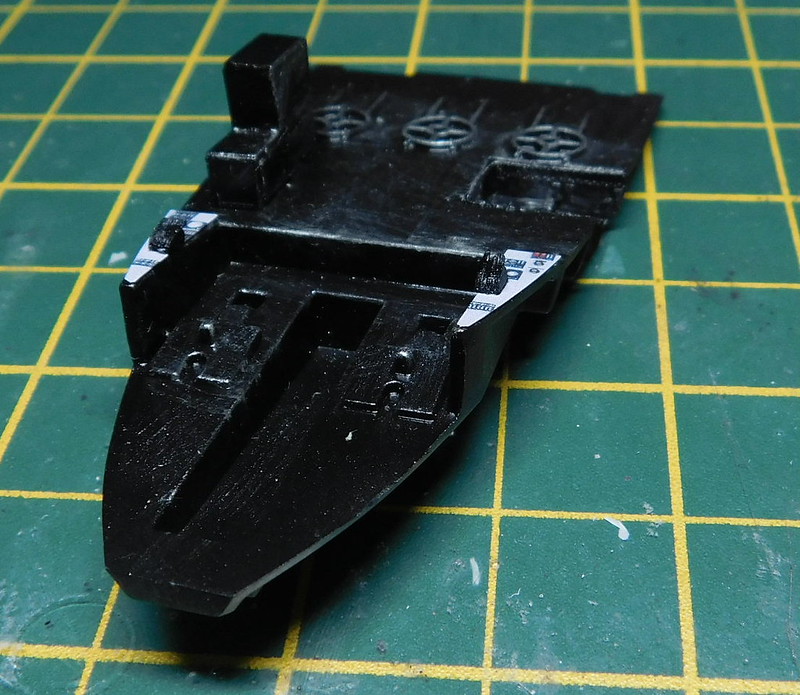
The cabin floor with some PE already added. One of the seat bases was removed as it seems the tanker has 3 in the back rather than 4.
And the rear console with the desk painted for wood, coloured PE will go on the console face later.

The instructions said the walls were all black. But the photo's i found of the Victor at RAF Cosford showed a light grey in the rear section and these seemed to match the Light Aircraft Grey that i had used on my Typhoon wheel wells, so i went with that.
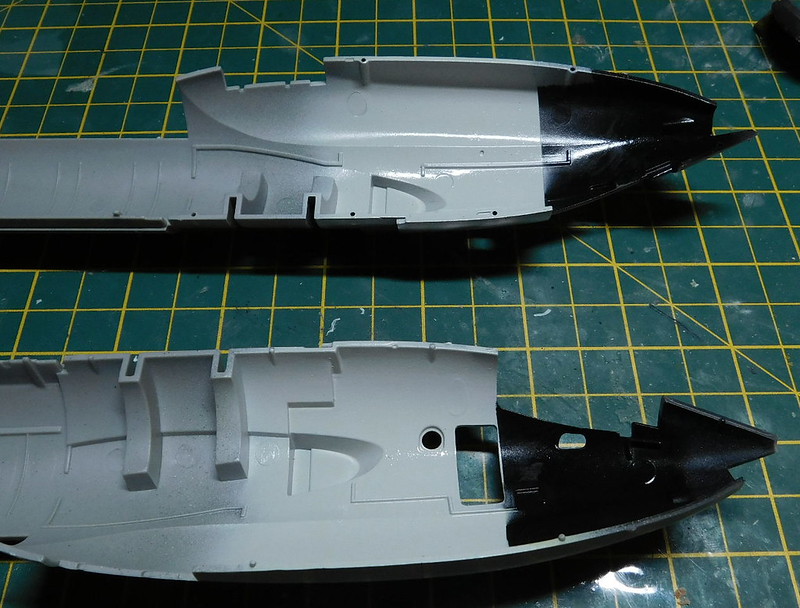
I've also done some work on the main whell wells. There is PE for the roof of the wel, but i left that out as the kit looked more accurate than the PE.

And got the main undercarrage together.
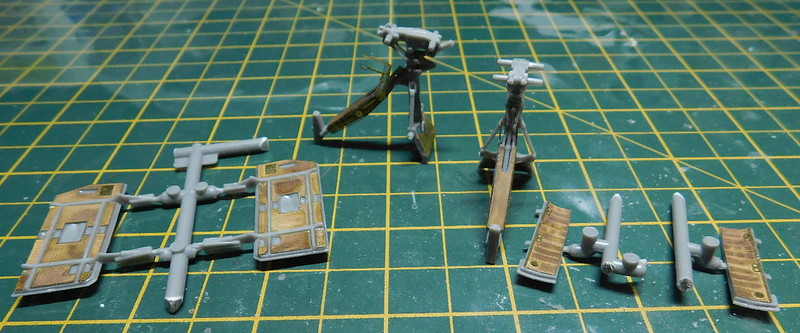
Got a bit of detail painting and weathering to do before i can flat coat the interior parts and get the fuselage together.


I am a Norfolk man and i glory in being so


On the bench: Airfix 1/72nd Harrier GR.3/Fujimi 1/72nd Ju 87D-3

  • Member since
    June 2014
Posted by BrandonK on Saturday, October 2, 2021 9:42 AM

Bish

Made a start on the victor, there is a lot of kit in this box, and even without the bomber parts, its not going to be a quicky build. I am adding Eduard PE plus resin wheels and a few other AM parts. I am still awaiting the re-release of a couple of pieces of ground equipment from AIM, but if need be i wil add those later if they are not released before this is done.

Starting out with the interior, from what i could find online i made a few changes to what Airfix recomends. Also, i noticed bthat the eduard interior set does not simply replace some of the consoles but it completly changes some. From what i could find the PE looked correct and so i checked the instructions for the previous bomber release which i found on scalemates. Airfix have not changed anything on the inside from their bomber boxing, and it does make sense that the 2 would be different. Once i worked all that out, i got going, the 2 front seats were painted, weathered and then the PE was added. The instructions said to paint the cushions yellow but this didn't seem right, the photo's seem to show grey, so thats what i went with.

And the rear seats along with the rudder pedals.

The cabin floor with some PE already added. One of the seat bases was removed as it seems the tanker has 3 in the back rather than 4.

And the rear console with the desk painted for wood, coloured PE will go on the console face later.

The instructions said the walls were all black. But the photo's i found of the Victor at RAF Cosford showed a light grey in the rear section and these seemed to match the Light Aircraft Grey that i had used on my Typhoon wheel wells, so i went with that.

I've also done some work on the main whell wells. There is PE for the roof of the wel, but i left that out as the kit looked more accurate than the PE.

And got the main undercarrage together.

Got a bit of detail painting and weathering to do before i can flat coat the interior parts and get the fuselage together.


Now that is one I have never seen. That is super cool looking. The PE is a super nice touch, especially at this scale. Nice start.

BK

On the bench:

A lot !! And I mean A LOT!!

2024 Kits on deck / in process / completed   

                         14 / 5 / 2  

                              Tongue Tied

  • Member since
    December 2002
  • From: Bury St Edmunds, Suffolk, England
Posted by Bish on Saturday, October 2, 2021 1:33 PM

Thanks BK.I've seen the old Matchbox kit built on here, but not either of the new Airfix ones.

I am a Norfolk man and i glory in being so


On the bench: Airfix 1/72nd Harrier GR.3/Fujimi 1/72nd Ju 87D-3

JOIN OUR COMMUNITY!

Our community is FREE to join. To participate you must either login or register for an account.

SEARCH FORUMS
FREE NEWSLETTER
By signing up you may also receive reader surveys and occasional special offers. We do not sell, rent or trade our email lists. View our Privacy Policy.