SEARCH FINESCALE.COM

Enter keywords or a search phrase below:

80 Years of the Mighty 8th GB

25657 views
424 replies
1 rating 2 rating 3 rating 4 rating 5 rating
  • Member since
    September 2020
Posted by fearlessfarless on Monday, May 23, 2022 11:29 PM

Mary looks great! Maybe with some forced perspective your 1/32 and my 1/48 Mustang could do some 84th FS formation flying LOL

  • Member since
    November 2008
  • From: Central Florida
Posted by plasticjunkie on Monday, May 23, 2022 11:52 AM

 GIFMaker.org_jy_Ayj_O


Too many models to build, not enough time in a lifetime!!

  • Member since
    November 2008
  • From: Central Florida
Posted by plasticjunkie on Monday, May 23, 2022 6:18 AM

Thanks Gary!

 GIFMaker.org_jy_Ayj_O


Too many models to build, not enough time in a lifetime!!

GAF
  • Member since
    June 2012
  • From: Anniston, AL
Posted by GAF on Sunday, May 22, 2022 9:23 PM

Fotofrank and TempestJohnny,

Those are some beautiful looking Jugs!  Those inspire me to dig out my Tamiya P-47 and build!  It's about time we had another "Big Beautiful Jugs" Group Builds.  Well done!

PJ,

What can I say about the P-51? Superlative!  You nailed it.

  • Member since
    November 2008
  • From: Central Florida
Posted by plasticjunkie on Sunday, May 22, 2022 9:46 AM

Photographed the Mustang out in natural light this morning to capture some of the Alclad metallic reflectivity that is present but subtle consistent with weathering in an operational combat aircraft. 

 GIFMaker.org_jy_Ayj_O


Too many models to build, not enough time in a lifetime!!

  • Member since
    December 2002
  • From: Northern California
Posted by jeaton01 on Sunday, May 22, 2022 12:04 AM

A fine piece of work!

John

To see build logs for my models:  http://goldeneramodel.com/mymodels/mymodels.html


  • Member since
    November 2008
  • From: Central Florida
Posted by plasticjunkie on Saturday, May 21, 2022 9:06 PM

Mary is finally completed. The yellow stripes on the iron bombs were hand painted. I may add a standing pilot later on just to add some interest in the vignette. Please use the 6th picture for the completed page.

 GIFMaker.org_jy_Ayj_O


Too many models to build, not enough time in a lifetime!!

  • Member since
    November 2008
  • From: Central Florida
Posted by plasticjunkie on Friday, May 20, 2022 9:52 AM

Thanks Mongoose!

Got back from Italy so will be back at the bench soon.

 GIFMaker.org_jy_Ayj_O


Too many models to build, not enough time in a lifetime!!

  • Member since
    November 2003
  • From: Naples, FL
Posted by tempestjohnny on Thursday, May 19, 2022 4:37 AM

jeaton01
Big Smile

Well, John.  That's two.  Only 15,634 to go!


15,633. Already have a C built


  • Member since
    December 2002
  • From: Northern California
Posted by jeaton01 on Wednesday, May 18, 2022 11:45 PM

Well, John.  That's two.  Only 15,634 to go!

John

To see build logs for my models:  http://goldeneramodel.com/mymodels/mymodels.html


  • Member since
    December 2002
  • From: Northern California
Posted by jeaton01 on Wednesday, May 18, 2022 11:43 PM

Well done, Frank!

John

To see build logs for my models:  http://goldeneramodel.com/mymodels/mymodels.html


  • Member since
    November 2003
  • From: Naples, FL
Posted by tempestjohnny on Wednesday, May 18, 2022 5:31 PM

Getting closer to the finish line


  • Member since
    January 2015
Posted by TheMongoose on Thursday, May 12, 2022 6:26 PM

plasticjunkie

Thanks JB! 

So the kit has extra tanks and some nice 500 lb. bombs that would look good in a vignette setting so I had an old picture frame to use for the base, some Sculptamold and water to make a tarmac. Taped up the edges to protect the wood.
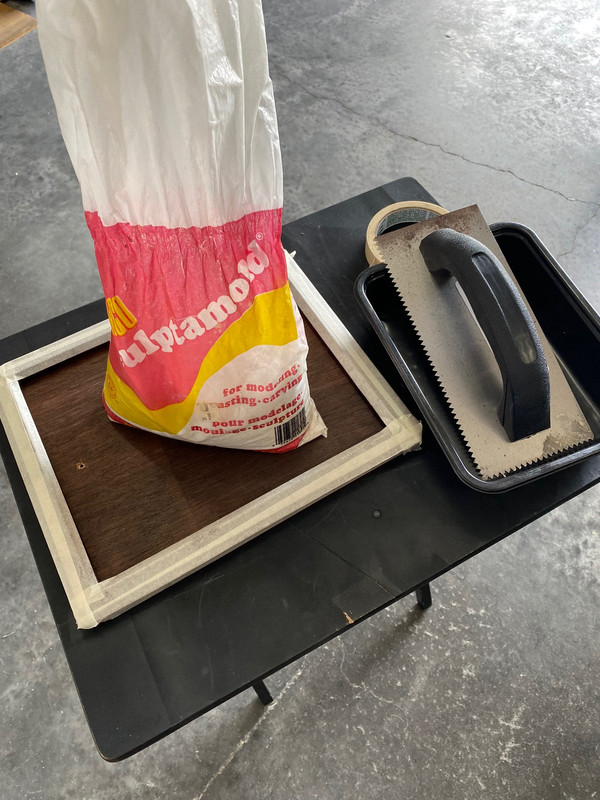
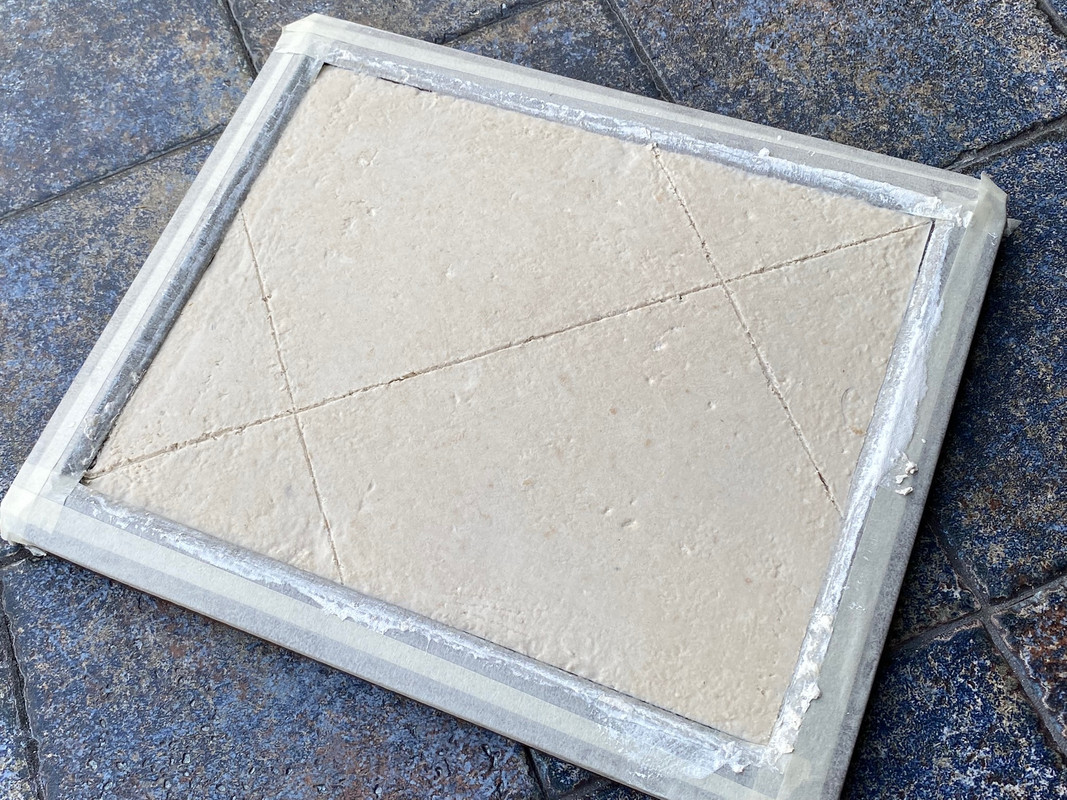
The Sculptamold was mixed and poured, smoothed out and expansion joints added.
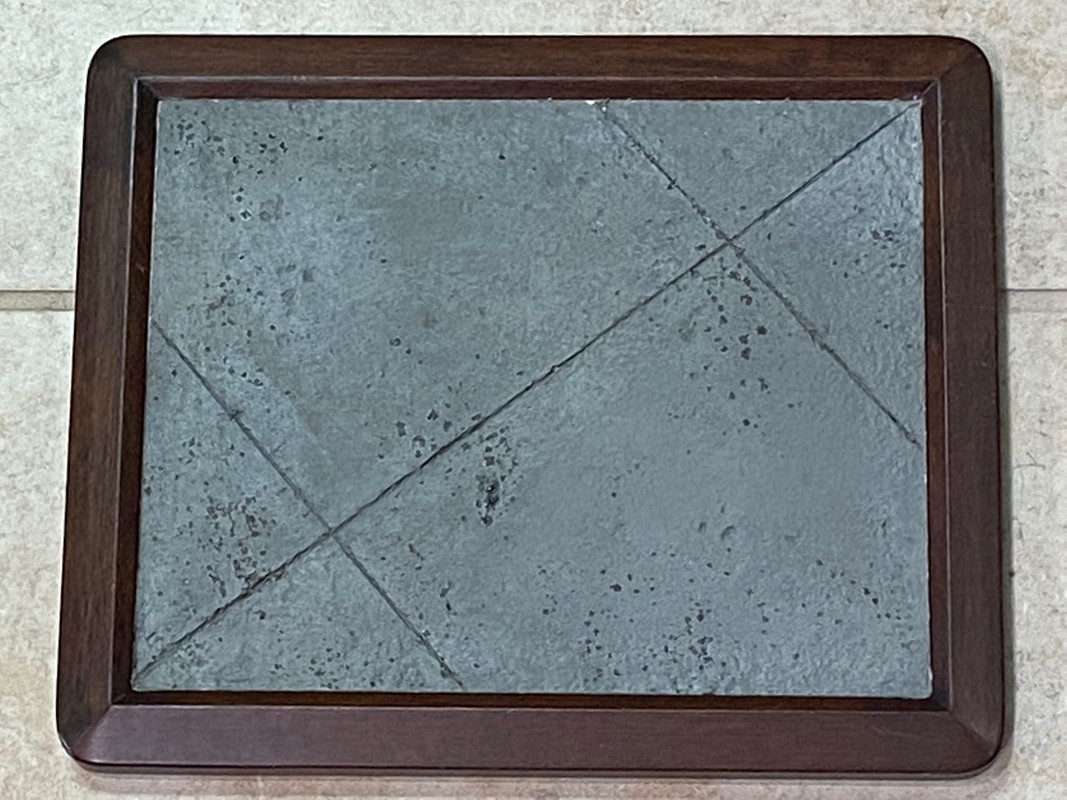
Then craft acrylics were used to paint and drybrush the tarmac. Oil stains were added.
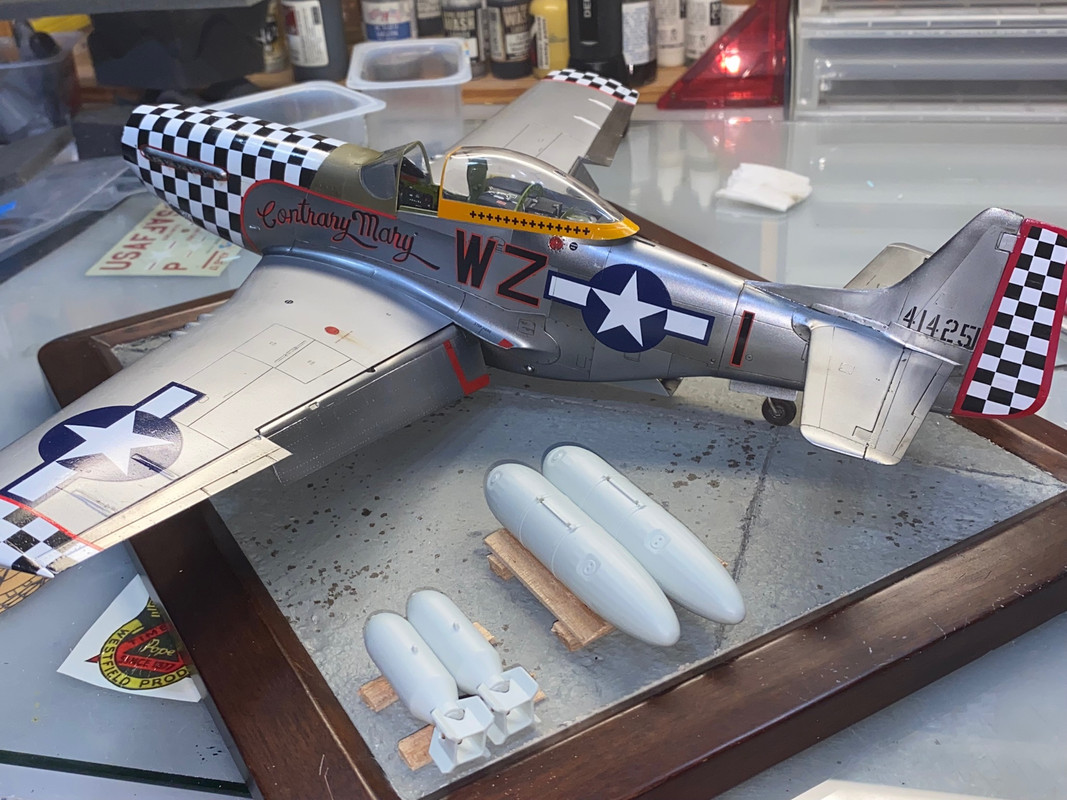
Figuring out positioning things. The disposible paper tanks and bombs need paint and decals.
Brake lines were also added to the main landing gear.
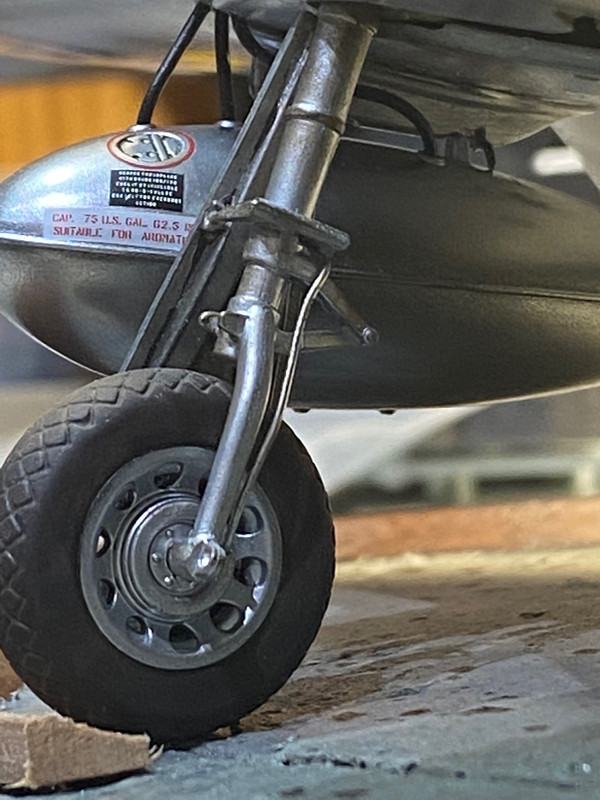
 

PJ that could be a movie model! That shot across the gear with the tank in the background has to be real. Wow great job!

In the pattern: Scale Shipyard's 1/48 Balao Class Sub! leaning out the list...NOT! Ha, added to it again - Viper MkVii, 1/32 THUD & F-15J plus a weekend madness build!

  • Member since
    January 2015
Posted by TheMongoose on Thursday, May 12, 2022 6:25 PM

fotofrank

OK. The 5th ERS Thunderbolt is finally done. Murphy's Law helped with the completion. I tried to paint as much as I could. The invasion stripes, the cowling, the national insignia are all painted. I discovered painting the insignia on the waist to be sure to close the super charger vent doors. Open, they are pretty difficult to paint with stencils. I have two more Thunderbolts in process and I was sure to close those doors. The three letter aircraft code, the tail number and the nose art are aftermarket decals. I should have made a stencil for the "Tony" but didn't see that until I Dullcoted the airplane. Anyway, here it is. Comments welcome. Oh yeah, the guns are brass from Master Model.


some superb looking paint work you did there! 

In the pattern: Scale Shipyard's 1/48 Balao Class Sub! leaning out the list...NOT! Ha, added to it again - Viper MkVii, 1/32 THUD & F-15J plus a weekend madness build!

  • Member since
    September 2020
Posted by fearlessfarless on Thursday, May 12, 2022 4:59 PM

Great looking P-47!

  • Member since
    June 2017
  • From: Winter Park, FL
Posted by fotofrank on Thursday, May 12, 2022 3:36 PM

OK. The 5th ERS Thunderbolt is finally done. Murphy's Law helped with the completion. I tried to paint as much as I could. The invasion stripes, the cowling, the national insignia are all painted. I discovered painting the insignia on the waist to be sure to close the super charger vent doors. Open, they are pretty difficult to paint with stencils. I have two more Thunderbolts in process and I was sure to close those doors. The three letter aircraft code, the tail number and the nose art are aftermarket decals. I should have made a stencil for the "Tony" but didn't see that until I Dullcoted the airplane. Anyway, here it is. Comments welcome. Oh yeah, the guns are brass from Master Model.

OK. In the stash: Way too much to build in one lifetime...

  • Member since
    November 2008
  • From: Central Florida
Posted by plasticjunkie on Monday, May 2, 2022 6:59 PM

jeaton01

Brilliant, PJ.  I do wish you would give the brake lines a little more attention.  There should be a rubber hose that spans the scissors and is fastened at both sides.  We don't want our hero to break a brake line!


Here is a link to photos of the gear strut details:

http://www.yolo.net/%7Ejeaton/Propplanes/p51/102p51.htm


John

Appreciate the headsup on the brake line detailed pictures you posted. Will come in very handy for an upcoming comission build next month. I was able to VERY carefully remove them and simulate the black rubber part that flexes with the mains and re attached them. I wish I had four hands but finally got them on. Will post pictures once we get back in town. 

 GIFMaker.org_jy_Ayj_O


Too many models to build, not enough time in a lifetime!!

  • Member since
    November 2008
  • From: Central Florida
Posted by plasticjunkie on Monday, May 2, 2022 1:18 PM

Thaks Gary. My kit parts fit was very good. I did not use any putty at all. I did have to thin the pit side frames to get a good fuselage seam line otherwise it was a tad too wide producing a slight gap.

 GIFMaker.org_jy_Ayj_O


Too many models to build, not enough time in a lifetime!!

GAF
  • Member since
    June 2012
  • From: Anniston, AL
Posted by GAF on Sunday, May 1, 2022 7:40 PM

First, to catch-up.

Nick> Nice going on the fortress.  Well done!

JB> Your P-51 is coming along nicely.

PJ> Beautiful work!  You've done a marvelous job.

As for me, I'm coming along slowly with "Alabama Rammer Jammer".  Would go faster if I didn't spend so much time on other stuff and concentrated on it, but she's coming along.  The pit and fuselage are together, and now I'm working on the wings.  I have a bit of sanding to make them fit correctly.  As a note to other modelers, tolerances are tight and perhaps a bit of a mismatch can cause things to not fit.

This may not be the best P-51 in this build, but I'll try to finish her to the best of my ability.

Thanks for looking!

Gary

  • Member since
    November 2008
  • From: Central Florida
Posted by plasticjunkie on Sunday, May 1, 2022 6:31 PM

Thanks lurch!

 GIFMaker.org_jy_Ayj_O


Too many models to build, not enough time in a lifetime!!

  • Member since
    November 2008
  • From: Central Florida
Posted by plasticjunkie on Sunday, May 1, 2022 6:30 PM

Thanks for the pictures John. I wanted to add the lines before attaching the struts but I forgot to do so before attaching the mains. I'm afraid to damage the mains at this time but may try something anyway. The pictures I saw had the lines as all metal or had rubber hose detail from what I could see but your pictures are really well detailed.

 GIFMaker.org_jy_Ayj_O


Too many models to build, not enough time in a lifetime!!

  • Member since
    December 2002
  • From: Northern California
Posted by jeaton01 on Sunday, May 1, 2022 3:26 PM

Brilliant, PJ.  I do wish you would give the brake lines a little more attention.  There should be a rubber hose that spans the scissors and is fastened at both sides.  We don't want our hero to break a brake line!


Here is a link to photos of the gear strut details:

http://www.yolo.net/%7Ejeaton/Propplanes/p51/102p51.htm

John

To see build logs for my models:  http://goldeneramodel.com/mymodels/mymodels.html


  • Member since
    August 2021
Posted by lurch on Sunday, May 1, 2022 1:43 PM

PJ you havedone a excellent job on that. It is very impressive. I like it.

  • Member since
    November 2008
  • From: Central Florida
Posted by plasticjunkie on Sunday, May 1, 2022 12:25 PM

fearlessfarless

WOW PJ! That's cool!!! Yes


Thanks! Beer

 GIFMaker.org_jy_Ayj_O


Too many models to build, not enough time in a lifetime!!

  • Member since
    September 2020
Posted by fearlessfarless on Sunday, May 1, 2022 7:18 AM

WOW PJ! That's cool!!! Yes

  • Member since
    November 2008
  • From: Central Florida
Posted by plasticjunkie on Saturday, April 30, 2022 11:02 PM

Thanks JB! 

So the kit has extra tanks and some nice 500 lb. bombs that would look good in a vignette setting so I had an old picture frame to use for the base, some Sculptamold and water to make a tarmac. Taped up the edges to protect the wood.

The Sculptamold was mixed and poured, smoothed out and expansion joints added.

Then craft acrylics were used to paint and drybrush the tarmac. Oil stains were added.

Figuring out positioning things. The disposible paper tanks and bombs need paint and decals.

Brake lines were also added to the main landing gear.

 GIFMaker.org_jy_Ayj_O


Too many models to build, not enough time in a lifetime!!

  • Member since
    September 2020
Posted by fearlessfarless on Saturday, April 30, 2022 6:11 PM

Looking good JB!

  • Member since
    April 2020
  • From: West Texas
Posted by JBRaider on Saturday, April 30, 2022 4:39 PM

Been away from the forums for most of the year (not that I am on them much to start with) and trying to get caught up on all of the amazing builds. The quality of work and attention to detail never ceases to amaze me.

PJ your P-51 is incredible, i am in awe over this one

I started on the Academy P-51 with an Eduard set for the cockpit. It is a lot of work and while it looks okay my PE skills are lacking.

The kit went together well and I was able to get the primer, preshade and base coats on this last week

Noticed a seam that needs to be taken care of on the bottom

Hoping to get the white stripes and the decals on this weekend.

I was going to do the Old Crow at first but the Malcolm Hood on the Academy kit is horrible. So I am working on a variant with the hinged canopy, Cpt. Victor Frances's "Miss Dallas"


  • Member since
    November 2008
  • From: Central Florida
Posted by plasticjunkie on Saturday, April 23, 2022 10:55 PM

Wing tanks mounted and hoses added from discarded electrical wires.

 GIFMaker.org_jy_Ayj_O


Too many models to build, not enough time in a lifetime!!

  • Member since
    November 2008
  • From: Central Florida
Posted by plasticjunkie on Friday, April 22, 2022 6:20 AM

jeaton01

I put in a resin cockpit, the Whirlybird tail correction, lengthened the tip tanks, stole the main wheels from an Aria/Lots AMT 707 kit which I have several of.  The fit of the replacement panels on mine was poor, as was the canopy.  But it will be nice when done.  I admit I have developed a bad attitude toward Italeri kits!Angry


That sounds like lots of extra work ans should look very nice.Yes

I built mine several years back for a Viet Nam GB. i modified the pit by scratbuilding it, replaced the tires, addedresin mg barrels,scratched some cluster bomsvused as truck killers. I know I did a couple of other things but can’t remember now. I did use aftermarket decals. As I recall the kit’s fit was very good. I would love to find another to build as a CIA Congo ship. I have the decals for it.

 GIFMaker.org_jy_Ayj_O


Too many models to build, not enough time in a lifetime!!

JOIN OUR COMMUNITY!

Our community is FREE to join. To participate you must either login or register for an account.

SEARCH FORUMS
FREE NEWSLETTER
By signing up you may also receive reader surveys and occasional special offers. We do not sell, rent or trade our email lists. View our Privacy Policy.