SEARCH FINESCALE.COM

Enter keywords or a search phrase below:

AIRCRAFT - Mustang Ranch... P-51 Group Build--ends 12/31/04

24211 views
610 replies
1 rating 2 rating 3 rating 4 rating 5 rating
  • Member since
    November 2005
Posted by Anonymous on Thursday, August 19, 2004 6:59 PM
well here ya go


well pardners I am done for the day (prolly not) need to make some touch ups later on it.
-Jeff
  • Member since
    March 2003
  • From: Brooklyn
Posted by wibhi2 on Thursday, August 19, 2004 6:17 PM
Haey SAlty, did ya check the fit on them AM wings?
Mine are all warpped to h@!$...both top and bottom, one side even has a twist.
Have to put them on the "think" pile for a while until I figure figure out to correct it.....I am worried about the hot water trick, since the last time I did that I actually shrank a fuselage half . Stang looks wonderful so far

Woodbeck: lookin' real good - can't wait to see the masks pulled.
3d modelling is an option a true mental excercise in frusrtation
  • Member since
    November 2005
Posted by Anonymous on Thursday, August 19, 2004 5:46 PM
Heh heres mah upn'date at that thar stallion. Gots the top silvered a tad and waitn for that thar stuff to cure some befores I start on the bottom.


More to come pard'ners
-Jeff
  • Member since
    July 2003
  • From: Lower Alabama
Posted by saltydog on Thursday, August 19, 2004 5:27 PM
thanks Thad, i used one o' them sharp objects you sent to cut away the flaps, and i still have all of my extremities intact!!Tongue [:P]Wink [;)] thanks, later.
Chris The Origins of Murphy's Law: "In the begginning there was nothing, and it exploded."!!! _________ chris
  • Member since
    May 2004
  • From: Dallas
Posted by KINGTHAD on Thursday, August 19, 2004 5:22 PM
Looking good Saltydog

Thad
  • Member since
    July 2003
  • From: Lower Alabama
Posted by saltydog on Thursday, August 19, 2004 4:47 PM
thanks all!

Murray its not an injector pin mark, but i cant' answer you question accurately niether because i don't know. like you say, it looks really uncomfortable to me as well. might've been an add on for those "really long" missions!!Tongue [:P]Wink [;)] the instructions mention nothing about it, and they are very concise to say the least. i've noticed that most, if not all connections to the sprue tree has been located in an inconspicuous location so when they're cut free, the sanded area is hardly noticeable. thanks for the kind words. later.
Chris The Origins of Murphy's Law: "In the begginning there was nothing, and it exploded."!!! _________ chris
  • Member since
    February 2003
  • From: A Spartan in the Wolverine State
Posted by rjkplasticmod on Thursday, August 19, 2004 3:48 PM
Chris, really nice work on the cockpit Thumbs Up [tup].

Jeff, nice progress. Should be a goodun.

Reagards, Rick
RICK At My Age, I've Seen It All, Done It All, But I Don't Remember It All...
  • Member since
    November 2005
Posted by Anonymous on Thursday, August 19, 2004 3:17 PM
Saltydog, here's question out of ignorance: there seems to be a 'hole' in the pilot's seat right under the seatbelts (which are amazing, BTW). It kinda looks like an ejector pin mark, but I'm sure that if it was, you would have fixed that. So, what the heck was it for? Looks like it would have been a bit uncomfortable?? BTW, the interior colors/contrasts are awesome. Looks great. Nice pics too!

Jeff, now you got me all curious about when you're gonna have the NMF on it. I'm gonna be checking the forum every few hours thinking there's gonna be an update!! Getting anxious!

Murray

  • Member since
    October 2003
  • From: Everett, WA
Posted by gwaihir on Thursday, August 19, 2004 10:15 AM
Your 'stangs are coming along great salty and woodbeck. (You take excellent photos salty!)

Mine is almost finished. Decals are on. Had two mishaps that made me want to scream (one insignia ripped and one decal lifted off a day after being applied - I think the snj powder residue has caused things to not stick and given me multiple headaches), but oh well. Hopefully I will put a PROTECTANT coat of future on today and then do panel lines/weathering tomorrow or this weekend if I can be patient enough.

Hope all builds are going well
Leon
Click the banner to see my builds.
  • Member since
    December 2003
  • From: Charleston, SC
Posted by sanderson_91 on Thursday, August 19, 2004 8:37 AM
Thanks Fightnjoe and Blackwolf - both your ideas sound good!

Awesome looking Stangs Saltydog and woodbeck3.


  • Member since
    July 2003
  • From: Lower Alabama
Posted by saltydog on Thursday, August 19, 2004 8:26 AM
thanks fellers!!

Darson No fit problems at all to speak of friend. very nice kit. the detail is excellent, but the cockpit details seem a little out of scale. maybe i'm just used to dealing with petite PE and resin detail parts. later.
Chris The Origins of Murphy's Law: "In the begginning there was nothing, and it exploded."!!! _________ chris
  • Member since
    February 2003
  • From: Melbourne, Australia
Posted by darson on Thursday, August 19, 2004 5:49 AM
Sign - Ditto [#ditto]Sign - Ditto [#ditto] Awesome looking work there Salty, can't wait to see her painted.

BTW, what's the fit like on that AM kit?

Cheers
Darren
  • Member since
    November 2005
Posted by Anonymous on Thursday, August 19, 2004 2:42 AM
SaltydogBow [bow]very well done thereCowboy [C):-)]i take mah hat of to ya........
  • Member since
    July 2003
  • From: Lower Alabama
Posted by saltydog on Thursday, August 19, 2004 2:29 AM
thanks jeff!! yers a sure is lookin' fine all glossed up!! i'm a tempted to put ta' stickers on em' when nay in nat stage!!
Chris The Origins of Murphy's Law: "In the begginning there was nothing, and it exploded."!!! _________ chris
  • Member since
    November 2005
Posted by Anonymous on Thursday, August 19, 2004 2:14 AM
Got some moh done....


Thats just the top... gonna do the bottome now.
  • Member since
    November 2005
Posted by Anonymous on Thursday, August 19, 2004 2:04 AM
Beautiful Salty. that thar is a fine filly you have grow'n. Mighty good show'n en all.
  • Member since
    July 2003
  • From: Lower Alabama
Posted by saltydog on Thursday, August 19, 2004 12:42 AM
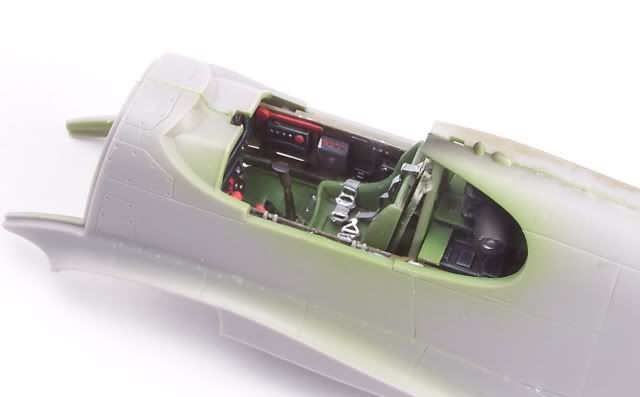
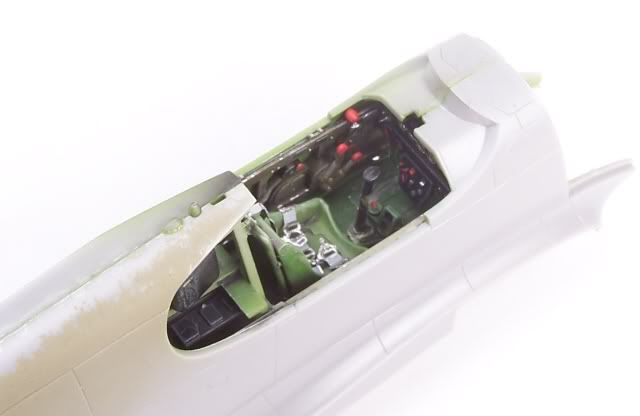
well, howdy fellers!! i've been miiity busy o'er the last couple o' days!! iss here is the beginnin's of a F-6B i signed on to rustle up. bought her from the Circle AM(accurate min.) ranch. she's bout' half grown (1/48). e'er thangs fittin' snug so far so i'm a keepin' my pistols latched in.
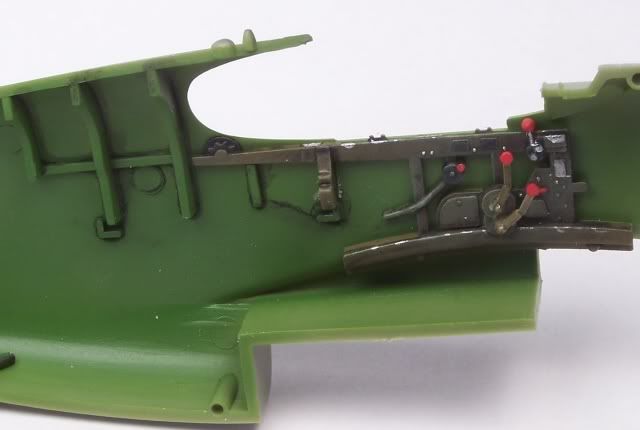
iss here is a shot o' the rite...........well uhhh.......maybe the leff.........well......one of the 2 sides o' the fuselage!
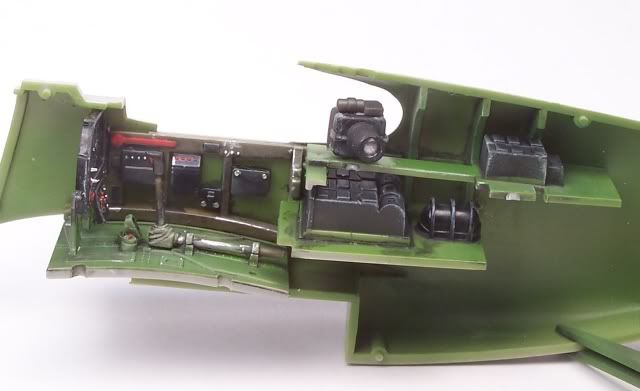

iss here izzda udder side o' it.

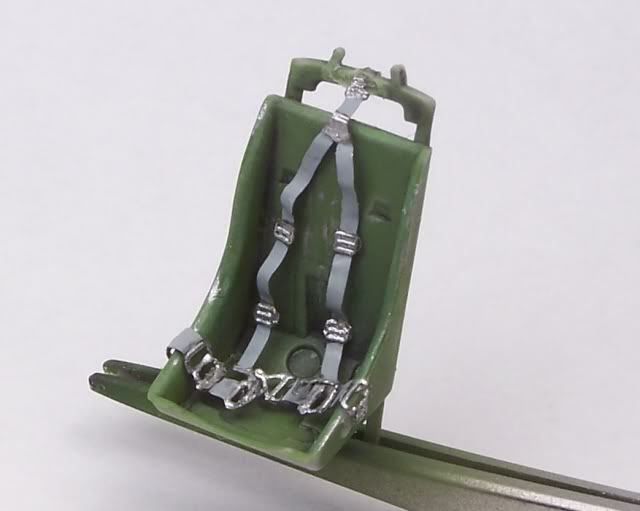
dis here izza saddle, da seat belts are PE stolt from anudder PE set.

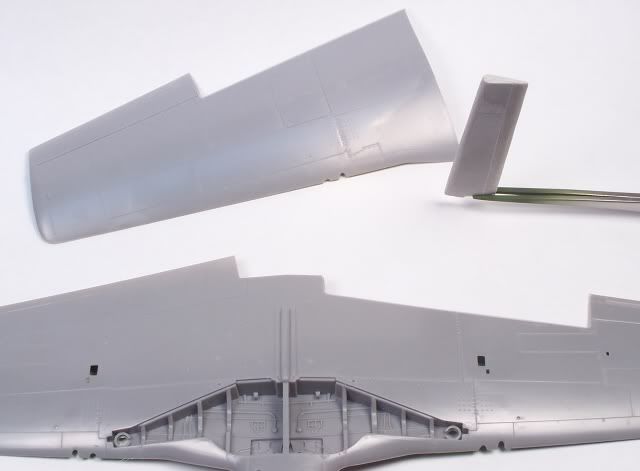
well, this here is my first go at choppin' up a bird to fry. i cut the flaps away in order to position them in the down pos. does the end profile look ok? any comments that may help me in this area would be greatly appreciated. if it turns out ok, i may do the rudder and possilbly tweak the ailerons slightly too. the exterior just looks so "stiff" or something, so i thought i'd try and spruce it up some............and maybe i won't screw it up. thanks


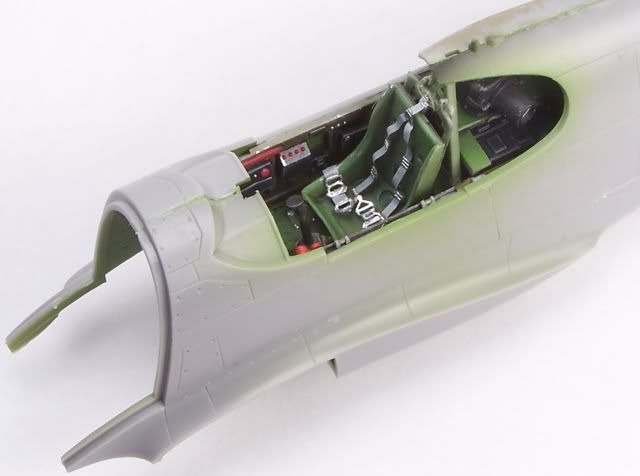
here is a couple of shots of the fuselage halves joined, and the pit in place.


Chris The Origins of Murphy's Law: "In the begginning there was nothing, and it exploded."!!! _________ chris
  • Member since
    December 2002
  • From: Pominville, NY
Posted by BlackWolf3945 on Wednesday, August 18, 2004 11:20 PM
QUOTE: Originally posted by sanderson_91

Hey fellas! Got a question for all you cowboys that are building the Monogram P51D. I'm ready to close the fuselage halves, but I'm not sure whether I should put the exhaust stacks in before or after closing it up. It looks like it would be hard to mask and paint around them but I've taped the halves together and it's kind of hard to get them in if the fuselage is closed up. It doesn't seem impossible, but what have some of you folks done? It's starting to look pretty nice to me and I don't want to screw this up. Thanks!

Steve


Real simple solution to this one...

Trim the exhausts so that they'll pass through the opening easily from the outside. Then, using some plastic card or any other bits of scrap plastic, build up a box or some other simple structure inside the openings. This way, when you go to put the exhausts in after the fuselage is buttoned up, there's something in there to glue the exhausts to.


Fade to Black...
  • Member since
    September 2011
Posted by fightnjoe on Wednesday, August 18, 2004 10:46 PM
i installed them before closing the halves. to me the masking wasnt a problem though. used foil on the nose.

joe

Veterans,

Thank You For Your Sacrifices,

Never To Be Forgotten

Where you can find me:

Workbench on FaceBook  Google Plus  YouTube

  • Member since
    November 2005
Posted by Anonymous on Wednesday, August 18, 2004 9:27 PM
Wow guys. NIce progress. I'm really impressed with the painting of the colors first on Pix and Woodbeck's planes. Don't know why I didn't think of that!!

Getting anxious to see some NMF on them though!! Looks like we're getting close!

Murray
  • Member since
    December 2003
  • From: Charleston, SC
Posted by sanderson_91 on Wednesday, August 18, 2004 9:08 PM
Hey fellas! Got a question for all you cowboys that are building the Monogram P51D. I'm ready to close the fuselage halves, but I'm not sure whether I should put the exhaust stacks in before or after closing it up. It looks like it would be hard to mask and paint around them but I've taped the halves together and it's kind of hard to get them in if the fuselage is closed up. It doesn't seem impossible, but what have some of you folks done? It's starting to look pretty nice to me and I don't want to screw this up. Thanks!

Steve


  • Member since
    October 2003
  • From: Everett, WA
Posted by gwaihir on Wednesday, August 18, 2004 3:19 PM
Progress looks great pix, wish my "problems and setbacks" ended up looking that good.
Leon
Click the banner to see my builds.
  • Member since
    November 2005
Posted by Anonymous on Wednesday, August 18, 2004 1:48 PM
sand fleas and honry toads... LOL. That thar be Verlindens bras gun covers on that wing'n all. Seein how the Verlinen set is non too good, and the gun bay theys made in that resin stuff too small, I's de'ided to just'n cover it all up and get it alls ready for that thar primer I been havn problems with.
  • Member since
    February 2003
  • From: A Spartan in the Wolverine State
Posted by rjkplasticmod on Wednesday, August 18, 2004 1:45 PM
Lookin right nice Pix, set backs & all.

Regards, Rick
RICK At My Age, I've Seen It All, Done It All, But I Don't Remember It All...
  • Member since
    November 2005
Posted by Anonymous on Wednesday, August 18, 2004 1:04 PM
What in tarnation? Confound it !

Ah started applyin' them black check decals this mornun. It wuz workin' fine from the git-go, puttin' 'em on the tail and stuff. Then ah comes to th' wingtips. Ah'd measured the yeller area from the dee-cal sheet, an' it looked OK. When ah commenced tah puttin' on the checks, ah dee-skovered they easn't wide enuff. Shoot-fire ! Ah had tah paint me in them litt'l squares wid a brush. Now ah gots tah widen the bottom o' this wing, 'long wid t'other-un. Sand fleas and horney toads ! this here boo boo sets me back a few days. Confound it !
  • Member since
    November 2005
Posted by Anonymous on Wednesday, August 18, 2004 6:12 AM
Hey Woodbeck...what's that orange/reddy-brown color on the wing about?

And ya ain't buyin' one of those lovely ladies, you do be buyin' them a drink! Now, put your hand in your pocket, get some change and buy us a whiskey or two!
(maybe we could start a new topic.....who would you want for bath night?Evil [}:)] )

Liam
  • Member since
    November 2005
Posted by Anonymous on Wednesday, August 18, 2004 2:46 AM
All of these progress shots are looking great. I'll have to borrow the camera back so I can get some shots of mine. I'll be masking off the blue nose as soon as I get a coat of future on. Then it won't be long from there. Later all.
  • Member since
    November 2005
Posted by Anonymous on Wednesday, August 18, 2004 2:14 AM
Gots me a little marh done tonight....


-Jeff
  • Member since
    November 2005
Posted by Anonymous on Wednesday, August 18, 2004 12:44 AM
Ah'm a-likin' your finished 'stang, there, Murray ! That "wascally wabbit" (Ah says in muh best Elmer Fudd voice) wheely wooks fine !

Ah gots me sum o' that thar Future stuff on th' painted areas o' muh burd. She's a-gonna be gettin them black checks tomoree ! YeeHah ! Jes one step closer tah that thar Alcad concoction !
  • Member since
    October 2003
  • From: Everett, WA
Posted by gwaihir on Tuesday, August 17, 2004 11:22 PM
Great job on your 'stang Murray. That is a very cool scheme; I like the stripes and the great looking rabbit art. Very nice job on it.
Leon
Click the banner to see my builds.
JOIN OUR COMMUNITY!

Our community is FREE to join. To participate you must either login or register for an account.

SEARCH FORUMS
FREE NEWSLETTER
By signing up you may also receive reader surveys and occasional special offers. We do not sell, rent or trade our email lists. View our Privacy Policy.