SEARCH FINESCALE.COM

Enter keywords or a search phrase below:

Battle of Britain GB 2006 - 1 May to 31 Oct 06

55079 views
1038 replies
1 rating 2 rating 3 rating 4 rating 5 rating
  • Member since
    July 2003
  • From: Bicester, England
Posted by KJ200 on Sunday, October 29, 2006 10:55 AM

Thanks Guys

Matt coated the Emil this afternoon. I'm not going overboard with the weathering on this build, just a little exhaust and oil staining, which I'll add once the matt coat has had a few days to harden fully.

The Dornier is getting close to completion, but it'll probably be a few weeks yet.

Karl 


Currently on the bench: AZ Models 1/72 Mig 17PF

  • Member since
    December 2002
  • From: Reno, NV
Posted by espins1 on Sunday, October 29, 2006 12:58 AM
Decals are on, just doing some decal softening with the roundels on the upper wing surfaces to get them to hunker down on a bit of raised surface detail.  I'll have some pics in the morning.

Scott Espin - IPMS Reno High Rollers  Geeked My Reviews 

  • Member since
    February 2003
  • From: A Spartan in the Wolverine State
Posted by rjkplasticmod on Friday, October 27, 2006 8:33 PM

Scott & Karl,  Nice work guys.

Regards,  Rick

RICK At My Age, I've Seen It All, Done It All, But I Don't Remember It All...
  • Member since
    December 2002
  • From: Reno, NV
Posted by espins1 on Friday, October 27, 2006 3:25 PM

Edit:  I figured it out.

Nice work Karl!  Looks great!

Scott Espin - IPMS Reno High Rollers  Geeked My Reviews 

  • Member since
    November 2003
  • From: Nashville, TN area
Posted by bobbaily on Friday, October 27, 2006 2:35 PM

Scott-nice job on the camo.  Hopefully the canopy will be ok.

Karl-nice clean build.  Good to see a 109 without mottle.

Bob


  • Member since
    July 2003
  • From: Bicester, England
Posted by KJ200 on Friday, October 27, 2006 2:01 PM

Guys, thanks for the kind words.

Scott, nice job on the Spitfire camo.

Bear, the Hasa 111P is a very nice, though not without it's foibles. The engines are multi piece assemblies and take a bit of care to ensure that every thing is aligned properly. Same goes for the engine to wing joint, which was fine underneath, but too deep on the top of the wing. Like I say, spend plenty of time on the dry fit and you'll be fine. That and the fuselage windows don't fit too well, being undersize for the appertures. Everything else is up to Hasa's usual standards though.

Progress Update

Tried posting this the other day, but haven't been able to get on the forum for some reason.

Decals are on, as are many of the smaller details. 
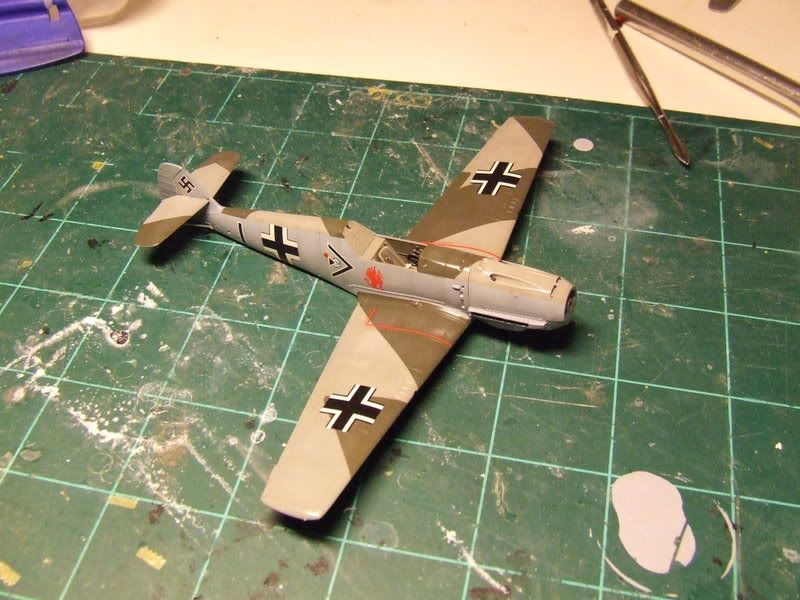
I'll give it a coat of Future tomorrow, then a panel wash, before it receives a matt coat on Sunday, and some weathering.

Still waiting on the new vac form canopy to turn up, hence the lack of a lid.

Karl 


Currently on the bench: AZ Models 1/72 Mig 17PF

  • Member since
    December 2002
  • From: Reno, NV
Posted by espins1 on Friday, October 27, 2006 11:04 AM
I'm happy with the way the masking job worked out, but I'm not too fond of the colors.  I think the Tamiya ratios for the colors are off.  Oh well, some heavy weathering will help solve that a bit.  Wink [;)]

I won't know for sure about the canopy until everythings is finished.  I'll be taking the tape off the canopy as the last thing I do.  If it's toast, I'll need to see about getting a replacement, but I think it's on there solid enough for now that I'll be able to finish it for the purposes of this GB, know what I mean? 

Scott Espin - IPMS Reno High Rollers  Geeked My Reviews 

  • Member since
    February 2003
  • From: Montreal, Quebec, Canada
Posted by superbear on Friday, October 27, 2006 9:55 AM

Scott  Looks Great the camo came out very niceThumbs Up [tup]  Did the canopy survive?  or will you have to go an alternate.   Looking forward to seeing the finished build. 


Cheers

Bear

Marc
  • Member since
    December 2002
  • From: Reno, NV
Posted by espins1 on Thursday, October 26, 2006 10:31 PM
Here's a pic of the camo right after I took all the tape off.


And here is the underside right after I sprayed the future.


Both of these are not in the best lighting conditions and well, I'm just too lazy right now to correct that.  Shock [:O] Laugh [(-D]

I have tomorrow off, which should give me plenty of time to do the decals, assuming the Future is nice and cured by then. 

Scott Espin - IPMS Reno High Rollers  Geeked My Reviews 

  • Member since
    December 2002
  • From: Reno, NV
Posted by espins1 on Thursday, October 26, 2006 10:30 PM
Here's a pic of the camo right after I took all the tape off.


And here is the underside right after I sprayed the future.


Both of these are not in the best lighting conditions and well, I'm just too lazy right now to correct that.  Shock [:O] Laugh [(-D]

I have tomorrow off, which should give me plenty of time to do the decals, assuming the Future is nice and cured by then. 

Scott Espin - IPMS Reno High Rollers  Geeked My Reviews 

  • Member since
    December 2002
  • From: Reno, NV
Posted by espins1 on Thursday, October 26, 2006 3:23 PM
 superbear wrote:

Sounds good Scott how about some picsBig Smile [:D]  I hope the canopy works out.


Cheers

Bear

You bet!  I'll be taking the tape off when I get home from work and will snap a couple photos before I apply the Future.  Smile [:)]

Scott Espin - IPMS Reno High Rollers  Geeked My Reviews 

  • Member since
    February 2003
  • From: Montreal, Quebec, Canada
Posted by superbear on Thursday, October 26, 2006 2:48 PM

Sounds good Scott how about some picsBig Smile [:D]  I hope the canopy works out.


Cheers

Bear

Marc
  • Member since
    December 2002
  • From: Reno, NV
Posted by espins1 on Thursday, October 26, 2006 12:09 PM

I might be in luck with my canopy as it's a totaly straight "snap" and I think if I can carefully get the tape off and it stays intact on the plane a little future might help hide the crack.  I won't know though until after I remove the canopy mask.

I sprayed the green on the Spitfire last night, turned out great!  After getting a nice thin coat of green on it I lightened the paint just a hair and sprayed a little randomness to very subtly give variations in the color.  I'm going to spray a coat of Future on it tonight, decals go on tomorrow.  Big Smile [:D]

Scott Espin - IPMS Reno High Rollers  Geeked My Reviews 

  • Member since
    September 2004
  • From: Vernon, BC, Canada
Posted by razordws on Thursday, October 26, 2006 9:12 AM
Hi guys,  I was working on my Fiat Br 20 last night preping some of the parts to get it ready for painting and I had to paint some parts with the MM enamel Italian Sand.  The color was a very pinkish biege and not at all what I expected.  Has anyone else used this color and have any comments?   I thought it would be a lot more yellow.

Dave

  • Member since
    February 2003
  • From: A Spartan in the Wolverine State
Posted by rjkplasticmod on Wednesday, October 25, 2006 7:30 PM

Sorry to hear of your woes Scott.  Future wont do much to repair a cracked canopy.  Best to replace it.

Regards,  Rick

RICK At My Age, I've Seen It All, Done It All, But I Don't Remember It All...
  • Member since
    December 2002
  • From: Reno, NV
Posted by espins1 on Wednesday, October 25, 2006 11:01 AM

Have I mentioned how much I hate masking lately?  Shock [:O] Dead [xx(]Laugh [(-D] 

I got the Spitfire all masked, including the canopy, so I could spray the green camo pattern last night.  Man, talk about tedious.  I also accidentally cracked the rear piece of the canopy.  Oh well, it's all glued on and hopefully won't get damaged further when I remove the tape.  Would a bit of future in the crack help at all?

Anyway, I was all ready for the reward of being able to spray the finaly camo color only to find out that I'm missing one of the colors I need to mix together to make the green!  I have XF62 in my stash, but not XF58.  Oh well, I'll make a run to the hobby store at lunch and spray the green tonight.

Scott Espin - IPMS Reno High Rollers  Geeked My Reviews 

  • Member since
    April 2005
  • From: Piscataway, NJ!
Posted by wing_nut on Tuesday, October 24, 2006 7:33 PM

My my my Karl has been a busy little beaver.Wink [;)]


All look good Karl. Stop typing and start gluing.

Marc  

  • Member since
    February 2003
  • From: A Spartan in the Wolverine State
Posted by rjkplasticmod on Tuesday, October 24, 2006 6:33 PM

Good progress Karl.  Looking forward to the finished build.

Regards,  Rick

RICK At My Age, I've Seen It All, Done It All, But I Don't Remember It All...
  • Member since
    November 2003
  • From: Nashville, TN area
Posted by bobbaily on Tuesday, October 24, 2006 6:21 PM
Karl-very nice work on all counts.

Bob


  • Member since
    February 2003
  • From: Montreal, Quebec, Canada
Posted by superbear on Tuesday, October 24, 2006 11:57 AM

Karl  Very nice work on both buildsThumbs Up [tup]  I realy like the work you've done on the Do.  Is your He-111 the Hasa P version?  if so how's the fit of the various assembly's, fuselage ,wings, engine.  I'm curious as I have the 111-P and I'm considering tackeling it next year after I've finished with my lancaster if it's not overly demanding.  Your thoughts would be appreciated.


Cheers

Bear 

Marc
  • Member since
    December 2002
  • From: Reno, NV
Posted by espins1 on Tuesday, October 24, 2006 11:45 AM

Looking good Karl!  Man, you have a lot of projects going on!  They all look great!  Nice work!

No progress on the Spitfire yesterday, had a very long day and when I finally got home there were "honey do's" I had to take care of and by the time I finished them I was ready for a couple glasses of wine and watched a movie "The Breakup".  Jennifer Anniston can keep me away from the modelling bench anytime.  Shock [:O] Wink [;)] Laugh [(-D]

Scott Espin - IPMS Reno High Rollers  Geeked My Reviews 

  • Member since
    July 2003
  • From: Bicester, England
Posted by KJ200 on Tuesday, October 24, 2006 11:39 AM
Rick, Dave, thanks for the encouragement.

Bit more progress today.....


...retouched yesterday's mistakes, and then re-Futured. The top and bottom engine cowls are now glued in place, as is the airscoop. All glued in with PVA wood glue, I always make a mess with CA, and I didn't want to screw up the paintwork.


The underside sans masking. Still need to touch in the rear stab supports and Future,

Tomorrow should see the decals on, followed by more Future and then a panel wash and matt coat over the weekend.

Also undergoing work...


This is definitely going to be a 2 foot build, that being the distance at which it stops looking too great!

Really did bite off more than I could chew with that one.

Karl

Currently on the bench: AZ Models 1/72 Mig 17PF

  • Member since
    September 2004
  • From: Vernon, BC, Canada
Posted by razordws on Monday, October 23, 2006 11:55 PM
Looking really good Karl, on both counts!  Can't wait to see the finished product(s).

Dave

  • Member since
    February 2003
  • From: A Spartan in the Wolverine State
Posted by rjkplasticmod on Monday, October 23, 2006 7:11 PM

looking good Karl.

Regards,  Rick

RICK At My Age, I've Seen It All, Done It All, But I Don't Remember It All...
  • Member since
    July 2003
  • From: Bicester, England
Posted by KJ200 on Monday, October 23, 2006 3:02 PM
Rick, I do early war Luftwaffe A/C so infrequently I can never remember the correct colours! Thanks for the confirmation. This one is definitely 02 and not 70.

Having said that, the griffon on the side of the cockpit is offered as either red or black, so I'm assuming there's a little confusion over that aspect of Galland's machine.

Bear, Bob, glad you like. This kit does all the work for you, despite my best efforts to ruin it.Blush [:I]

Progress Update


Applied the RLM70 this afternoon....


...managed to mask the triangle on the starboard wing short, but I'll touch that in tomorrow, then it's on to decals.

Also back on the bench....


.....but this won't be done for the end of the month.

I'm also trying to complete the Dornier for the end of the month.

Karl

Currently on the bench: AZ Models 1/72 Mig 17PF

  • Member since
    February 2003
  • From: Montreal, Quebec, Canada
Posted by superbear on Monday, October 23, 2006 7:01 AM

Scott & Karl  your builds are comming along nicely, great workThumbs Up [tup]


Cheers

Bear

Marc
  • Member since
    February 2003
  • From: A Spartan in the Wolverine State
Posted by rjkplasticmod on Sunday, October 22, 2006 8:07 PM

Nice work Karl.  Most BoB Emils were RLM 71/02/65, but a few were still in RLM 70/71/65.  Best to check references.

Regards,  Rick

RICK At My Age, I've Seen It All, Done It All, But I Don't Remember It All...
  • Member since
    November 2003
  • From: Nashville, TN area
Posted by bobbaily on Sunday, October 22, 2006 2:18 PM
Scott & Karl-both planes are looking good.

Bob


  • Member since
    July 2003
  • From: Bicester, England
Posted by KJ200 on Sunday, October 22, 2006 2:08 PM
Dave, thanks.

I did a trawl through the various AM decal sheets for 109s on Hannant's site after I posted, and all bar one were 65/02/71.

Karl


Currently on the bench: AZ Models 1/72 Mig 17PF

  • Member since
    September 2004
  • From: Vernon, BC, Canada
Posted by razordws on Sunday, October 22, 2006 1:59 PM
Thanks for the pics Karl, looks great!  Thumbs Up [tup]  I believe it is RLM 71/02 for the upper camo.

Dave

JOIN OUR COMMUNITY!

Our community is FREE to join. To participate you must either login or register for an account.

SEARCH FORUMS
FREE NEWSLETTER
By signing up you may also receive reader surveys and occasional special offers. We do not sell, rent or trade our email lists. View our Privacy Policy.