SEARCH FINESCALE.COM

Enter keywords or a search phrase below:

Spanish Civil War GB.

34010 views
434 replies
1 rating 2 rating 3 rating 4 rating 5 rating
  • Member since
    December 2002
  • From: Reno, NV
Posted by espins1 on Saturday, April 21, 2007 2:48 PM

I drilled out the place on the front of the rudder assembly which controls the pitch of the tail planes, then attached the tail planes and strut supports.  Was easier than I expected but still required some patience and care. 

At last!  The primer is going on today!  Big Smile [:D]


Scott Espin - IPMS Reno High Rollers  Geeked My Reviews 

  • Member since
    December 2002
  • From: Reno, NV
Posted by espins1 on Saturday, April 21, 2007 7:48 PM

Big update - Canopy has been masked and attached, wheels wells masked and the underside has been primered!  Just waiting a bit then I'm going to flip it over and prime the topside.

I'm guessing there will probably be one or two seam issues, which will be readily apparent once this stuff has dried. 

Scott Espin - IPMS Reno High Rollers  Geeked My Reviews 

  • Member since
    December 2002
  • From: Reno, NV
Posted by espins1 on Sunday, April 22, 2007 2:11 AM

And here is a shot of the topside after being primered.  That cowling was a bit of a pain, but man, all that work was worth it, it's gorgeous!  Cool [8D] Bow [bow]

Scott Espin - IPMS Reno High Rollers  Geeked My Reviews 

  • Member since
    February 2003
  • From: A Spartan in the Wolverine State
Posted by rjkplasticmod on Sunday, April 22, 2007 9:10 AM

Looks great Scott.  Well worth the effort.

Regards,  Rick

RICK At My Age, I've Seen It All, Done It All, But I Don't Remember It All...
  • Member since
    December 2002
  • From: Reno, NV
Posted by espins1 on Sunday, April 22, 2007 12:57 PM
 rjkplasticmod wrote:

Looks great Scott.  Well worth the effort.

Regards,  Rick

Thanks Rick.  There are a few things I would have done differently, and a few glitches I wish I could have prevented, but at least I know where the trouble spots are.  My next 3 Classic Airframes 109s will be up to the standard I would like them to be, having learned so much from this one.  Smile [:)] 

Scott Espin - IPMS Reno High Rollers  Geeked My Reviews 

  • Member since
    December 2002
  • From: Reno, NV
Posted by espins1 on Sunday, April 22, 2007 5:53 PM

well, sure enough I found a few little spots that needed some more seam work.  The underside of the cowling and the front of the wing where I had to drill out the holes for the MGs.  I'm just about finished that those minor repairs. 

I'm anxious to get the pre-shade on so I can paint the underside in the morning, but oddly enough the primer is still a tiny bit tacky on the leading edge slats. Shock [:O] At first I thought it might have something to do with the resin, but theoretically I should have had the same problem with the cowling bits.  Strange.  Never had that problem with Tamiya primber before.  Guess I'll need to wait until at least tomorrow before I begin painting.

Scott Espin - IPMS Reno High Rollers  Geeked My Reviews 

  • Member since
    December 2002
  • From: Reno, NV
Posted by espins1 on Sunday, April 22, 2007 8:00 PM

Pre-shade is done, I'll spray the underside in the morning.  Smile [:)]

Scott Espin - IPMS Reno High Rollers  Geeked My Reviews 

  • Member since
    December 2002
  • From: Reno, NV
Posted by espins1 on Monday, April 23, 2007 1:29 PM

I decided to spray the white wingtips and rudder now, and will then mask them off for the duration of the spraying. 

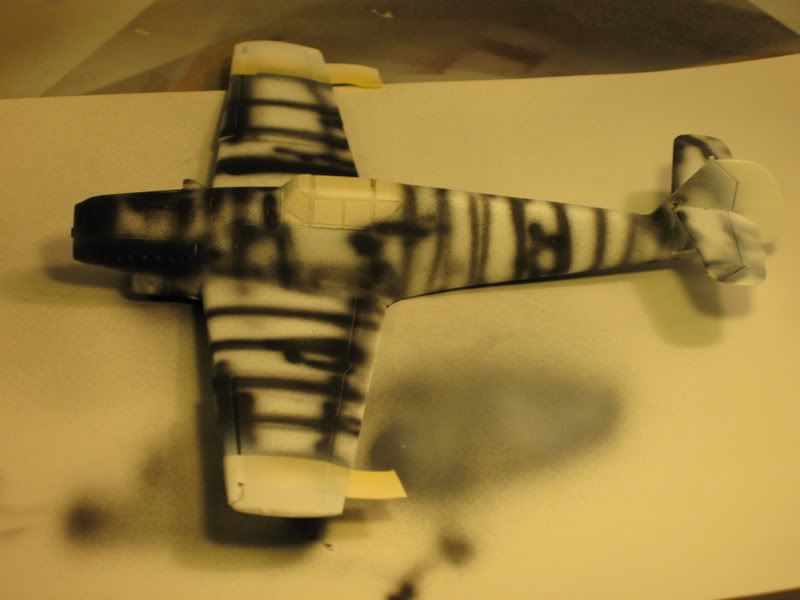
Apparently I have some artistic license with my paint scheme.  Gotta love inconsistant and incorrect reference materials,  :roll: 

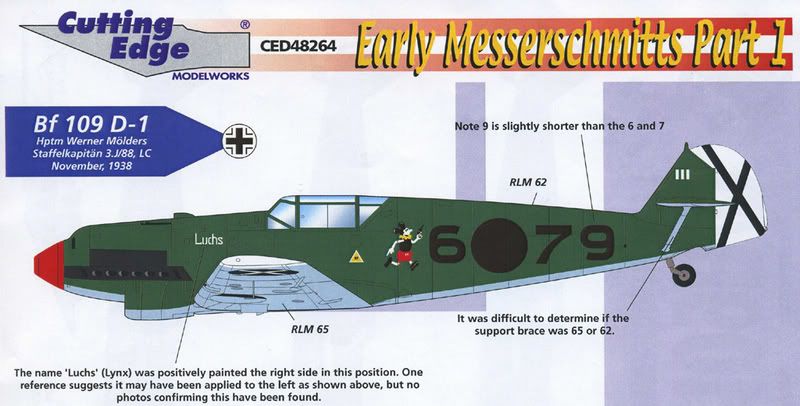
Based on all the information I can gather, the Cutting Edge profile seems to be the winning ticket.  The Mickey Mouse character has red pants, I believe, by closely studying photos of the logo on Molders Plane (others used variations of the same logo, some with black pants, others with slightly different poses etc.).  I'm still trying to decide about the nose spinner.  Some sources say red, some say white.  I'm leaning towards the red as it would look more interesting, but I know many Condor Legion 109s had white spinners.  But some also had gray, red, yellow and even black.

Here is the painting and marking chart from the Cutting Edge decal set I'm using:

Here is a profile from "Messerschmitt Me 109 Volume 1 From 1936 to 1942" by Anis Elbied and Andre Jouineau published by Histoire and Collections:

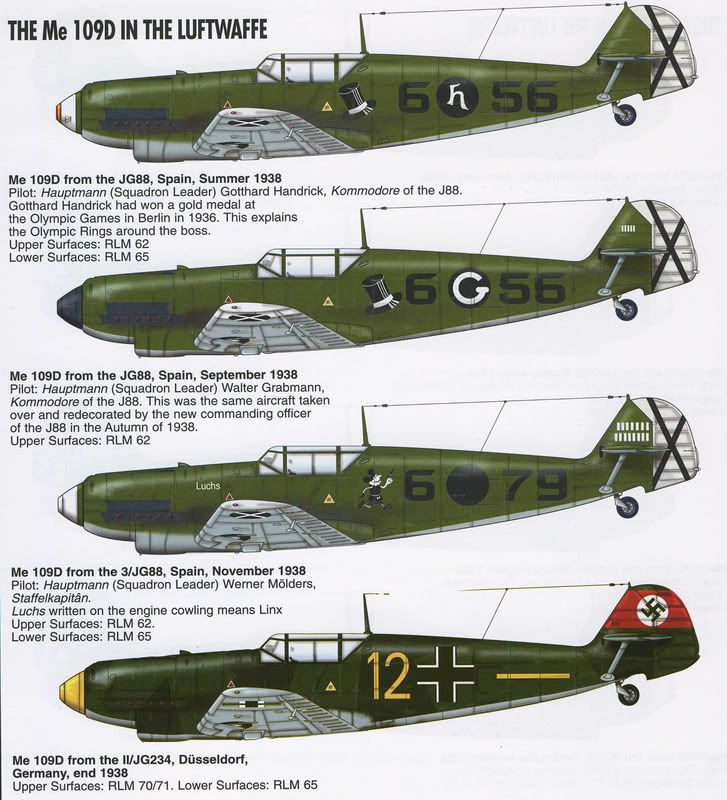
And here is a profile and some photoes from the Luftwaffe Colours Jagdwaffe Volume One Section 2 "The Spanish Civil War" by Eric Mombeek with J. Richard Smith and Eddie J. Creek:

Scott Espin - IPMS Reno High Rollers  Geeked My Reviews 

  • Member since
    December 2002
  • From: Reno, NV
Posted by espins1 on Monday, April 23, 2007 9:01 PM

Here are two shots right after I sprayed the underside RLM65 Hellblau  Smile [:)]


Scott Espin - IPMS Reno High Rollers  Geeked My Reviews 

  • Member since
    December 2002
  • From: Reno, NV
Posted by espins1 on Tuesday, April 24, 2007 9:05 PM

Here are two shots just after I sprayed the RLM62 on the topside.  I masked the tailplane struts and the underside of the tailplanes but decided to freehand the soft edge between the RLM65 and RLM62 along the fuselage and lower cowling.  Turned out pretty good. Smile [:)]

I may have to do just a tiny bit of touch up with the RLM65, and maybe none at all.  You can just barely make out the pre-shade, which is exactly what I was going for.  I believe in "subtle" when it comes to weathering techniques.

Scott Espin - IPMS Reno High Rollers  Geeked My Reviews 

  • Member since
    December 2002
  • From: Reno, NV
Posted by espins1 on Wednesday, April 25, 2007 10:50 AM

I need to set up some better lighting for my digital photography work.  Those last pics just don't do justice to the sublteties in the paint finish.  I'm going to set up a photo booth or something after I get back from Vegas next week.

Anyway, I sprayed the spinner red last night.  Some of my sources indicted Molders spinner was white, and some red.  I opted for the red as it will accent the red shorts on the "Mickey Mouse" logo that goes on the fuselage side.  I also did a bit of touch up spraying of the RLM65 this morning to clean up the soft edges along the lower cowling. 

I'm going to spray the entire plane in Future tonight so I can get the decals on tomorrow.  I want to have this model finished before I head to Vegas on Monday next week.  Whistling [:-^]

Scott Espin - IPMS Reno High Rollers  Geeked My Reviews 

  • Member since
    September 2004
  • From: Vernon, BC, Canada
Posted by razordws on Wednesday, April 25, 2007 11:16 AM
I'm enjoying the progress updates Scott, keep them coming! Thumbs Up [tup]

Dave

  • Member since
    December 2002
  • From: Reno, NV
Posted by espins1 on Wednesday, April 25, 2007 4:15 PM

Shock [:O] Doh!  Just realized I haven't sprayed the exhaust panel, and the rectangular panel above them.  I'll spray them Tamiya Flat Black thinned with isopropyl alcohol for quick drying as soon as I get home. 

If I spray them at 5:30ish, does anyone think it would be safe to spray the overall Future coat around 10pm?  Confused [%-)]


Scott Espin - IPMS Reno High Rollers  Geeked My Reviews 

  • Member since
    February 2003
  • From: A Spartan in the Wolverine State
Posted by rjkplasticmod on Wednesday, April 25, 2007 6:28 PM

You're probably safe, since you're spraying acrylic over acrylic, but I always wait 24 hours anyway.  Better safe than sorry.

Regards,  Rick

RICK At My Age, I've Seen It All, Done It All, But I Don't Remember It All...
  • Member since
    December 2002
  • From: Reno, NV
Posted by espins1 on Thursday, April 26, 2007 8:38 AM

Here is a shot of the exhaust panel area.  I have a bit more touch up to do with the green tonight.  Also, the slats have issues with the paint.  Remember how I told you guys the other day that the primer just wasn't curing on the slats?  Well, the green paint is doing the same thing.... the paint is still barely tacky on those slats, which I discovered while handling the model as I was masking the exhaust areas.  Very odd.  Shock [:O]  So I lightly sanded them last night and will respray a light coat of the green tonight.  I'm not sure why I'm having that issue only on the slats, and not on any of the other resin pieces.  And there are a few spots where the green needs a little touch up. 

Scott Espin - IPMS Reno High Rollers  Geeked My Reviews 

  • Member since
    February 2003
  • From: A Spartan in the Wolverine State
Posted by rjkplasticmod on Thursday, April 26, 2007 9:07 AM

All resin needs to be thoroughly cleaned to remove mold release residue before painting.  Are you sure you cleaned the slats ?

Regards,  Rick

RICK At My Age, I've Seen It All, Done It All, But I Don't Remember It All...
  • Member since
    December 2002
  • From: Reno, NV
Posted by espins1 on Thursday, April 26, 2007 10:31 AM
 rjkplasticmod wrote:

All resin needs to be thoroughly cleaned to remove mold release residue before painting.  Are you sure you cleaned the slats ?

Regards,  Rick

Well that's just it.  I cleaned them at the same time I cleaned all the rest of the resin parts.  Also, the casting block ran the length of the slat and was located on the front/top face of the slats, so that whole area has been thoroughly sanded.  I'm at a loss.  All the rest of the resin parts have no issue.  Oh well, nothing that a little sanding and touch up can't fix.  The only bad thing is now I won't have it finished by Sunday.  I should be able to get the decals on and another gloss coat before Monday and possibly the oil wash.  I'll just have to wait to seal it all up when I get back on Thursday.  Sigh [sigh]

I want to get this thing off my bench so I'll finally be ahead of the game with all my GBs. 

Scott Espin - IPMS Reno High Rollers  Geeked My Reviews 

  • Member since
    December 2002
  • From: Reno, NV
Posted by espins1 on Thursday, April 26, 2007 8:42 PM
Well, I resprayed the slats and a few spots on the fuselage that had a bit of overspray on them.  I'm going to let the slats cure for a day or two before I even THINK about touching the 109..... Black Eye [B)]

Scott Espin - IPMS Reno High Rollers  Geeked My Reviews 

  • Member since
    February 2003
  • From: A Spartan in the Wolverine State
Posted by rjkplasticmod on Thursday, April 26, 2007 8:43 PM

Good plan Scott Smile [:)].

Regards,  Rick

RICK At My Age, I've Seen It All, Done It All, But I Don't Remember It All...
  • Member since
    December 2002
  • From: Reno, NV
Posted by espins1 on Thursday, April 26, 2007 8:47 PM

I'm still at a loss as to what the issue was on the slats.  The only other thing I can think of is maybe I somehow contaminated the surface of the slats, but I would also have expected to have had that issue in the area all around them.  Stay tuned for more Unsolved Mysteries..... Wink [;)]

It's probably just as well that this happened, made me slow down as I think I was rushing things a bit since I was on such a roll. 

Scott Espin - IPMS Reno High Rollers  Geeked My Reviews 

  • Member since
    July 2003
  • From: Bicester, England
Posted by KJ200 on Saturday, April 28, 2007 6:55 AM

Scott, great progress on the Dora.

I'm really looking forward to the rest of your family of Ds.

Keep those progress picscoming. 

Nothing doing from me on the Chaika, need to finish a Tamiya 262 and a couple of targets first.

Karl 

Currently on the bench: AZ Models 1/72 Mig 17PF

  • Member since
    December 2002
  • From: Reno, NV
Posted by espins1 on Sunday, April 29, 2007 11:30 AM

I've finished all the touch up work on the Dora, but am still a bit perplexed with the slats.  It's been 3 days and the texture and feel of the paint on them is totally different than what it feels like on the rest of the plane.  I'm just going to have to be really careful not to touch them to prevent marring of the finish.  Confused [%-)]

I'm going to spray the gloss Future coat on the underside now, and on the topside this evening.  That will give it plenty of time to cure while I'm in Vegas.  I should be putting the decals on either Thursday or Friday night. 

On another note, here is a pic of the nose piece of my Classic Airframes CR.32.  If you all remember, the first one had several of the cooling vanes malformed or damaged so Classic Airframes was kind enough to send me a replacement.  As you can see from the photo, the lower lip of the replacement resin cowling around the radiator isn't fully formed.  I think I can build the lip up a bit with some super glue, but I'm really nervous with the prospects of sanding and shaping it without causing more damage.


Scott Espin - IPMS Reno High Rollers  Geeked My Reviews 

  • Member since
    December 2002
  • From: Reno, NV
Posted by espins1 on Sunday, April 29, 2007 12:35 PM

Here are a couple of shots of the Bf109D just before spraying the Future gloss coat.  I must admit I'm less than thrilled about the fit of the canopy parts.... 

Scott Espin - IPMS Reno High Rollers  Geeked My Reviews 

  • Member since
    December 2002
  • From: Reno, NV
Posted by espins1 on Monday, April 30, 2007 8:43 AM

And here we are ready for decals.  I'll get the decals on when I get back from Vegas, which will give plenty of time for the Future to cure.  Can't wait to get this one in the display case!  Smile [:)]

Thanks for your patience, and sorry for being so late on this one... seems to be the story of my life.  Sigh [sigh]

Scott Espin - IPMS Reno High Rollers  Geeked My Reviews 

  • Member since
    February 2003
  • From: A Spartan in the Wolverine State
Posted by rjkplasticmod on Monday, April 30, 2007 6:35 PM

Looks good Scott.  Have fun in Sin City.

Regards,  Rick

RICK At My Age, I've Seen It All, Done It All, But I Don't Remember It All...
  • Member since
    December 2002
  • From: Reno, NV
Posted by espins1 on Monday, April 30, 2007 7:19 PM
 rjkplasticmod wrote:

Looks good Scott.  Have fun in Sin City.

Regards,  Rick

Thanks Rick.  Had an interesting flight down here.  About 5 minutes after take off the pilot announced on the intercom that we were turning around and heading back to Reno as the seal on one of the equipment access panels wasn't sealing, therefore they couldn't maintain cabin pressure.  Shock [:O]  A change of planes and 3 hours later, hear I am. 

Well, off to Hobby Town on W. Sahara to see if I can find any hidden gems.  After that a workout at 24 hour fitness, then back to the hotel room to pour over the Me 262 references I brought with me.  Ya, I know, I am what I am.....

If it's any consolation, I tease my wife and tell her I'm going to go out "clubbin"  Wink [;)]

Scott Espin - IPMS Reno High Rollers  Geeked My Reviews 

  • Member since
    December 2002
  • From: Reno, NV
Posted by espins1 on Thursday, May 3, 2007 10:57 AM

Yay!  I'm going home today!  I'm going home today!  I can't wait to get back to my awesome wife Kisses [:X] (and my workbench Wink [;)]

I will be finishing up my submission for this build over the next few days, can't wait to get it on the shelf!  Cool [8D]

Scott Espin - IPMS Reno High Rollers  Geeked My Reviews 

  • Member since
    February 2003
  • From: A Spartan in the Wolverine State
Posted by rjkplasticmod on Thursday, May 3, 2007 2:31 PM

Looking forward to the finished bird Scott.

Regards,  Rick

RICK At My Age, I've Seen It All, Done It All, But I Don't Remember It All...
  • Member since
    December 2002
  • From: Reno, NV
Posted by espins1 on Thursday, May 3, 2007 3:31 PM

I have to admit though that I'm a bit unhappy with the monotony of the green on the upper surfaces.  The preshade/postshade looked ok after the initial spray, but the subsequent touch up coats just overpowered the pre-shade so it's almost not even noticable now.  I'll have to rethink my approach next time and maybe do the post shade after all the initial touch up work is completed. 

I'm also less than thrilled with the fit of the canopy parts, I'll have to rethink how I do that next time so I can hopefully get a better fit.  I'll do all my dry fitting and sanding work for the canopy parts before I even think about laying down the paint.  If I had been a bit more patient and thought it through better I could have alleviated some of the things that are bugging me now.  Oh well, that's how we learn, this was my first tricky/multi-media build and was a tremendous learning/skill building experience.  Smile [:)]

Scott Espin - IPMS Reno High Rollers  Geeked My Reviews 

  • Member since
    December 2002
  • From: Reno, NV
Posted by espins1 on Saturday, May 5, 2007 1:58 PM

If you were my Cutting Edge decal sheet with Werner Molders markings, where would you be? 

I've got to stop carrying reference books, decal sets and kit instructions around like a little kid with a blanky.... lol  Whistling [:-^]  I know they're around here somewhere.....

Scott Espin - IPMS Reno High Rollers  Geeked My Reviews 

JOIN OUR COMMUNITY!

Our community is FREE to join. To participate you must either login or register for an account.

SEARCH FORUMS
FREE NEWSLETTER
By signing up you may also receive reader surveys and occasional special offers. We do not sell, rent or trade our email lists. View our Privacy Policy.