SEARCH FINESCALE.COM

Enter keywords or a search phrase below:

Knights of the Sky WWI GB The End

111747 views
1882 replies
1 rating 2 rating 3 rating 4 rating 5 rating
  • Member since
    February 2007
  • From: Lubbock, TX
Posted by MrDrummy on Thursday, November 1, 2007 10:06 AM

I'll second Stephen's stuff as being first-rate.  There was a wealth of knowledge included in my download.

Here's where I'm at as of this morning:


Tail painted (sans black stripe on the border of white/blue,) pilot holes drilled for rigging, and started dry fitting the wings.  Now I just need to make them fit right!Banged Head [banghead]

Frank-- I've fallen in love with these Eduard kits!! 

-Justin
On the Bench: 1:48 Dragon Dr. 1 1:48 Trumpeter MiG-15 Fagot B Photo Sharing and Video Hosting at Photobucket
  • Member since
    September 2003
  • From: South Central Wisconsin
Posted by Daywalker on Thursday, November 1, 2007 6:26 AM
Thanks Mike, it does look like a gem of a kit.  And, it's the first time I ordered an Eduard kit that actually came with the entire kit in the box! Propeller [8-]

Frank 


  • Member since
    December 2003
  • From: Los Angeles
Posted by dostacos on Thursday, November 1, 2007 1:03 AM

Stephen, I just read the download on your Newport build, and there are great ideas that will add to my build timeThumbs Up [tup] and since the weekend kit is cheaper, I plan on doing all four at some point in time { I guess 5 if you count Rawlings with the new markings... eek, I forgot to check and see if his final flight had a lewis on the wing} using the decals from the flyboys kit.

 I have a couple of questions regarding the article that I will PM you with.

and for others here, it was worth it for me, and I plan on getting some more real soon


Dan 

Dan support your 2nd amendment rights to keep and arm bears!
  • Member since
    February 2006
  • From: Smithers, BC, Canada
Posted by ruddratt on Wednesday, October 31, 2007 7:27 PM
Great choice, buddy! Eduard's kits are awesome, and the Nieuports had nowhere near the amount of rigging of say a SPAD or a Camel. I built their Nieuport 17 and it was a joy to put together. Go get 'em! Thumbs Up [tup]

Mike

 "We have our own ammunition. It's filled with paint. When we fire it, it makes pretty pictures....scares the hell outta people."


  • Member since
    September 2003
  • From: South Central Wisconsin
Posted by Daywalker on Wednesday, October 31, 2007 6:32 PM
OK, I got my Internet back up and running, so should be able to post some pics real soon.  Right now, my girlfriend has the camera at work to take pictures of everyone in their Halloween costumes.  And, I got a new model for this build today in the mail!  It's the Eduard 1/48 Nieuport 11.  One I have wanted to build for a long time!  Looking at that beautiful lil' kit, it's hard to believe it's 1/48 and not 1/72!

Frank 


  • Member since
    September 2003
  • From: South Central Wisconsin
Posted by Daywalker on Wednesday, October 31, 2007 6:02 AM
Beautiful work Doug!  Man, there's some serious talent 'round here! Thumbs Up [tup]

Frank 


  • Member since
    June 2007
  • From: Kansas City MO
Posted by Dougums on Wednesday, October 31, 2007 1:11 AM

Thanks for the praise! :)

MrDrummy- Yup pretty much... it worked great.


  • Member since
    February 2007
  • From: Lubbock, TX
Posted by MrDrummy on Tuesday, October 30, 2007 9:36 PM

Dougums--

That looks awesome, man!!  Great job.

Did you pretty much follow his methods to a T?

-Justin
On the Bench: 1:48 Dragon Dr. 1 1:48 Trumpeter MiG-15 Fagot B Photo Sharing and Video Hosting at Photobucket
  • Member since
    February 2007
  • From: Casa Grande, Az.
Posted by DesertRat on Tuesday, October 30, 2007 9:15 PM
 Dougums wrote:

Well I painted my prop ....   

 I wasn't really sure about the color until I read about the use of clear orange.  Thanks for the tip Marc!!  It made it all come together. Now I need to hunt down Carmine Red.  Any suggestions??


Doug 

That's an incredible looking prop! I swear it looks more like you went out and carved one outta wood with stain, lacquer and the whole bit! Hell, it looks nicer than alot of my better wooden furniture does.Cool [8D]

Warmest regards,

Roger

  • Member since
    June 2007
  • From: Kansas City MO
Posted by Dougums on Tuesday, October 30, 2007 8:30 PM

Well I painted my prop ....   

 I wasn't really sure about the color until I read about the use of clear orange.  Thanks for the tip Marc!!  It made it all come together. Now I need to hunt down Carmine Red.  Any suggestions??


Doug 

  • Member since
    December 2002
  • From: A secret workshop somewhere in England
Posted by TANGO 1 on Tuesday, October 30, 2007 2:33 PM

 StephenLawson wrote:
Greetings Tango1 which kit are you working with?

Hi Stephen,

its the Academy 1/32 Neiuport 17. My knowledge of WWI aircraft is limited and I am not getting on well with it at the minute. I hope to do better once I reslove some of the fit issues.

Regards, Darren. C.A.G. FAA/USNFAW GB
  • Member since
    September 2003
  • From: South Central Wisconsin
Posted by Daywalker on Tuesday, October 30, 2007 8:14 AM

Thanks Stephen- much appreciated!

Darren- Sorry to hear of your troubles with that one, mate!  With the skills you possess, I KNOW it will turn beautifully!

Justin- Milliput would work well there.  You can mix some up, smear it in the bad spots, then use a little water to smooth it out.  You probably wouldn't even have to do any sanding!

It may be a few days before I can post any pics.  My Internet at home is down (gotta love the lil' local phone company!) so I can only check in here while at work.  Just don't tell the boss! Taped Shut [XX]

Frank 


  • Member since
    October 2004
  • From: Colorado
Posted by StephenLawson on Tuesday, October 30, 2007 2:47 AM

 MrDrummy wrote:
". . . I had a couple of spots I knew were going to be problems, such as this gap where the vertical stabilizer meets the fuselage. It sure was an icky fit, just not wanting to sit down in place no matter what I did!  I merely made the best fit I could, and secured it in place, and this is what I have left. . .Stephen-- do you think the color looks fairly accurate?  Also did you use the decal for the sash around the fuselage, or did you paint yours on?  I'm debating on what to do!"

This is the kind of thing I talk about in my how to articles.  But I'll go this far and say the fin was built intergerally with the fuselage on the Albatros D. type fighters.  After I close up the fuselage I begin my Albie builds with applying a bead of gel super glue to each side of the unpainted fuselage at the joint of the Eduard fin. I then use a finger tightly wrapped paper towel to wipe it down to the closest contour. Minor sanding follows.  Simply fold sanding film or paper several times into a narrow edge and pinch it between your index finger and thumb to sand it down.  Not much will be needed. 

On the colour: my monitor may show a different colour than yours.  And truthfully this kind of colour match leaves a lot of room for interpretation.  Since there is no colour chip for the aircraft in question - its up to you and your research. 


Stachel...unconfirmed by Armee means unconfirmed!!!!

  • Member since
    December 2002
  • From: Northern California
Posted by jeaton01 on Monday, October 29, 2007 10:56 PM

I make my own sanding sticks for odd corners like that by CA'ing 400 wet or dry sandpaper to the right shape of brass tubing or square stock, whatever I have nearby that is the right shape.

Looks like it's pretty well put together to me.  But, I wonder how well faired in the real fin was to the monocoque fuselage?


John

To see build logs for my models:  http://goldeneramodel.com/mymodels/mymodels.html


  • Member since
    February 2007
  • From: Lubbock, TX
Posted by MrDrummy on Monday, October 29, 2007 10:38 PM

Ok-- first coat of paint (read:coat that shows you all your mistakes) on tonight. Mostly, though, it looks ok. A big blob of color in photos, really.  Tail will be white eventually.
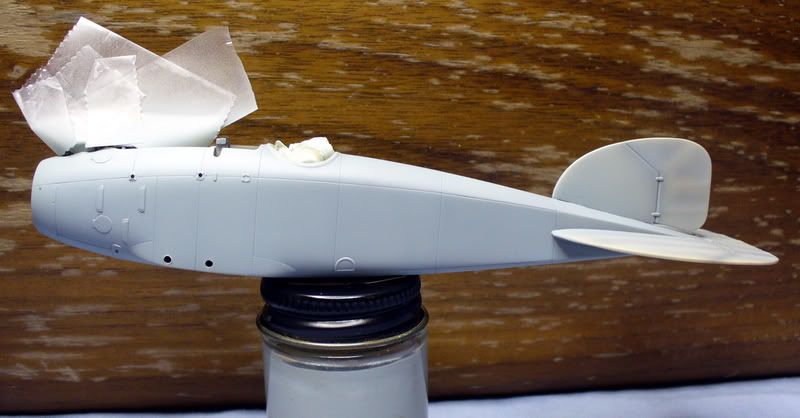
 

I had a couple of spots I knew were going to be problems, such as this gap where the vertical stabilizer meets the fuselage. It sure was an icky fit, just not wanting to sit down in place no matter what I did!  I merely made the best fit I could, and secured it in place, and this is what I have left.
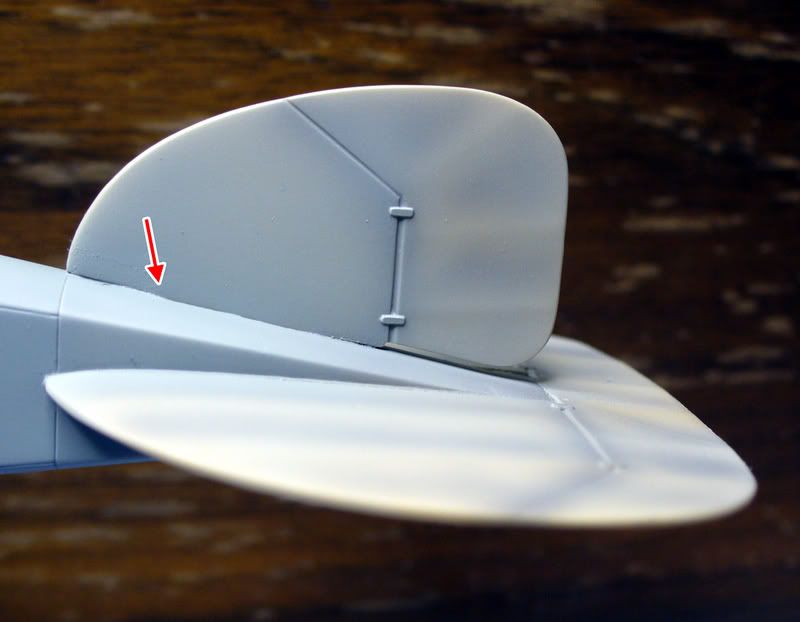
 

What have you guys found the best way of eliminating a gap of this type?  I don't have anything thin enough to sand down in the crack, but I'm sure that a shot of some really think CA glue would polish this thing off pretty easily.  Any tips appreciated!!  

Stephen-- do you think the color looks fairly accurate?  Also did you use the decal for the sash around the fuselage, or did you paint yours on?  I'm debating on what to do!

-Justin
On the Bench: 1:48 Dragon Dr. 1 1:48 Trumpeter MiG-15 Fagot B Photo Sharing and Video Hosting at Photobucket
  • Member since
    October 2004
  • From: Colorado
Posted by StephenLawson on Monday, October 29, 2007 8:45 PM
Greetings Tango1 which kit are you working with?


Stachel...unconfirmed by Armee means unconfirmed!!!!

  • Member since
    October 2004
  • From: Colorado
Posted by StephenLawson on Monday, October 29, 2007 8:44 PM
Greetings Frank; Decals sent out today. No great shakes odds and ends. Crosses, series and etc. Keep them or pass on what you don't use.  No worries, Model On!


Stachel...unconfirmed by Armee means unconfirmed!!!!

  • Member since
    December 2002
  • From: A secret workshop somewhere in England
Posted by TANGO 1 on Monday, October 29, 2007 4:02 PM

Hello lads,

I have started work on my N.17 and I am not having a great time with this kit-the fit(or lack of it) is terrible! 

I have got the engine mounted and the lower wing has been glued into place. I have also added the tail elevators and rudder......when I figure out how to rig this thing I'll get some pics up!Confused [%-)]


Regards, Darren. C.A.G. FAA/USNFAW GB
  • Member since
    September 2003
  • From: South Central Wisconsin
Posted by Daywalker on Monday, October 29, 2007 12:50 PM
 wing_nut wrote:

Be afraid... be very afraid....


The light at the end of the tunnel has come into view on my P-47 build so it won’t be long before I will be pestering you WWI experts with seemingly moronic questions like… “That 2nd wing goes where? No really? Really?  WOW whodathunk!”


Marc-

Glad to hear you will be able to start soon, I cannot wait to see your work on a WWI subject!  Justin- Thanks!  I'll try to get them in the next couple of days.  Been very busy here and at work with Christmas coming! Propeller [8-]

Frank 


  • Member since
    April 2005
  • From: Piscataway, NJ!
Posted by wing_nut on Monday, October 29, 2007 10:57 AM

Be afraid... be very afraid....


The light at the end of the tunnel has come into view on my P-47 build so it won’t be long before I will be pestering you WWI experts with seemingly moronic questions like… “That 2nd wing goes where? No really? Really?  WOW whodathunk!”


Marc  

  • Member since
    February 2007
  • From: Lubbock, TX
Posted by MrDrummy on Monday, October 29, 2007 10:39 AM

Nice, Frank.  Looking forward to those pics!

I got nothing done, as I was out cruising around being a rockstar (or something...)  Should get a bit of paint on the fuselage this afternoon!

-Justin
On the Bench: 1:48 Dragon Dr. 1 1:48 Trumpeter MiG-15 Fagot B Photo Sharing and Video Hosting at Photobucket
  • Member since
    September 2003
  • From: South Central Wisconsin
Posted by Daywalker on Monday, October 29, 2007 9:45 AM
I got a little work done on the DVIII this weekend, and hope to post some pics soon. Thumbs Up [tup]

Frank 


  • Member since
    September 2003
  • From: South Central Wisconsin
Posted by Daywalker on Saturday, October 27, 2007 5:25 AM
Thanks a bunch Stephen!  I appreciate the help. Thumbs Up [tup]

Frank 


  • Member since
    October 2004
  • From: Colorado
Posted by StephenLawson on Friday, October 26, 2007 11:21 PM
Also on the early Fokker E.V the outer wheel covers were either done like the Fok. Dr.I types where the clear doped linen was mounted then the wheel spun and paint applied with a brush or later versions were lozenge.  Got your "addy" will root through my decal files tonight.


Stachel...unconfirmed by Armee means unconfirmed!!!!

  • Member since
    September 2003
  • From: South Central Wisconsin
Posted by Daywalker on Friday, October 26, 2007 3:19 PM
Stephen- PM received, another inbound! Thumbs Up [tup]

Frank 


  • Member since
    September 2003
  • From: South Central Wisconsin
Posted by Daywalker on Thursday, October 25, 2007 11:06 PM
Thanks Stephen.  PM inbound!

Frank 


  • Member since
    October 2004
  • From: Colorado
Posted by StephenLawson on Thursday, October 25, 2007 4:28 PM

 Daywalker wrote:
Thanks Stephen!  I am building the DML kit, and the decals were shot in it.  Luckily, Mike (Ruddratt) was able to help me out with the lozenge and the crosses so I was thinking about doing a factory fresh aircraft w/o individual markings.  BTW, do you know of anyone who makes AM decals for a DVIII?  I have searched, but have come up empty. Sigh [sigh]

 Aeromaster did and it may now only be offered through Squadron.   Blue Rider decals (Insignia magazine) can still be purchased and they have mutinational insignias offered.  I have a large selection of Eduard & DML kit decals.  Let me know if you need something.  


Stachel...unconfirmed by Armee means unconfirmed!!!!

  • Member since
    September 2003
  • From: South Central Wisconsin
Posted by Daywalker on Thursday, October 25, 2007 3:16 PM
Thanks Stephen!  I am building the DML kit, and the decals were shot in it.  Luckily, Mike (Ruddratt) was able to help me out with the lozenge and the crosses so I was thinking about doing a factory fresh aircraft w/o individual markings.  BTW, do you know of anyone who makes AM decals for a DVIII?  I have searched, but have come up empty. Sigh [sigh]

Frank 


  • Member since
    October 2004
  • From: Colorado
Posted by StephenLawson on Thursday, October 25, 2007 1:49 PM
 Daywalker wrote:

Thanks Stephen, there's a lot of interesting info there!  I really like that photo of the machine in Belgian markings postwar with the "cupping" of the wing surface between the structural details.  Now, I gotta decide if I want to attempt that look on my DML wing.  A little practice is in order on some scrap wings!

I looked through those articles, but couldn't really tell what colors the tail, cowl, and wheel covers would have been from the factory, though.  Any ideas?

All metal areas were done in a medium green.  Model Master medium green is very close to paint chips from an original Fok. E.V rudder control horn in my care at the Lafayette Foundation. Its still attached to the rudder by the way. The tail units were covered in fabric.  There are cases where 4 or 5 colour lozenge was used. The vertical unit was covered in lozenge and over painted in white.  The rudder entirely and the vertical fin was only overpainted over about have its length.  

There is if memory serves an article in Finescale that concerns  overstressed metal skin on an airframe.  The cupping on the wooden skinned Fokker E.V / D.VIII wing is very similar.  The newest issue of this Eduard kit has two wings.  One in pristine condition (from the factory) the other with the cupped effect between the spars and ribs.


Stachel...unconfirmed by Armee means unconfirmed!!!!

  • Member since
    September 2003
  • From: South Central Wisconsin
Posted by Daywalker on Thursday, October 25, 2007 8:29 AM

Thanks Stephen, there's a lot of interesting info there!  I really like that photo of the machine in Belgian markings postwar with the "cupping" of the wing surface between the structural details.  Now, I gotta decide if I want to attempt that look on my DML wing.  A little practice is in order on some scrap wings!

I looked through those articles, but couldn't really tell what colors the tail, cowl, and wheel covers would have been from the factory, though.  Any ideas?

Frank 


JOIN OUR COMMUNITY!

Our community is FREE to join. To participate you must either login or register for an account.

SEARCH FORUMS
FREE NEWSLETTER
By signing up you may also receive reader surveys and occasional special offers. We do not sell, rent or trade our email lists. View our Privacy Policy.