SEARCH FINESCALE.COM

Enter keywords or a search phrase below:

Grumman Iron Works Group Build

31634 views
253 replies
1 rating 2 rating 3 rating 4 rating 5 rating
  • Member since
    November 2005
  • From: that state up North
Posted by More Power Scotty on Wednesday, March 12, 2008 4:27 PM

John,

For an older kit, you certainly made the engine look like something out of a new Trumpeter 1/32 scale release. Thumbs Up [tup]

btp2k2,

Your cat is looking very good.  I am looking forward to seeing the end product. Big Smile [:D]

Scott
  • Member since
    January 2015
  • From: Katy, TX
Posted by Aggieman on Wednesday, March 12, 2008 8:55 PM

btp,

Nice Tomcat!  I only skimmed what you wrote and didn't realize that it wasn't quite done, but I've already posted one of your photos in the Iron Works section of the first page.  When you get the completed photos, I'll update.

  • Member since
    October 2007
  • From: Bothell, WA
Posted by btp2k2 on Friday, March 14, 2008 3:47 PM

Thanks Aggie!


For all the grief people give this kit it really builds into a nice bird....

Here are the "official" pics...


Paul I Like Tomcats!
  • Member since
    July 2004
  • From: Northern KY
Posted by mucker on Friday, March 14, 2008 6:51 PM
Well done, btp. Nice looking Tomcat!!

  • Member since
    November 2005
  • From: that state up North
Posted by More Power Scotty on Monday, March 17, 2008 4:09 PM

btp2k2,

That is one nice looking CAG aircraft! Thumbs Up [tup]

Scott
  • Member since
    December 2002
  • From: Northern California
Posted by jeaton01 on Tuesday, March 18, 2008 10:06 AM
Well done, born to(something)2002!  The weathering is great.

John

To see build logs for my models:  http://goldeneramodel.com/mymodels/mymodels.html


  • Member since
    October 2007
  • From: Bothell, WA
Posted by btp2k2 on Tuesday, March 18, 2008 10:14 AM

 jeaton01 wrote:
Well done, born to(something)2002!  The weathering is great.


Actually, BTP is my wife's, my daughter's and my initials and the year I made that nickname...I guess now it should be updated to btp2k8

Paul I Like Tomcats!
  • Member since
    September 2006
  • From: From Vernal UT OH YEA!!
Posted by raptordriver on Tuesday, March 18, 2008 5:05 PM

Nice Tomcats everyoneSmile [:)]

Here's some progress on the avenger almost finished.

DSCF1667.jpg Avenger picture by Raptor94

Andrew


  • Member since
    January 2015
  • From: Katy, TX
Posted by Aggieman on Tuesday, March 18, 2008 6:44 PM
Looking good raptor!
  • Member since
    September 2006
  • From: From Vernal UT OH YEA!!
Posted by raptordriver on Wednesday, March 19, 2008 7:43 AM
Thanks aggie.

Andrew


  • Member since
    September 2006
  • From: From Vernal UT OH YEA!!
Posted by raptordriver on Sunday, March 23, 2008 4:38 PM

Ok here it is just got it finished.

DSCF1682.jpg picture by Raptor94

DSCF1687.jpg picture by Raptor94

DSCF1686.jpg picture by Raptor94

DSCF1685.jpg picture by Raptor94

DSCF1684.jpg picture by Raptor94

DSCF1683.jpg picture by Raptor94

 This was a pretty long build but was worth it. Thanks for looking. Big Smile [:D]

Andrew


  • Member since
    November 2005
  • From: that state up North
Posted by More Power Scotty on Monday, March 24, 2008 12:37 PM

Raptordriver,

The Avenger looks great! Thumbs Up [tup]

All,

I made some progress on the Panther and finally took some photos as well.  Here are a couple of photos of the Blackbox cockpit for your enjoyment. 

Sorry about the focus on this one..

A shot of the ejection seat installed...

I installed a "rope" for the face curtain pulldown as this matched what was shown in the movie "the Bridges at Toko-Ri".  I watched the movie this past weekend as I was finishing the cocpit details to verify some colors.  For this particulat seat, the pulldown should have been a horizontal loop of black and yellow cord, but the rope always stood out for me watching the movie.  Besides, except for you folks, only an expert will ever know. Smile,Wink, & Grin [swg]  Any and all comments will be appreciated.

Scott
  • Member since
    November 2005
  • From: that state up North
Posted by More Power Scotty on Sunday, April 13, 2008 11:34 PM
Although I have no new photos to add, I made some progress on my Panther on my night off.  I had painted the exhaust pieces on my last night off, so this week, I managed to glue the fuselage halves together.  I was a little disappointed with the fit, and there will be a fair amount of time spent cleaning up the seam on the underside.  The fit on the top was not bad in the tail and spine, but forward of the cockpit, it got a little ugly.  I will continue to keep the group posted as I slowly move forward.
Scott
  • Member since
    December 2002
  • From: Northern California
Posted by jeaton01 on Sunday, April 13, 2008 11:58 PM
I'm making slow but steady progress on my F6F also.  The fit of the windscreen is indefinite at best, odd because so far everything has been great fit-wise, even the Verlinden resin was not a bad fit.  But, the windscreen is on and I only have about 14 more of the 36 ignition leads to put on.

John

To see build logs for my models:  http://goldeneramodel.com/mymodels/mymodels.html


  • Member since
    November 2005
  • From: that state up North
Posted by More Power Scotty on Saturday, April 26, 2008 6:08 PM

I started making progress again on my F9F-5 Panther last evening.  Here are photos of the top and bottom of the fuselage showing the filler on the seams.  I have all but finished sanding the filler down, and will scribe a few lines that were removed.  I seem to be having more fit issues than a friend of mine who built this out of the box a couple of years ago.  Anyway, enjoy the photos.

Scott
  • Member since
    January 2015
  • From: Katy, TX
Posted by Aggieman on Monday, April 28, 2008 9:10 PM

Nice work so far!  Looking forward to seeing this one finished.

I have just begun work on my F7F Tigercat, second build for this GB.  I'll post photos when I have something to photograph.

  • Member since
    January 2015
  • From: Katy, TX
R2800!!!!
Posted by Aggieman on Tuesday, May 6, 2008 8:08 PM

times 2!

I've made some progress on the Italeri F7F Tigercat that will be my second build for this GB.  This will actually be an unusual build for me in that - typically - when I buy a new kit, it sits on the stash shelf for YEARS before I get to it.  This one I've had for a little more than 3 months or so.

Any way, this kit features some pretty nice R2800 engines.  Not exactly kits unto themselves but I've added some ignition wiring.  One is mostly done while the other is in the process of drying when the photo was taken.

We're actually coming up on the conclusion of this group build.  Hopefully every one who has started will be able to complete by the dead line, but if not, so be it and please continue to update us on your progress!

  • Member since
    July 2004
  • From: Northern KY
Posted by mucker on Tuesday, May 6, 2008 9:10 PM

Steven: Looking good so far. I'm not sure if these pics will help, but maybe provide some inspiration. I took these during a recent trip to the Planes of Fame museum in China, CA. It was both sad and awe inspiring to see this bird parked outside awaiting restoration...

It was very peaceful to see all the warbirds there.


  • Member since
    January 2015
  • From: Katy, TX
Posted by Aggieman on Tuesday, May 6, 2008 10:03 PM

Thanks Charles.

That's almost criminal how that Cat looks, but once she's restored I'm sure she'll be a beauty.

  • Member since
    January 2015
  • From: Katy, TX
Posted by Aggieman on Tuesday, May 13, 2008 7:44 PM

The engines are complete.  The pictures I took don't show the weathering I did very well, so maybe I'll do a bit more - a dirty wash mostly.

I added ignition wiring but I think in looking at some photos of a 1/32 R-2800 engine that I didn't get the wiring quite right.  Should have researched more before I did all that work.  Well, lesson learned, time to move on.

  • Member since
    December 2002
  • From: Northern California
Posted by jeaton01 on Tuesday, May 13, 2008 8:59 PM

Steven:

I just finished the wiring harness on my Hasegawa 1/32 R-2800 for the F6F.  Perish the thought of doing two in 1/48, at least not by me anytime soon.  36 spark plugs, 36 wires.  A person can go blind!  I made the spark plugs from round styrene stock painted silver, and the wires are of soft brass wire.  I don't remember the size but I made them scale to about 1/2" in full size.  The exhaust piping was no small project either, but it does look suitably snazzy, I think, and even all  fits within the cowl.


John

To see build logs for my models:  http://goldeneramodel.com/mymodels/mymodels.html


  • Member since
    November 2005
  • From: that state up North
Posted by More Power Scotty on Saturday, May 17, 2008 8:33 AM

Nice looking engines gentlemen. Thumbs Up [tup]

So there is a deadline with this build?Question [?]  Just kidding, but I had forgotten about when the end date was.  I am still fixing the seams on the wing pylons, but I do hope to be painting soon. 

Scott
gzt
  • Member since
    May 2007
  • From: Massachusetts
Posted by gzt on Saturday, May 17, 2008 11:32 AM

John,

Nice job on the engne !!! Amazing how much you can do in 1/32 Smile [:)]

Here is some reference photos of the engine

If you need I've got more Smile [:)]

I started my F6F Mk II. Working on the cockpit decaling IP Smile [:)] 

Flying is a thrill #2 known to mankind. Landing is #1.

http://www.rwd-6.org

  • Member since
    December 2002
  • From: Northern California
Posted by jeaton01 on Saturday, May 17, 2008 6:15 PM

Thanks for the offer and the nice comments, Greg, but you may have gathered that I am quite ready to focus my weary fingers and eyes on another task, rather than add more wiring to that engine.  No more references, PLEASE.  AMS is out of control on this project anyway.  Here is the gun bay.  The breeches and the top of the access door aare Verlinden, the barrels are 2 sizes of brass tubing and .032 stainless wire, the chutes are from the Hasegawa guns, wires and junction box are from the junk bin.


John

To see build logs for my models:  http://goldeneramodel.com/mymodels/mymodels.html


  • Member since
    December 2002
  • From: Northern California
Posted by jeaton01 on Tuesday, May 20, 2008 11:33 PM

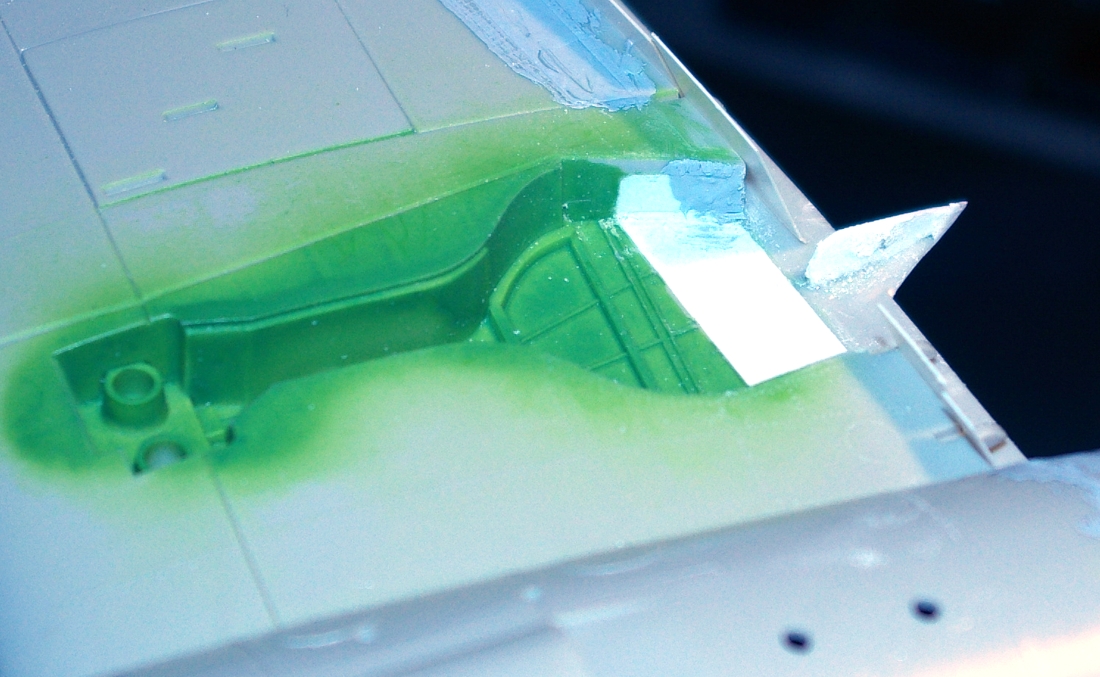
Working on the wings now.  I've done a lot of filling on panel lines, Hasegawa made them pretty big on this kit and the Hellcats I've seen didn't leave me with that impression.  I have worked out a pretty quick method of doing the filling.  I put down Tamiya tape on both sides of the panel line as close as I can get it, and then I use a dental trowel and spread Mr. Surfacer 500 into the line.  Next I take a Q-tip soaked in nail polish remover and wipe off the excess.  Next, I pull off the tape and go over the lines with the wet Q-tip once again.  It all goes pretty quick, otherwise the Mr. Surfacer gets too dry and does not work down as well.  Done right, I don't lose any of the rivets right next to the line I am filling.  I have a number of Trumpeter kits that need this treatment, and plan to use it on the Hasegawa 1/72 B-25 too.

The other part I am working on is modifying the wheel wells and flap wells.  I am dropping the flaps which are made separately on this kit, but Hasegawa missed the doors that seal to the flaps when the flaps are up, but fold up into the flap well as the flaps are retracted.  F6F's had a pretty good flap system  The selector in the cockpit had only two positions, full up and full down.  On take off when the engine was throttled up air loads compressed a spring in the extension linkage and the flaps automatically went to the takeoff position.  This was especially helpful on a wave off, as the airplane went from the full flap landing position to the takeoff position without any attention from the pilot when he advanced the throttle to full power.  There are some unfinished areas in the aft gear wells that I have filled with styrene sheet.
 

John

To see build logs for my models:  http://goldeneramodel.com/mymodels/mymodels.html


gzt
  • Member since
    May 2007
  • From: Massachusetts
Gruman Iron Works
Posted by gzt on Wednesday, May 21, 2008 10:24 PM

John,

as usuall you correct each flaw in their design Smile [:)] I am glad you do it first and I can keep it as a reference Smile [:)]

I just started my Hasegawa 1/48 Hellcat Mk II.

Cockpit supposed to be OOB but ... in the middle of it I changed my mind. Some things I could not correct , however I think it is done. Now its time to get it fit into the fuselage and start a serious work Smile [:)] = filling and sanding Smile [:)]

few pictures


and again, after its closed ... not much can be seen .... Sad [:(]


Flying is a thrill #2 known to mankind. Landing is #1.

http://www.rwd-6.org

  • Member since
    September 2006
  • From: From Vernal UT OH YEA!!
Posted by raptordriver on Wednesday, May 21, 2008 10:36 PM
dang, great cockpit. Smile [:)]

Andrew


  • Member since
    January 2015
  • From: Katy, TX
Posted by Aggieman on Thursday, May 22, 2008 3:52 PM

That's a fine-looking cockpit you have there!

I was going to post photos of my Tigercat progress but alas, Photobucket seems to have hosed over my account and I am unable to log on to it with the username and password I have for that account.  And no one from there has bothered responding to my inquiries of how to get back into my account.

Considering a new account with another provider, or even another Photobucket account, but I really don't want to lose everything that I've already put out there.  Grrrrrrrrrrr.....

  • Member since
    July 2004
  • From: Northern KY
Posted by mucker on Friday, May 23, 2008 8:52 AM
Good stuff, Greg! The Hellcat is a beautiful bird!

  • Member since
    January 2015
  • From: Katy, TX
Posted by Aggieman on Friday, May 23, 2008 2:06 PM

Got my photobucket problem resolved, so without further delay, here are a couple of pictures of my progress.  [After having seen Greg's work on his Hellcat cockpit, I purchased a set of the Mike Grant decals for the instruments and will upgrade the IP when the decals arrive].

Eduard PE seatbelts are the only addition otherwise everything is OOB.

JOIN OUR COMMUNITY!

Our community is FREE to join. To participate you must either login or register for an account.

SEARCH FORUMS
FREE NEWSLETTER
By signing up you may also receive reader surveys and occasional special offers. We do not sell, rent or trade our email lists. View our Privacy Policy.