SEARCH FINESCALE.COM

Enter keywords or a search phrase below:

BIG CATS GROUP BUILD 2008

55207 views
681 replies
1 rating 2 rating 3 rating 4 rating 5 rating
  • Member since
    May 2007
Posted by Specter on Thursday, September 4, 2008 3:12 PM
Ok, they'll be up soonBig Smile [:D]
Seth
  • Member since
    December 2002
  • From: Bury St Edmunds, Suffolk, England
Posted by Bish on Thursday, September 4, 2008 4:01 PM

Thunderbolt379- I know the FSM article you mean, i have it close to hand whenever i am building armour. I like the use of pastels as my main means of weathering. But i have gone off the idea of dry brushing useing more and more white until its just straight white. This is not realistic at all. His book on armour modelling is very useful, but again there are a few things that i don't personally favour, sutch as the use of scale colour or putting down a primer. But i guess thats just down to personal taiste.

What do you think of his idea that armour should be finished with a gloss or semi gloss finish.

The dio i will be doing will be my Tiger, which is the one in the pic you mention, haveing its engine looked at. And next to it will be the Schimm also being repaired. It was originally going to be a Kubel, but after seeing that pic i decided to try to do the schimm in the photo. There are two more photos from the same sequence showing other Tigers with the same schimm in them.

I am a Norfolk man and i glory in being so


On the bench: Airfix 1/72nd Harrier GR.3/Fujimi 1/72nd Ju 87D-3

  • Member since
    May 2007
Posted by Specter on Thursday, September 4, 2008 4:03 PM

Ok here is a new pic (about the only good oneSigh [sigh]) sorry this is all I could get, my camera isn't really the best. I will say though that the yellow is really how it looks and the mud is polyscale (which looks somewhat like the basecoat) and then I added some mud from the Tamiya weathering kit (the one with dust, light dust, and mud)

I know you probably want more but this is the best I was able to get SMJ

Seth
  • Member since
    April 2007
  • From: Schroon Lake, NY
Posted by SMJmodeler on Friday, September 5, 2008 12:03 PM
 Specter wrote:

I know you probably want more but this is the best I was able to get SMJ

Better than before!  What camera are you using and does it have a macro setting?  The reason I ask is most newer cameras have the setting and are enough pixels to get a good shot.  I use a blue poster board from WalMart and tape it down on my desk, curving it up a wall then tape the top edge (no seams in backdrop).  Then I use two desk lamps (60 watt incadescents), on either side of he build, one close one a bit back...then click, take the photo, that's about as basic as it gets but it works.  Try that!

...Anyway, I like your build, the camo is especially well done! I like the tracks and road wheels too..nice work! It could use more weathering, IMO, maybe start with some heavier washes.  The tracks on the turret are a bit clean too.  Fine effort, definately badge worthyThumbs Up [tup]

By the way, try that photo technique before this GB ends because I will be asking everyone to post their fav' pic' (or I'll choose) and assemble them in a gallery format to share in GB's and in Armor.

  • Member since
    May 2007
Posted by Specter on Friday, September 5, 2008 4:36 PM

Thanks SMJ, my camera is a FinePix A400 with 4.1 mega pixels  and does have a macro setting. I'll definately try out those techniques you explained.

As for the weathering, I'm still learning the ins and outs of oil washes (not trying to make excuses) and will keep on trying. I'm also going to keep my eye out for those Mig pigments I've heard so much about.

As for the badge. Do you want me to fix her up more post pics and then take the badge? It makes no difference to me.

Seth
  • Member since
    February 2008
  • From: ladner BC Canada
Posted by stick man on Saturday, September 6, 2008 3:07 PM
 Specter wrote:

As for the weathering, I'm still learning the ins and outs of oil washes (not trying to make excuses) and will keep on trying. I'm also going to keep my eye out for those Mig pigments I've heard so much about.


Theres an artical on wahes in the July 08 FSM that could help you.

My tiger is the only build I've bean working on this week and I going to spray it later today so I may have pics tomaro......

Smile [:)]

I'm 15 and I model I sk8board and I drum what could be better.
  • Member since
    May 2007
Posted by Specter on Sunday, September 7, 2008 4:57 PM
Thanks stick man, I'll go through and read it a few times.
Seth
  • Member since
    April 2005
Posted by Thunderbolt379 on Sunday, September 7, 2008 7:37 PM

Hi guys,

Contemplating the paintjob on my Tiger -- what would folks recommend as a good match for German rotbraun in enamels? Humbrol or Model Master -- what are their matches like?

Mike/TB379

http://worldinminiature.blogspot.com/

  • Member since
    April 2007
  • From: Schroon Lake, NY
Posted by SMJmodeler on Monday, September 8, 2008 10:52 AM
 Specter wrote:

As for the weathering, I'm still learning the ins and outs of oil washes (not trying to make excuses) and will keep on trying. I'm also going to keep my eye out for those Mig pigments I've heard so much about.

They are big $$$, about 7$ a piece...just grib=ng down your own chalk pastels, this was advice I got!!!...works great!

 Specter wrote:

As for the badge. Do you want me to fix her up more post pics and then take the badge? It makes no difference to me.

Take the badge now...

  • Member since
    May 2007
Posted by Specter on Monday, September 8, 2008 1:35 PM

Cool advice on the pastels, thanksThumbs Up [tup]

I'll have the new pics by the time the gb is over.

Seth
  • Member since
    February 2008
  • From: ladner BC Canada
Posted by stick man on Wednesday, September 10, 2008 11:57 PM

Well heres where I'm at now I've painted and done an oil dot filter and have added Mig pigments and paint chiping but I was to exited building it to take any pics. Also the paint job is the 3ed redo I could'nt get it how I liked it (I'm VERY picky)Wink [;)]

All coments welcome!

Smile [:)]

I'm 15 and I model I sk8board and I drum what could be better.
  • Member since
    April 2007
  • From: Schroon Lake, NY
Posted by SMJmodeler on Thursday, September 11, 2008 9:45 AM
stick man:  Really nice worn finish, that exposed steel is really well done!  Is that acrylics or oils? I don't see a lot of modelers show that much wear like that..I'm one who does...it takes some thought to get it in the right amount and locations...Thumbs Up [tup]  A bit heavy on the rust though, IMO...It might just be the color, too bright of orange.  I recommend using "rust-all", it's thin and dries to a "fresh" flat, rust look..give it a try!

  • Member since
    December 2002
  • From: Reno, NV
Posted by espins1 on Thursday, September 11, 2008 1:05 PM

I'm making headway on the Panther D w/zimmerit.  The travel lock has been installed and the basic turret assembly is complete.  The next few sessions at the bench will be all about the iddy biddy photo etch brackets, clamps etc.

Scott Espin - IPMS Reno High Rollers  Geeked My Reviews 

  • Member since
    October 2007
  • From: Louisville, KY
Posted by pordoi on Thursday, September 11, 2008 7:56 PM

    Great job on the PE chain. Just about drove me nuts putting all those pieces together in my recent Panther builds.  Never did get them in perfect register and in the process, I glued my fingers together about a dozen times.  Sigh [sigh]  I've been quietly following your build and look forward to seeing it progress. 

 Don


  • Member since
    April 2005
Posted by Thunderbolt379 on Thursday, September 11, 2008 9:05 PM

Hi guys,

Stickman -- excellent job! The rust is particularly realistic, teamed with the damage to the stowage bin (the top hatch no longer fitting is a brilliant touch!) My only reservation is whether a service vehicle would be allowed to deteriorate as far as this before somebody found a can of paint. This is what it would look like if it had stood in a marshalling yard of captured weapons for a couple of months after the war. No matter, it's visually stunning!

Scott -- PE chains -- gulp! There goes a brave modeller... On a diff. topic, in your experience, will thoroughly cured acrylic tolerate enamel applied over it? I did this on an Abrams I built about two years ago and there was no problem, but it was only a tiny amount of acrylic and a quick touchup witb enamel over some parts of it. I ask as I'm seriously looking at enamel to give me the control to freehand the Tiger camo (the acrylics only want to spatter, period).

Cheers,

Mike

http://worldinminiature.blogspot.com/

  • Member since
    November 2006
  • From: Coastal Maine
Posted by dupes on Friday, September 12, 2008 5:27 AM
 stick man wrote:

Stick man - the more I look at this, the more I really dig the rust effects you've done here. However, I think that T-bolt nailed it on the head - there's no way an operational vehicle would get to this state. If you're trying to portray it as such, you may get a few arguments over in the armor forum. Wink [;)] However, if you're going for the "recently abandoned" look Big Smile [:D] I think you're going to earn some well-deserved kudos.

What methods did you use to get that rusty look? 

  • Member since
    March 2007
  • From: NJ
Posted by JMart on Friday, September 12, 2008 9:10 PM
I have been away from this GB awhile and my goodness! The quality is amazing, best GB builds I have seen (but have nit seen many! LOL). Seriously, wading thru these pages was like browsing an issue of Great Models. Not sure if i will be able to get mine done of time, work turned crazy ina hurry, but loved reading the blogs and oogling the pics! Lots of great info and building tips...cheers all!


  • Member since
    February 2008
  • From: ladner BC Canada
Posted by stick man on Saturday, September 13, 2008 11:00 AM

espins1.... Nice work on the PE chain it looks realy goodThumbs Up [tup]

dupes.... I'm going to make it a reacentlee abandond vical and I'm going to put it in a dio that will have some soviot troops waking by and looking at it but I'm not shure if I should have it stuck in the mud or make it look abandond for other reasons like the engine died. To get the rusty look I drybrused Burnt Umber OIL paints over the base couler but I made shure I had some Miniral Spirits on my brush first. I waited for that to be almost dry but made shure some of the paint and spirits where still damp in some places then with a soft wide brush I did a coat of dry mig Light Rust pigments and wereever the damp paint was it changed the couler of the pigments a bit after that I used a stifer brush to stipple mig Standerd Rust and Dark mud pigments and them added chiping over top.

Smile [:)]

I'm 15 and I model I sk8board and I drum what could be better.
  • Member since
    December 2002
  • From: Reno, NV
Posted by espins1 on Wednesday, September 17, 2008 9:50 AM
 Thunderbolt379 wrote:

Scott -- PE chains -- gulp! There goes a brave modeller... On a diff. topic, in your experience, will thoroughly cured acrylic tolerate enamel applied over it? I did this on an Abrams I built about two years ago and there was no problem, but it was only a tiny amount of acrylic and a quick touchup witb enamel over some parts of it. I ask as I'm seriously looking at enamel to give me the control to freehand the Tiger camo (the acrylics only want to spatter, period).

Cheers,

Mike

Ya, those were tricky to get together.  I eventually managed to stack all 6 layers and got them all lined up just right while using my fingers as a clamp.  I then just barely touched one end to the tip of my CA glue and let capillary action suck the glue in.  I took my tweezers and gave the end a quick squeeze to get them to hold together.  Then did the other end after a couple of minutes.  I was only glued to the chain for a few moments.... LOL  

I would imagine you'd be ok using the enamels over the acrylics.  You could always test it on some scrap plastic just to be sure.  I don't work with enamels much anymore, just Tamiya Acrylics.  

Scott Espin - IPMS Reno High Rollers  Geeked My Reviews 

  • Member since
    April 2005
Posted by Thunderbolt379 on Saturday, September 20, 2008 3:48 AM

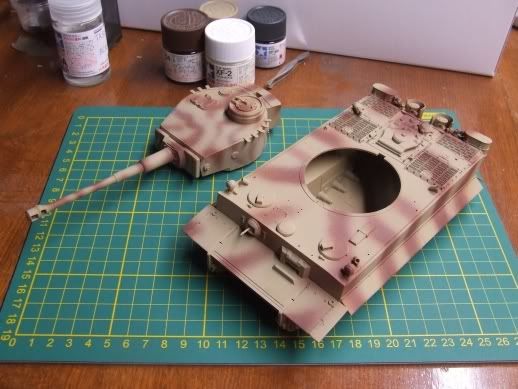
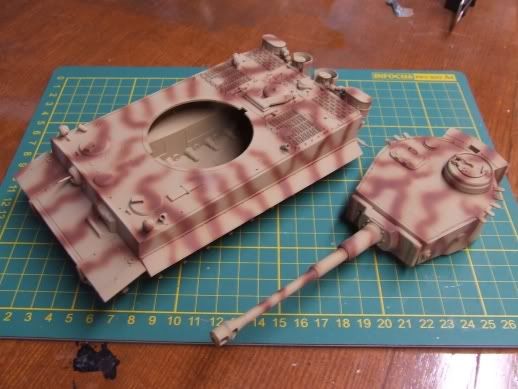
Hi Scott and all -- I decided to do some experimental spraying today, sticking with acrylics. I just got Chris Mrosko's first book for VLS and he described fineline spraying with the pressure as high as 40psi, over double the prerssure I've ever worked at before, so I thought I might as well have a go on some card. To my amazement it pretty much worked -- clean, no spatter, tight demarkation. So I went on and did the rotbraun for my Tiger (using a third of my gas bottle in the process, I gotta get more economical with practice!).

Here's the old job from a few months ago:

Photobucket" border="0" />

Heavy swathes of brown, laid down pretty regularly because there was no finesse in the output of the AB. Next, here's today's effort (after she was resprayed to dunkelgelb a couple of weeks ago):

Photobucket" border="0" />

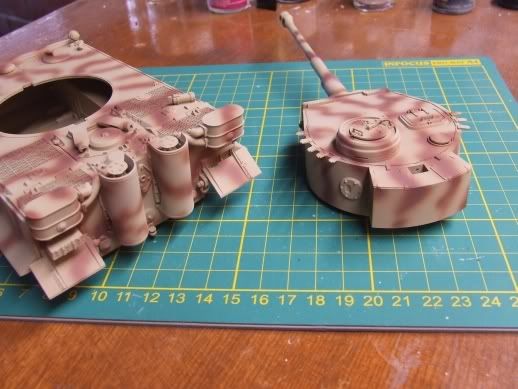
Perhaps still not as random as it would really have been, but the balance of color now favors the yellow, and the overspray is fine enough to manage distinct stripes, even the 'Y' shapes toward the rear left flank seen on the Bison profile. Here she is from behind:

Photobucket" border="0" />

Still pretty stark, but the fade coat and washes will pull the colors together.

What do you think, guys? Am I on track this time?

Cheers,

Mike/TB379

http://worldinminiature.blogspot.com/

  • Member since
    December 2002
  • From: Reno, NV
Posted by espins1 on Saturday, September 20, 2008 11:53 AM
Hi Mike, that looks pretty good!  I'm going to have to try that next time, those lines look great in terms of thickenss and everything.  Nicely done!

Scott Espin - IPMS Reno High Rollers  Geeked My Reviews 

  • Member since
    April 2005
Posted by Thunderbolt379 on Saturday, September 20, 2008 7:11 PM

Hi Scott -- Phew, a thumbs-up from an expert! I'm glad!

Well, fade-coat next, then I'll leave the acrylics to harden thoroughly before I start wiping at them with a brush loaded with enamel thinner and oils. I'll need to review the project also, it's been sitting in its box lid for months. I think there's precious little to do in terms of other subassemblies, the wheels are sprayed (rotbraun is not too precise, but they'll get dirtied up a mile) and the external tools are an easy prep on the sprue.

I'm thinking back to the StuG III I did for The Hunters -- at what point do the decals go on? After the oil washes but before the drybrushing? That would seem the least damaging to the decals.

Cheers, and thanks,

Mike

http://worldinminiature.blogspot.com/

  • Member since
    November 2006
  • From: Coastal Maine
Posted by dupes on Saturday, September 20, 2008 10:14 PM

Looks darn good to me, T-bolt! Thumbs Up [tup]

After talking to Crockett quite a while back, I've sprayed just about everything at 25-30 psi - seems to keep the spatter down quite a bit (at least when thinned properly). I know a lot of magazing tutorials talk about dialing the pressure way down to like 5-8 psi, but I haven't added that in my bag of tricks quite yet. Whistling [:-^]

  • Member since
    November 2006
  • From: Coastal Maine
Posted by dupes on Saturday, September 20, 2008 10:16 PM

Oh, about the decals - when I do them, anyway, it's right after all of the base + camo colors are done. Hit it with a gloss coat if necessary, decal away, then seal with a flat coat. Weather away!

Decals are surprisingly quite resistant to all of the oil washes/oil-dot filters that we regularly throw at them. 

  • Member since
    November 2007
  • From: Wisconsin Rapids, WI
Posted by moose421 on Saturday, September 20, 2008 10:26 PM

same here for the decals.  I put mine on right after the base coat and camo colors.  I havn't had any problems with my weathering affecting the decals.  I do seal mine with a dull coat to make sure I don't have any visable outlines from the film. 

  • Member since
    April 2005
Posted by Thunderbolt379 on Saturday, September 20, 2008 11:01 PM

Hi Dupes and Moose --

Thanks for the confidence, guys! I was just thinking about spraying pressures. I've been working at low pressure, rarely more than 1bar and less than that for special effects. I was getting spatter and I assumed raisng the pressure would cause the problem to worsen, but I reckon the higher pressure actually aerosols the paint droplets more thoroughly in the AB, creating the fineness. You can really feel the blast trying to move the model in your hand! Pity it uses so much air, my bottle is a $30+ fill so I've got to be more economical with it.

I've not yet experimented with clear coats (something tells me it's not far away!) so I think I'll get some dirt on ahead of decals, then use minimal effects over them for safety (e.g., pigment).

Cheers, looking forward to putting this one in the display case!

Mike

http://worldinminiature.blogspot.com/

  • Member since
    December 2002
  • From: Reno, NV
Posted by espins1 on Tuesday, September 23, 2008 10:16 AM
 dupes wrote:

Looks darn good to me, T-bolt! Thumbs Up [tup]

After talking to Crockett quite a while back, I've sprayed just about everything at 25-30 psi - seems to keep the spatter down quite a bit (at least when thinned properly). I know a lot of magazing tutorials talk about dialing the pressure way down to like 5-8 psi, but I haven't added that in my bag of tricks quite yet. Whistling [:-^]

I've never had much luck spraying at lower pressures.  25-30 seems to work best for my compressor/airbrush/paint combo.

Scott Espin - IPMS Reno High Rollers  Geeked My Reviews 

  • Member since
    April 2007
  • From: Schroon Lake, NY
Posted by SMJmodeler on Tuesday, September 23, 2008 2:12 PM
 espins1 wrote:
 dupes wrote:

Looks darn good to me, T-bolt! Thumbs Up [tup]

After talking to Crockett quite a while back, I've sprayed just about everything at 25-30 psi - seems to keep the spatter down quite a bit (at least when thinned properly). I know a lot of magazing tutorials talk about dialing the pressure way down to like 5-8 psi, but I haven't added that in my bag of tricks quite yet. Whistling [:-^]

I've never had much luck spraying at lower pressures.  25-30 seems to work best for my compressor/airbrush/paint combo.

Guys: Try thinning the paint more.  The lower pressure adds another dimension to your airbrush arsenal...mainly gettting in REAL close!!!

  • Member since
    June 2006
  • From: Michigan
Posted by ps1scw on Saturday, October 18, 2008 5:33 PM
How are they coming?
  • Member since
    December 2002
  • From: Reno, NV
Posted by espins1 on Tuesday, October 21, 2008 10:25 AM
I've had to push my Panther Ausf. D off to the side for a bit to deal with a disaster at our rental property and to finish up other builds with very pressing deadlines.  I should be back to work on it as soon as I finish my Char B1 bis.  Smile [:)]

Scott Espin - IPMS Reno High Rollers  Geeked My Reviews 

JOIN OUR COMMUNITY!

Our community is FREE to join. To participate you must either login or register for an account.

SEARCH FORUMS
FREE NEWSLETTER
By signing up you may also receive reader surveys and occasional special offers. We do not sell, rent or trade our email lists. View our Privacy Policy.