SEARCH FINESCALE.COM

Enter keywords or a search phrase below:

Battle of Britain GB 2008 - 21 June to 31 Oct 08

82881 views
1491 replies
1 rating 2 rating 3 rating 4 rating 5 rating
  • Member since
    July 2003
  • From: waynesboro va, via Ireland
Posted by sidure on Wednesday, October 1, 2008 4:29 PM

I just want to make a big thank you to Aaron for comming through with making m a replacement prop for the FW-200. I got them today Aaron and you did a great job on such a delicate item. I know it must have been a pain with all the trials and errors. You put a lot of effort into it my friend. Now I have three props and many spare hubs and blades to work with. Its guys like Aaron that make this GB and the FS forums a great place to hang out and build and share info with and meet new good friends. You all rock.

Tonight I hope to decal the Condor and finish up the 109. My camera is out of action for a while but I will be posting pics soon.

Steve

  • Member since
    December 2005
  • From: back seat of your car with duct tape streched out
Posted by soulcrusher on Wednesday, October 1, 2008 6:27 PM

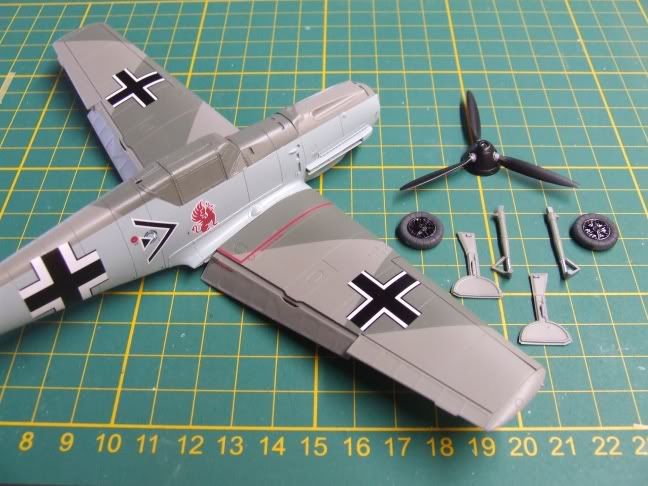
Mike I think it is the lighting. I do not really have any type of set up to properly photograph. As you can see in most of my pics the model is just sitting on my workbench under a bare bulb. I really need to invest in some simple basic materials like a sheet of white poster board and mabye some better lighting. The 02 gray appears much lighter in the photos for some reason. There is aslo no weathering done to this model either. This is the pic I ment to post earlier that showed the demarcation line not the top view. The kit says this is the plane Adolf flew in August of 1940. I believe the Mickey Mouse plane markings are from a plane he flew earlier that summer. I thhink he also flew a E-4 after this one though i have not done any reseach yet to see what markings it carried.

Aaron a big thumbs ups for providing the replacement props for SteveThumbs Up [tup].

                                                                           Soulcrusher


  • Member since
    April 2005
Posted by Thunderbolt379 on Thursday, October 2, 2008 12:16 AM

SC -- what an absolute beauty! I can't wait to get this one completed, if it compares well to your own I'll be mightily pleased!

I just did the wheel wells. Here she is with masking in place, much of it multiply-reused strips from earlier:

Photobucket" border="0" />

Spray painting must spoil us, the tiniest brush touch-up leaves you feeling as if the finish isn't what it should be... The wheel well curved parts were masked with straight lines leaving tiny fillets of grey at the edges to be brushed over, but even so... Hmm, gotta find a way to mask curved lines. Masking the three-dimensional contours of the wells themselves was something I couldn't get my head around, and my fingers certainly weren't interested.

Here she is with the masking away and touch-ups done:

Photobucket" border="0" />

The paint lustre looks amply good enough to take Tamiya's decals, I've applied them to matt finish on tanks without difficulty in the past so this should be a breeze. I can start decaling tonight.

Cheers,

Mike

http://worldinminiature.blogspot.com/

  • Member since
    February 2007
  • From: Bournemouth UK
Posted by Luftwoller on Thursday, October 2, 2008 6:13 AM

Mike, dont panic about touch ups. I always thin my paints 50/50 and then brush paint the small touch ups. That way you rarely see where its been done.

Im having a senior moment where im actually feeling sorry for the RAF. So i have a cunning plan!

Hopefully some pics soon. (I have the day off today BTW)

...Guy

..'Your an embarrassment to the human genus, makes me ashamed to call myself Homo'.
  • Member since
    April 2005
Posted by Thunderbolt379 on Thursday, October 2, 2008 9:51 AM

Hi Guy -- thinning it, that's what I should have done! Well, I'll have plenty of practice, it turns out the masking wasn't secure in a few places and I got bleed-under, especially on the leading edge. I could tell when I used both magnifying specs and a hand lens to inspect her as I started decaling. I put a dozen pieces of stencil data on the port side this evening, using the Microscale system, but haven't touched the starboard side yet... I discovered I had the starboard wingroot masking in the wrong place. By rights I need to remask the wing and fuselage camo and splash a bit more 65 along the wingroot to even them up. GRRR, seriously!

Mike

http://worldinminiature.blogspot.com/

  • Member since
    October 2004
  • From: League City, Texas
Posted by sfcmac on Thursday, October 2, 2008 6:38 PM
 Thanks Steve. I hope it lets you get that Condor all wrapped up cuz it's a beaut!  SC looks like you need to go back on the Hurricane production line with all these fine looking 109's!
  • Member since
    September 2004
  • From: Vernon, BC, Canada
Posted by razordws on Thursday, October 2, 2008 8:59 PM
 Luftwoller wrote:

...im actually feeling sorry for the RAF. So i have a cunning plan!

Hmmm...  Me 109 in RAF markings? Clown [:o)]

Dave

  • Member since
    October 2004
  • From: League City, Texas
Posted by sfcmac on Thursday, October 2, 2008 9:04 PM
 razordws wrote:
 Luftwoller wrote:

...im actually feeling sorry for the RAF. So i have a cunning plan!

Hmmm...  Me 109 in RAF markings? Clown [:o)]

Geeze don't give him any more ideas!

Is that AirFix kit Steve (sidure) is working on 1/48 scale? I don't believe I have ever seen it?

  • Member since
    July 2003
  • From: waynesboro va, via Ireland
Posted by sidure on Thursday, October 2, 2008 9:37 PM

Aaron, the Airfix 109 is 1/72 scale. It was a special edition that Airfix came out with called ''Aircraft of the Aces''. Bought a lot of them at a store a log time ago. I dont know how many are in the series but I got about 4. I figured it would be a quick and easy build to go along with the Condor. I normally build in 1/48 but for odd and rare kits I pick up in 1/72. I need to get a 1/48 Condor next. It was not available when I got the 1/72.

The 109 is finished and waiting to be photographed. Pics comming soon.

Steve

  • Member since
    December 2005
  • From: back seat of your car with duct tape streched out
Posted by soulcrusher on Thursday, October 2, 2008 10:16 PM

 sfcmac wrote:
 Thanks Steve. I hope it lets you get that Condor all wrapped up cuz it's a beaut!  SC looks like you need to go back on the Hurricane production line with all these fine looking 109's!

Funny you should mention that Aaron! I planned on turning my attention towards finishing up my third unoficial Hurricane build that I put on the back burner for the Fw 190 GB. The Airfix kit is no jem but it should help even the odds up a bit! I think I can hear Herman shaking in his boots already! The battle is winding down and it is becoming readily apparent even to Herman that the Luftwaffe can not sustain these losses and operation sea lion must be "postponed" i.e. the battle is over!

                                                                           Soulcrusher


  • Member since
    March 2008
  • From: Wilmington, NC
Posted by mark983 on Friday, October 3, 2008 6:23 AM

Alright guys...was up late last night doing some final touch ups on my Stuka after a coat of primer..then got the airbrush out and laid down some pre-shading.  Was going to get pictures but was way too late..pictures of my progress on the way this evening...Hope to lay down the first REAL color on her tonight!! 

Mark 

  • Member since
    February 2007
  • From: Bournemouth UK
Posted by Luftwoller on Friday, October 3, 2008 4:13 PM
 sfcmac wrote:
 razordws wrote:
 Luftwoller wrote:

...im actually feeling sorry for the RAF. So i have a cunning plan!

Hmmm...  Me 109 in RAF markings? Clown [:o)]

Geeze don't give him any more ideas!

Is that AirFix kit Steve (sidure) is working on 1/48 scale? I don't believe I have ever seen it?

Muwahahahahahah.......Its almost finished. Just a couple more nights. Ill give you a clue.. Aaron knows all about them. Whistling [:-^]

...Guy

..'Your an embarrassment to the human genus, makes me ashamed to call myself Homo'.
  • Member since
    February 2003
  • From: A Spartan in the Wolverine State
Posted by rjkplasticmod on Friday, October 3, 2008 5:23 PM

OMG, looked at the Calandar & figured I better get off my butt & build something.  My bench time has been limited by Golf, Gardening, training my new Dog & other distractions.  But I did get started on my build.  Yet another Tamiya 1/72 Bf-109E3.  I haven't built a 1/72 kit in about 3 years, with 1/48 being my normal choice of scale.  I've had this kit in the stash for even longer, as I recall buying it shortly after it was first released.

Decided to build this one strictly OOB.  Got the pit done.  Used kit decals for the seat belts & Instrument panel, rather than my usual PE used in 1/48 builds.  Not as nice, but OK in this scale.  I'd forgotten how small these birds are in 1/72.

Nothing fancy here, but it will have to suffice Smile [:)].

Regards,  Rick

RICK At My Age, I've Seen It All, Done It All, But I Don't Remember It All...
  • Member since
    November 2003
  • From: Nashville, TN area
Posted by bobbaily on Friday, October 3, 2008 5:56 PM

Sorry that I haven't acknowledged the great work being displayed here for a couple of days, so......

Soulcrusher-Nice E-3.  I need to add that kit to my stash.

Steve-Good job on the yellow nose.  You know, I could never figure out why the Luftwaffe went to the extremes of all the sponging/mottle/splinter only to paint the nose of the plane in 'See Me Yellow'.  Go figure.

Mike-Looking good.  Keep up the good work.

Rick-Very impressive, especially for 1/72nd scale.  I'm not brave (or skilled) enough to try braille scale yet.....

Bob


  • Member since
    October 2004
  • From: League City, Texas
Posted by sfcmac on Friday, October 3, 2008 6:05 PM

 Guy? I didn't know they had cheer leaders in this battle? Should be a cool surprise! All I can say is Ut- OH!

 Rick! Great looking start! Wish I could get off my rear and throw something ( not fancy) together that looked that fantastic!

 Looks like another Me-109 inbound! SC!

  • Member since
    March 2008
  • From: Wilmington, NC
Posted by mark983 on Friday, October 3, 2008 11:34 PM

Here's my progress on my stuka....hope to get more paint on her tonight...my first attempt at preshading...

Mark 


  • Member since
    April 2005
Posted by Thunderbolt379 on Saturday, October 4, 2008 2:06 AM

Hi all, esp. SC and others working on Tamiya Emils,

I'm working on the Emil today, touch-ups and decaling. I remasked the starboard wing and top camo and resprayed the 65 at the wingroot to correct the line, then touched up the leading edge with thinned paint -- I still got some bleed-under and had to clean it up again. I think I'll add a bit of chipped paint to disguise it! I'm probably being way too picky, I need #1 magnifying specs and a 3" hand lens to really resolve all this.

Decals are going on with very few problems. I had hoped for a slightly more enthuaiastic response to Micro Sol. It's taking three applications to draw the decals into the surface detail, but while I had my doubts, the rear fuselage access hatch did not disappear under the big crosses, but is clearly visible... Speaking of which, the #4 national insignia decals are about 10% larger than the designs appear, proportionally, in the plans. Alignment is off and they seem to wrap too far under. They're larger than the insignia in my references too. I lapped them a touch above the camo line to ease the problem, a scale six inches maybe. Should I be using decals #2, the same style of crosses, slightly smaller, which will fit comfortably between the #4 and #6 fuselage frame lines, and which are depicted as upper wing crosses on one of the other marking options? If so, do I remember correctly that soaking a decal in Micro Sol will loosen it so it can be removed?

I may be misreading the plans, but are there two pieces of stencil data that wrap around the landing gear legs???

Hopefully I'll have a photo up tonight of the port side, completely decaled.

Cheers,

Mike

http://worldinminiature.blogspot.com/

  • Member since
    April 2005
Posted by Thunderbolt379 on Saturday, October 4, 2008 8:56 AM

Here we are, a promised! Okay, guys -- what's your call on that balkenkreuzer? Should I use the smaller one, or was there as much variety in late 1940 as would account for the size? It's unlike Tamiya to make a mistake like that, too...

Mike

Photobucket" border="0" />

http://worldinminiature.blogspot.com/

  • Member since
    February 2007
  • From: Bournemouth UK
Posted by Luftwoller on Saturday, October 4, 2008 1:57 PM

Rick, Theres a fair bit of detail in those 1/72nd Tamiya kits. Looks very impressive so far. Are the belts molded in or decals. They look very convincing either way.

Mark, Nice work on the preshading. I love the Stukas and am looking forward to seeing some paint on the beast.

Mike, Im reckoning that she looks just about perfect. I checked mine out (Not that my model is any sort of benchmark) and it looks the same, so its gotta be right LOL.

Aaron, The other thing you know about apart from cheerleaders Wink [;)]

...Guy

..'Your an embarrassment to the human genus, makes me ashamed to call myself Homo'.
  • Member since
    September 2004
  • From: Vernon, BC, Canada
Posted by razordws on Saturday, October 4, 2008 2:27 PM
 Luftwoller wrote:

Aaron, The other thing you know about apart from cheerleaders Wink [;)]

...Guy

RUM!!!  Your plan is to get the RAF drunk????  Clown [:o)]

Dave

  • Member since
    October 2004
  • From: League City, Texas
Posted by sfcmac on Saturday, October 4, 2008 2:48 PM

Hmmmm searching me memory banks. Can you smell the hard drive smokin?

 Displaying results.......


Hmmmm froze up again. My mind in pics. Laugh [(-D]Make a Toast [#toast]

  • Member since
    April 2005
Posted by Thunderbolt379 on Saturday, October 4, 2008 6:50 PM

Guy, thanks for the Thumbs Up [tup], mate! Your result looks terrific too, I can't wait to see mine with the canopy unmasked. Did you use clearcoats? Anyway, we both took the same solution to handling the flank insignia, and SC did something similar, so that seems to be the 'modeler-preferred solution!'

Of course, I coulda Googled it 24 hours ago...

http://hsfeatures.com/gallanddt_1.htm 

and for Galland's E-4 and E-7:

http://www.asisbiz.com/il2/old/Bf-109E%20JG26%20$Adolf%20Galland/index.htm

They all seem to show the smaller insignia, precisely the width of two fuselage frames. Hmmm, should I strip the decal...? Or should I call it good, especially as the decal has really pulled down into the detail? I can always try the smaller insignia on future builds, of which there will be plenty, data suggesting I should... Hmph! Next step, check the Microscale site for stripping tips, and decide if it's worth the mess.

Mike

http://worldinminiature.blogspot.com/

  • Member since
    July 2003
  • From: waynesboro va, via Ireland
Posted by sidure on Sunday, October 5, 2008 11:11 PM

Finally some progress pics to share. The decals have a very bad case of silvering although it did get a little better. I glosscoated, decaled and glosscoated again followed by dullcoat, all by Testors. The decals still have some silvering. As you will also see some decals are a little out of regester. If there is some other technique I could do please let me know. I can almost see the end of the tunnel now. Some detail painting and then put on all the fiddly bits and shes done. The 109 is finished and I will post pics later.

Thanks for looking and any critique is always welcome.

Steve

  • Member since
    October 2004
  • From: League City, Texas
Posted by sfcmac on Sunday, October 5, 2008 11:29 PM

 Wow that thing is really large. Even in 1/72. What a great splinter paint job! You even pulled off yellow which is really tough to get even. I can see the silvering you spoke of on the decals. If you got it all sealed over I would just leave it as there isn't much you can do short of damaging the paint/finish and the decals. Most you could try to do is with a sharp Hobby knife make some small cuts ( Very small ) into the silvered areas and try a drop of solveset or something setting. I'd leave it be though cuz you run the risk of it not working as well unless it really bothers you.

 I am guessing it would be because the decals are older. Maybe the glue on their backing yellowed enough to make the film a little more visable.  In those cases it is a help to cut out only the printed part cutting the excess film away. Takes a little longer but that would have made the edges not be seen. Seems like the Silvering is on the clear edges of the carrier film.

 Simple tips on a small detail in my book as I think it looks fine. Probably wouldn't have noticed had you not mentioned it.

 I am still shocked by it's size and all that painting you had to pull off.  I like it!

  • Member since
    March 2007
  • From: Carmel, CA
Posted by bondoman on Monday, October 6, 2008 12:00 AM


Gennelmen, Italy wuz wunnerfull!!

  • Member since
    September 2004
  • From: Vernon, BC, Canada
Posted by razordws on Monday, October 6, 2008 12:27 AM

Welcome back Bondo.  I expect a full report at some point.

Steve, wow that thing is huge and I can't wait to see her done.  Looking forward to the 109 pics too.  I have had problems in the past too with some of revell's older decals.  They can be very flat textured with excessive carrier film.  I'm with Aaron on the best approach being to remove as much of the excess carrier film as possible before applying them to the model.  Doesn't help you now I know but you'll know for next time.

Dave

  • Member since
    October 2004
  • From: League City, Texas
Posted by sfcmac on Monday, October 6, 2008 12:55 AM
 bondoman wrote:


Gennelmen, Italy wuz wunnerfull!!

Bondo!!!!!!!!!! So your back home? I too look forward to a full report when ye be more rested!

Glad to see ya!

  • Member since
    April 2005
Posted by Thunderbolt379 on Monday, October 6, 2008 3:09 AM

Steve -- what a size! What a paintjob! You've really done the business on this classic! It's great to see old kits get the modern treatment, I must take a shot at one myself!

Okay, guys, here's the Emil, with 54 decals in place.

Photobucket" border="0" /> 

I decided to leave the over-size crosses as-is. Microscale's instructions for removing a decal involved things like high-tac tape to pull it off, followed by Microsol and an eraser to clean up the remains. That sounded too fraught for this stage of the game, so I declared it a 'from-the-box-ism!'

The underside crosses are an interesting case. The plans show them slightly offset, the one under the port wing is located fractionally further back than the starboard. I checked my references and found a single unclear photograph of an E which seemed to support the offset placement. Then I checked pics of the work of other modellers who had clearly done their research, and found no evidence of an offset. I declared the matter one for simplification and placed them in equal locations.

Two decals remain, the ones to wrap around the gear legs, then I can assemble the legs to the doors. A few touch-ups on the tires and the wheels can be added. I have the piot tube and tail gear to paint, and have painted the canons and exhausts. I need to punch through the port underwing cross to locate the pitot tube.

Next challenge: clearcoat. I've read some online articles and Pledge One-Go, available in Australia, no matterhow much it might suffice as floor polish, is not a universal subtitute for Future. There are stories of it yellowing, refusing to dry, stripping decals... I won't bother with it. Klear, from the UK, is said to be virtually identical, i read a post by a modeller who had been using it the same way as Future for some twenty years, and it turns out the UK post will carry the stuff, so I'll see about getting a bottle sent over.

But for the moment... What do you all think of Tamiya Clear Gloss X-22, and Gunze Aqueous Clear Flat? These are my immediate options for the Emil. Glosscoat to protect the enamels from oil wash for some underside streaking and to allow use of the Promodeller panel wash, then Gunze acrylic flat to seal it all.

I'm getting to the finishing stage, I can see this Emil in the display case by next weekend!

Cheers,

Mike

http://worldinminiature.blogspot.com/

  • Member since
    February 2007
  • From: Bournemouth UK
Posted by Luftwoller on Monday, October 6, 2008 7:22 AM

Steve, the Condor is looking resplendant in all its colourfull glory. Im so looking forward to seeing the girl finished.

Mike, the 109 is looking great mate, far better than my effort LOL. As for the clearcoat issue. In the UK we can get Klear, the English 'Future', and to be honest, its ok but I have hit and miss results with the stuff. It would be interesting to find out what pressures and how many coats other ppl use with the stuff to get a good finish. You mentioned X-22, This is what i use when i remember. (Future is easy, no mixing)  Ive recently watched Mig Jimmenez's DVD and he raves about X-22. It goes off rock hard and allways gives a good clear coat. Id try that before struggling to get Future.

...Guy

..'Your an embarrassment to the human genus, makes me ashamed to call myself Homo'.
  • Member since
    April 2005
Posted by Thunderbolt379 on Monday, October 6, 2008 7:58 AM

Hi Guy -- thanks for the kind words! This Emil is actually my first plane kit to be completed in five years (armor and scratchbuilds since then), though not the first to be started! Big Smile [:D] It's good to see my skills seem to be advancing.

X-22! Well, if Spain's answer to Francios Verlinden endorses it, it must be worth a go. It's standard shelf stock here, in fact I have some already. But the bottle is 15 years old (remember the old, big bottles?), and the remaining contents looks a bit yellowish, so I think I'll sortie to the LHS for some fresh tomorrow. I bought it in my first round of Tamiya paints, for mixing shades for finishing vinyl dinosaurs in the 90s, the clear was to bring up the hide lustre by mixing with the colours and for adding eye and mouth moisture. I have Horizon's 1:30 T. rex finished in Tamiya paints, it was my first published article, in an Aussie model mag around '92, '93. Those paints are all still fine, I'm still using them.

I've never airbrushed it straight, though. I tried once, an attempt to bring up the gloss on some Navy midnight blue, but the X-22 was going to go on rougher and flatter than the gloss enamel, so I didn't bother, and never did another experiment. I think this calls for some test spraying. All being well, I should be accenting the panel lines of the Emil later in the week.

Cheers,

Mike

http://worldinminiature.blogspot.com/

JOIN OUR COMMUNITY!

Our community is FREE to join. To participate you must either login or register for an account.

SEARCH FORUMS
FREE NEWSLETTER
By signing up you may also receive reader surveys and occasional special offers. We do not sell, rent or trade our email lists. View our Privacy Policy.