SEARCH FINESCALE.COM

Enter keywords or a search phrase below:

251 Halftracks GB 1 October '08 - 8 June '09

129718 views
1459 replies
1 rating 2 rating 3 rating 4 rating 5 rating
  • Member since
    November 2006
  • From: Coastal Maine
Posted by dupes on Thursday, October 2, 2008 9:10 AM
You are officially checked off, he of the /6 Command Variant. When are you planning on starting?
  • Member since
    June 2008
Posted by lewbud on Thursday, October 2, 2008 10:20 AM
 dupes wrote:

Sooooo...who's going to be the first one to post pics of some 251 work? Laugh [(-D]

Boyd - you did get hosed. Do you usually get your catalog before the end of the month? Sadly, I missed out as well - some nasty intestinal attack hit me on the 30th (the day my catalog came...and the day I needed to place the order). I was in a drug enduced stupor when I should have been calling Squadron to place my order. HIGHLY disappointed. Here's me hoping that the November catalog has some good deals. Yuck [yuck]

Dupes,

You sure you looking at the right month?  I usually get mine a couple of days before the start of the month (there have been exceptions), but then I live 45 min from Squadron.  But still, I find it hard to believe it takes a month for it to get from Carrollton, TX to wherever in Maine you are.  If it's consistently that late, I'd talk to customer service at either Squadron or your local post office.  Btw, you can go to the Squadron website and download the flyer if you haven't got yours yet.  In answer to your first question, it ain't gonna be me as Buddy's Halftrack factory hasn't opened yet.  Buddy's Aircraft and Helo factory is operating at full tilt boogie however.

Buddy- Those who say there are no stupid questions have never worked in customer service.

  • Member since
    February 2007
  • From: Bournemouth UK
Posted by Luftwoller on Thursday, October 2, 2008 11:44 AM

 dupes wrote:
You are officially checked off, he of the /6 Command Variant. When are you planning on starting?

Soon my man, soon.

...Guy

..'Your an embarrassment to the human genus, makes me ashamed to call myself Homo'.
  • Member since
    October 2004
  • From: League City, Texas
Posted by sfcmac on Thursday, October 2, 2008 12:03 PM

 Hey Dupes ! When talking to Guy don't say /6. You'll end up with a Me-109 G-6 . Laugh [(-D] That's the 251 Halftrack Command version Guy!  Of course I too was confused and started mounting a 1/35 Pak 36 to a 1/350 Yamato. Dead [xx(]

 But fear not Dupes now that I have recovered from the moose milk I am back on track! See if I can get some pics up soon 4 ya!

  • Member since
    December 2002
  • From: Bury St Edmunds, Suffolk, England
Posted by Bish on Thursday, October 2, 2008 3:30 PM

Had another busy day today and managed to get most of the interior assembled and alot of the tracks built. Hope to get the inside sprayed tomorrow then to get some pics before i put the top half on.

A few points for anyone else building a Dragon 251 and who like me hasn't built one before. Firstly, there are a couple of sink holes on the interior on the lower half of the hull. Luckly for me the ammo racks for the 20mm magazines will cover them, but for other versions they won't. There are also raised lines which seem to apply for other equipment on other versions. You need to check which ones don't apply to you and remove them. I have looked at my other Dragon 251 kits and they all appear to be the same. Another thing i noticed is that the two bits which stick out of the side of the back part of the hull had to be removed for it to fit correctly with the lower side pieces. It might have just be me makeing a balls up, but what ever i did they didn't fit correctly.

I am a Norfolk man and i glory in being so


On the bench: Airfix 1/72nd Harrier GR.3/Fujimi 1/72nd Ju 87D-3

  • Member since
    October 2004
  • From: League City, Texas
Posted by sfcmac on Thursday, October 2, 2008 4:33 PM

 I don't know how much this fares as an in progress pic but I wanted to share some intial thoughts on the Dragon Kit.

1st thought ..... Wow that's a whole load of plastic! Shock [:O]

2nd. Is this is the first 251 kit I have built since the Tamiya 1970's special.  The details and parts count are very intense compared to that old favorite. Lots of typical Dragon trademarks though. Such as many ejector pin marks and molding seams that are requiring time consuming clean -up and the typical busy directions that make you rub your eyes and think bad thoughts.Evil [}:)] Over all not a surprise but par for the course.

 I must say if you don't have one of these kits you need one. If for no other reason than the amount of equipment and accessories included. I believe it really is a deal for all you get in the box. I don't feel that as much anymore so this was nice! Party [party] Plus a 40 % off coupon made it even better!

 As far as my progress goes I have made it to step 1 and 1/2 before taking my first break.  Have to let things dry and do some pre painting of details and road wheels. Ah the glorious monotony of road wheels!

The suspension is pretty straight forward but with lots of clean up and placement is a little finicky. Not a Tamiya throw together here it takes some careful checking and patience to get everything lined up and level. The good thing is if you like positioning your suspension to match terrain than this makes it easier for that.

 Lots of details are included that I don't think will be seen in this first step. A fuel tank extc under the floor? Nice if you need to show the guts but wont be seen in most builds I think. Oh well put it in and will paint it anyways for some far future fellow to discover.
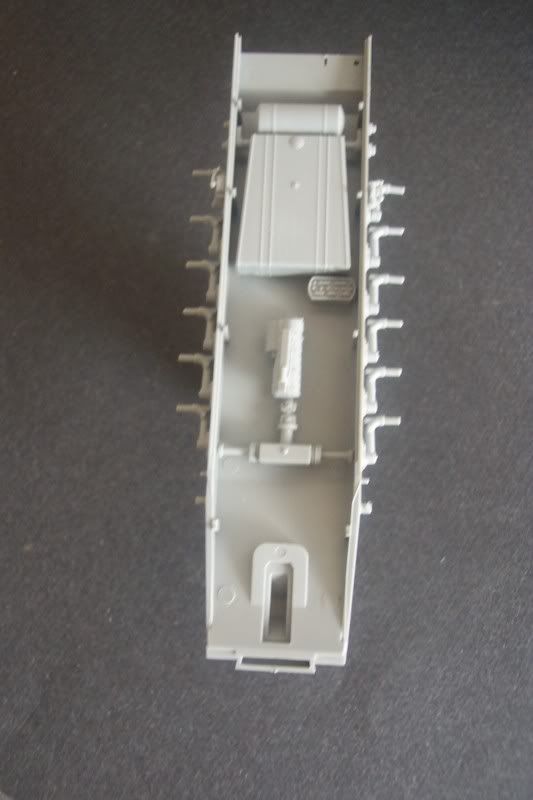
 Now lastly I was going to make that Afrika Korp version but it looks to me like an engineer vehicle that may have a pak 36 added on as a kinda duel purpose modification that the DAK was famous for. I probably will still do it later but for this GB I want to stick to the basics and represent a pure version of the /10 to keep our focus true. After I get that done then I'll free myself to play a little more.

 This is gonna get exciting with all the talented fellows here! Can't wait!

  • Member since
    April 2007
  • From: Schroon Lake, NY
Posted by SMJmodeler on Thursday, October 2, 2008 4:35 PM

 dupes wrote:
...Took the Cyber Hobby /2 out of the box earlier and started caressing and rubbing the spru - nevermind. Whistling [:-^]

Looks like you two need a room...oops, you already have one..I'll leave you alone.

  • Member since
    June 2008
Posted by lewbud on Thursday, October 2, 2008 9:08 PM

Bish, et al.,

If you're building a Dragon kit when it comes time to put the front suspension on, wait until you've got the tracks on or at least a run you can set the road wheels on.  The reason I say this is if you push the front suspension all the way up in its slot, the front wheels will be the the height of a track off the ground. I found this out after I had finished my 251/1C for a group build for the Nationals.  Fortunately, we found a spot on the base where it didn't matter.

Buddy- Those who say there are no stupid questions have never worked in customer service.

  • Member since
    October 2004
  • From: League City, Texas
Posted by sfcmac on Thursday, October 2, 2008 9:12 PM
 lewbud wrote:

Bish, et al.,

If you're building a Dragon kit when it comes time to put the front suspension on, wait until you've got the tracks on or at least a run you can set the road wheels on.  The reason I say this is if you push the front suspension all the way up in its slot, the front wheels will be the the height of a track off the ground. I found this out after I had finished my 251/1C for a group build for the Nationals.  Fortunately, we found a spot on the base where it didn't matter.

Thanks for the heads er (wheels) up there Buddy!

  • Member since
    April 2006
  • From: LaValle, Wisconsin
Posted by Hermesminiatures on Thursday, October 2, 2008 10:30 PM

The best way to ensure the front wheels are on the ground is to position the suspension arms as far from the ground as they will go (there's at least 3mm vertical play in the fit)

I'm working on the tracks now, needless to say they're taking awhile. I'll probably have watched everything Hulu has by the time I'm done...

Jonathan

For every modeling technique that works, I have three that don't.

  • Member since
    November 2006
  • From: Coastal Maine
Posted by dupes on Friday, October 3, 2008 8:10 AM
 lewbud wrote:
 dupes wrote:

Sooooo...who's going to be the first one to post pics of some 251 work? Laugh [(-D]

Boyd - you did get hosed. Do you usually get your catalog before the end of the month? Sadly, I missed out as well - some nasty intestinal attack hit me on the 30th (the day my catalog came...and the day I needed to place the order). I was in a drug enduced stupor when I should have been calling Squadron to place my order. HIGHLY disappointed. Here's me hoping that the November catalog has some good deals. Yuck [yuck]

Dupes,

You sure you looking at the right month?  I usually get mine a couple of days before the start of the month (there have been exceptions), but then I live 45 min from Squadron.  But still, I find it hard to believe it takes a month for it to get from Carrollton, TX to wherever in Maine you are.  If it's consistently that late, I'd talk to customer service at either Squadron or your local post office.  Btw, you can go to the Squadron website and download the flyer if you haven't got yours yet.

Lewbud - yeah, I'm looking at the right month. Wink [;)] What I try to do is place a double-catalog order - if you get, say, your October catalog on September 29th or 30th, you can place an order using both the Sep + Oct prices (whichever is more advantageous to you). Me being "indisposed" Yuck [yuck] on the evening of the 30th prevented me from doing said combo order...so I missed out on the good September reference book sale. Now I'm hoping that the November catalog comes a day or two early, and has some good stuff in it to go with October's goodies. Big Smile [:D]

Hey - good tip on the suspension there. Certainly wouldn't have thought of that one. Odd that they don't mention anything about it in the instructions. Thumbs Up [tup]

  • Member since
    December 2002
  • From: Reno, NV
Posted by espins1 on Friday, October 3, 2008 9:58 AM
I was digging through the box of goodies in my AFV Club 251/1 w/PaK40 and man oh man it seems like a really nice kit!  The PaK40 is quite the kit in its own right!  Tongue [:P]

Scott Espin - IPMS Reno High Rollers  Geeked My Reviews 

  • Member since
    April 2007
  • From: Bonnie Scotland
Posted by Assurgeant on Friday, October 3, 2008 10:19 AM

Hi Dupes,

Still here and very interested.

Have a slight admission in that I now have two in number 251/7D kits in my collection, but intend to build the 2.8cm gun version first.


Cheers, Bryan
  • Member since
    November 2006
  • From: Coastal Maine
Posted by dupes on Friday, October 3, 2008 12:06 PM

Bryan - thanks for checking in. Now we just need MPKev31b and Russamys and the whole gang is here. Wink [;)]

Scott - can't wait to see it! If it's anything like the PaK43/41 kit I have of theirs it should be a knockout. Cool [8D]

  • Member since
    February 2007
  • From: Bournemouth UK
Posted by Luftwoller on Friday, October 3, 2008 4:07 PM

Wow, Aaron. Your eagre, and congrats on the 1st bits posted.

I opened a box today and it had a book in it called 'Tank Power Vol LVII...Sd Kfz 251 vol I/II'

some fantastic photos in it BTW. Big Smile [:D]

...Guy

..'Your an embarrassment to the human genus, makes me ashamed to call myself Homo'.
  • Member since
    December 2002
  • From: Bury St Edmunds, Suffolk, England
Posted by Bish on Friday, October 3, 2008 4:58 PM
 lewbud wrote:

Bish, et al.,

If you're building a Dragon kit when it comes time to put the front suspension on, wait until you've got the tracks on or at least a run you can set the road wheels on.  The reason I say this is if you push the front suspension all the way up in its slot, the front wheels will be the the height of a track off the ground. I found this out after I had finished my 251/1C for a group build for the Nationals.  Fortunately, we found a spot on the base where it didn't matter.

Oops, think this is slightly to late. I put the front suspension on tonight, but haven't put the wheels on it yet. Maybe i can get it off as its onlt held on by the one small bit. I did notice that when it came to putting the last peace on, the Y shaped peace, the instructions where not that clear. It had them upside down and didn't show the bottom of the Y going into the hull and being left unglued.

I have finished the tracks tonight and i like these alot. I found them easier than the Fruil metal tracks i usually use. Also got the inside sprayed and once i have the seats in i will get some pics.

I am a Norfolk man and i glory in being so


On the bench: Airfix 1/72nd Harrier GR.3/Fujimi 1/72nd Ju 87D-3

  • Member since
    October 2004
  • From: League City, Texas
Posted by sfcmac on Friday, October 3, 2008 5:27 PM

 Oh I think there are plenty father along than I , Guy! Just had my camera at the ready is all. I have a set-up just for posting on the forum if you can't tell by all my crazy pics. I tend to ramble to much and they say a pic is worth a thousand words so....... Confused [%-)]

Any how I was looking through my Squadron 251 in action book and discovered I have some kinda misprint. Mine goes up to decribing the /17 then repeats the last 8 pages starting over with the /8 again. You know it doesn't take much to confuse me as it is. I thought I had passed into some interdemential loop but alas it was just duplicate pages. Wonder if there was anything past the /17 I missed as the book ends there for me. Sign - Oops [#oops]

 I have finished all of step 2 and well into step 3 but had to decide on which /10 I wished to represent as it was time to start painting things. Settled on a GD version from Kursk.  Pretty cool!

Has this one been put up? It is the GD division commander on an early /6. Looks like a dio waiting to happen to me. Tongue [:P]

Oh thanks Buddy! are you saying cuz I am a slow reader( or aq fast gluer) that I have this ?

I thought this would be a cool idea for a gun shield if someone had a hankerin.


  • Member since
    December 2002
  • From: Bury St Edmunds, Suffolk, England
Posted by Bish on Saturday, October 4, 2008 6:16 AM
Do any of you guys know where the power cable for the radio goe's to. I'm building an Ausf D so the radio is above the operator. I'm just not sure if the power cable goes behind the radio and over the drivers bulkhead or down the right side of the hull then under the floor.

I am a Norfolk man and i glory in being so


On the bench: Airfix 1/72nd Harrier GR.3/Fujimi 1/72nd Ju 87D-3

  • Member since
    April 2005
  • From: Piscataway, NJ!
Posted by wing_nut on Saturday, October 4, 2008 5:10 PM

Bish sorry no answer for you but i do have a question for the toops.  Are the pads on the tracks metal or rubber?


Marc  

  • Member since
    October 2004
  • From: League City, Texas
Posted by sfcmac on Saturday, October 4, 2008 5:29 PM
 wing_nut wrote:

Bish sorry no answer for you but i do have a question for the toops.  Are the pads on the tracks metal or rubber?


Not certain on the cable. Was pretty sure it went into the floor to ajoin the battery cables. Not 100% but don't know why it would be diff. The Tracks were steel with rubber pads except in late one piece shoes which were not as common.

I was looking at some photos and they seemed to hold up pretty well. They don't appear worn down as with my experience with APC's and Bradleys. Must have been sturdy rubber and well displaced ground pressure. Most of the photos I am looking at  really show them in good shape.

I'm gonna make an educated guess and say the radio itself had a cable that went to it's mount for power. Then an actual power line from the floor to the mount. To that end it remains removeable for possible external use by battery or interchange with another vehicle. Another glass of wine and I really wont know what I'm talking about but I am checking for photo's of the Aus D that may show something.

 Hmmm not a whole lot of luck but enough to say I was way off! Looks like the power cable attached to the front lower right. ( Big hole with prongs) No cable or real clue. to be seen. Maybe someone has a more direct photo but worst case is to route it the shortest route behind and down. I would have it come out the fire wall out of the crew compartment where it would be easily damaged.

Last look would seem it would route around follow the ceiling over behind the instruments and follow the routing of the instrument cableing.

  • Member since
    July 2006
  • From: San Francisco Bay Area
Posted by bufflehead on Saturday, October 4, 2008 11:58 PM
dupes, I'm checking in!  Although I won't be able to get crackin on my build anytime soon I'll be here participating as best I can! 

Ernest

Last Armor Build - 1/35 Dragon M-26A1, 1/35 Emhar Mk.IV Female


Last Aircraft Builds - Hobby Boss 1/72 F4F Wildcat & FW-190A8


  • Member since
    February 2007
  • From: Bournemouth UK
Posted by Luftwoller on Sunday, October 5, 2008 5:14 AM

Hi Marc, the rubber pads on this bad boy were almost black in colour and hard as concrete, but deffo rubber. Also, of note, was that nearly everyone was marked, cracked or damaged in some way or another. As for the wiring question, id reckon they would just route it directly behind the radio itself. Itwould only need a power and earth. The earth from the body or chassis of the radio and the power directly from the battery.

..'Your an embarrassment to the human genus, makes me ashamed to call myself Homo'.
  • Member since
    December 2002
  • From: Bury St Edmunds, Suffolk, England
Posted by Bish on Sunday, October 5, 2008 6:23 AM

Thanks for the help guys. There is a good page on 251 radios on the geosites site that someone posted a link to on page one. It does show what wires connected to what part of the radio and there is a pic of an installed radio in use, but this is on an early vehicle with the radio on the side of the hull. I think i am just going to put the cable going behind the radio rather than try to route in down the side of the hull.

Once i get the radio wired i will be ready to get the two halfs of the hull together. I managed to get the gun put together yesterday, its very fiddaly but it does look nice. I have taken some pics but like an idiot i seem to have left the cable that connects the camera to the computer at home, so i will get them all posted in a oner next weekend.

As for the track pads, i do believe they tried all metal tracks towards the end of the war because of lack of rubber. But from what i recall reading this caused problems with vibration so they went back to rubber pads.


I am a Norfolk man and i glory in being so


On the bench: Airfix 1/72nd Harrier GR.3/Fujimi 1/72nd Ju 87D-3

  • Member since
    November 2006
  • From: Coastal Maine
Posted by dupes on Sunday, October 5, 2008 3:07 PM

Lufty - pleaaaase tell me that you climbed up into the back of that 251 to hang out with the dummies...Smile,Wink, & Grin [swg] Very cool that you've actually touched what you're building. Cool [8D]

Interesting that those fenders are so beat up...and the mufflers are all paint colored, with not a BIT of rust on them.

Ernest - your check-in has been duly noted. Wink [;)]

  • Member since
    February 2007
  • From: Bournemouth UK
Posted by Luftwoller on Monday, October 6, 2008 8:24 AM

Did you still need that book Dupes?" It is rather good. LOL.

Well i did a bit last night. Got the chassis together and threw a couple of bits of PE at the dash. Im not going to use the PE dash panel as it appears from refs to be the wrong size LOL.

...Guy

..'Your an embarrassment to the human genus, makes me ashamed to call myself Homo'.
  • Member since
    November 2006
  • From: Coastal Maine
Posted by dupes on Monday, October 6, 2008 9:21 AM

I'm pretty sure I still do need that book...so long as A) you can assure me you haven't gotten too much drool on it and B) you can tell me what it cost. I'm a bit worried on both counts! Laugh [(-D]

Glad to see you're rolling on this monster - reallllly looking forward to seeing what you're able to do with it. Wink [;)]

  • Member since
    October 2007
  • From: Louisville, KY
Posted by pordoi on Monday, October 6, 2008 3:15 PM
 Luftwoller wrote:

Got the chassis together and threw a couple of bits of PE at the dash. Im not going to use the PE dash panel as it appears from refs to be the wrong size LOL.


Could you elaborate a bit, Guy.  Is the the Eduard 251 detail set?  How exactly is the PE dash deficient?  I'm just gearing up to start my build so it will be useful to know what to expect.

 Don


  • Member since
    February 2005
  • From: Green Bay, Wisconsin
Posted by russamys on Monday, October 6, 2008 4:27 PM
 dupes wrote:

Bryan - thanks for checking in. Now we just need MPKev31b and Russamys and the whole gang is here. Wink [;)]

Sorry, have not been on the webpage much the last several weeks.  Lots of projects to complete before the good weather goes south for the winter Sad [:(]  I am still on board and plan to get moving on my kit within the next couple weeks.

Russ

  • Member since
    April 2005
  • From: Piscataway, NJ!
Posted by wing_nut on Monday, October 6, 2008 4:38 PM

How do you know when a part cleaning session has gotten out of hand...


Here is a simple jig I made to hold these little idly track parts so they can be glued together with out me going completely insane.  The problem with these links is the guide horn is on the opposite side from the locating pins for the hinge point. 1st I glued 2, 3/8 x 1/8 balsa strips down to a wider piece.  I used the guide horns of a couple of links as a spacer.  A piece of double stick tape was pressed down the length and slit up the middle between the 2 balsa strips. Now the tracks pieces can be set, guide horn down, and be held firmly in place and the parts will overlap perfectly.  Just go back and carefully glue the pads over the hinge point and BOB'S YOUR UNCLE…workable tracks put together like any other indy link.


Marc  

  • Member since
    December 2002
  • From: Bury St Edmunds, Suffolk, England
Posted by Bish on Monday, October 6, 2008 6:33 PM
Bugger, wish i had thought of that. O well, will keep that in mind for next time. I really like these tracks.

I am a Norfolk man and i glory in being so


On the bench: Airfix 1/72nd Harrier GR.3/Fujimi 1/72nd Ju 87D-3

JOIN OUR COMMUNITY!

Our community is FREE to join. To participate you must either login or register for an account.

SEARCH FORUMS
FREE NEWSLETTER
By signing up you may also receive reader surveys and occasional special offers. We do not sell, rent or trade our email lists. View our Privacy Policy.